2004 BMW 525I SEDAN key
[x] Cancel search: keyPage 53 of 220
Controls
51Reference
At a glance
Driving tips
Communications
Navigation
Entertainment
Mobility
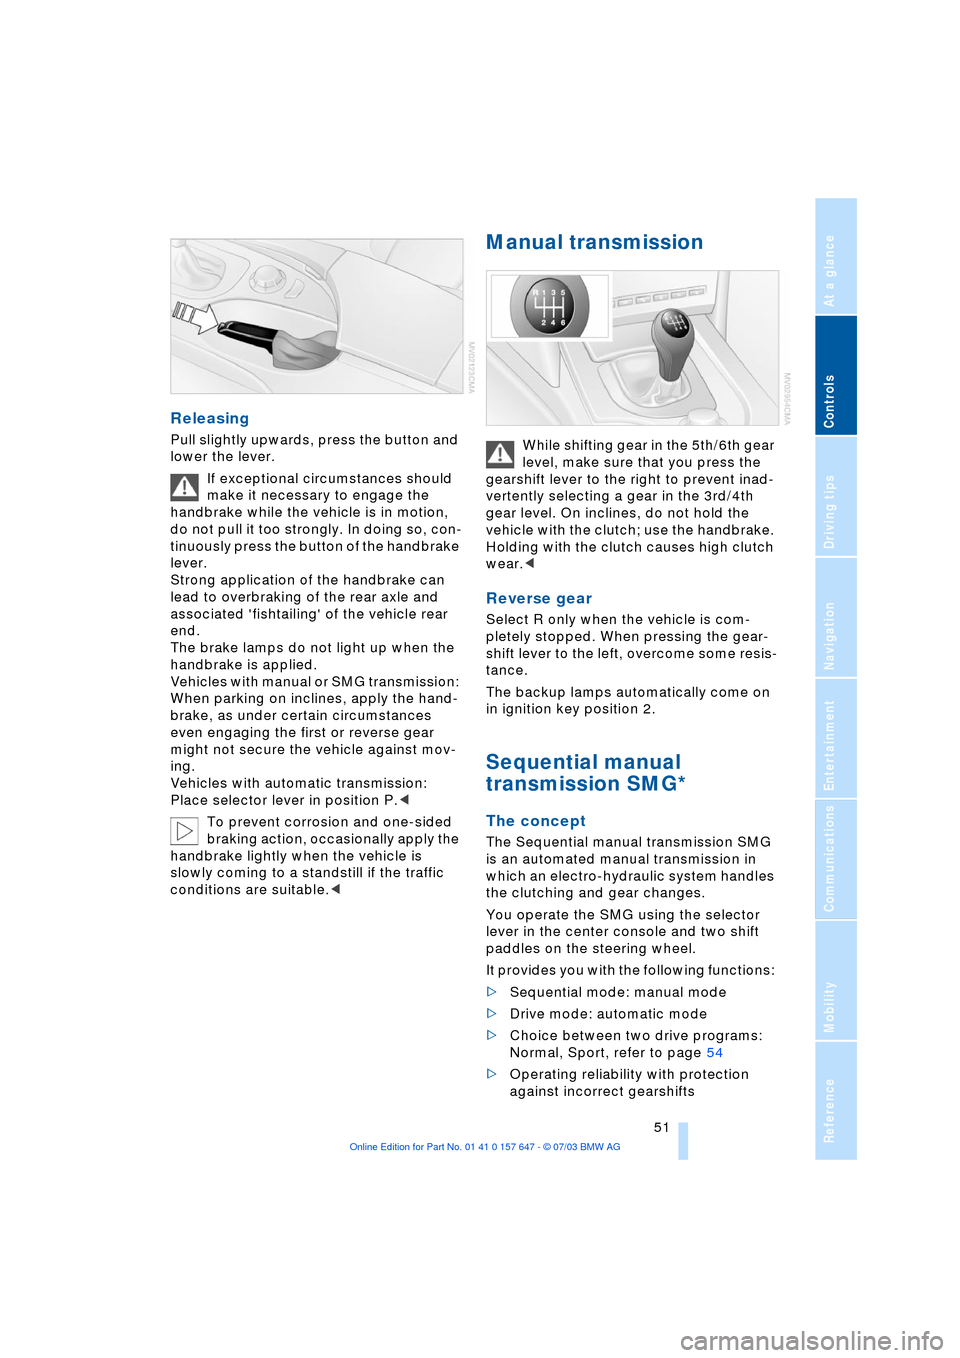
Releasing
Pull slightly upwards, press the button and
lower the lever.
If exceptional circumstances should
make it necessary to engage the
handbrake while the vehicle is in motion,
do not pull it too strongly. In doing so, con-
tinuously press the button of the handbrake
lever.
Strong application of the handbrake can
lead to overbraking of the rear axle and
associated 'fishtailing' of the vehicle rear
end.
The brake lamps do not light up when the
handbrake is applied.
Vehicles with manual or SMG transmission:
When parking on inclines, apply the hand-
brake, as under certain circumstances
even engaging the first or reverse gear
might not secure the vehicle against mov-
ing.
Vehicles with automatic transmission:
Place selector lever in position P.<
To prevent corrosion and one-sided
braking action, occasionally apply the
handbrake lightly when the vehicle is
slowly coming to a standstill if the traffic
conditions are suitable.<
Manual transmission
While shifting gear in the 5th/6th gear
level, make sure that you press the
gearshift lever to the right to prevent inad-
vertently selecting a gear in the 3rd/4th
gear level. On inclines, do not hold the
vehicle with the clutch; use the handbrake.
Holding with the clutch causes high clutch
wear.<
Reverse gear
Select R only when the vehicle is com-
pletely stopped. When pressing the gear-
shift lever to the left, overcome some resis-
tance.
The backup lamps automatically come on
in ignition key position 2.
Sequential manual
transmission SMG*
The concept
The Sequential manual transmission SMG
is an automated manual transmission in
which an electro-hydraulic system handles
the clutching and gear changes.
You operate the SMG using the selector
lever in the center console and two shift
paddles on the steering wheel.
It provides you with the following functions:
>Sequential mode: manual mode
>Drive mode: automatic mode
>Choice between two drive programs:
Normal, Sport, refer to page 54
>Operating reliability with protection
against incorrect gearshifts
Page 54 of 220
Driving
52 >Automatic upshifts and downshifts in
the Drive mode
>Automatic downshifts with minimum
engine speed
>Kickdown function in the Drive mode
>Acceleration assistant, refer to
page 54.
Selector-lever positions
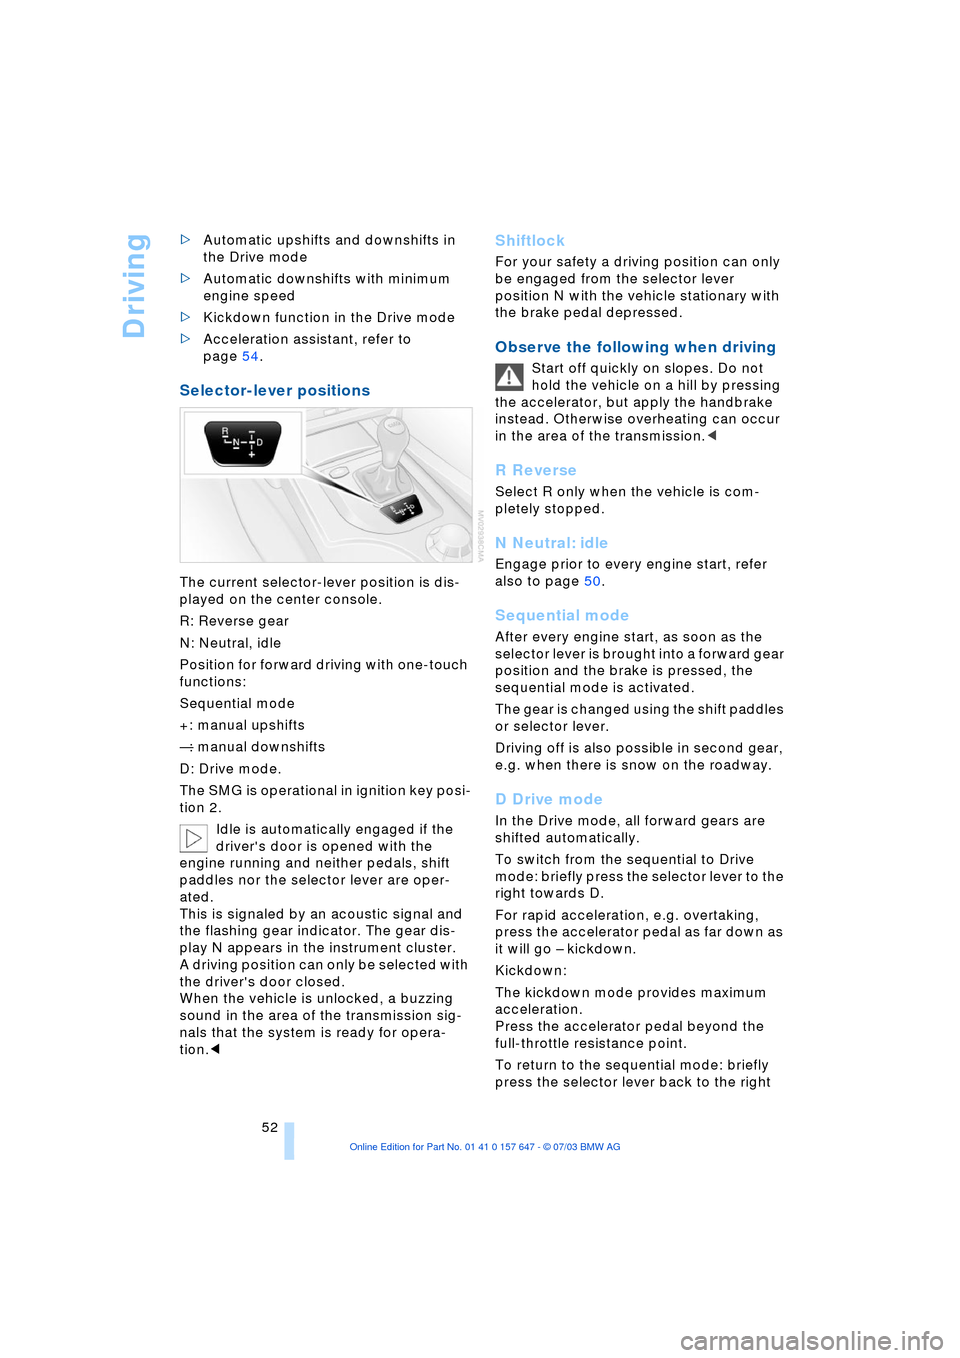
The current selector-lever position is dis-
played on the center console.
R: Reverse gear
N: Neutral, idle
Position for forward driving with one-touch
functions:
Sequential mode
+: manual upshifts
Ñ: manual downshifts
D: Drive mode.
The SMG is operational in ignition key posi-
tion 2.
Idle is automatically engaged if the
driver's door is opened with the
engine running and neither pedals, shift
paddles nor the selector lever are oper-
ated.
This is signaled by an acoustic signal and
the flashing gear indicator. The gear dis-
play N appears in the instrument cluster.
A driving position can only be selected with
the driver's door closed.
When the vehicle is unlocked, a buzzing
sound in the area of the transmission sig-
nals that the system is ready for opera-
tion.<
Shiftlock
For your safety a driving position can only
be engaged from the selector lever
position N with the vehicle stationary with
the brake pedal depressed.
Observe the following when driving
Start off quickly on slopes. Do not
hold the vehicle on a hill by pressing
the accelerator, but apply the handbrake
instead. Otherwise overheating can occur
in the area of the transmission.<
R Reverse
Select R only when the vehicle is com-
pletely stopped.
N Neutral: idle
Engage prior to every engine start, refer
also to page 50.
Sequential mode
After every engine start, as soon as the
selector lever is brought into a forward gear
position and the brake is pressed, the
sequential mode is activated.
The gear is changed using the shift paddles
or selector lever.
Driving off is also possible in second gear,
e.g. when there is snow on the roadway.
D Drive mode
In the Drive mode, all forward gears are
shifted automatically.
To switch from the sequential to Drive
mode: briefly press the selector lever to the
right towards D.
For rapid acceleration, e.g. overtaking,
press the accelerator pedal as far down as
it will go Ð kickdown.
Kickdown:
The kickdown mode provides maximum
acceleration.
Press the accelerator pedal beyond the
full-throttle resistance point.
To return to the sequential mode: briefly
press the selector lever back to the right
Page 56 of 220
Driving
54
Dynamic Driving Control
With Dynamic Driving Control, you can
choose between a standard and a sport
program.
Sport program
>The engine responds more spontane-
ously to accelerator pedal movements
>The steering becomes more direct and
provides even better road contact.
In addition, with SMG and an automatic
transmission:
>The shifting times are shorter
>The engine speed range is used opti-
mally in the Drive mode.
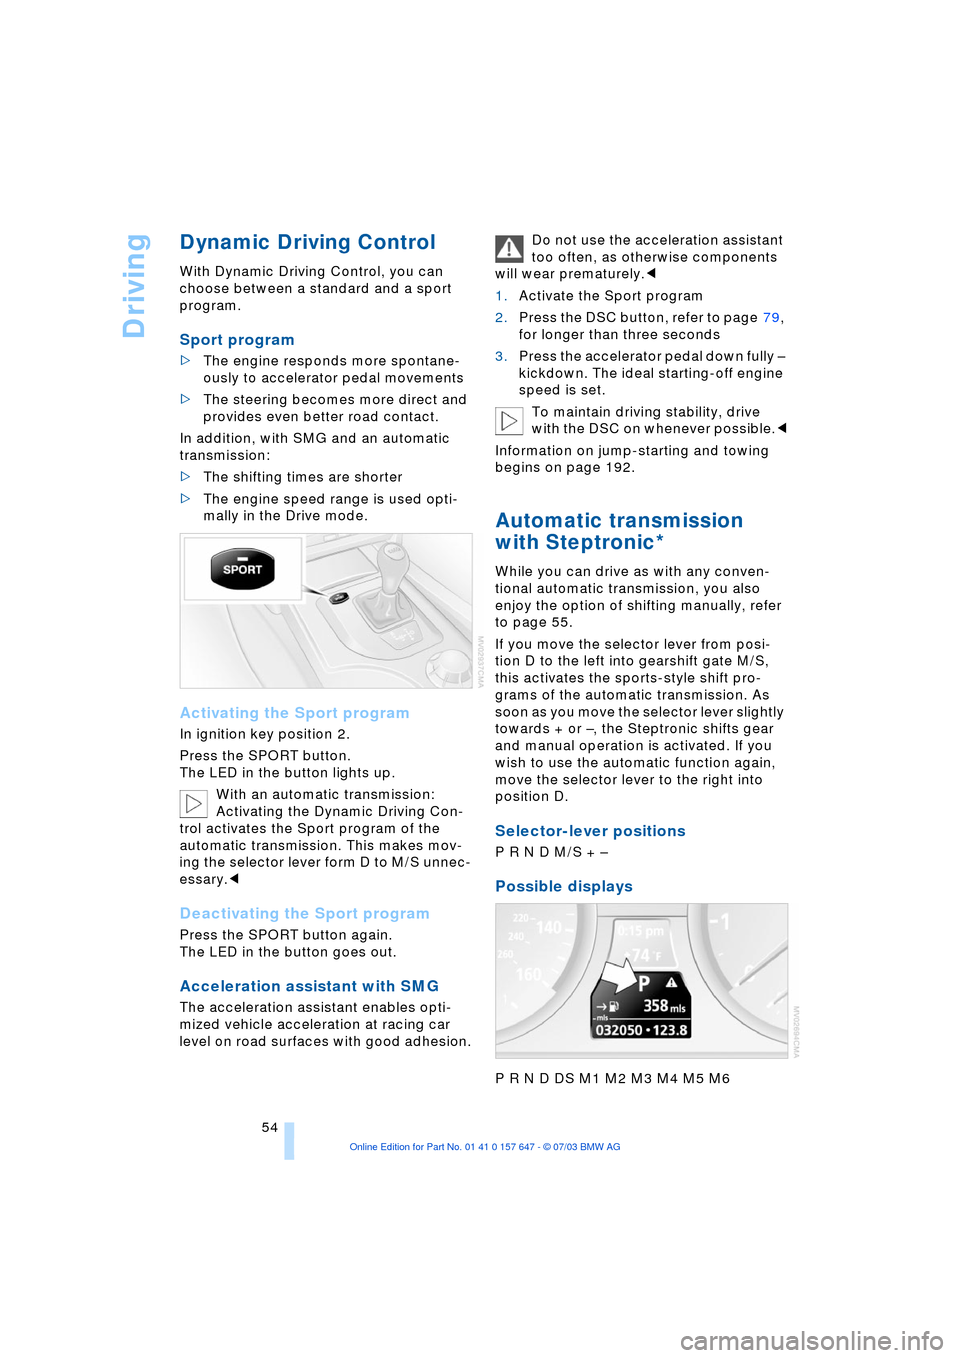
Activating the Sport program
In ignition key position 2.
Press the SPORT button.
The LED in the button lights up.
With an automatic transmission:
Activating the Dynamic Driving Con-
trol activates the Sport program of the
automatic transmission. This makes mov-
ing the selector lever form D to M/S unnec-
essary.<
Deactivating the Sport program
Press the SPORT button again.
The LED in the button goes out.
Acceleration assistant with SMG
The acceleration assistant enables opti-
mized vehicle acceleration at racing car
level on road surfaces with good adhesion.Do not use the acceleration assistant
too often, as otherwise components
will wear prematurely.<
1.Activate the Sport program
2.Press the DSC button, refer to page 79,
for longer than three seconds
3.Press the accelerator pedal down fully Ð
kickdown. The ideal starting-off engine
speed is set.
To maintain driving stability, drive
with the DSC on whenever possible.<
Information on jump-starting and towing
begins on page 192.
Automatic transmission
with Steptronic*
While you can drive as with any conven-
tional automatic transmission, you also
enjoy the option of shifting manually, refer
to page 55.
If you move the selector lever from posi-
tion D to the left into gearshift gate M/S,
this activates the sports-style shift pro-
grams of the automatic transmission. As
soon as you move the selector lever slightly
towards + or Ð, the Steptronic shifts gear
and manual operation is activated. If you
wish to use the automatic function again,
move the selector lever to the right into
position D.
Selector-lever positions
P R N D M/S + Ð
Possible displays
P R N D DS M1 M2 M3 M4 M5 M6
Page 59 of 220
Controls
57Reference
At a glance
Driving tips
Communications
Navigation
Entertainment
Mobility
Wiper system
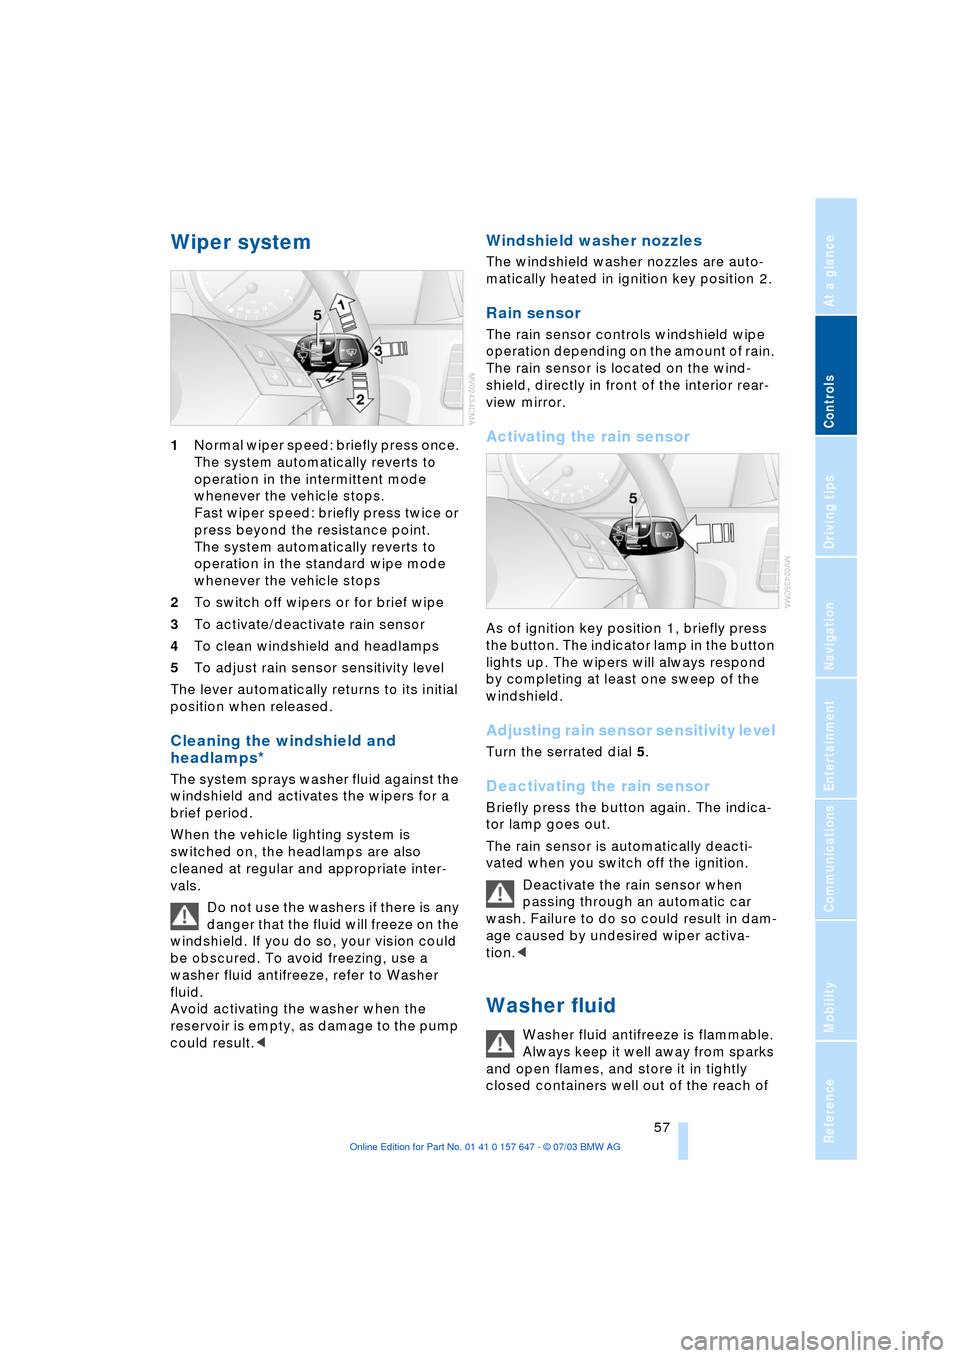
1Normal wiper speed: briefly press once.
The system automatically reverts to
operation in the intermittent mode
whenever the vehicle stops.
Fast wiper speed: briefly press twice or
press beyond the resistance point.
The system automatically reverts to
operation in the standard wipe mode
whenever the vehicle stops
2To switch off wipers or for brief wipe
3To activate/deactivate rain sensor
4To clean windshield and headlamps
5To adjust rain sensor sensitivity level
The lever automatically returns to its initial
position when released.
Cleaning the windshield and
headlamps*
The system sprays washer fluid against the
windshield and activates the wipers for a
brief period.
When the vehicle lighting system is
switched on, the headlamps are also
cleaned at regular and appropriate inter-
vals.
Do not use the washers if there is any
danger that the fluid will freeze on the
windshield. If you do so, your vision could
be obscured. To avoid freezing, use a
washer fluid antifreeze, refer to Washer
fluid.
Avoid activating the washer when the
reservoir is empty, as damage to the pump
could result.<
Windshield washer nozzles
The windshield washer nozzles are auto-
matically heated in ignition key position 2.
Rain sensor
The rain sensor controls windshield wipe
operation depending on the amount of rain.
The rain sensor is located on the wind-
shield, directly in front of the interior rear-
view mirror.
Activating the rain sensor
As of ignition key position 1, briefly press
the button. The indicator lamp in the button
lights up. The wipers will always respond
by completing at least one sweep of the
windshield.
Adjusting rain sensor sensitivity level
Turn the serrated dial 5.
Deactivating the rain sensor
Briefly press the button again. The indica-
tor lamp goes out.
The rain sensor is automatically deacti-
vated when you switch off the ignition.
Deactivate the rain sensor when
passing through an automatic car
wash. Failure to do so could result in dam-
age caused by undesired wiper activa-
tion.<
Washer fluid
Washer fluid antifreeze is flammable.
Always keep it well away from sparks
and open flames, and store it in tightly
closed containers well out of the reach of
Page 67 of 220
Controls
65Reference
At a glance
Driving tips
Communications
Navigation
Entertainment
Mobility
Everything under control
Odometer, outside
temperature display, clock
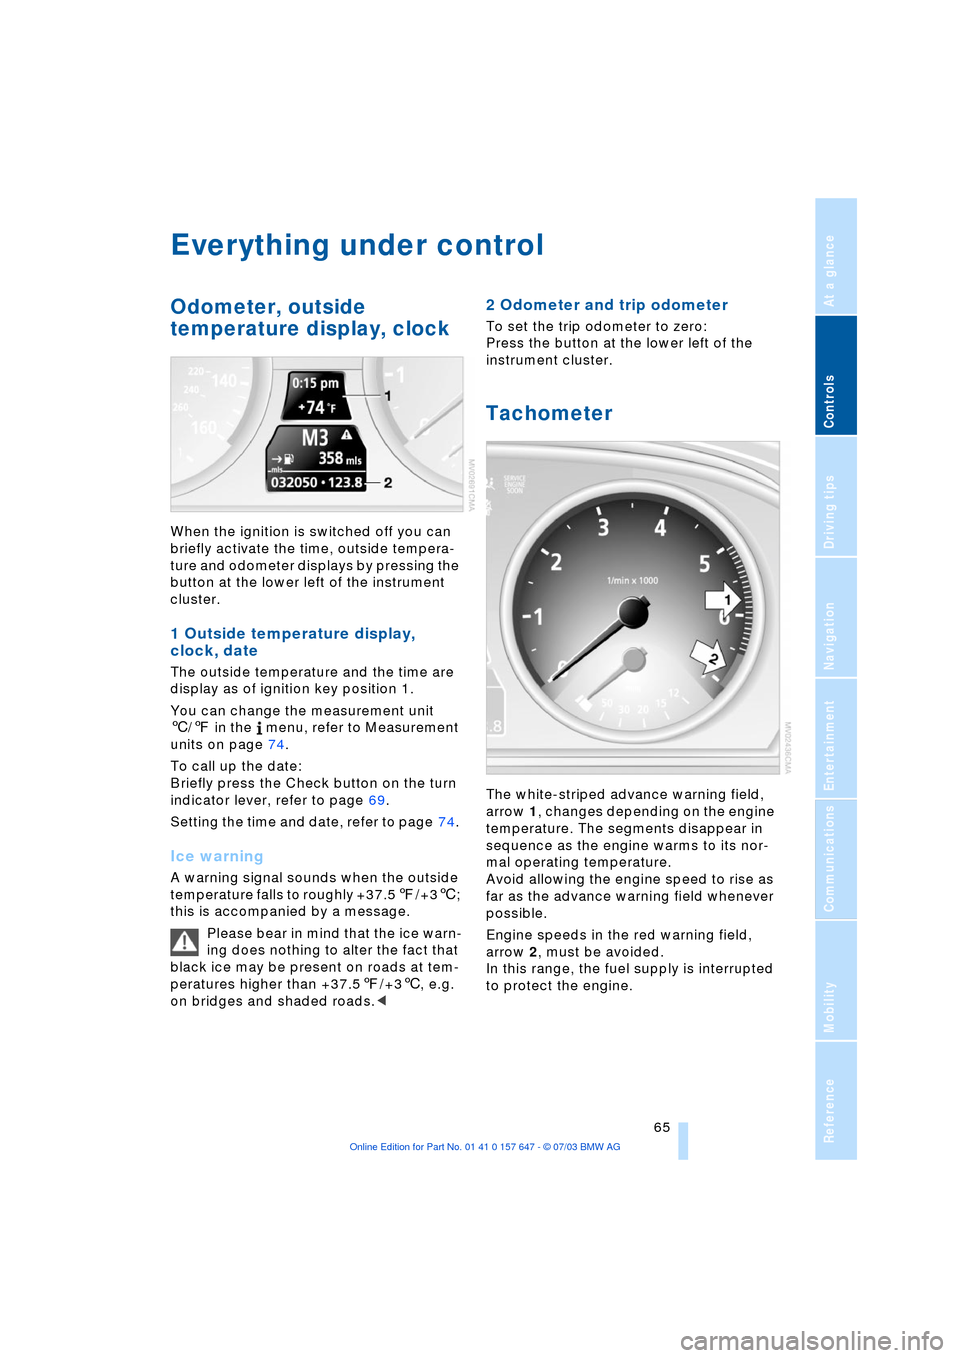
When the ignition is switched off you can
briefly activate the time, outside tempera-
ture and odometer displays by pressing the
button at the lower left of the instrument
cluster.
1 Outside temperature display,
clock, date
The outside temperature and the time are
display as of ignition key position 1.
You can change the measurement unit
6/7 in the menu, refer to Measurement
units on page 74.
To call up the date:
Briefly press the Check button on the turn
indicator lever, refer to page 69.
Setting the time and date, refer to page 74.
Ice warning
A warning signal sounds when the outside
temperature falls to roughly +37.57/+36;
this is accompanied by a message.
Please bear in mind that the ice warn-
ing does nothing to alter the fact that
black ice may be present on roads at tem-
peratures higher than +37.57/+36, e.g.
on bridges and shaded roads.<
2 Odometer and trip odometer
To set the trip odometer to zero:
Press the button at the lower left of the
instrument cluster.
Tachometer
The white-striped advance warning field,
arrow 1, changes depending on the engine
temperature. The segments disappear in
sequence as the engine warms to its nor-
mal operating temperature.
Avoid allowing the engine speed to rise as
far as the advance warning field whenever
possible.
Engine speeds in the red warning field,
arrow 2, must be avoided.
In this range, the fuel supply is interrupted
to protect the engine.
Page 68 of 220
Everything under control
66
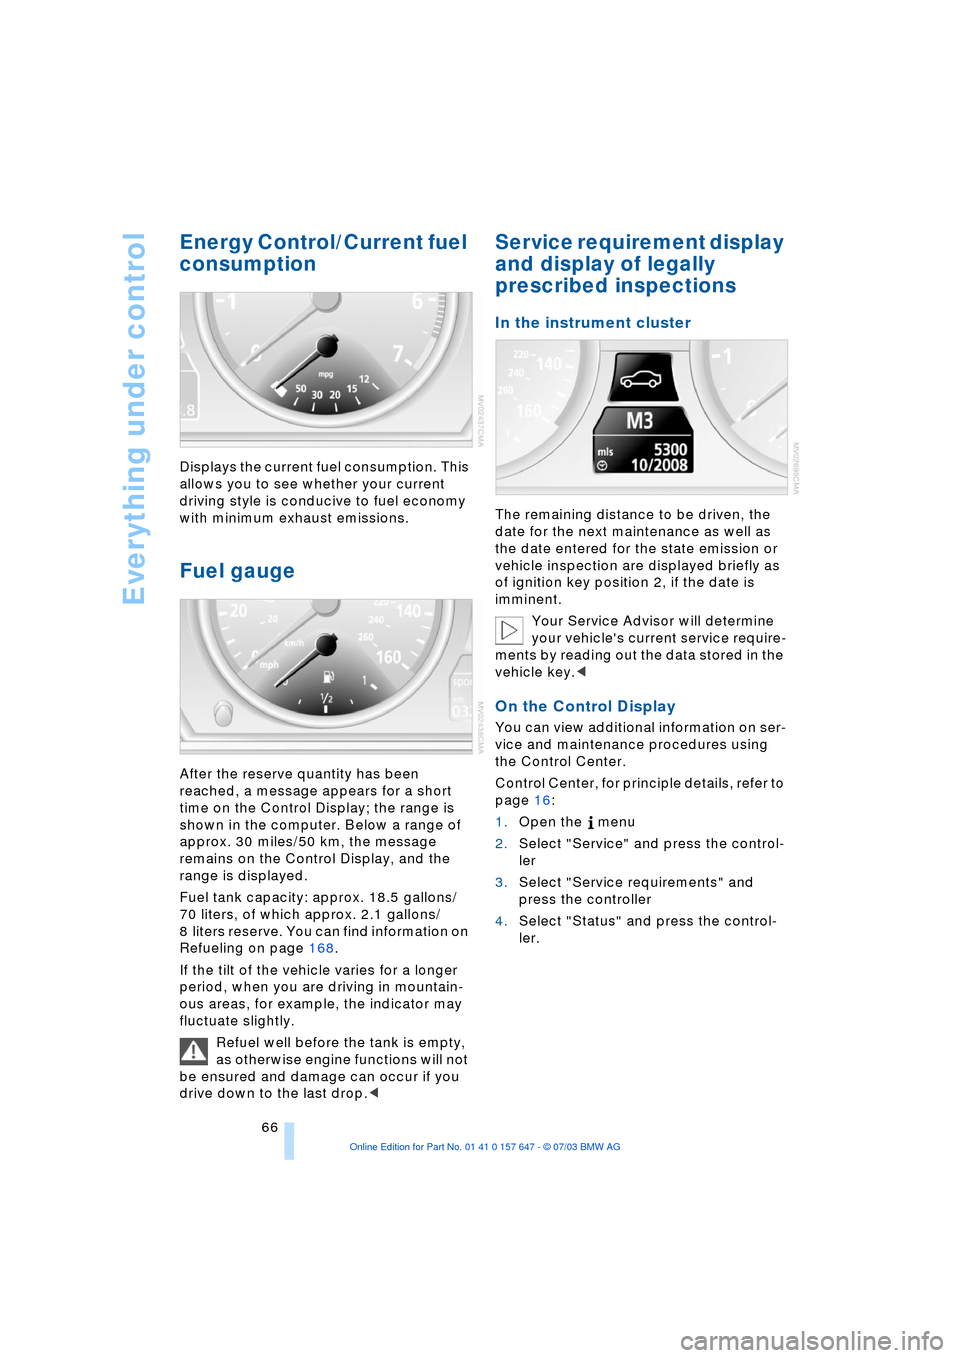
Energy Control/Current fuel
consumption
Displays the current fuel consumption. This
allows you to see whether your current
driving style is conducive to fuel economy
with minimum exhaust emissions.
Fuel gauge
After the reserve quantity has been
reached, a message appears for a short
time on the Control Display; the range is
shown in the computer. Below a range of
approx. 30 miles/50 km, the message
remains on the Control Display, and the
range is displayed.
Fuel tank capacity: approx. 18.5 gallons/
70 liters, of which approx. 2.1 gallons/
8 liters reserve. You can find information on
Refueling on page 168.
If the tilt of the vehicle varies for a longer
period, when you are driving in mountain-
ous areas, for example, the indicator may
fluctuate slightly.
Refuel well before the tank is empty,
as otherwise engine functions will not
be ensured and damage can occur if you
drive down to the last drop.<
Service requirement display
and display of legally
prescribed inspections
In the instrument cluster
The remaining distance to be driven, the
date for the next maintenance as well as
the date entered for the state emission or
vehicle inspection are displayed briefly as
of ignition key position 2, if the date is
imminent.
Your Service Advisor will determine
your vehicle's current service require-
ments by reading out the data stored in the
vehicle key.<
On the Control Display
You can view additional information on ser-
vice and maintenance procedures using
the Control Center.
Control Center, for principle details, refer to
page 16:
1.Open the menu
2.Select "Service" and press the control-
ler
3.Select "Service requirements" and
press the controller
4.Select "Status" and press the control-
ler.
Page 72 of 220
Everything under control
70
Computer
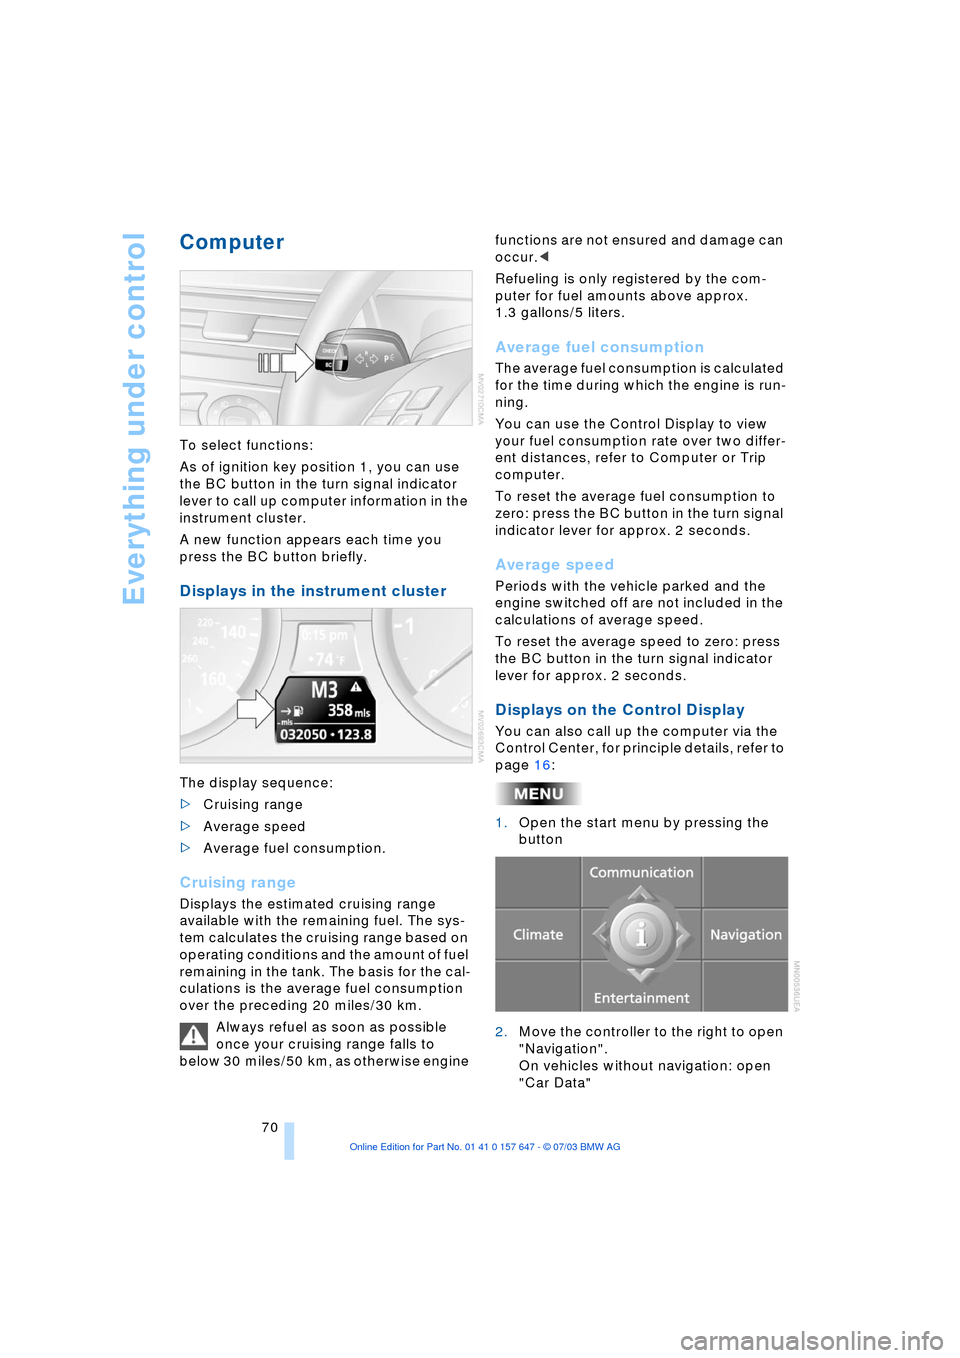
To select functions:
As of ignition key position 1, you can use
the BC button in the turn signal indicator
lever to call up computer information in the
instrument cluster.
A new function appears each time you
press the BC button briefly.
Displays in the instrument cluster
The display sequence:
>Cruising range
>Average speed
>Average fuel consumption.
Cruising range
Displays the estimated cruising range
available with the remaining fuel. The sys-
tem calculates the cruising range based on
operating conditions and the amount of fuel
remaining in the tank. The basis for the cal-
culations is the average fuel consumption
over the preceding 20 miles/30 km.
Always refuel as soon as possible
once your cruising range falls to
below 30 miles/50 km, as otherwise engine functions are not ensured and damage can
occur.<
Refueling is only registered by the com-
puter for fuel amounts above approx.
1.3 gallons/5 liters.
Average fuel consumption
The average fuel consumption is calculated
for the time during which the engine is run-
ning.
You can use the Control Display to view
your fuel consumption rate over two differ-
ent distances, refer to Computer or Trip
computer.
To reset the average fuel consumption to
zero: press the BC button in the turn signal
indicator lever for approx. 2 seconds.
Average speed
Periods with the vehicle parked and the
engine switched off are not included in the
calculations of average speed.
To reset the average speed to zero: press
the BC button in the turn signal indicator
lever for approx. 2 seconds.
Displays on the Control Display
You can also call up the computer via the
Control Center, for principle details, refer to
page 16:
1.Open the start menu by pressing the
button
2.Move the controller to the right to open
"Navigation".
On vehicles without navigation: open
"Car Data"
Page 75 of 220
Controls
73Reference
At a glance
Driving tips
Communications
Navigation
Entertainment
Mobility
3.Select "Limit" and press the controller
4.Select "Select current speed" and
press the controller. The system adopts
your current speed as the limit.
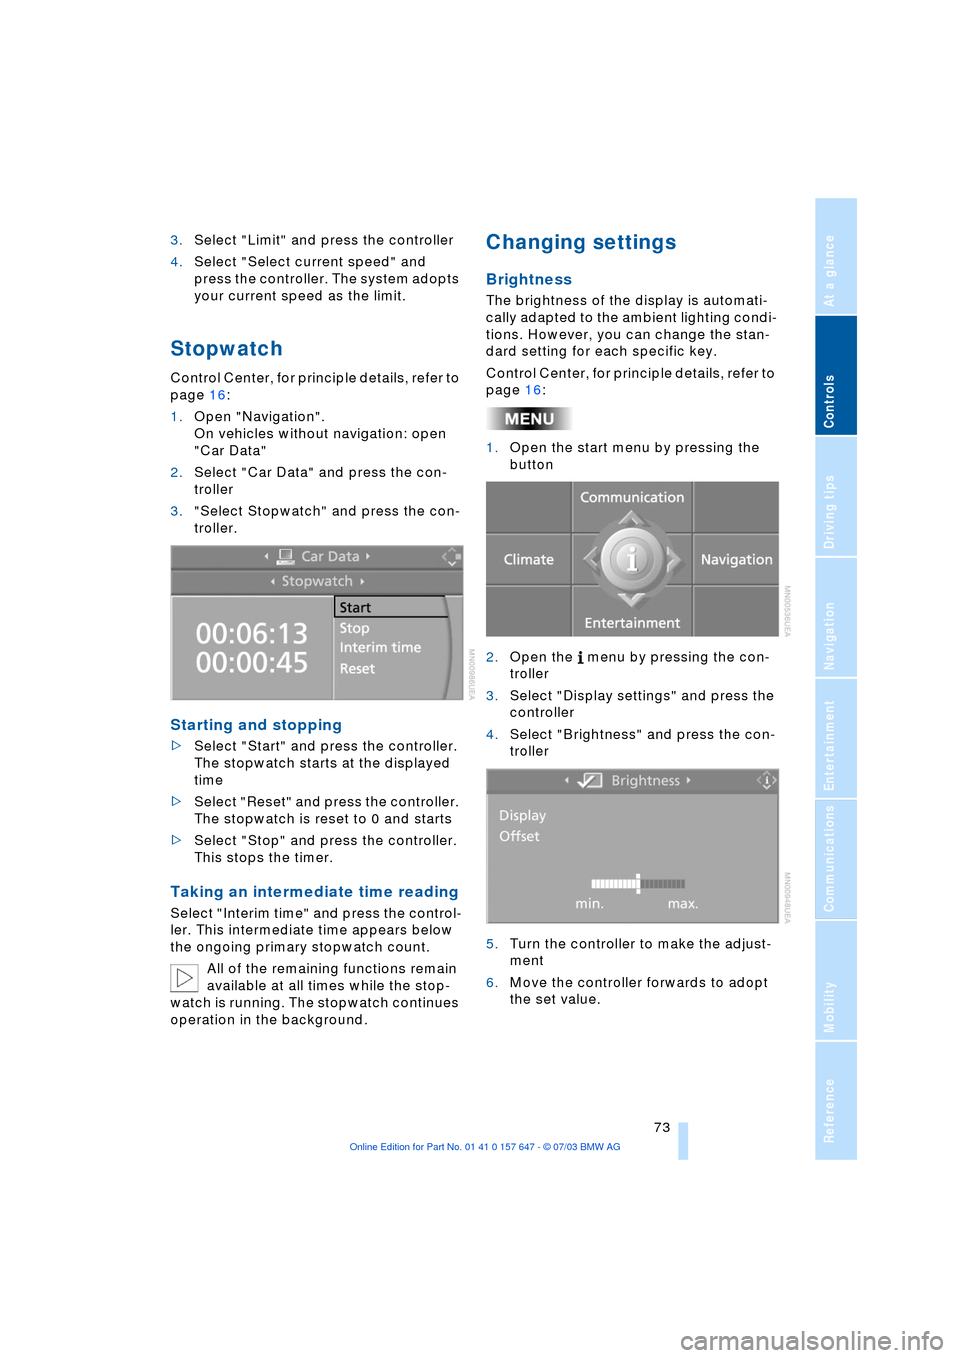
Stopwatch
Control Center, for principle details, refer to
page 16:
1.Open "Navigation".
On vehicles without navigation: open
"Car Data"
2.Select "Car Data" and press the con-
troller
3."Select Stopwatch" and press the con-
troller.
Starting and stopping
>Select "Start" and press the controller.
The stopwatch starts at the displayed
time
>Select "Reset" and press the controller.
The stopwatch is reset to 0 and starts
>Select "Stop" and press the controller.
This stops the timer.
Taking an intermediate time reading
Select "Interim time" and press the control-
ler. This intermediate time appears below
the ongoing primary stopwatch count.
All of the remaining functions remain
available at all times while the stop-
watch is running. The stopwatch continues
operation in the background.
Changing settings
Brightness
The brightness of the display is automati-
cally adapted to the ambient lighting condi-
tions. However, you can change the stan-
dard setting for each specific key.
Control Center, for principle details, refer to
page 16:
1.Open the start menu by pressing the
button
2.Open the menu by pressing the con-
troller
3.Select "Display settings" and press the
controller
4.Select "Brightness" and press the con-
troller
5.Turn the controller to make the adjust-
ment
6.Move the controller forwards to adopt
the set value.