Page 357 of 2234
A75342
Battery4
5
±
FUEL FUEL SYSTEM (1ZZ±FE/3ZZ±FE)
11±7
AVENSIS REPAIR MANUAL (RM1018E)
(b) When not using the hand±held tester
(1) Connect the positive (+) lead form the battery to ter-minal 4 of the connector and connect the negative
(±) lead to terminal 5.
(2) Check that the pump operates.
http://vnx.su
Page 358 of 2234
110UT±01
A75341
Fuel
Pump
Connector
B00679
Vinyl or Plastic Bag
±
FUELFUEL SYSTEM(1ZZ±FE/3ZZ±FE)
11±1
AVENSIS REPAIR MANUAL (RM1018E)
FUEL SYSTEM(1ZZ±FE/3ZZ±FE)
PRECAUTION
1.PRECAUTION
(a)Before working on fuel system, disconnect negative (±) battery cable.
(b)Do not smoke or work near fire when handling the fuel system.
(c)Keep gasoline away from rubber or leather parts.
2.DISCHARGE FUEL SYSTEM PRESSURE
CAUTION:
�Do not disconnect any part of the fuel system until
you have discharged the fuel system pressure.
�Even after discharging the fuel pressure, place a
shop rag over fittings as you separate them to reduce
risk of fuel spray on yourself or in the engine compart-
ment.
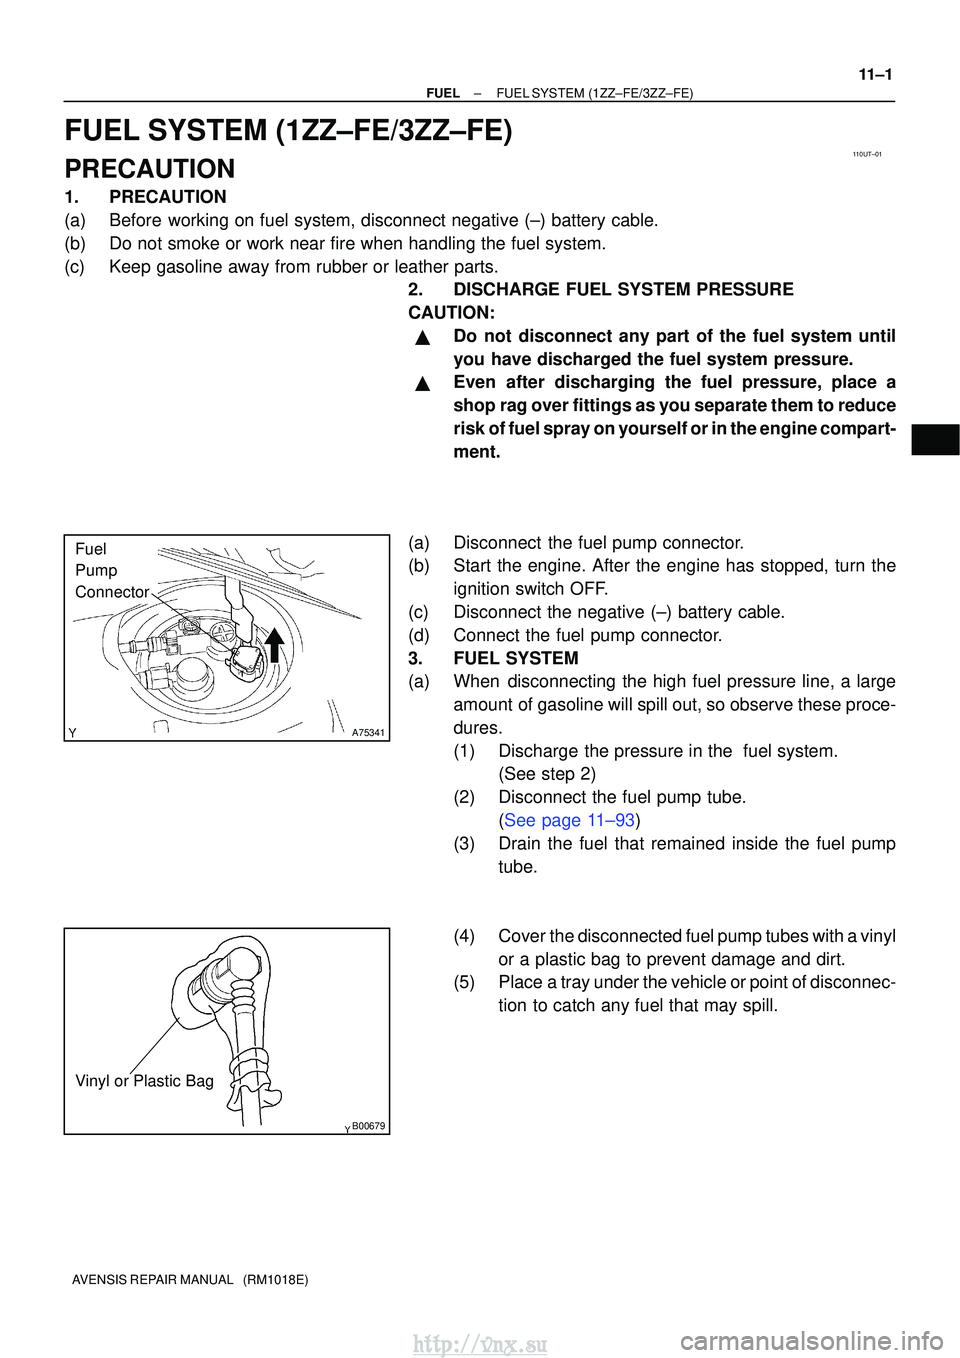
(a)Disconnect the fuel pump connector.
(b)Start the engine. After the engine has stopped, turn the ignition switch OFF.
(c)Disconnect the negative (±) battery cable.
(d)Connect the fuel pump connector.
3.FUEL SYSTEM
(a)When disconnecting the high fuel pressure line, a large amount of gasoline will spill out, so observe these proce-
dures.
(1)Discharge the pressure in the fuel system. (See step 2)
(2) Disconnect the fuel pump tube. (See page 11±93)
(3) Drain the fuel that remained inside the fuel pump tube.
(4) Cover the disconnected fuel pump tubes with a vinyl or a plastic bag to prevent damage and dirt.
(5) Place a tray under the vehicle or point of disconnec-
tion to catch any fuel that may spill.
http://vnx.su
Page 362 of 2234
110V1±01
A16628A32859
B10599
Ohmmeter
11±36
±
FUEL FUEL SYSTEM (1AZ±FSE)
AVENSIS REPAIR MANUAL (RM1018E)
INSPECTION
1. INSPECT FUEL INJECTOR ASSY
NOTICE:
This inspection aims at inspecting the fuel injectors for open or short, bec\
ause the fuel injectors of
this vehicle are high±pressure type and do not allow to inspect fuel inje\
ction volume.
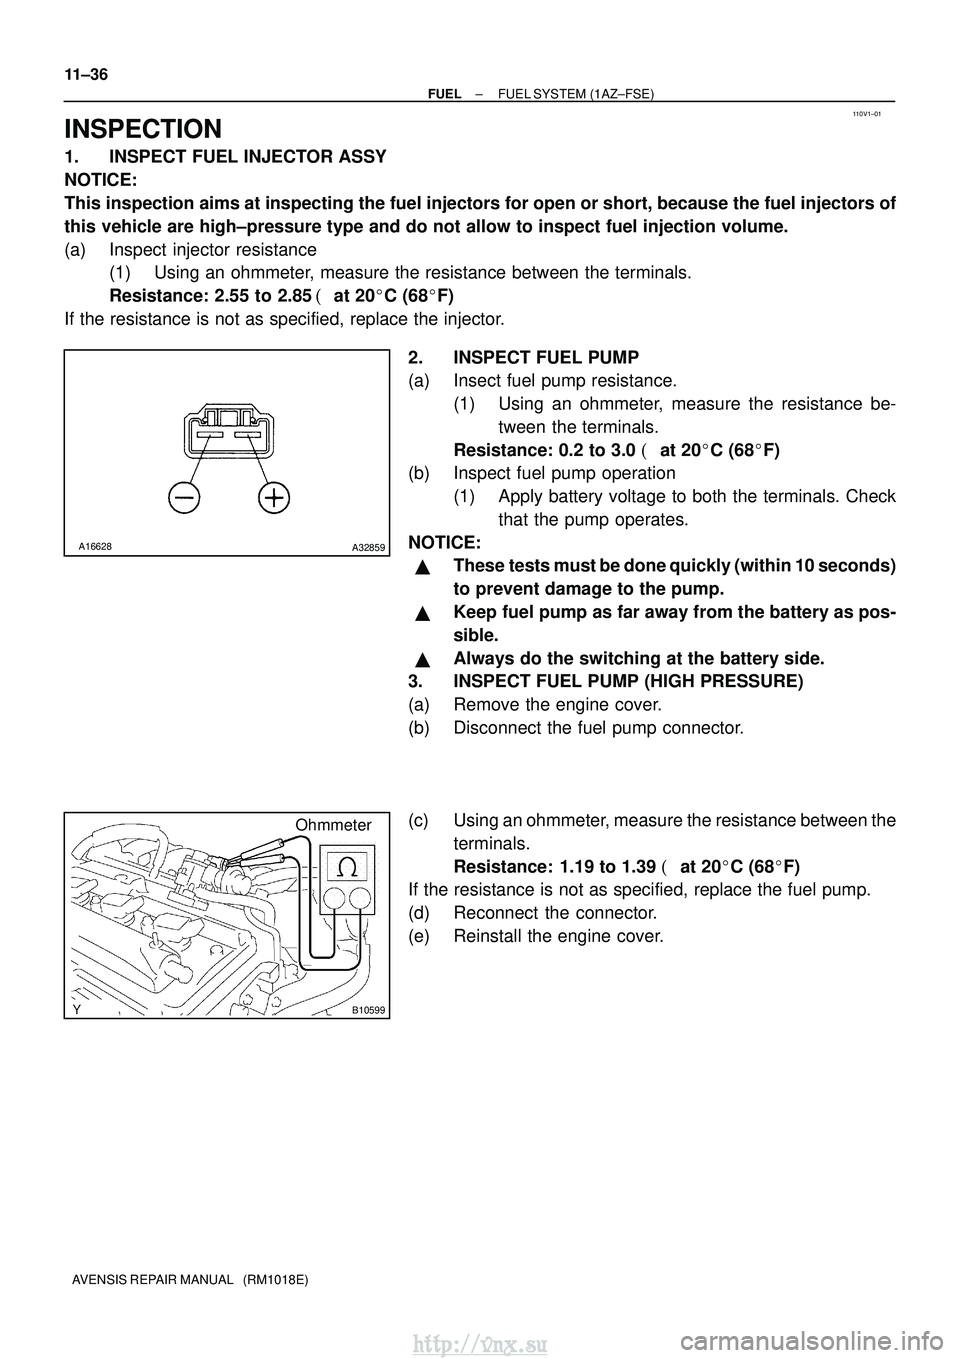
(a) Inspect injector resistance (1) Using an ohmmeter, measure the resistance between the terminals.
Resistance: 2.55 to 2.85 �at 20� C (68� F)
If the resistance is not as specified, replace the injector.
2. INSPECT FUEL PUMP
(a) Insect fuel pump resistance.(1) Using an ohmmeter, measure the resistance be-tween the terminals.
Resistance: 0.2 to 3.0 � at 20 �C (68� F)
(b) Inspect fuel pump operation
(1) Apply battery voltage to both the terminals. Checkthat the pump operates.
NOTICE:
�These tests must be done quickly (within 10 seconds)
to prevent damage to the pump.
�Keep fuel pump as far away from the battery as pos-
sible.
�Always do the switching at the battery side.
3. INSPECT FUEL PUMP (HIGH PRESSURE)
(a) Remove the engine cover.
(b) Disconnect the fuel pump connector.
(c) Using an ohmmeter, measure the resistance between the
terminals.
Resistance: 1.19 to 1.39 � at 20 �C (68� F)
If the resistance is not as specified, replace the fuel pump.
(d) Reconnect the connector.
(e) Reinstall the engine cover.
http://vnx.su
Page 363 of 2234
110V0±01
Fuel Tube Connector
A50710
A60083
Fuel Pipe
Clamp No.1
AA
B12941
±
FUELFUEL SYSTEM(1AZ±FSE)
11±33
AVENSIS REPAIR MANUAL (RM1018E)
ON±VEHICLE INSPECTION
1.CHECK FUEL PRESSURE
(a)Discharge the pressure in the fuel system and take pre-
cautions for possible fuel spillage. (See page 11±30)
(b) Check that the battery voltage is above 12 V.
(c) Disconnect the negative (±) battery cable.
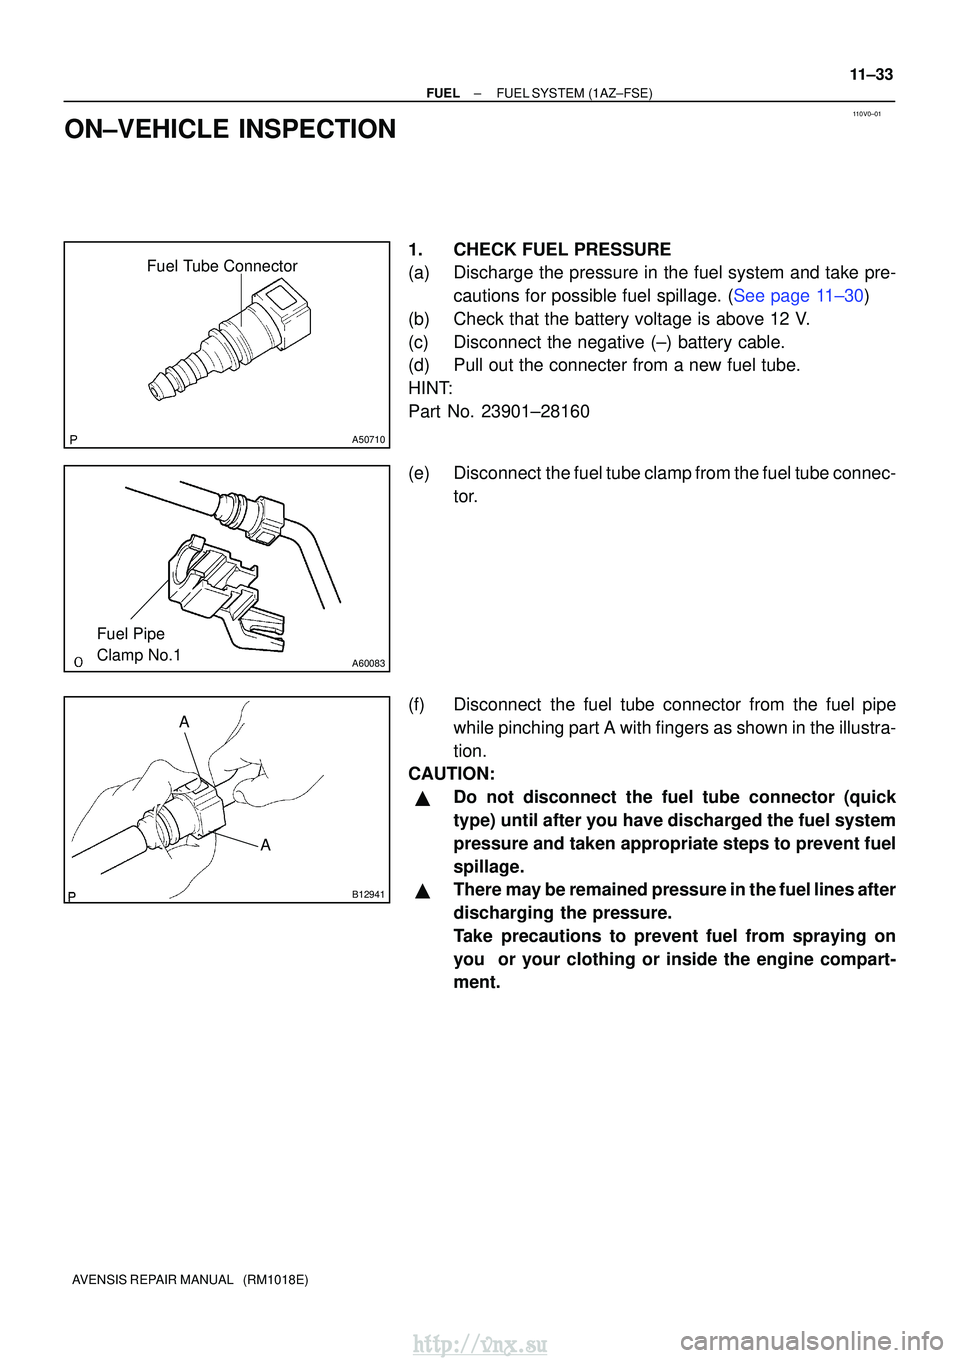
(d) Pull out the connecter from a new fuel tube.
HINT:
Part No. 23901±28160
(e) Disconnect the fuel tube clamp from the fuel tube connec- tor.
(f) Disconnect the fuel tube connector from the fuel pipe while pinching part A with fingers as shown in the illustra-
tion.
CAUTION:
�Do not disconnect the fuel tube connector (quick
type) until after you have discharged the fuel system
pressure and taken appropriate steps to prevent fuel
spillage.
�There may be remained pressure in the fuel lines after
discharging the pressure.
Take precautions to prevent fuel from spraying on
you or your clothing or inside the engine compart-
ment.
http://vnx.su
Page 364 of 2234
No.1 Fuel Pipe
Fuel Tube Connector
SST
(Clip)
SST (T joint)SST
SST
(Hose)
B12975
11±34
±
FUEL FUEL SYSTEM (1AZ±FSE)
AVENSIS REPAIR MANUAL (RM1018E)
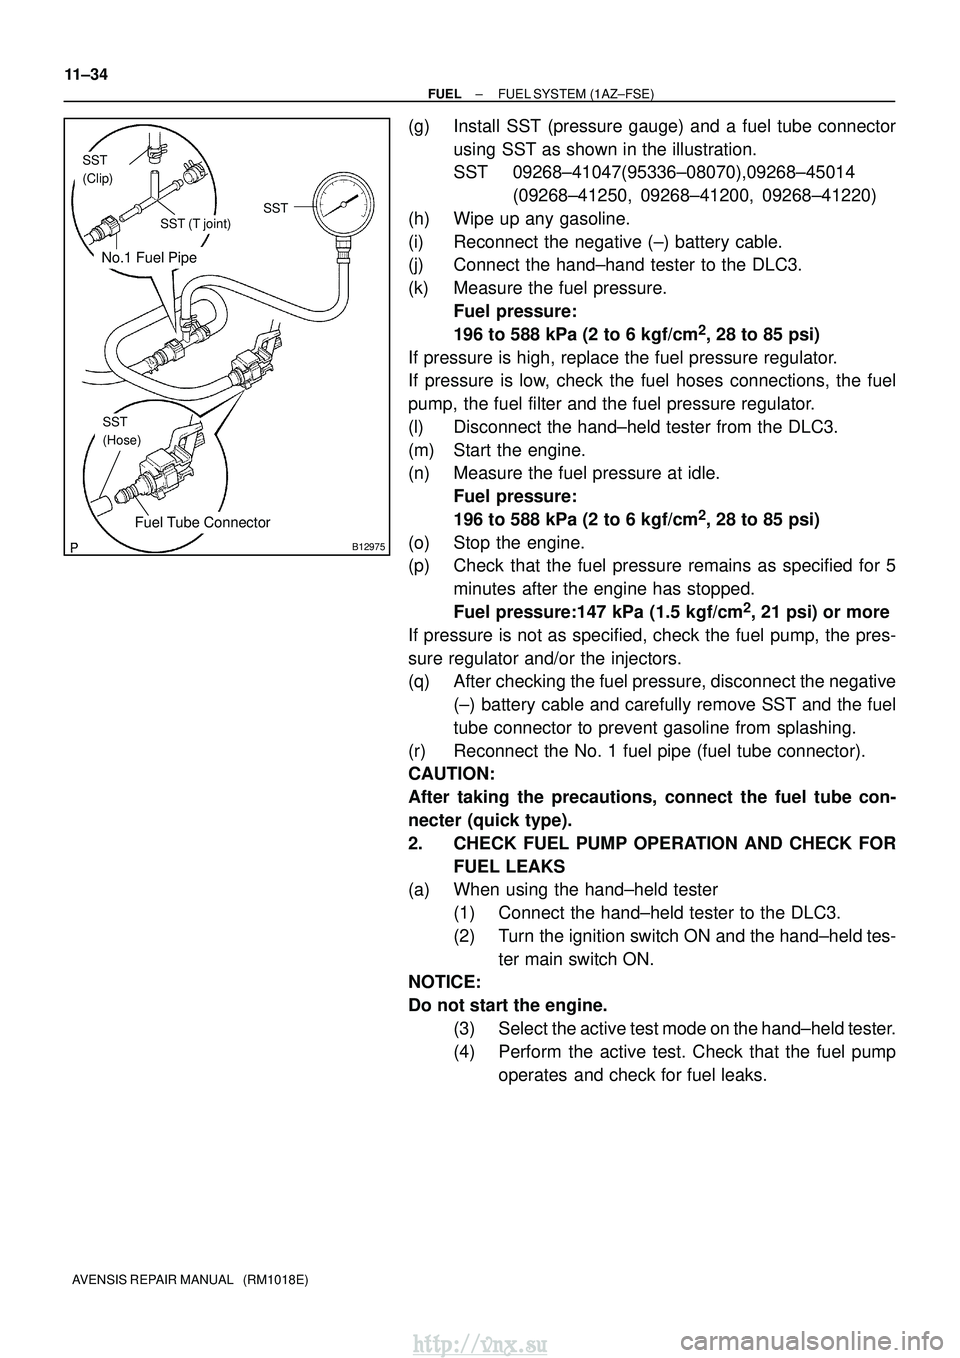
(g) Install SST (pressure gauge) and a fuel tube connector using SST as shown in the illustration.
SST 09268±41047(95336±08070),09268±45014 (09268±41250, 09268±41200, 09268±41220)
(h) Wipe up any gasoline.
(i) Reconnect the negative (±) battery cable.
(j) Connect the hand±hand tester to the DLC3.
(k) Measure the fuel pressure. Fuel pressure:
196 to 588 kPa (2 to 6 kgf/cm
2, 28 to 85 psi)
If pressure is high, replace the fuel pressure regulator.
If pressure is low, check the fuel hoses connections, the fuel
pump, the fuel filter and the fuel pressure regulator.
(l) Disconnect the hand±held tester from the DLC3.
(m) Start the engine.
(n) Measure the fuel pressure at idle. Fuel pressure:
196 to 588 kPa (2 to 6 kgf/cm
2, 28 to 85 psi)
(o) Stop the engine.
(p) Check that the fuel pressure remains as specified for 5 minutes after the engine has stopped.
Fuel pressure:147 kPa (1.5 kgf/cm
2, 21 psi) or more
If pressure is not as specified, check the fuel pump, the pres-
sure regulator and/or the injectors.
(q) After checking the fuel pressure, disconnect the negative (±) battery cable and carefully remove SST and the fuel
tube connector to prevent gasoline from splashing.
(r) Reconnect the No. 1 fuel pipe (fuel tube connector).
CAUTION:
After taking the precautions, connect the fuel tube con-
necter (quick type).
2. CHECK FUEL PUMP OPERATION AND CHECK FOR FUEL LEAKS
(a) When using the hand±held tester
(1) Connect the hand±held tester to the DLC3.
(2) Turn the ignition switch ON and the hand±held tes-ter main switch ON.
NOTICE:
Do not start the engine.
(3) Select the active test mode on the hand±held tester.
(4) Perform the active test. Check that the fuel pumpoperates and check for fuel leaks.
http://vnx.su
Page 365 of 2234
A75340
Battery4
5
������B12608
A76859
Hand±held Tester
±
FUEL FUEL SYSTEM (1AZ±FSE)
11±35
AVENSIS REPAIR MANUAL (RM1018E)
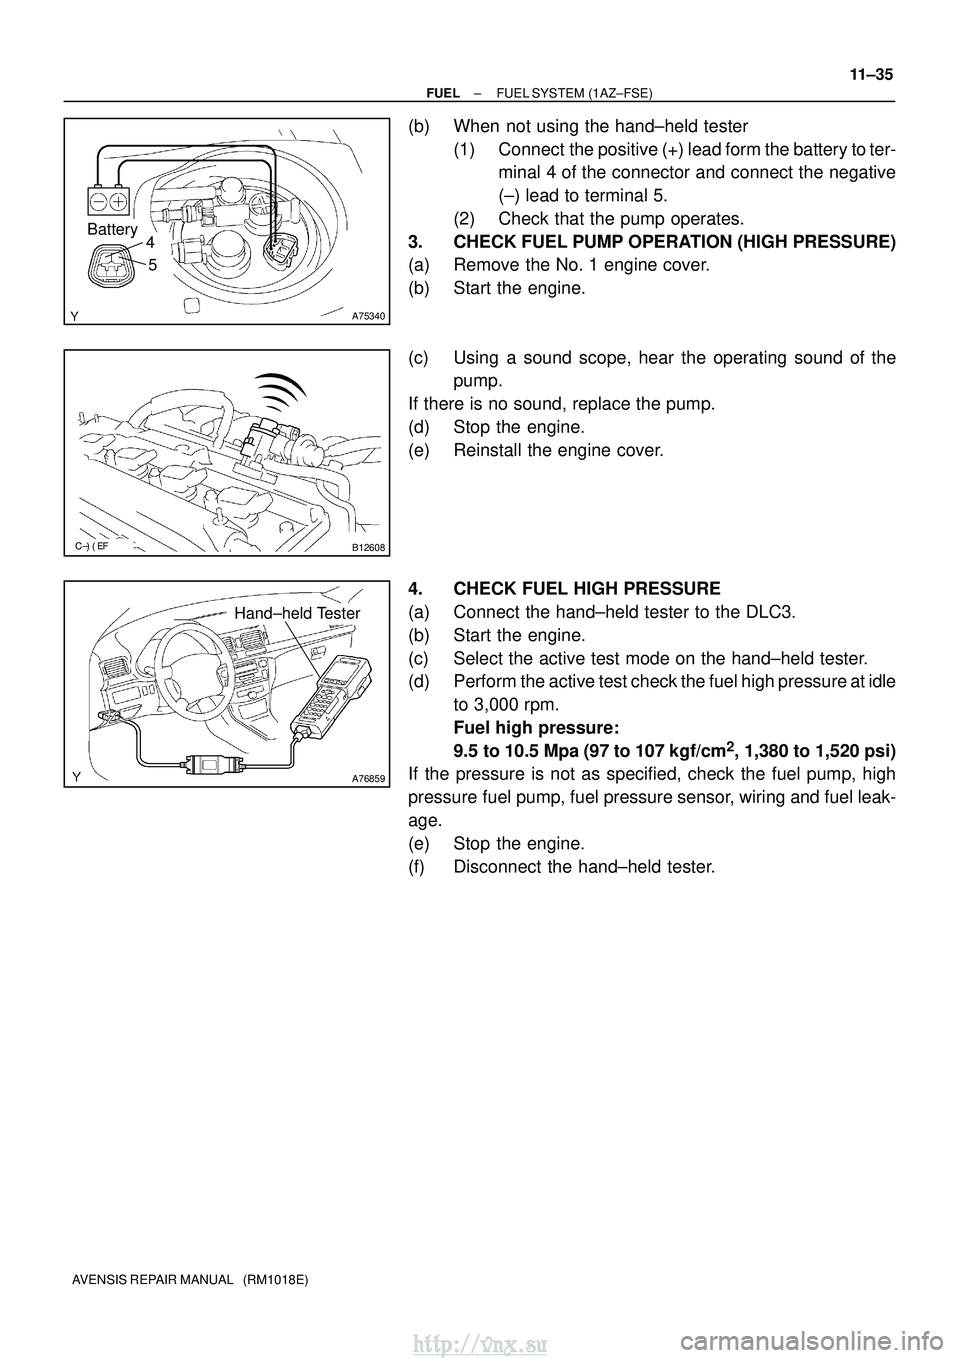
(b) When not using the hand±held tester
(1) Connect the positive (+) lead form the battery to ter-minal 4 of the connector and connect the negative
(±) lead to terminal 5.
(2) Check that the pump operates.
3. CHECK FUEL PUMP OPERATION (HIGH PRESSURE)
(a) Remove the No. 1 engine cover.
(b) Start the engine.
(c) Using a sound scope, hear the operating sound of the pump.
If there is no sound, replace the pump.
(d) Stop the engine.
(e) Reinstall the engine cover.
4. CHECK FUEL HIGH PRESSURE
(a) Connect the hand±held tester to the DLC3.
(b) Start the engine.
(c) Select the active test mode on the hand±held tester.
(d) Perform the active test check the fuel high pressure at idle to 3,000 rpm.
Fuel high pressure:
9.5 to 10.5 Mpa (97 to 107 kgf/cm
2, 1,380 to 1,520 psi)
If the pressure is not as specified, check the fuel pump, high
pressure fuel pump, fuel pressure sensor, wiring and fuel leak-
age.
(e) Stop the engine.
(f) Disconnect the hand±held tester.
http://vnx.su
Page 366 of 2234
110UZ±01
A75339
Fuel
Pump
Connector
B00679
Vinyl or Plastic Bag
11±30
±
FUELFUEL SYSTEM(1AZ±FSE)
AVENSIS REPAIR MANUAL (RM1018E)
FUEL SYSTEM(1AZ±FSE)
PRECAUTION
1.PRECAUTION
(a)Before working on fuel system, disconnect negative (±) battery cable.
(b)Do not smoke or work near fire when handling the fuel system.
(c)Keep gasoline away from rubber or leather parts. 2.DISCHARGE FUEL SYSTEM PRESSURE
CAUTION:
�Do not disconnect any part of the fuel system until
you have discharged the fuel system pressure.
�Even after discharging the fuel pressure, place a
shop rag over fittings as you separate them to reduce
risk of fuel spray on yourself or in the engine compart-
ment.
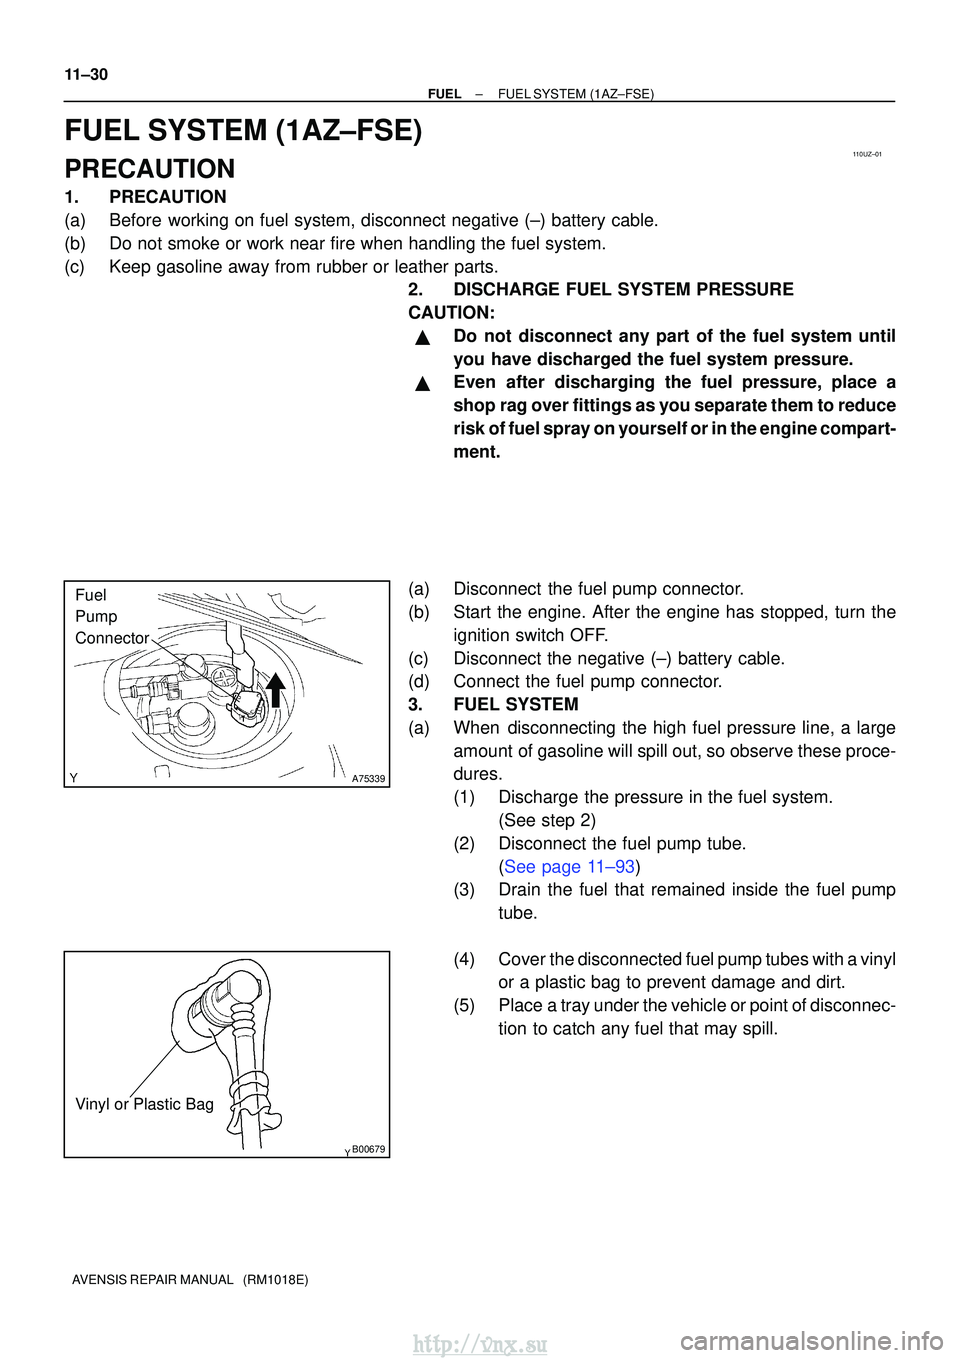
(a)Disconnect the fuel pump connector.
(b)Start the engine. After the engine has stopped, turn the ignition switch OFF.
(c)Disconnect the negative (±) battery cable.
(d)Connect the fuel pump connector.
3.FUEL SYSTEM
(a)When disconnecting the high fuel pressure line, a large amount of gasoline will spill out, so observe these proce-
dures.
(1)Discharge the pressure in the fuel system. (See step 2)
(2) Disconnect the fuel pump tube. (See page 11±93)
(3) Drain the fuel that remained inside the fuel pump
tube.
(4) Cover the disconnected fuel pump tubes with a vinyl or a plastic bag to prevent damage and dirt.
(5) Place a tray under the vehicle or point of disconnec- tion to catch any fuel that may spill.
http://vnx.su
Page 413 of 2234
A77115
Ohmmeter
Resistance
A77116
Ohmmeter
No continuity
A77117
Air
E
F
A77118
Air
E
F
Battery
A61829
+BHT
E1
Bank 1 Sensor 1:
±
EMISSION CONTROL EMISSION CONTROL SYSTEM (1AZ±FE)
12±9
AVENSIS REPAIR MANUAL (RM1018E)
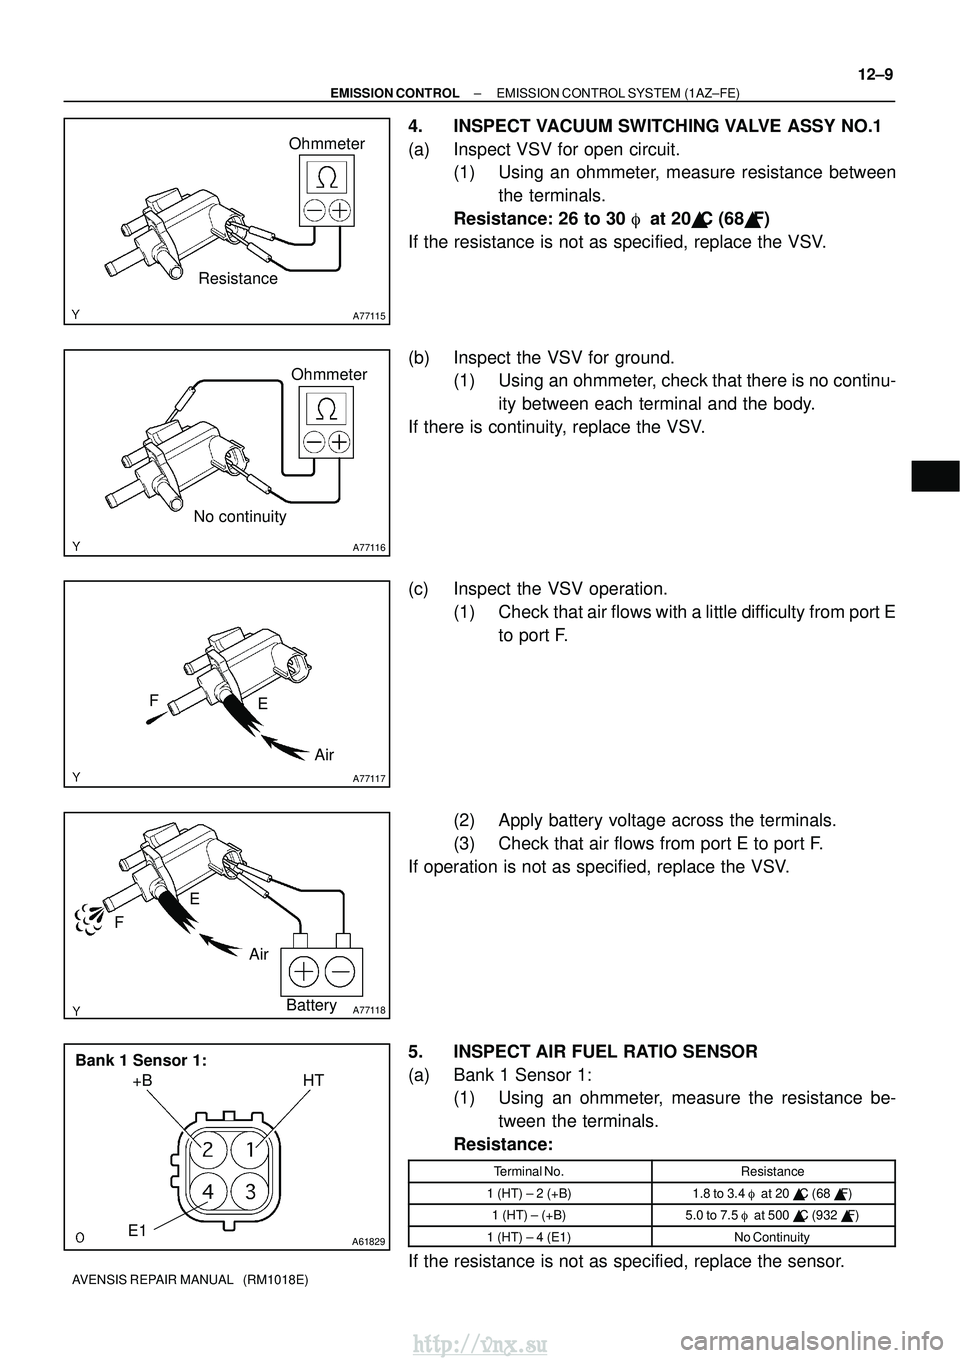
4. INSPECT VACUUM SWITCHING VALVE ASSY NO.1
(a) Inspect VSV for open circuit.
(1) Using an ohmmeter, measure resistance between
the terminals.
Resistance: 26 to 30 � at 20 �C (68� F)
If the resistance is not as specified, replace the VSV.
(b) Inspect the VSV for ground. (1) Using an ohmmeter, check that there is no continu-
ity between each terminal and the body.
If there is continuity, replace the VSV.
(c) Inspect the VSV operation. (1) Check that air flows with a little difficulty from port Eto port F.
(2) Apply battery voltage across the terminals.
(3) Check that air flows from port E to port F.
If operation is not as specified, replace the VSV.
5. INSPECT AIR FUEL RATIO SENSOR
(a) Bank 1 Sensor 1: (1) Using an ohmmeter, measure the resistance be-
tween the terminals.
Resistance:
Terminal No.Resistance
1 (HT) ± 2 (+B)1.8 to 3.4 � at 20 �C (68 �F)
1 (HT) ± (+B)5.0 to 7.5 � at 500 � C (932 �F)
1 (HT) ± 4 (E1)No Continuity
If the resistance is not as specified, replace the sensor.
http://vnx.su