Page 700 of 2234
A76714
A78459
14±44
±
ENGINE MECHANICAL PARTIAL ENGINE ASSY (1ZZ±FE/3ZZ±FE)
AVENSIS REPAIR MANUAL (RM1018E)
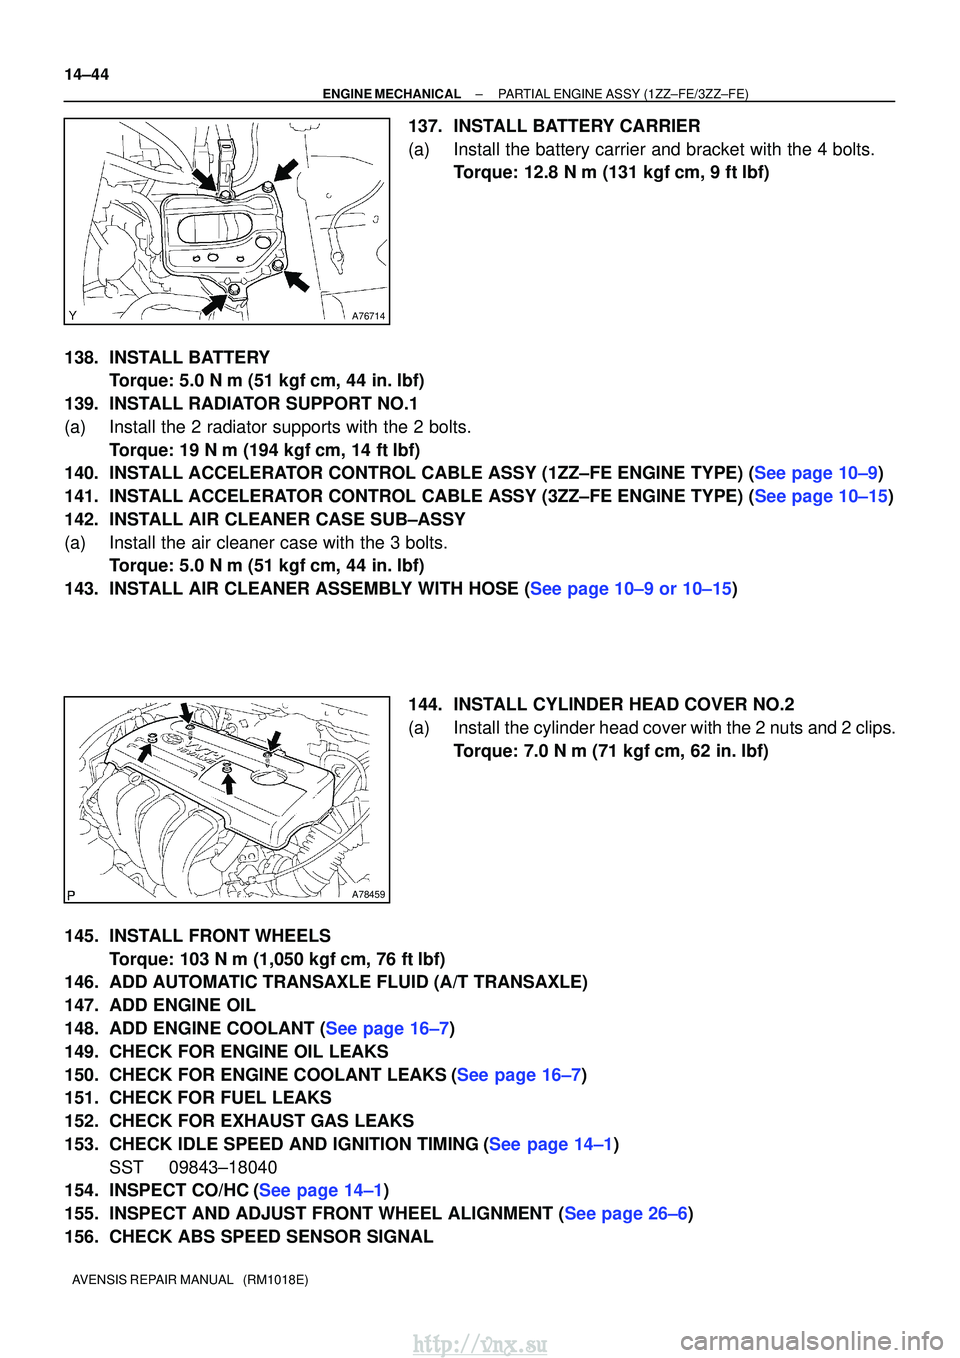
137. INSTALL BATTERY CARRIER
(a) Install the battery carrier and bracket with the 4 bolts. Torque: 12.8 N� m (131 kgf�cm, 9 ft�lbf)
138. INSTALL BATTERY Torque: 5.0 N �m (51 kgf �cm, 44 in. �lbf)
139. INSTALL RADIATOR SUPPORT NO.1
(a) Install the 2 radiator supports with the 2 bolts. Torque: 19 N �m (194 kgf� cm, 14 ft�lbf)
140.INSTALL ACCELERATOR CONTROL CABLE ASSY (1ZZ±FE ENGINE TYPE) (See page 10±9)
141.INSTALL ACCELERATOR CONTROL CABLE ASSY (3ZZ±FE ENGINE TYPE) (See page 10±15)
142. INSTALL AIR CLEANER CASE SUB±ASSY
(a) Install the air cleaner case with the 3 bolts. Torque: 5.0 N �m (51 kgf �cm, 44 in. �lbf)
143.INSTALL AIR CLEANER ASSEMBLY WITH HOSE (See page 10±9 or 10±15)
144. INSTALL CYLINDER HEAD COVER NO.2
(a) Install the cylinder head cover with the 2 nuts and 2 clips.Torque: 7.0 N� m (71 kgf�cm, 62 in. �lbf)
145. INSTALL FRONT WHEELS Torque: 103 N� m (1,050 kgf�cm, 76 ft �lbf)
146. ADD AUTOMATIC TRANSAXLE FLUID (A/T TRANSAXLE)
147. ADD ENGINE OIL
148.ADD ENGINE COOLANT (See page 16±7)
149. CHECK FOR ENGINE OIL LEAKS
150.CHECK FOR ENGINE COOLANT LEAKS(See page 16±7)
151. CHECK FOR FUEL LEAKS
152. CHECK FOR EXHAUST GAS LEAKS
153.CHECK IDLE SPEED AND IGNITION TIMING(See page 14±1)
SST 09843±18040
154.INSPECT CO/HC(See page 14±1)
155.INSPECT AND ADJUST FRONT WHEEL ALIGNMENT (See page 26±6)
156. CHECK ABS SPEED SENSOR SIGNAL
http://vnx.su
Page 704 of 2234
A61183SST
A09605Turn
A61185
14±308
±
ENGINE MECHANICAL TIMING BELT (1CD±FTV)
AVENSIS REPAIR MANUAL (RM1018E)
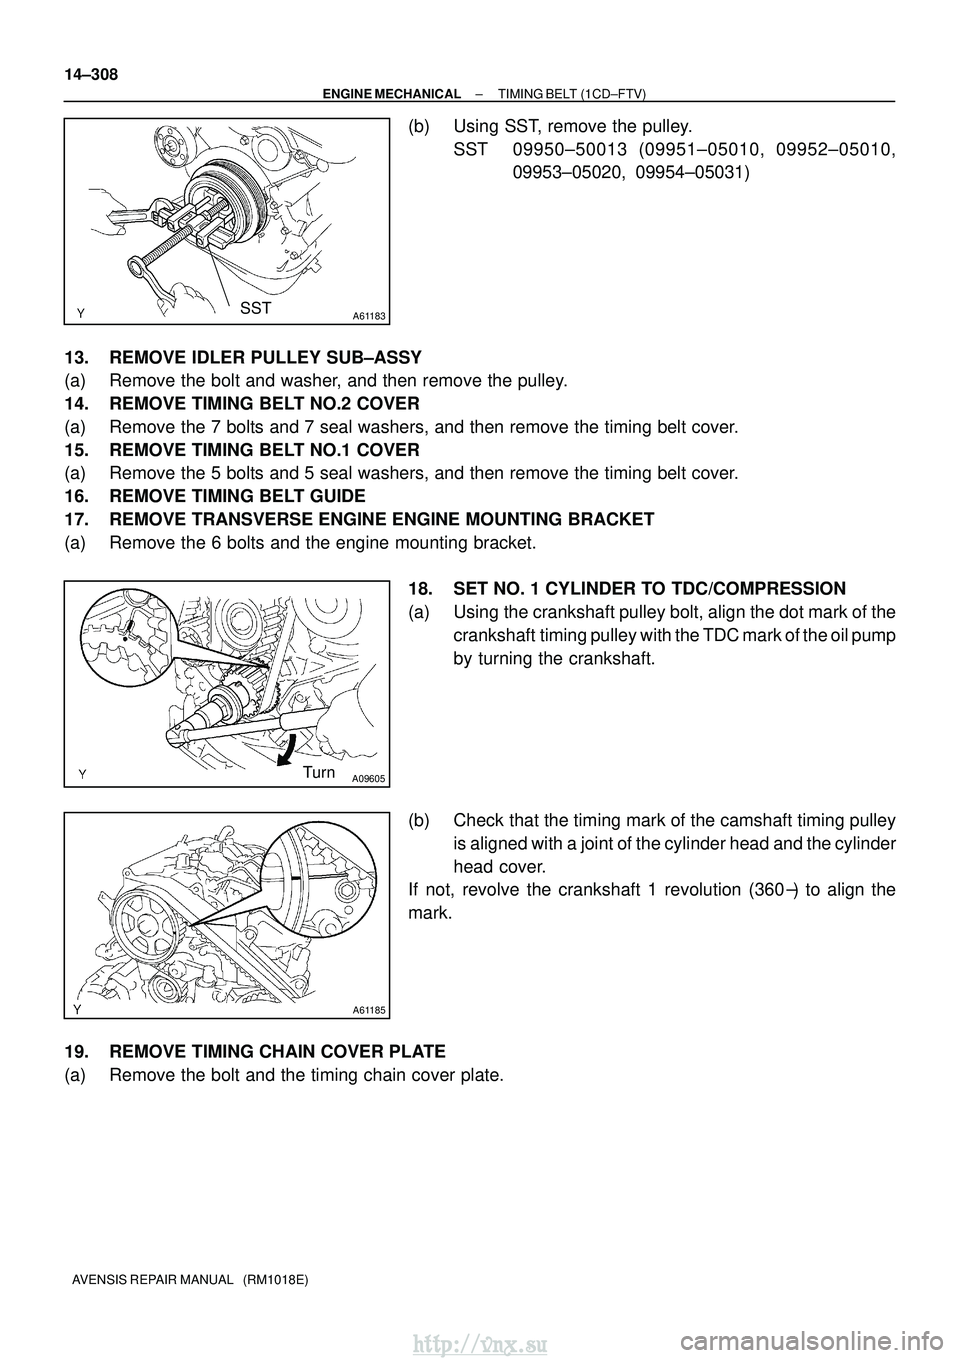
(b) Using SST, remove the pulley. SST 09950±50013 (09951±05010, 09952±05010, 09953±05020, 09954±05031)
13. REMOVE IDLER PULLEY SUB±ASSY
(a) Remove the bolt and washer, and then remove the pulley.
14. REMOVE TIMING BELT NO.2 COVER
(a) Remove the 7 bolts and 7 seal washers, and then remove the timing belt c\
over.
15. REMOVE TIMING BELT NO.1 COVER
(a) Remove the 5 bolts and 5 seal washers, and then remove the timing belt c\
over.
16. REMOVE TIMING BELT GUIDE
17. REMOVE TRANSVERSE ENGINE ENGINE MOUNTING BRACKET
(a) Remove the 6 bolts and the engine mounting bracket. 18. SET NO. 1 CYLINDER TO TDC/COMPRESSION
(a) Using the crankshaft pulley bolt, align the dot mark of thecrankshaft timing pulley with the TDC mark of the oil pump
by turning the crankshaft.
(b) Check that the timing mark of the camshaft timing pulley is aligned with a joint of the cylinder head and the cylinder
head cover.
If not, revolve the crankshaft 1 revolution (360 �) to align the
mark.
19. REMOVE TIMING CHAIN COVER PLATE
(a) Remove the bolt and the timing chain cover plate.
http://vnx.su
Page 706 of 2234
A09612
1st2nd
5th
3rd
4th
6th
7th
A09589
Hexagon
Wrench
(1.27 mm)
(A)
A09623
A61179
Hexagon
Wrench
(1.27 mm)
A09605
Turn
Dot Mark
TDC Mark
14±310
±
ENGINE MECHANICAL TIMING BELT (1CD±FTV)
AVENSIS REPAIR MANUAL (RM1018E)
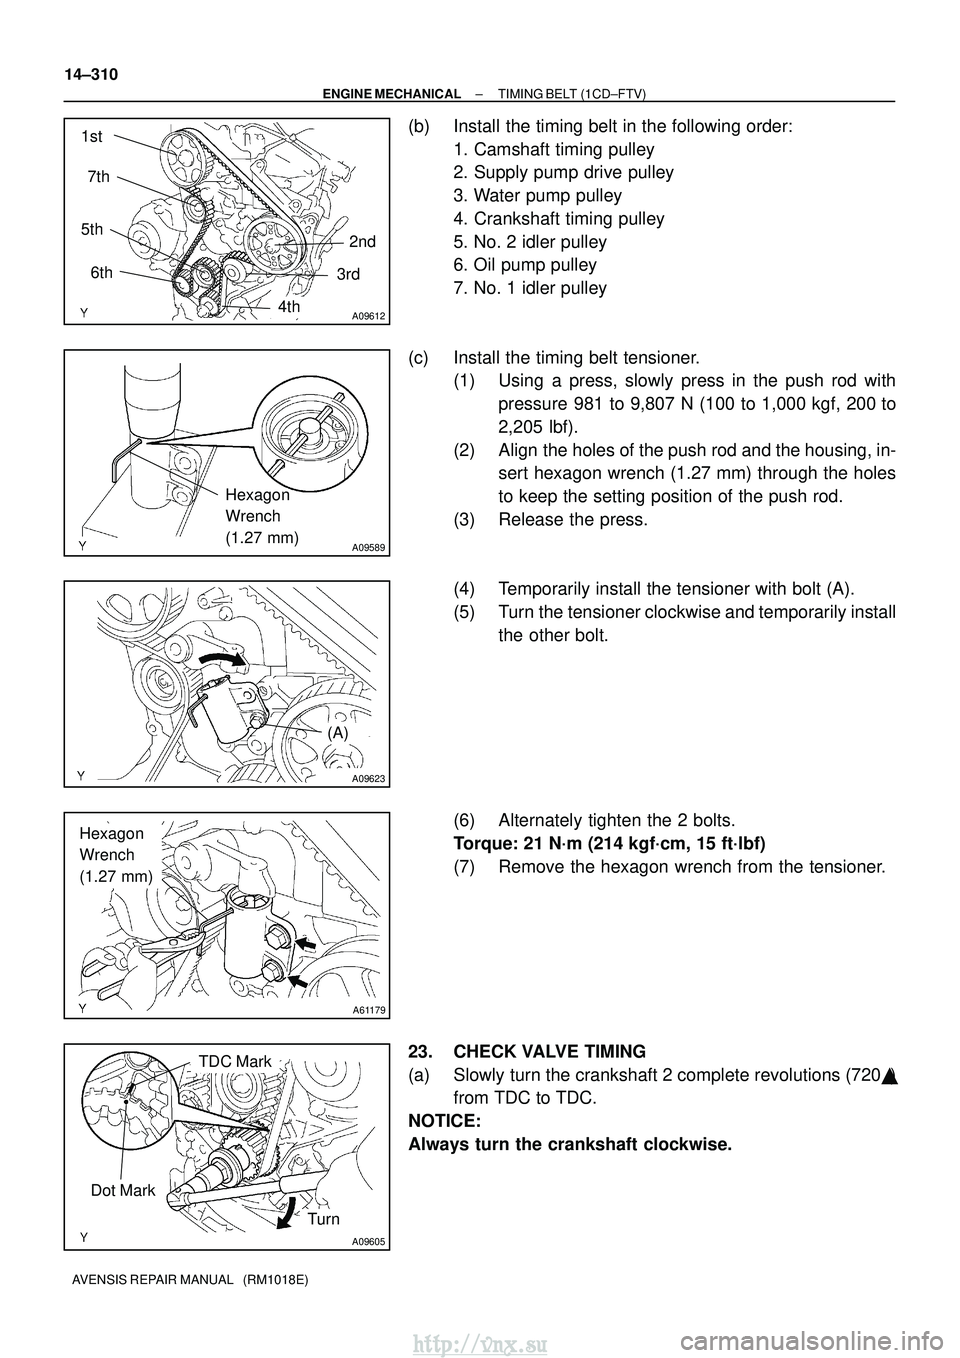
(b) Install the timing belt in the following order: 1. Camshaft timing pulley
2. Supply pump drive pulley
3. Water pump pulley
4. Crankshaft timing pulley
5. No. 2 idler pulley
6. Oil pump pulley
7. No. 1 idler pulley
(c) Install the timing belt tensioner. (1) Using a press, slowly press in the push rod with
pressure 981 to 9,807 N (100 to 1,000 kgf, 200 to
2,205 lbf).
(2) Align the holes of the push rod and the housing, in- sert hexagon wrench (1.27 mm) through the holes
to keep the setting position of the push rod.
(3) Release the press.
(4) Temporarily install the tensioner with bolt (A).
(5) Turn the tensioner clockwise and temporarily install the other bolt.
(6) Alternately tighten the 2 bolts.
Torque: 21 N´m (214 kgf´cm, 15 ft´lbf)
(7) Remove the hexagon wrench from the tensioner.
23. CHECK VALVE TIMING
(a) Slowly turn the crankshaft 2 complete revolutions (720 �)
from TDC to TDC.
NOTICE:
Always turn the crankshaft clockwise.
http://vnx.su
Page 707 of 2234
A09679
A09596
A09603
Seal PackingGasket
Groove
±
ENGINE MECHANICAL TIMING BELT (1CD±FTV)
14±311
AVENSIS REPAIR MANUAL (RM1018E)
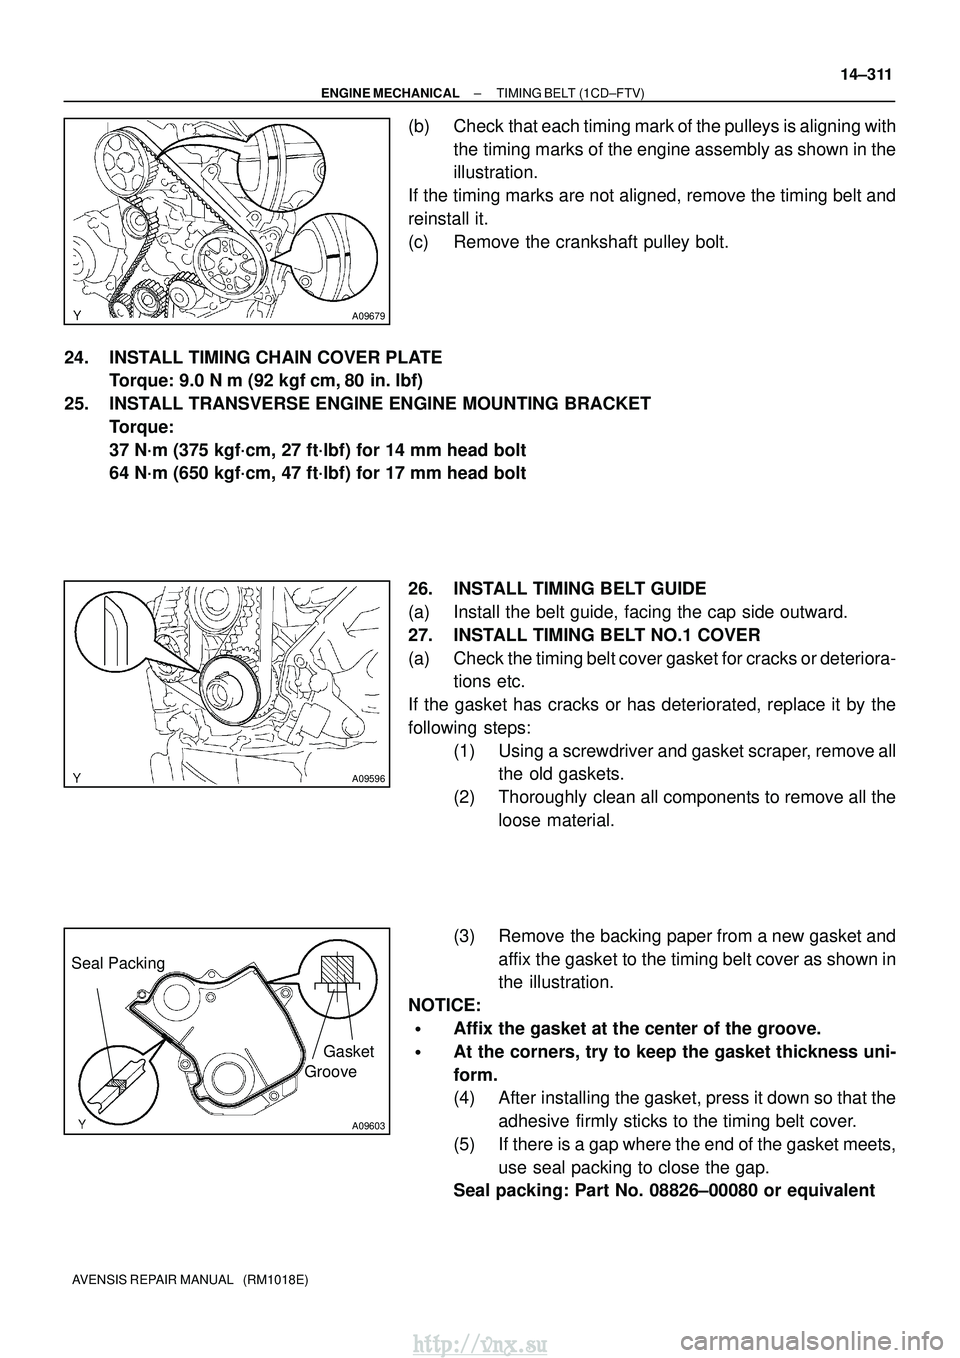
(b) Check that each timing mark of the pulleys is aligning with
the timing marks of the engine assembly as shown in the
illustration.
If the timing marks are not aligned, remove the timing belt and
reinstall it.
(c) Remove the crankshaft pulley bolt.
24. INSTALL TIMING CHAIN COVER PLATE Torque: 9.0 N �m (92 kgf �cm, 80 in. �lbf)
25. INSTALL TRANSVERSE ENGINE ENGINE MOUNTING BRACKET Torque:
37 N´m (375 kgf´cm, 27 ft´lbf) for 14 mm head bolt
64 N´m (650 kgf´cm, 47 ft´lbf) for 17 mm head bolt
26. INSTALL TIMING BELT GUIDE
(a) Install the belt guide, facing the cap side outward.
27. INSTALL TIMING BELT NO.1 COVER
(a) Check the timing belt cover gasket for cracks or deteriora-tions etc.
If the gasket has cracks or has deteriorated, replace it by the
following steps: (1) Using a screwdriver and gasket scraper, remove allthe old gaskets.
(2) Thoroughly clean all components to remove all the loose material.
(3) Remove the backing paper from a new gasket and affix the gasket to the timing belt cover as shown in
the illustration.
NOTICE:
�Affix the gasket at the center of the groove.
�At the corners, try to keep the gasket thickness uni-
form.
(4) After installing the gasket, press it down so that the adhesive firmly sticks to the timing belt cover.
(5) If there is a gap where the end of the gasket meets, use seal packing to close the gap.
Seal packing: Part No. 08826±00080 or equivalent
http://vnx.su
Page 708 of 2234
A09602
Seal
Packing
Gasket
Groove
A61186
SST
14±312
±
ENGINE MECHANICALTIMING BELT(1CD±FTV)
AVENSIS REPAIR MANUAL (RM1018E)
(b)Install the No. 1 timing belt cover and the gasket with the 5 bolts and 5 seal washers.
Torque: 7.4 N �m (75 kgf�cm,65 in. �lbf)
(c)After installing the belt cover, check that there is no peel- ings of the gasket.
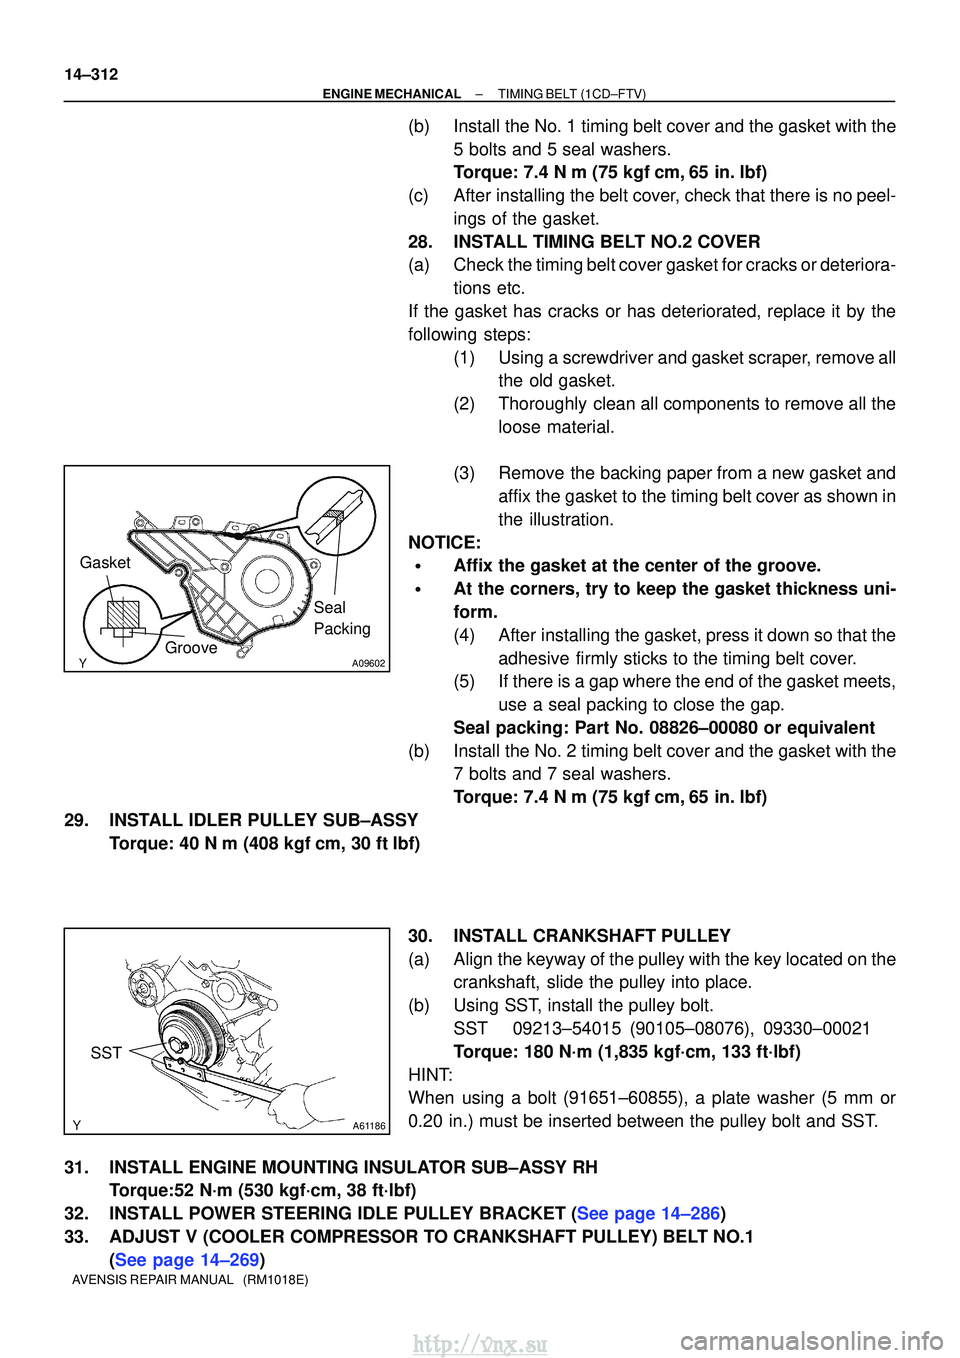
28.INSTALL TIMING BELT NO.2 COVER
(a)Check the timing belt cover gasket for cracks or deteriora- tions etc.
If the gasket has cracks or has deteriorated, replace it by the
following steps: (1)Using a screwdriver and gasket scraper, remove allthe old gasket.
(2)Thoroughly clean all components to remove all the loose material.
(3)Remove the backing paper from a new gasket and affix the gasket to the timing belt cover as shown in
the illustration.
NOTICE:
�Affix the gasket at the center of the groove.
�At the corners, try to keep the gasket thickness uni-
form.
(4)After installing the gasket, press it down so that the adhesive firmly sticks to the timing belt cover.
(5)If there is a gap where the end of the gasket meets,
use a seal packing to close the gap.
Seal packing: Part No. 08826±00080 or equivalent
(b)Install the No. 2 timing belt cover and the gasket with the 7 bolts and 7 seal washers.
Torque: 7.4 N �m (75 kgf�cm,65 in. �lbf)
29.INSTALL IDLER PULLEY SUB±ASSY Torque: 40 N �m (408 kgf�cm, 30 ft�lbf)
30.INSTALL CRANKSHAFT PULLEY
(a)Align the keyway of the pulley with the key located on thecrankshaft, slide the pulley into place.
(b)Using SST, install the pulley bolt. SST09213±54015 (90105±08076), 09330±00021
Torque: 180 N´m (1,835 kgf´cm, 133 ft´lbf)
HINT:
When using a bolt (91651±60855), a plate washer (5 mm or
0.20 in.) must be inserted between the pulley bolt and SST.
31.INSTALL ENGINE MOUNTING INSULATOR SUB±ASSY RH Torque:52 N´m (530 kgf´cm, 38 ft´lbf)
32.INSTALL POWER STEERING IDLE PULLEY BRACKET (See page 14±286)
33. ADJUST V (COOLER COMPRESSOR TO CRANKSHAFT PULLEY) BELT NO.1 (See page 14±269)
http://vnx.su
Page 711 of 2234
A62183
Cut Position
Pry
A62184
SST
A62837SST
A64005
±
ENGINE MECHANICAL TIMING CHAIN OR BELT COVER OIL
SEAL (1ZZ±FE/3ZZ±FE)14±97
AVENSIS REPAIR MANUAL (RM1018E)
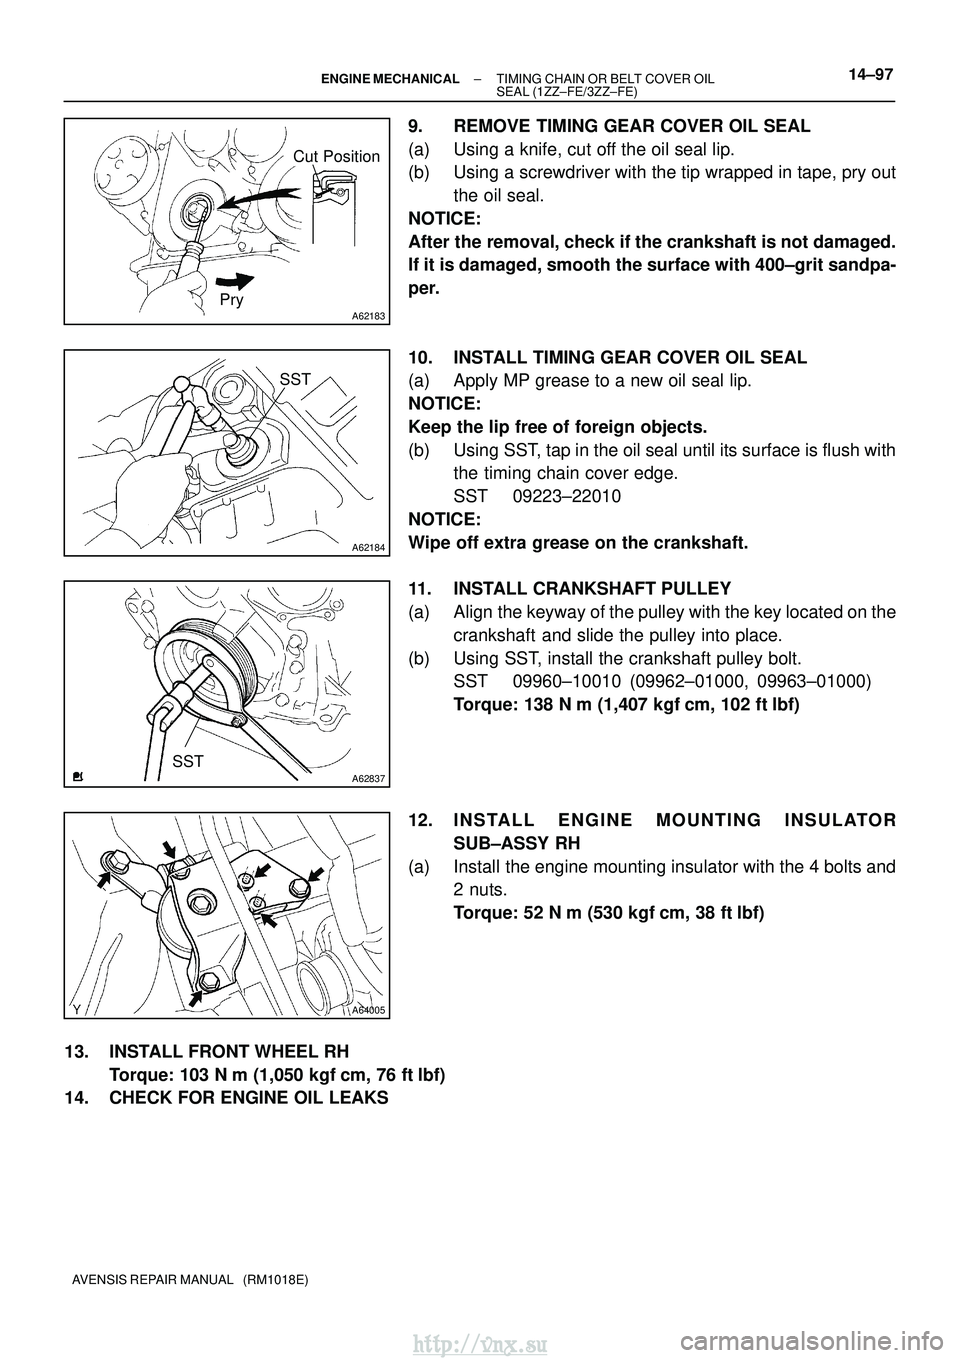
9. REMOVE TIMING GEAR COVER OIL SEAL
(a) Using a knife, cut off the oil seal lip.
(b) Using a screwdriver with the tip wrapped in tape, pry out
the oil seal.
NOTICE:
After the removal, check if the crankshaft is not damaged.
If it is damaged, smooth the surface with 400±grit sandpa-
per.
10. INSTALL TIMING GEAR COVER OIL SEAL
(a) Apply MP grease to a new oil seal lip.
NOTICE:
Keep the lip free of foreign objects.
(b) Using SST, tap in the oil seal until its surface is flush with the timing chain cover edge.
SST 09223±22010
NOTICE:
Wipe off extra grease on the crankshaft.
11. INSTALL CRANKSHAFT PULLEY
(a) Align the keyway of the pulley with the key located on the crankshaft and slide the pulley into place.
(b) Using SST, install the crankshaft pulley bolt. SST 09960±10010 (09962±01000, 09963±01000)
Torque: 138 N� m (1,407 kgf�cm, 102 ft� lbf)
12. INSTALL ENGINE MOUNTING INSULATOR SUB±ASSY RH
(a) Install the engine mounting insulator with the 4 bolts and 2 nuts.
Torque: 52 N �m (530 kgf� cm, 38 ft�lbf)
13. INSTALL FRONT WHEEL RH Torque: 103 N� m (1,050 kgf�cm, 76 ft �lbf)
14. CHECK FOR ENGINE OIL LEAKS
http://vnx.su
Page 713 of 2234
A77418
Cut Position
A77419
SST
A77420
SST
SST
±
ENGINE MECHANICALTIMING GEAR CASE OR TIMING CHAIN CASE OIL
SEAL(1AZ±FE)14±179
AVENSIS REPAIR MANUAL (RM1018E)
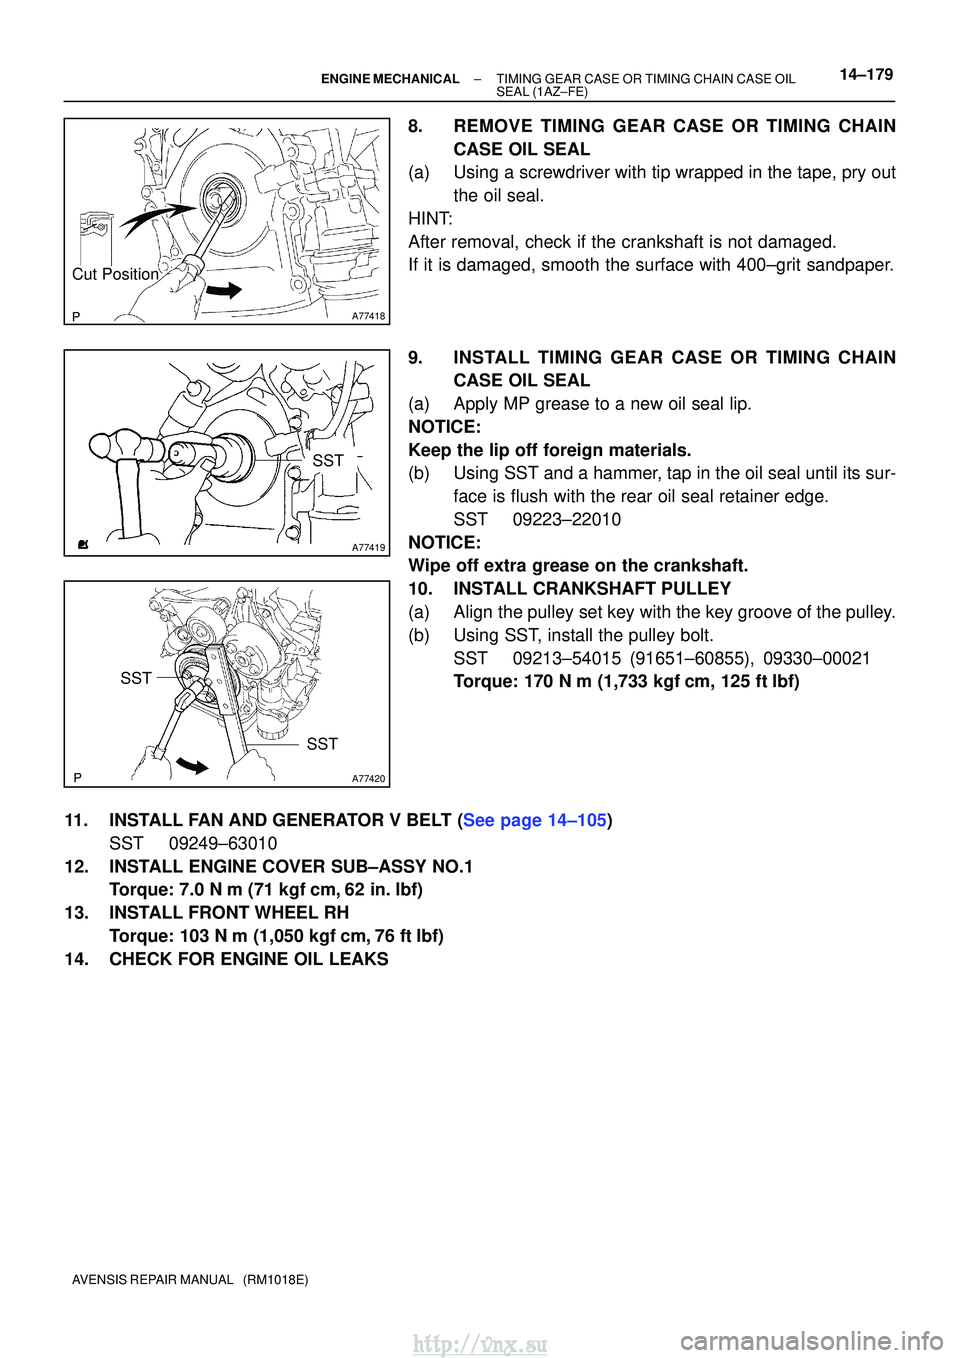
8.REMOVE TIMING GEAR CASE OR TIMING CHAIN
CASE OIL SEAL
(a)Using a screwdriver with tip wrapped in the tape, pry out
the oil seal.
HINT:
After removal, check if the crankshaft is not damaged.
If it is damaged, smooth the surface with 400±grit sandpaper.
9.INSTALL TIMING GEAR CASE OR TIMING CHAIN CASE OIL SEAL
(a)Apply MP grease to a new oil seal lip.
NOTICE:
Keep the lip off foreign materials.
(b)Using SST and a hammer, tap in the oil seal until its sur- face is flush with the rear oil seal retainer edge.
SST09223±22010
NOTICE:
Wipe off extra grease on the crankshaft.
10.INSTALL CRANKSHAFT PULLEY
(a)Align the pulley set key with the key groove of the pulley.
(b)Using SST, install the pulley bolt. SST09213±54015 (91651±60855), 09330±00021
Torque: 170 N�m (1,733 kgf�cm, 125 ft�lbf)
11.INSTALL FAN AND GENERATOR V BELT (See page 14±105) SST 09249±63010
12. INSTALL ENGINE COVER SUB±ASSY NO.1 Torque: 7.0 N �m (71 kgf �cm, 62 in. �lbf)
13. INSTALL FRONT WHEEL RH Torque: 103 N� m (1,050 kgf�cm, 76 ft �lbf)
14. CHECK FOR ENGINE OIL LEAKS
http://vnx.su
Page 715 of 2234
Cut Position
A13332
A77419
SST
A13697
SST
SST
14±264
±
ENGINE MECHANICALTIMING GEAR CASE OR TIMING CHAIN CASE OIL
SEAL(1AZ±FSE)
AVENSIS REPAIR MANUAL (RM1018E)
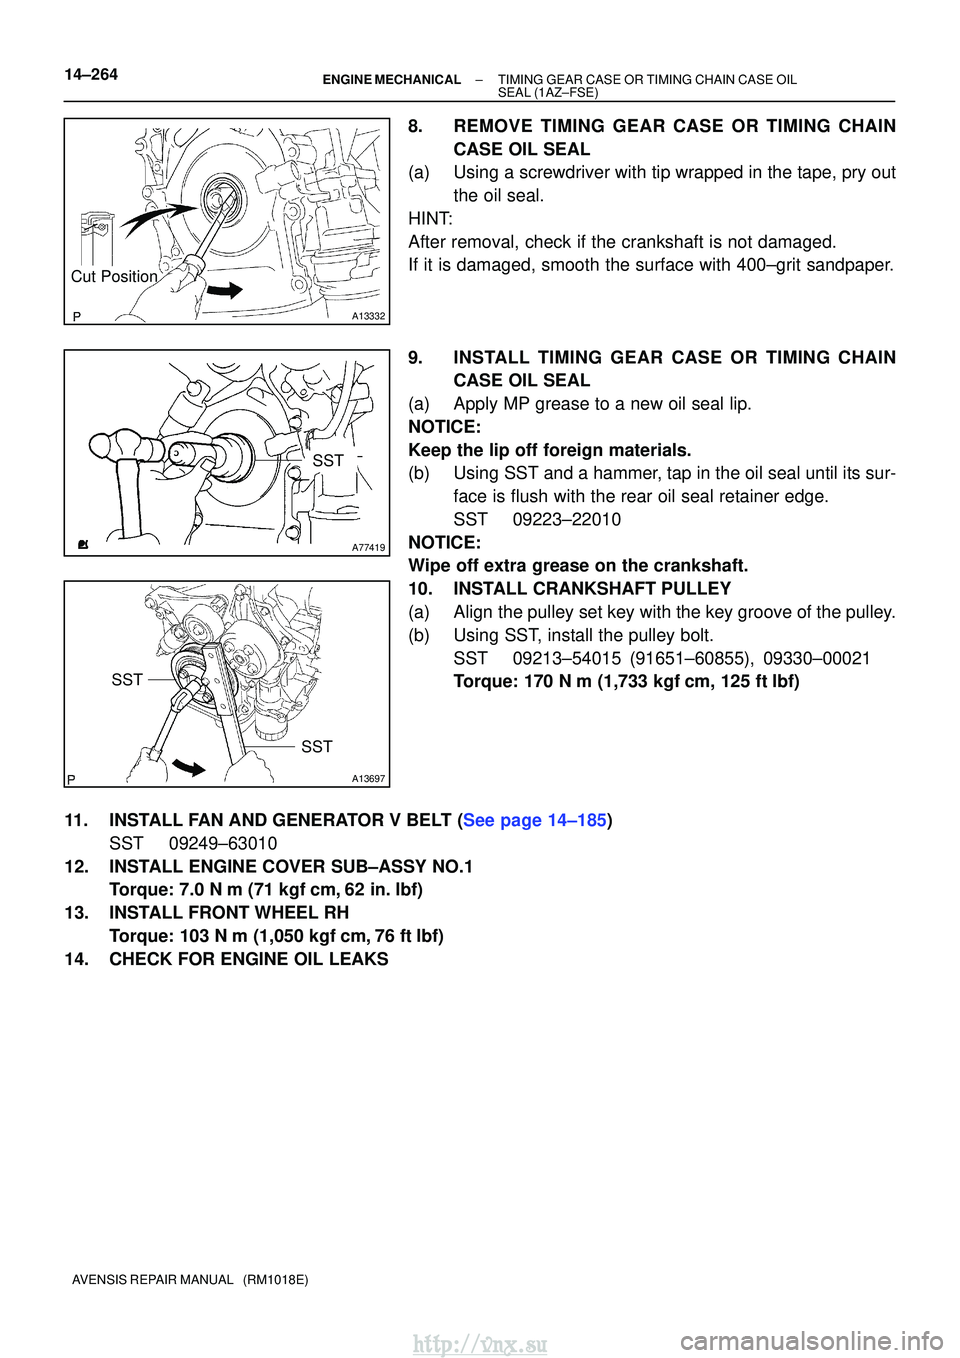
8.REMOVE TIMING GEAR CASE OR TIMING CHAIN CASE OIL SEAL
(a)Using a screwdriver with tip wrapped in the tape, pry out
the oil seal.
HINT:
After removal, check if the crankshaft is not damaged.
If it is damaged, smooth the surface with 400±grit sandpaper.
9.INSTALL TIMING GEAR CASE OR TIMING CHAIN CASE OIL SEAL
(a)Apply MP grease to a new oil seal lip.
NOTICE:
Keep the lip off foreign materials.
(b)Using SST and a hammer, tap in the oil seal until its sur- face is flush with the rear oil seal retainer edge.
SST09223±22010
NOTICE:
Wipe off extra grease on the crankshaft.
10.INSTALL CRANKSHAFT PULLEY
(a)Align the pulley set key with the key groove of the pulley.
(b)Using SST, install the pulley bolt. SST09213±54015 (91651±60855), 09330±00021
Torque: 170 N�m (1,733 kgf�cm, 125 ft�lbf)
11.INSTALL FAN AND GENERATOR V BELT (See page 14±185) SST 09249±63010
12. INSTALL ENGINE COVER SUB±ASSY NO.1 Torque: 7.0 N �m (71 kgf �cm, 62 in. �lbf)
13. INSTALL FRONT WHEEL RH Torque: 103 N� m (1,050 kgf�cm, 76 ft �lbf)
14. CHECK FOR ENGINE OIL LEAKS
http://vnx.su