Page 422 of 2234
1203V±03
B08075
12±16
±
EMISSION CONTROL EMISSION CONTROL SYSTEM (1CD±FTV)
AVENSIS REPAIR MANUAL (RM1018E)
EMISSION CONTROL SYSTEM (1CD±FTV)
ON±VEHICLE INSPECTION
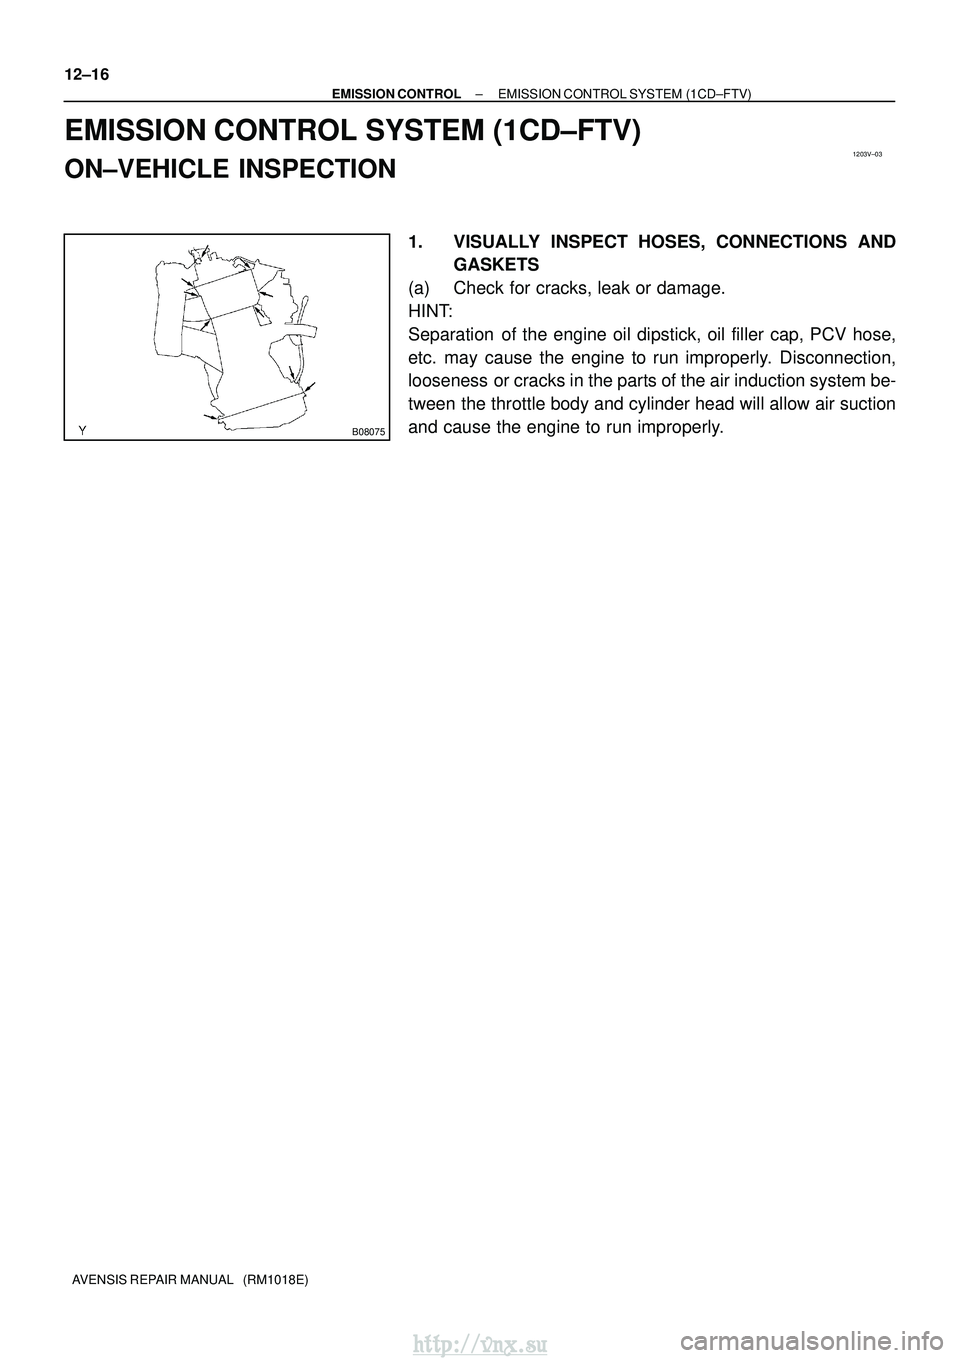
1. VISUALLY INSPECT HOSES, CONNECTIONS AND GASKETS
(a) Check for cracks, leak or damage.
HINT:
Separation of the engine oil dipstick, oil filler cap, PCV hose,
etc. may cause the engine to run improperly. Disconnection,
looseness or cracks in the parts of the air induction system be-
tween the throttle body and cylinder head will allow air suction
and cause the engine to run improperly.
http://vnx.su
Page 427 of 2234
A62836
1ZZ±FE3ZZ±FE
12±2
±
EMISSION CONTROL EMISSION CONTROL SYSTEM (1ZZ±FE/3ZZ±FE)
AVENSIS REPAIR MANUAL (RM1018E)
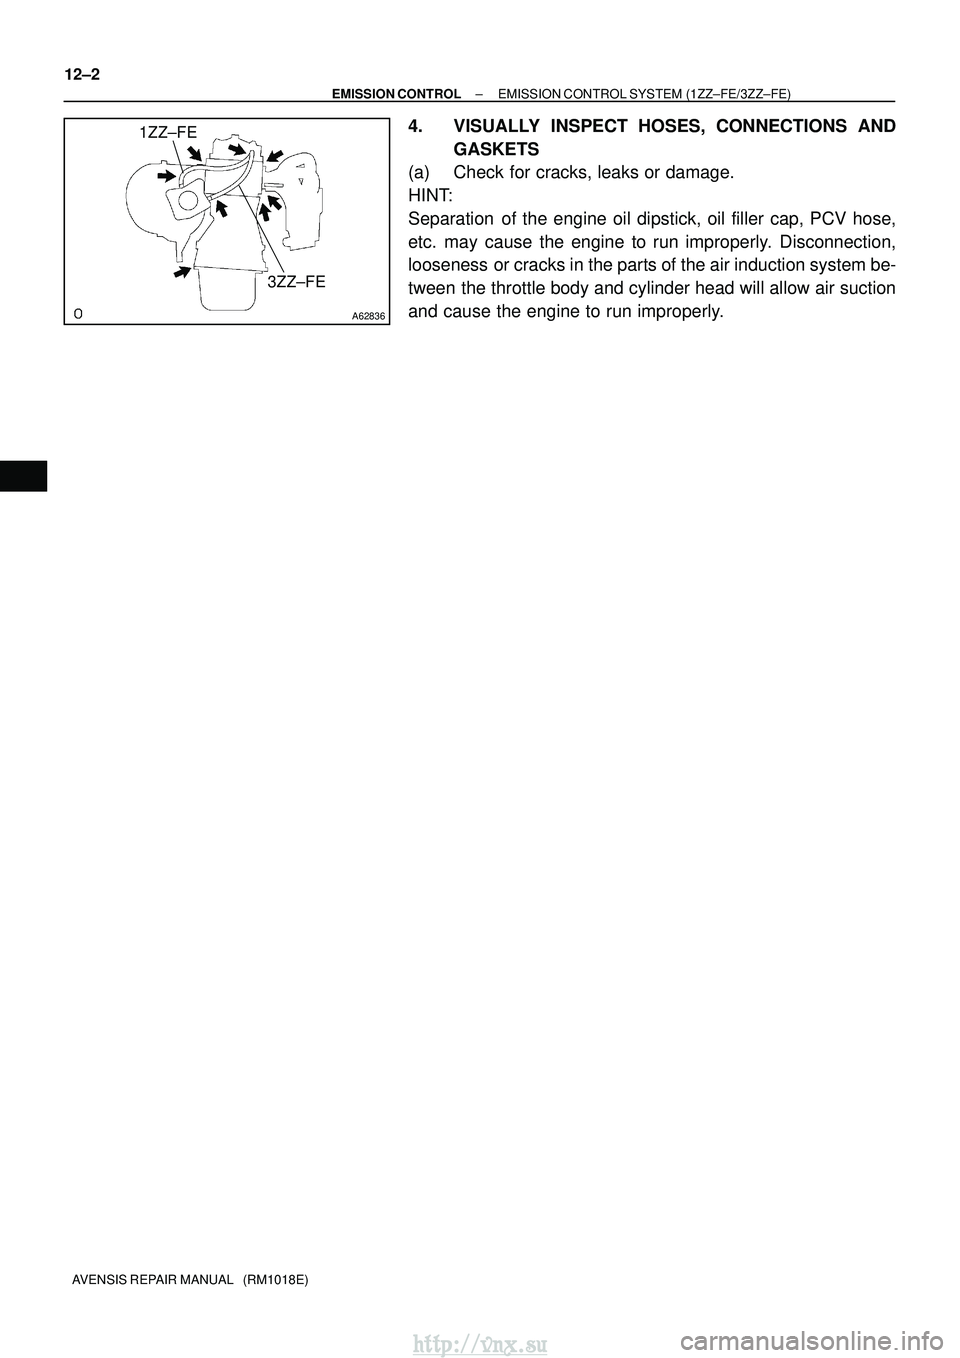
4. VISUALLY INSPECT HOSES, CONNECTIONS AND GASKETS
(a) Check for cracks, leaks or damage.
HINT:
Separation of the engine oil dipstick, oil filler cap, PCV hose,
etc. may cause the engine to run improperly. Disconnection,
looseness or cracks in the parts of the air induction system be-
tween the throttle body and cylinder head will allow air suction
and cause the engine to run improperly.
http://vnx.su
Page 908 of 2234
1700F±09
A56466
Recommended Viscosity (SAE)
BEFORE NEXT OIL CHANGE TEMPERATURE RANGE ANTICiPATED416 2738
0 20 40 60 80 100
±29
±20 ±18 ±7
� C
� F 20 W ± 50
15 W ± 40
10 W ± 30
5 W ± 30 PREFERRED
Oil Pressure Switch
B11410
Oil Pressure Switch
Oil Pressure Gauge
B11411
Oil Pressure Gauge
17±6
±
LUBRICATION LUBRICATION SYSTEM (1AZ±FE)
AVENSIS REPAIR MANUAL (RM1018E)
LUBRICATION SYSTEM (1AZ±FE)
ON±VEHICLE INSPECTION
1. CHECK ENGINE OIL LEVEL
(a) After warm up the engine and then 5 minutes after the engine stop, oil l\
evel should be between the low level and full level marks of the dipstick.
If low, check for leakage and add oil up to the full level mark.
NOTICE:
Do not fill with engine oil above the full level mark.
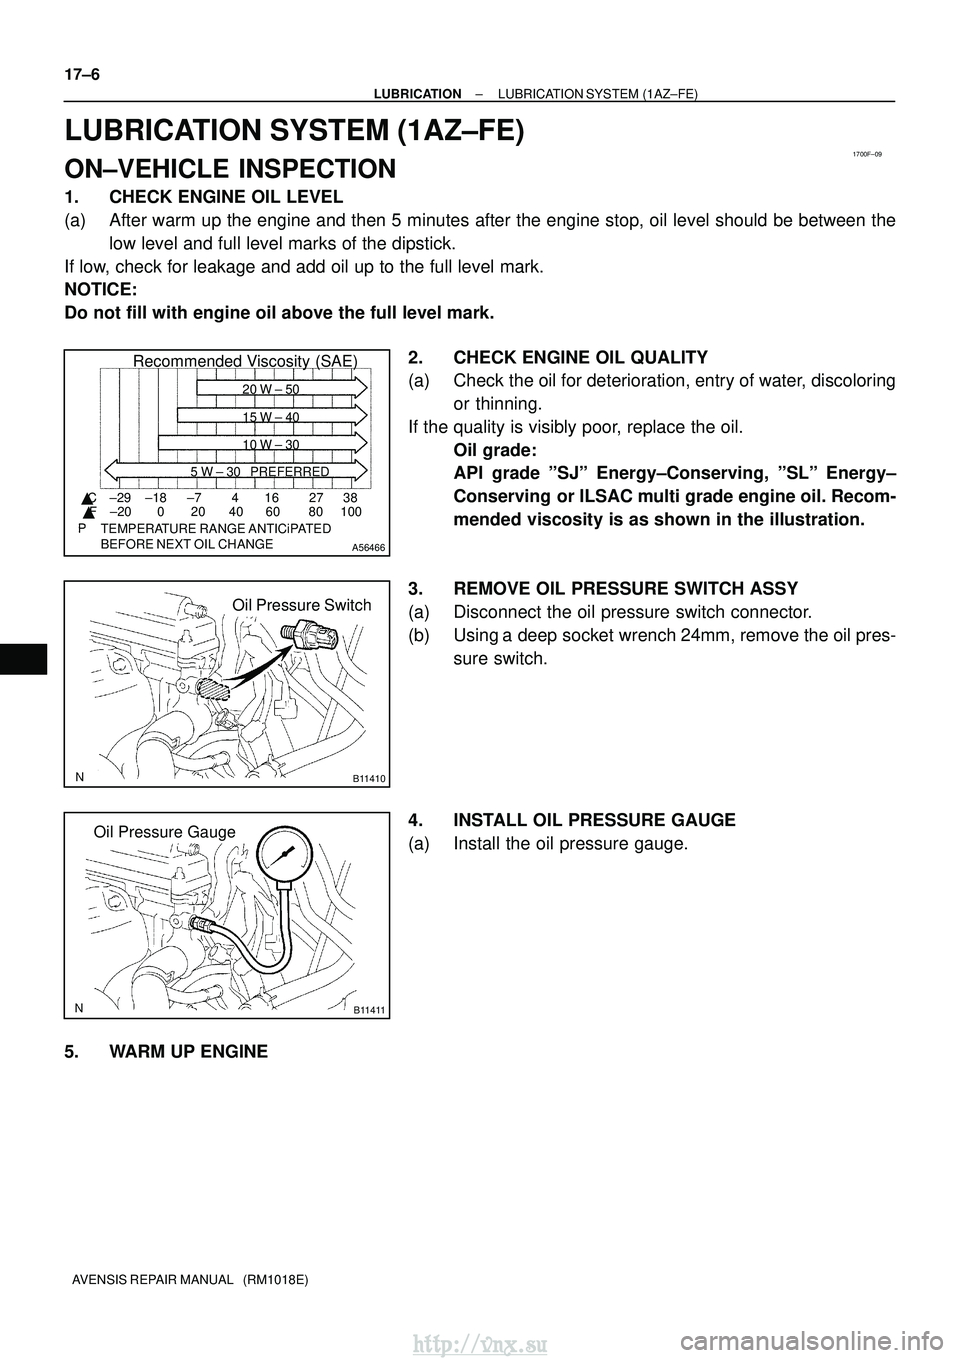
2. CHECK ENGINE OIL QUALITY
(a) Check the oil for deterioration, entry of water, discoloringor thinning.
If the quality is visibly poor, replace the oil. Oil grade:
API grade ºSJº Energy±Conserving, ºSLº Energy±
Conserving or ILSAC multi grade engine oil. Recom-
mended viscosity is as shown in the illustration.
3. REMOVE OIL PRESSURE SWITCH ASSY
(a) Disconnect the oil pressure switch connector.
(b) Using a deep socket wrench 24mm, remove the oil pres- sure switch.
4. INSTALL OIL PRESSURE GAUGE
(a) Install the oil pressure gauge.
5. WARM UP ENGINE
http://vnx.su
Page 910 of 2234
1700E±07
A56466
Recommended Viscosity (SAE)
BEFORE NEXT OIL CHANGE TEMPERATURE RANGE ANTICiPATED416 2738
0 20 40 60 80 100
±29
±20 ±18 ±7
� C
� F 20 W ± 50
15 W ± 40
10 W ± 30
5 W ± 30 PREFERRED
B67536
B67537Oil Pressure Gauge
±
LUBRICATION LUBRICATION SYSTEM (1AZ±FSE)
17±13
AVENSIS REPAIR MANUAL (RM1018E)
LUBRICATION SYSTEM (1AZ±FSE)
ON±VEHICLE INSPECTION
1. CHECK ENGINE OIL LEVEL
(a) After warm up the engine and then 5 minutes after the engine stop, oil l\
evel should be between the
low level and full level marks of the dipstick.
If low, check for leakage and add oil up to the full level mark.
NOTICE:
Do not fill with engine oil above the full level mark.
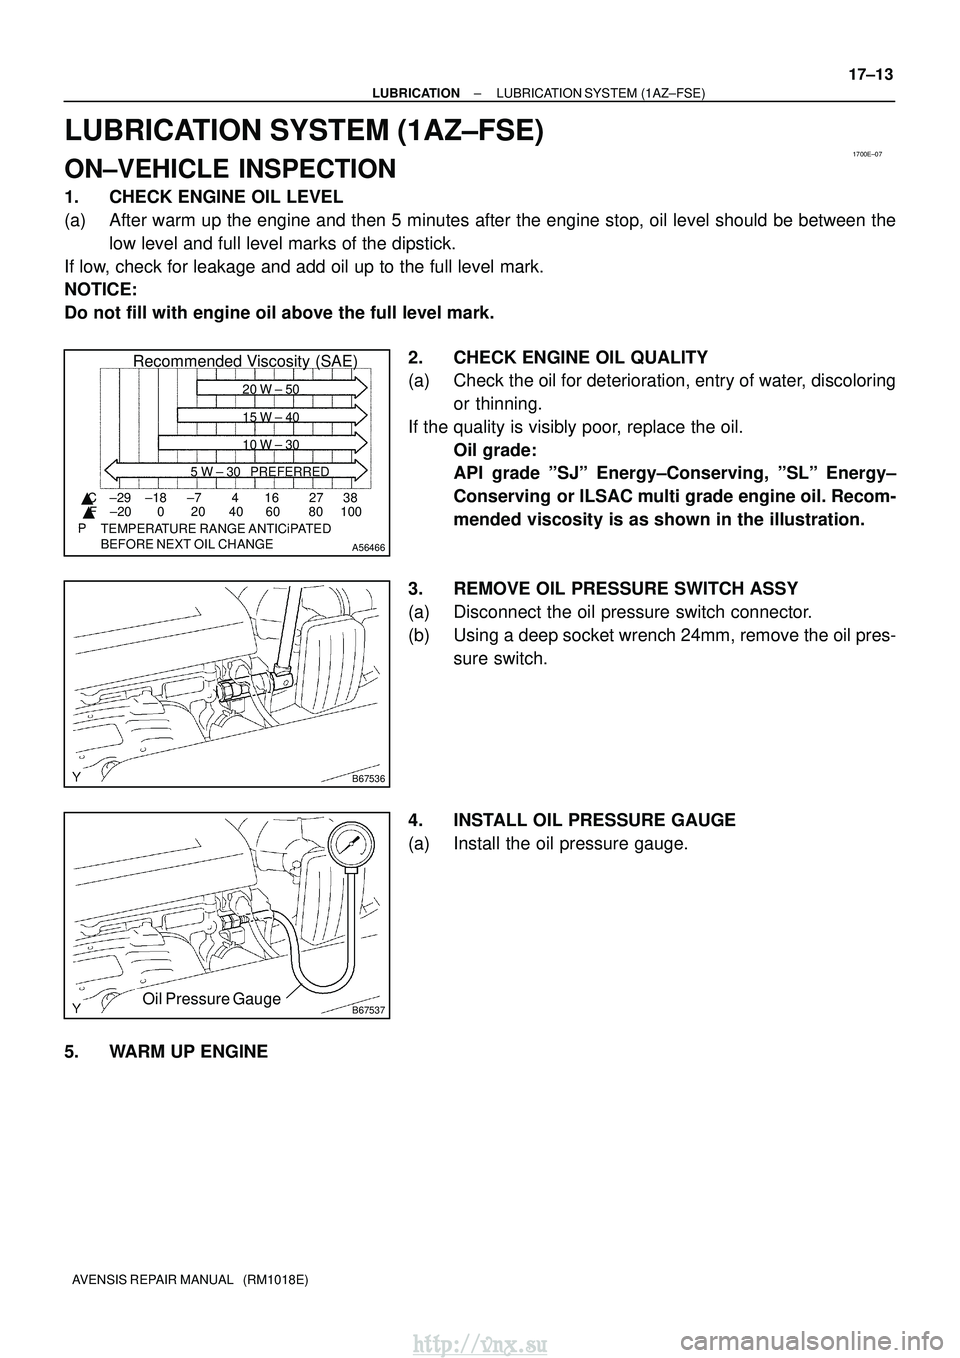
2. CHECK ENGINE OIL QUALITY
(a) Check the oil for deterioration, entry of water, discoloringor thinning.
If the quality is visibly poor, replace the oil. Oil grade:
API grade ºSJº Energy±Conserving, ºSLº Energy±
Conserving or ILSAC multi grade engine oil. Recom-
mended viscosity is as shown in the illustration.
3. REMOVE OIL PRESSURE SWITCH ASSY
(a) Disconnect the oil pressure switch connector.
(b) Using a deep socket wrench 24mm, remove the oil pres- sure switch.
4. INSTALL OIL PRESSURE GAUGE
(a) Install the oil pressure gauge.
5. WARM UP ENGINE
http://vnx.su
Page 912 of 2234
17045±03
A56466
Recommended Viscosity (SAE)
BEFORE NEXT OIL CHANGE TEMPERATURE RANGE ANTICiPATED416 2738
0 20 40 60 80 100
±29
±20 ±18 ±7
� C
� F 20 W ± 50
15 W ± 40
10 W ± 30
5 W ± 30 PREFERRED
B14332
Oil Pressure Switch
B14333
Oil Pressure Gauge
17±20
±
LUBRICATION LUBRICATION SYSTEM (1CD±FTV)
AVENSIS REPAIR MANUAL (RM1018E)
LUBRICATION SYSTEM (1CD±FTV)
ON±VEHICLE INSPECTION
1. CHECK ENGINE OIL LEVEL
(a) After warm up the engine and then 5 minutes after the engine stop, oil l\
evel should be between the low level and full level marks of the dipstick.
If low, check for leakage and add oil up to the full level mark.
NOTICE:
Do not fill with engine oil above the full level mark.
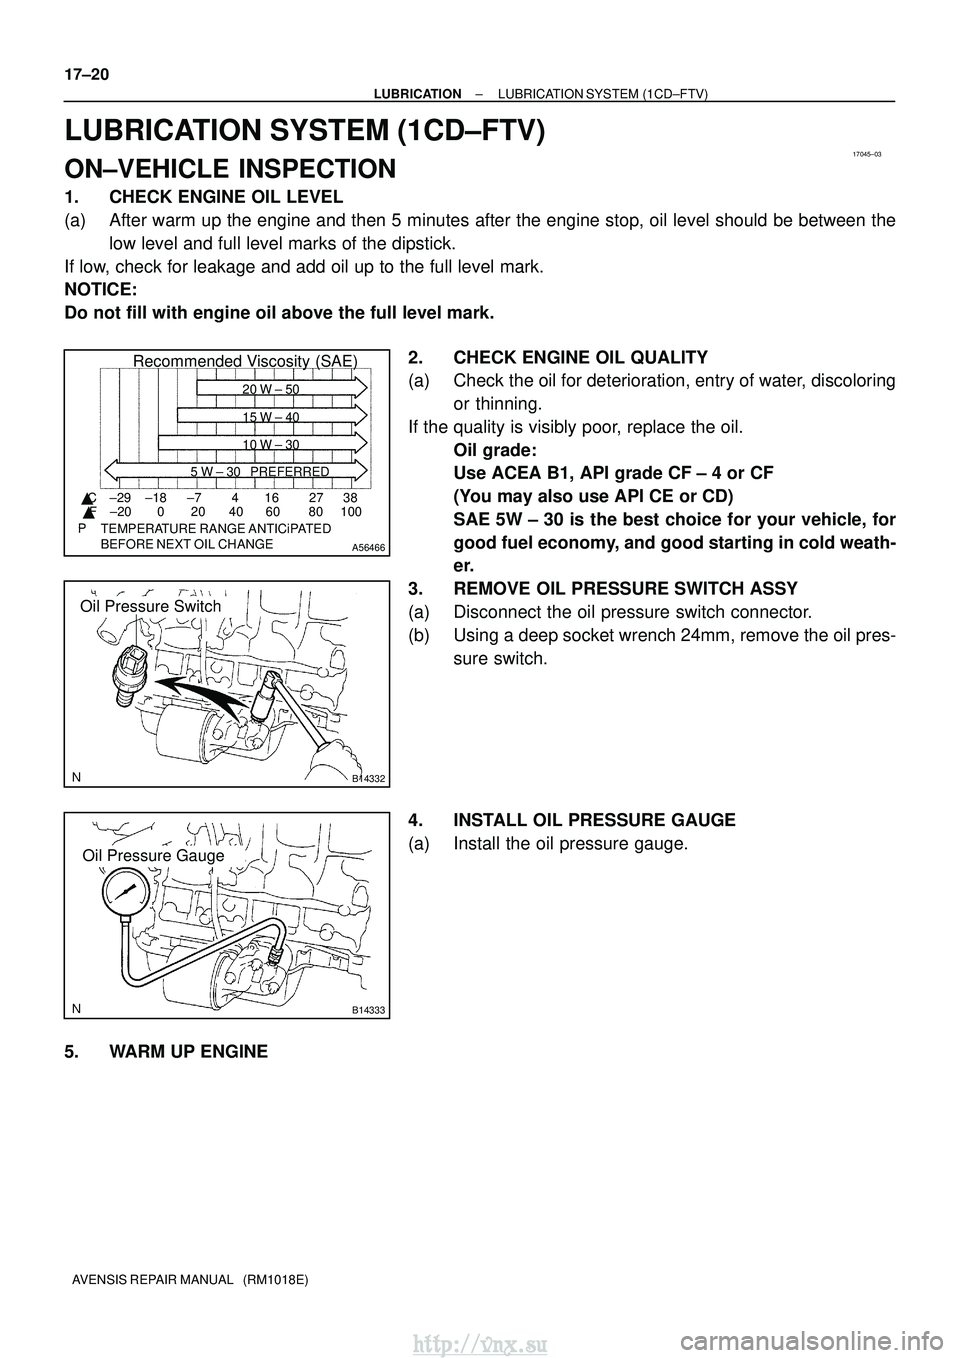
2. CHECK ENGINE OIL QUALITY
(a) Check the oil for deterioration, entry of water, discoloringor thinning.
If the quality is visibly poor, replace the oil. Oil grade:
Use ACEA B1, API grade CF ± 4 or CF
(You may also use API CE or CD)
SAE 5W ± 30 is the best choice for your vehicle, for
good fuel economy, and good starting in cold weath-
er.
3. REMOVE OIL PRESSURE SWITCH ASSY
(a) Disconnect the oil pressure switch connector.
(b) Using a deep socket wrench 24mm, remove the oil pres- sure switch.
4. INSTALL OIL PRESSURE GAUGE
(a) Install the oil pressure gauge.
5. WARM UP ENGINE
http://vnx.su
Page 914 of 2234
1700F±10
A56466
Recommended Viscosity (SAE)
BEFORE NEXT OIL CHANGE TEMPERATURE RANGE ANTICiPATED416 2738
0 20 40 60 80 100
±29
±20 ±18 ±7
� C
� F 20 W ± 50
15 W ± 40
10 W ± 30
5 W ± 30 PREFERRED
Oil Pressure
Switch
A80004
Oil Pressure GaugeOil Pressure Gauge
A50711
±
LUBRICATION LUBRICATION SYSTEM (1ZZ±FE/3ZZ±FE)
17±1
AVENSIS REPAIR MANUAL (RM1018E)
LUBRICATION SYSTEM (1ZZ±FE/3ZZ±FE)
ON±VEHICLE INSPECTION
1. CHECK ENGINE OIL LEVEL
(a) After warm up the engine and then 5 minutes after the engine stop, oil l\
evel should be between the
low level and full level marks of the dipstick.
If low, check for leakage and add oil up to the full level mark.
NOTICE:
Do not fill with engine oil above the full level mark.
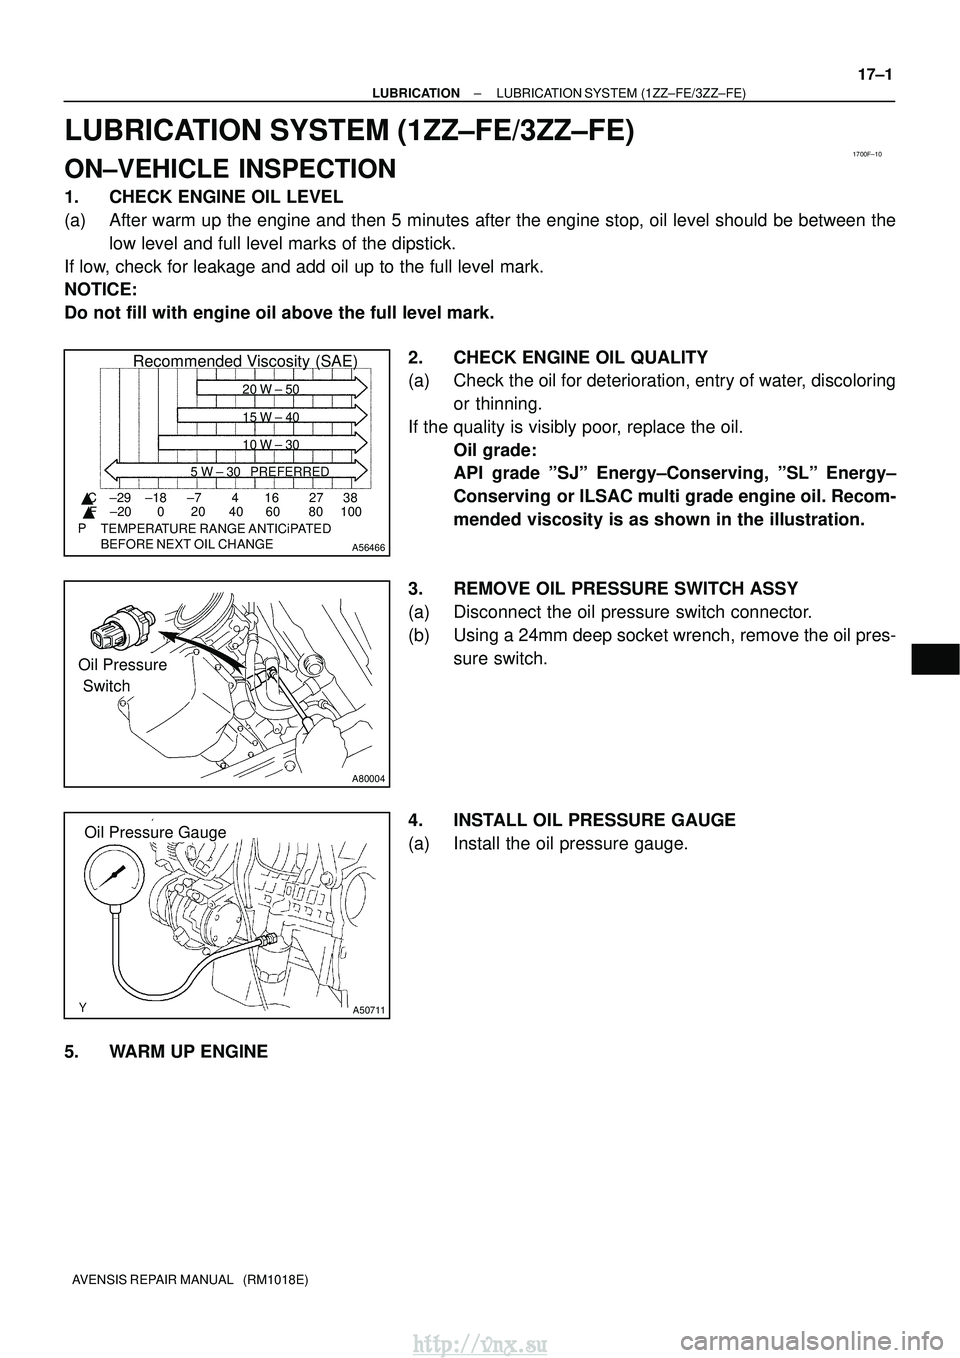
2. CHECK ENGINE OIL QUALITY
(a) Check the oil for deterioration, entry of water, discoloringor thinning.
If the quality is visibly poor, replace the oil. Oil grade:
API grade ºSJº Energy±Conserving, ºSLº Energy±
Conserving or ILSAC multi grade engine oil. Recom-
mended viscosity is as shown in the illustration.
3. REMOVE OIL PRESSURE SWITCH ASSY
(a) Disconnect the oil pressure switch connector.
(b) Using a 24mm deep socket wrench, remove the oil pres- sure switch.
4. INSTALL OIL PRESSURE GAUGE
(a) Install the oil pressure gauge.
5. WARM UP ENGINE
http://vnx.su