Page 1065 of 1574
TRANSFER CASE (PART TIME 4408) 5D1-13
7. Remove the center mounting nuts and end sides mountingbolts of the cross member and then remove the cross
member. Installation Notice
Tightening Torque(1)
Tightening Torque(2) 21 - 35 Nm62 - 93 Nm
8. Remove the transfer case by removing the bolts attaching
the transfer case to the transmission. Installation Notice Notice Apply long-term grease to the inner spline of the transfer case input shaft.
9. Installation should follow the removal procedure in the reverse order.
Tightening Torque 38 - 51 Nm
Page 1080 of 1574
5D1-28 TRANSFER CASE (PART TIME 4408)
6. Install the planet carrier assembly onto the input shaftand install the thrust washer. Press the bearing over input shaft.
7. After pressing the bearing, install the retaining ring.
8. Press the pin into the front adapter.
9. Slowly press the oil seal into the front adapter.
10. Install the front adapter assembly. Notice
After installation, make sure that snap ring is correctly installed into the groove.
11. Position the input shaft assembly over front cover and engage into the bearing groove by expanding the ends ofsnap ring.
12. Apply 1.6mm bead of sealant on the mounting face for the transfer case and tighten the 6 bolts.
13. Install the breather.
75 Snap Ring
76 Oil Seal
77 Spiral Pin
78 Front Adapter
82 Sleeve Bearing
8 3 Needle Bearing
8 4 Input Shaft
Item
6 Bolts
Breather Tightening Torque
28 - 48 Nm8 - 20 Nm
Page 1082 of 1574

5D1-30 TRANSFER CASE (PART TIME 4408)
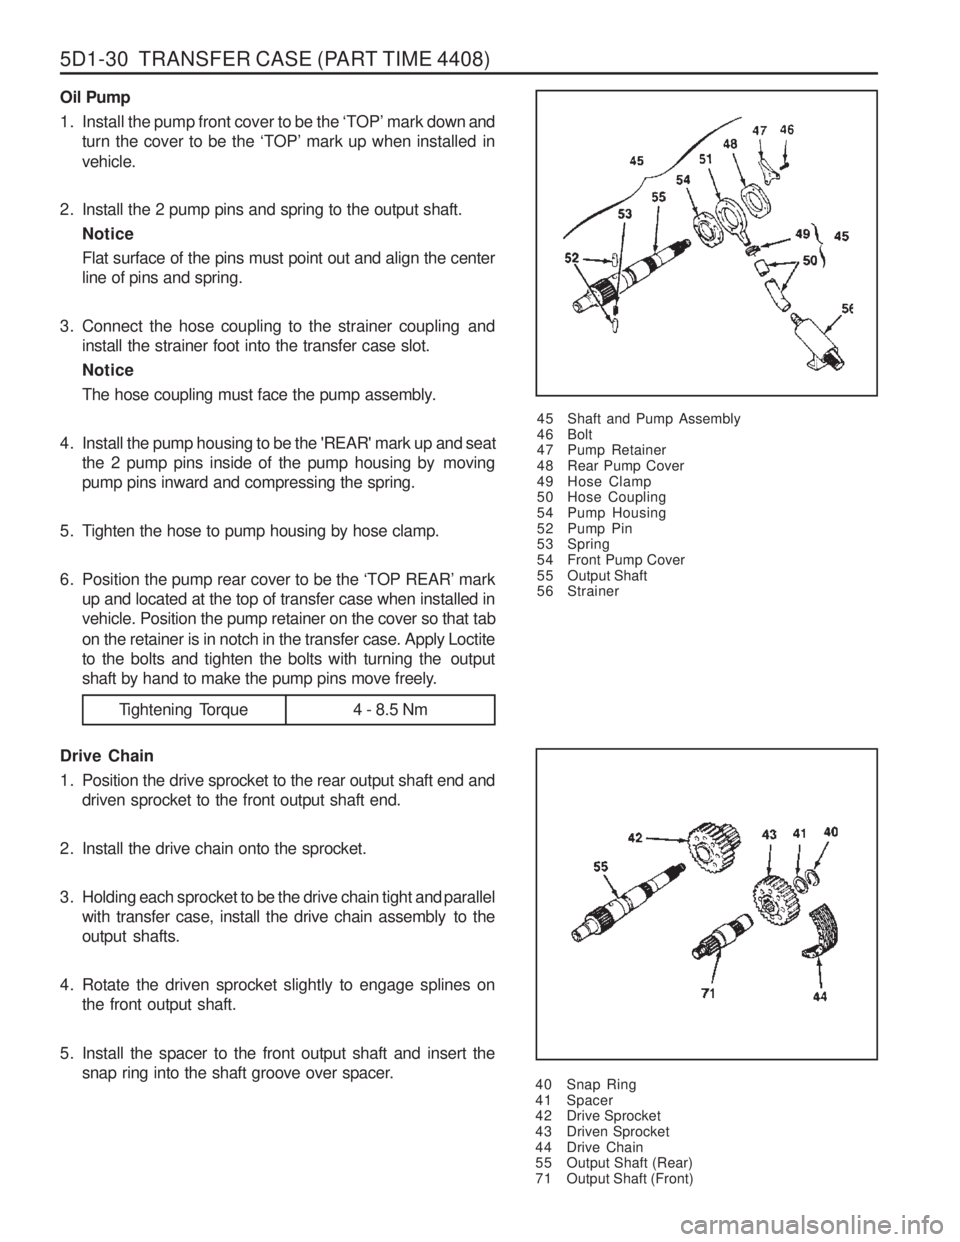
Oil Pump
1. Install the pump front cover to be the ‘TOP ’ mark down and
turn the cover to be the ‘TOP ’ mark up when installed in
vehicle.
2. Install the 2 pump pins and spring to the output shaft. NoticeFlat surface of the pins must point out and align the center
line of pins and spring.
3. Connect the hose coupling to the strainer coupling and install the strainer foot into the transfer case slot. Notice
The hose coupling must face the pump assembly.
4. Install the pump housing to be the 'REAR' mark up and seat the 2 pump pins inside of the pump housing by moving pump pins inward and compressing the spring.
5. Tighten the hose to pump housing by hose clamp.
6. Position the pump rear cover to be the ‘TOP REAR ’ mark
up and located at the top of transfer case when installed in
vehicle. Position the pump retainer on the cover so that tab
on the retainer is in notch in the transfer case. Apply Loctite
to the bolts and tighten the bolts with turning the output
shaft by hand to make the pump pins move freely. 45 Shaft and Pump Assembly
46 Bolt
47 Pump Retainer
48 Rear Pump Cover
49 Hose Clamp
50 Hose Coupling
54 Pump Housing
52 Pump Pin
53 Spring
54 Front Pump Cover
55 Output Shaft
56 Strainer
40 Snap Ring
41 Spacer
42 Drive Sprocket
43 Driven Sprocket
44 Drive Chain
55 Output Shaft (Rear)
71 Output Shaft (Front)
Drive Chain
1. Position the drive sprocket to the rear output shaft end and
driven sprocket to the front output shaft end.
2. Install the drive chain onto the sprocket.
3. Holding each sprocket to be the drive chain tight and parallel with transfer case, install the drive chain assembly to the output shafts.
4. Rotate the driven sprocket slightly to engage splines on the front output shaft.
5. Install the spacer to the front output shaft and insert the snap ring into the shaft groove over spacer.
Tightening Torque 4 - 8.5 Nm
Page 1084 of 1574
5D1-32 TRANSFER CASE (PART TIME 4408)
Cover
1. Position the cover to be the open end up on the work table.
2. Position the end of needle bearing to be identification markup and press into the cover until upper end of bearing is
40.47 - 40.97mm below cover face that contacts with transfer case.
3. Press the ball bearing into the cover and install the snap ring .
4. Install remaining parts as follows. � Install the 4 O-rings on the stud bolts of the clutch coil
assembly.
� Install the clutch coil assembly inside the cover and
tighten 3 nuts.
18 Oil Seal
19 Bushing
20 Nut
21 Clutch Coil Assembly
22 Snap Ring
23 Ball Bearing
24 Needle Bearing
2 5 Cover
Tightening Torque 8 - 11 Nm
� Install the bearing and motor bearing into the cover.
Page 1085 of 1574

TRANSFER CASE (PART TIME 4408) 5D1-33
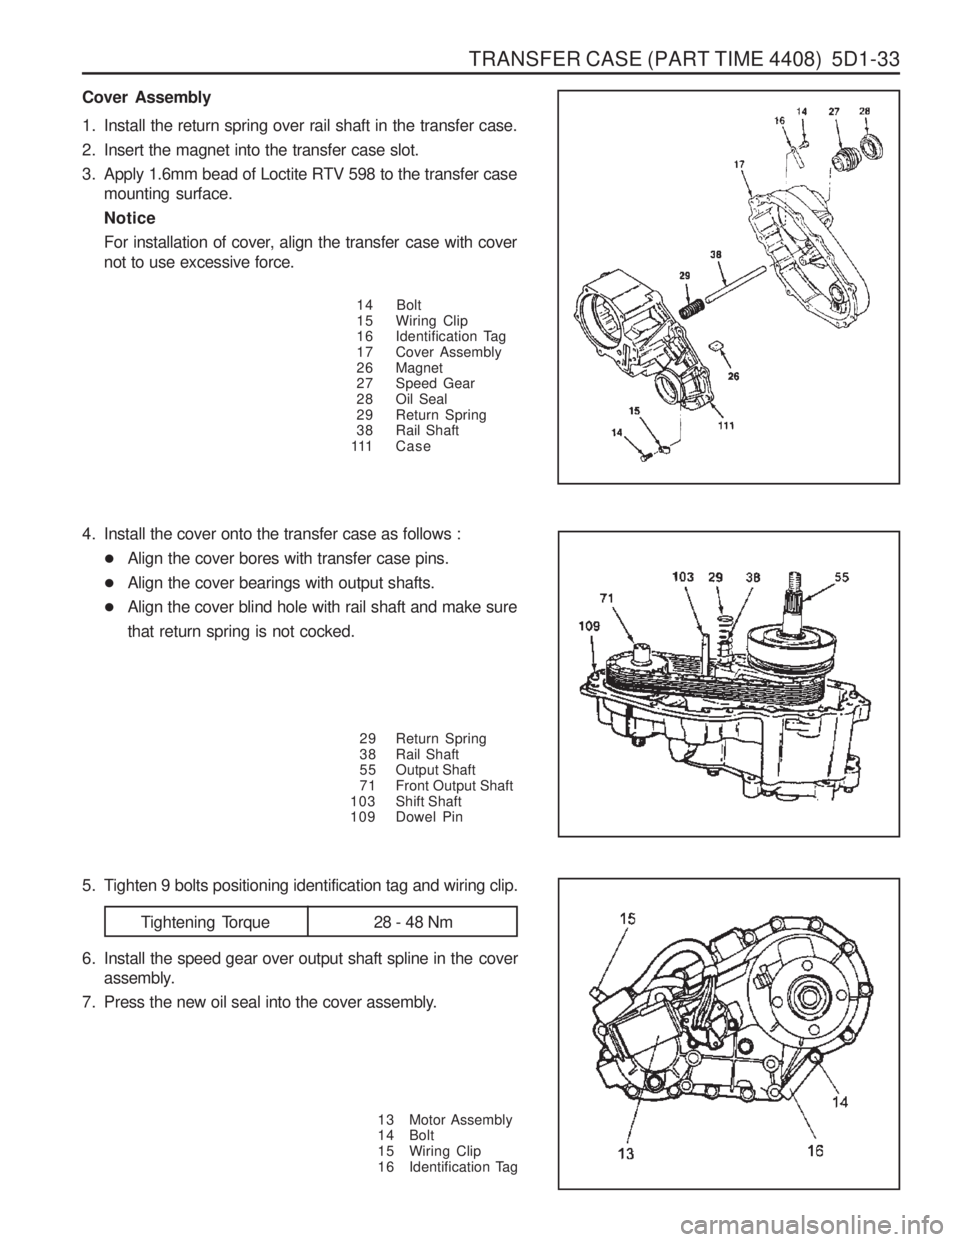
4. Install the cover onto the transfer case as follows :� Align the cover bores with transfer case pins.
� Align the cover bearings with output shafts.
� Align the cover blind hole with rail shaft and make sure that return spring is not cocked.
29 Return Spring
38 Rail Shaft
55 Output Shaft
71 Front Output Shaft
103 Shift Shaft
109 Dowel Pin
Cover Assembly
14 Bolt
15 Wiring Clip
16 Identification Tag
17 Cover Assembly
2 6 Magnet
27 Speed Gear
28 Oil Seal
29 Return Spring
38 Rail Shaft
111 Case
1. Install the return spring over rail shaft in the transfer case.
2. Insert the magnet into the transfer case slot.
3. Apply 1.6mm bead of Loctite RTV 598 to the transfer case
mounting surface.Notice
For installation of cover, align the transfer case with cover not to use excessive force.
13 Motor Assembly
14 Bolt
15 Wiring Clip
16 Identification Tag
5. Tighten 9 bolts positioning identification tag and wiring clip.
6. Install the speed gear over output shaft spline in the cover
assembly.
7. Press the new oil seal into the cover assembly.
Tightening Torque 28 - 48 Nm
Page 1086 of 1574
5D1-34 TRANSFER CASE (PART TIME 4408)
External Electric Shift
1. Align the motor with shift shaft and position the motorassembly onto the cover.
2. Install the motor to the shift shaft and contact cover androtate the motor clockwise direction to check correctengagement.
6 Bolt
7 Washer
8 Bolt
9 Sensor and Harness Bracket
10 Sensor Assembly
14 Speed Sensor
12 O-ring
13 Motor Assembly
2 5 Cover
13 Motor Assembly
103 Shift Shaft
3. Insert the 0-ring on the speed sensor speed sensor
assembly to the cover.
4. Install the bracket to the motor assembly and tighten 3bolts.
Tightening Torque 8 -11 Nm
Page 1087 of 1574
TRANSFER CASE (PART TIME 4408) 5D1-35
Companion Flange
1. Install the 2 plugs to the cover.
2. Install the companion flange, oil seal and washer.
3. Holding the companion flange, tighten the nut.1 Nut
2 Washer
3 Oil Seal
4 Companion Flange
5 Plug
2 5 Cover
Notice Apply Loctite 262 to nut before installation.
Tightening Torque 346 - 380 Nm
Page 1090 of 1574

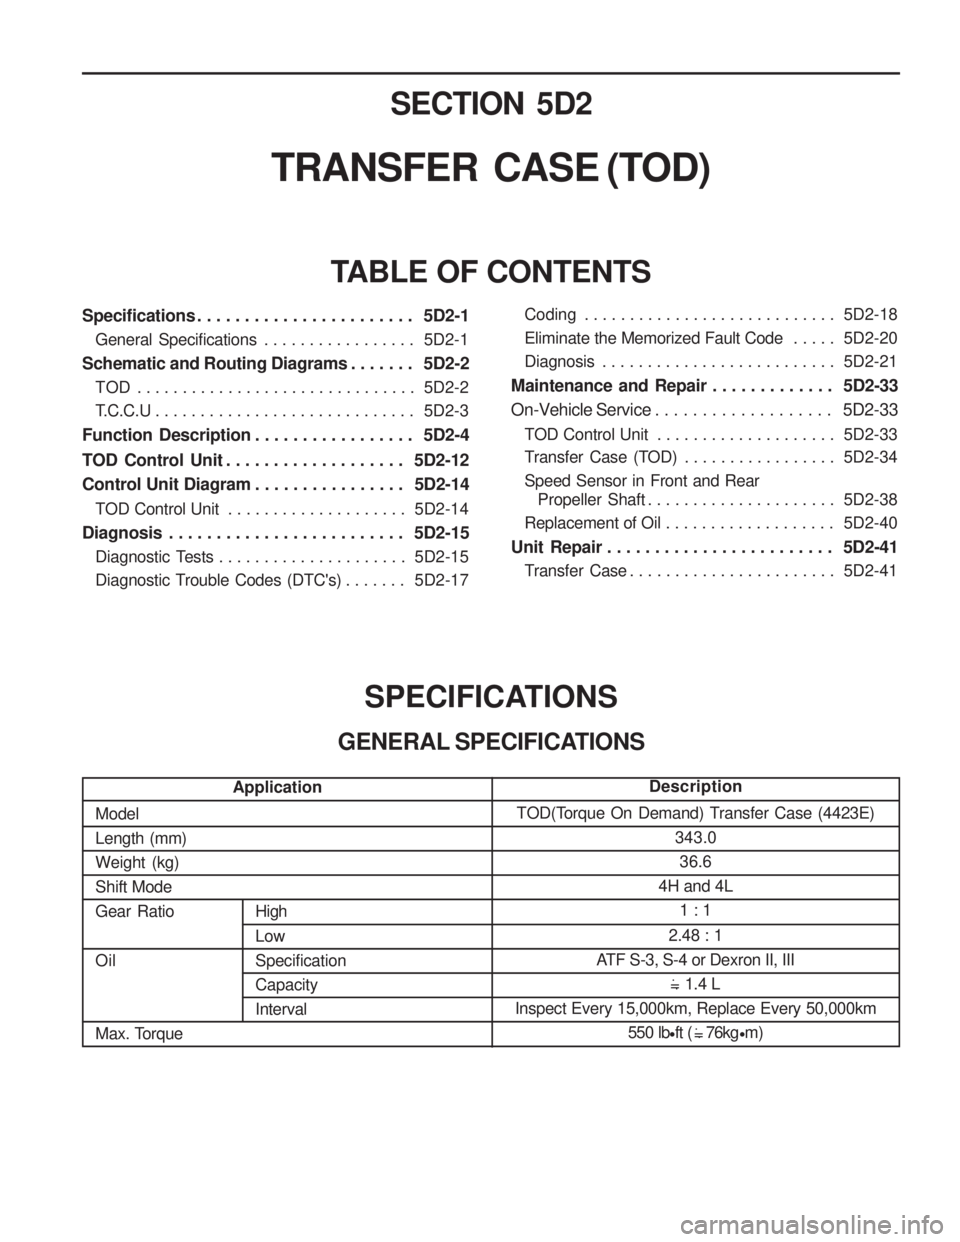
SECTION 5D2
TRANSFER CASE (TOD)
Specifications . . . . . . . . . . . . . . . . . . . . . . . 5D2-1General Specifications . . . . . . . . . . . . . . . . . 5D2-1
Schematic and Routing Diagrams . . . . . . . 5D2-2 TOD . . . . . . . . . . . . . . . . . . . . . . . . . . . . . . . 5D2-2
T.C.C.U . . . . . . . . . . . . . . . . . . . . . . . . . . . . . 5D2-3
Function Description . . . . . . . . . . . . . . . . . 5D2-4
TOD Control Unit . . . . . . . . . . . . . . . . . . . 5D2-12
Control Unit Diagram . . . . . . . . . . . . . . . . 5D2-14
TOD Control Unit . . . . . . . . . . . . . . . . . . . . 5D2-14
Diagnosis . . . . . . . . . . . . . . . . . . . . . . . . . 5D2-15 Diagnostic Tests . . . . . . . . . . . . . . . . . . . . . 5D2-15
Diagnostic Trouble Codes (DTC's) . . . . . . . 5D2-17
TABLE OF CONTENTS
SPECIFICATIONS
GENERAL SPECIFICATIONS
ModelLength (mm)Weight (kg)Shift ModeGear Ratio Oil
Max. Torque
High Low SpecificationCapacityInterval TOD(Torque On Demand) Transfer Case (4423E)
343.036.6
4H and 4L
1 : 1
2.48 : 1
ATF S-3, S-4 or Dexron II, III 1.4 L
Inspect Every 15,000km, Replace Every 50,000km 550 lbft ( 76kg m)
.
= .
.
= .
Application Description
Coding . . . . . . . . . . . . . . . . . . . . . . . . . . . . 5D2-18
Eliminate the Memorized Fault Code . . . . .
5D2-20
Diagnosis . . . . . . . . . . . . . . . . . . . . . . . . . . 5D2-21
Maintenance and Repair . . . . . . . . . . . . . 5D2-33
On-Vehicle Service . . . . . . . . . . . . . . . . . . . 5D2-33
TOD Control Unit . . . . . . . . . . . . . . . . . . . . 5D2-33
Transfer Case (TOD) . . . . . . . . . . . . . . . . . 5D2-34
Speed Sensor in Front and Rear Propeller Shaft . . . . . . . . . . . . . . . . . . . . . 5D2-38
Replacement of Oil . . . . . . . . . . . . . . . . . . . 5D2-40
Unit Repair . . . . . . . . . . . . . . . . . . . . . . . . 5D2-41 Transfer Case . . . . . . . . . . . . . . . . . . . . . . . 5D2-41