Page 1005 of 1574
5B-16 MANUAL TRANSMISSION
7. Remove the front and rear propeller shafts from thetransfercase. Installation Notice
Tightening Torque 81 - 89 Nm
70 - 90 NmFront
Rear
8. Support the transmission on an suitable jack. Unscrew the center mounting nuts and each sides
mounting bolts and remove the cross member. Installation Notice
9. Remove the transmission mounting bolts. Installation Notice
Tightening Torque (1)
Tightening Torque (2) 21 - 35 Nm62 - 93 Nm
10. Move the transmission jack backward careful and
disengage the transmission input shaft from the engine. Remove the transmission.
11. Installation should follow the removal procedure in the reverse order.
Tightening Torque 77 - 87 Nm
Page 1012 of 1574
MANUAL TRANSMISSION 5B-23
Assembly Procedure
1. Using a hydraulic press and a supporting tool, press thecounter shaft rear bearing into the case. Be sure that the supporting tool inside of the case should support the counter shaft.
2. Without the shim, install the retainer and counter shaft rear bearing outer race. Tighten the 4 retainer bolts.
3. Place a dial indicator on the case and measure counter shaft end play by moving up and down.
4. Select a shim which is the same thickness as the indicator rearing (up to 0.004 inch) and assemble it.
5. When the end play is correctly adjusted, remove the counter shaft rear bearing retainer and outer race.
6. Using a pin punch and rubber hammer, install the reverse idler shaft, gear and O-ring.
Tightening Torque 20 Nm
Page 1013 of 1574

5B-24 MANUAL TRANSMISSION
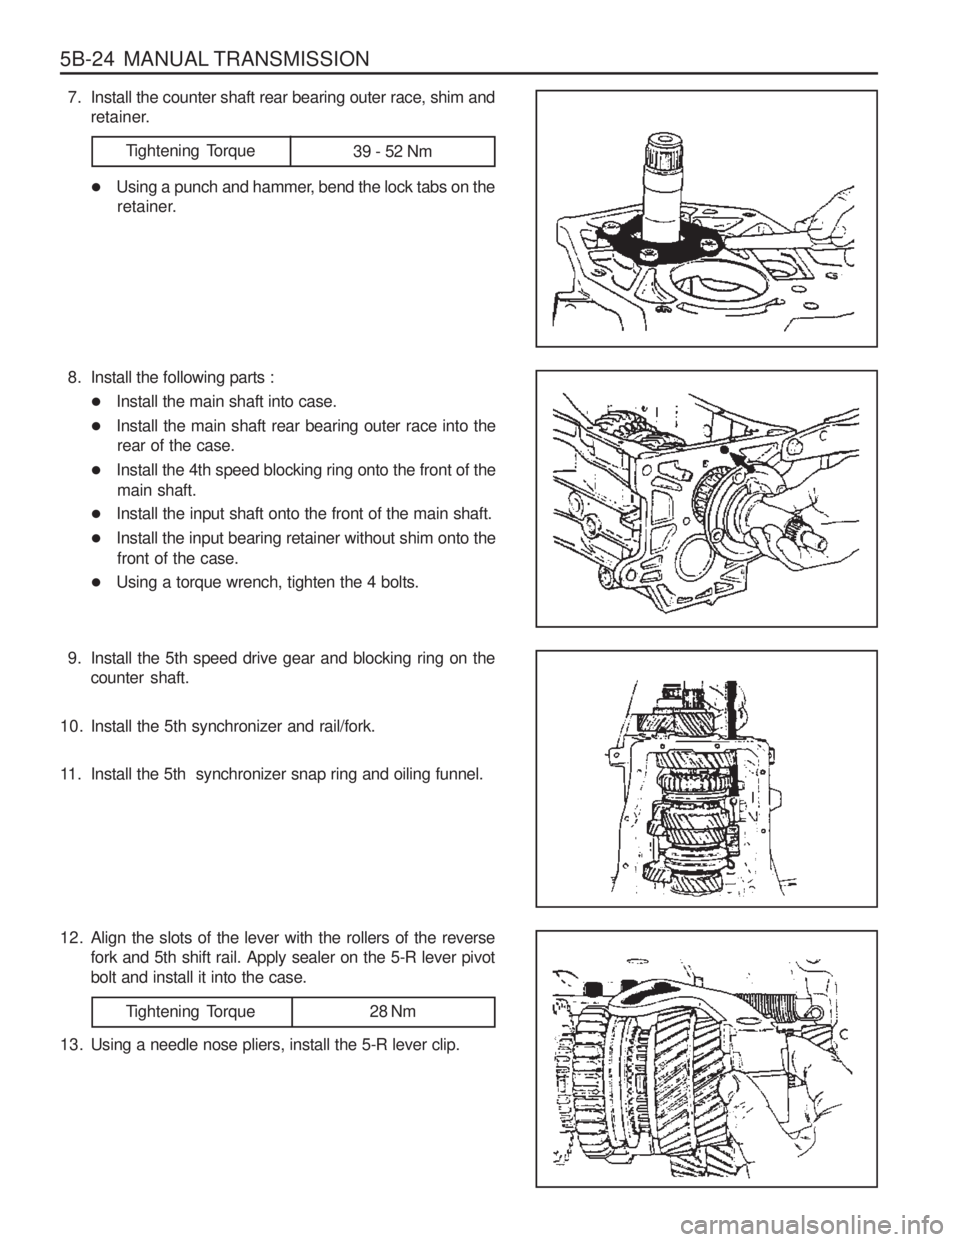
7. Install the counter shaft rear bearing outer race, shim andretainer.
Tightening Torque 39 - 52 Nm
� Using a punch and hammer, bend the lock tabs on the
retainer.
8. Install the following parts : � Install the main shaft into case.
� Install the main shaft rear bearing outer race into the
rear of the case.
� Install the 4th speed blocking ring onto the front of the
main shaft.
� Install the input shaft onto the front of the main shaft.
� Install the input bearing retainer without shim onto the
front of the case.
� Using a torque wrench, tighten the 4 bolts.
9. Install the 5th speed drive gear and blocking ring on the counter shaft.
10. Install the 5th synchronizer and rail/fork.
11. Install the 5th synchronizer snap ring and oiling funnel.
12. Align the slots of the lever with the rollers of the reverse fork and 5th shift rail. Apply sealer on the 5-R lever pivot bolt and install it into the case.
Tightening Torque 28 Nm
13. Using a needle nose pliers, install the 5-R lever clip.
Page 1045 of 1574
5C-10 CLUTCH Removal & Installation Procedure
1. Remove the starter motor. Install the special tool to theflywheel through the starter motor mounting holes.
Tightening Torque 47 Nm
Engine Lock 602 589 00 40 00
2. Unscren the release cylinder mounting bolts and remove the release cylinder. Installation Notice
3. Unscrew the clutch housing bolts and remove the clutch housing, release fork and release bearing.Installation Notice
4. Insert the centering pin into the clutch spline. Loosen the clutch cover bolts 1/2 turn in crisscross sequence until the spring tension is released. Notice
Do not remove the bolts at a time, or clutchcover can be damaged or deformed.
Centering Pin 661 589 00 15 00
Tightening Torque 30 - 40 Nm
Page 1046 of 1574
CLUTCH 5C-11
5. Unscrew the bolts and remove the clutch cover, pressure
plate and clutch disc. NoticeBe careful not to drop the pressure plate and clutch disc.Installation Notice
Tightening Torque 21 - 27 Nm
6. Installation should follow the removal procedure in the reverse order. Notice
� Before installation, clean oil and grease on the flywheel surface.
� Do not clean the clutch disc and release bearing insolvent.
Page 1049 of 1574
5C-14 CLUTCH
Removal & Installation Procedure
1. Draw out the fluid.
2. Pull out the snap pin and clevis pin from the clutch pedalconnection.
3. Remove the clutch tube. Installation Notice
Tightening Torque 15 - 18 Nm
Notice Be careful not the fluid contact a painted surface.
4. Remove the master cylinder mounting nuts and pull off the master cylinder.Installation Notice
Tightening Torque 8 - 18 Nm
5. Check the clutch pedal operation.
6. Bleed the clutch system.
Page 1062 of 1574
5D1-10 TRANSFER CASE (PART TIME 4408)
MAINTENANCE AND REPAIR ON-VEHICLE SERVICE MAINTENANCE OF TRANSFER CASE LUBRICANT Oil Level Check� Clean the oil level plug and surrounding area.
� Remove the oil level plug and check whether oil is drip out or not.
� Tighten the oil level plug.
Oil Change � Clean the oil level plug and surrounding area
� Place a suitable container under the transfer case.
� Remove the oil and tighten the drain plug.
� Fill the oil through the oil level plug until oil begins todrip out.
� Tighten the oil level plug.
Cautions for oil level check and plugs tightening � Do not use an impact wrench to remove or tighten theoil level plug or drain plug since this will damage thethreads in the transfer case.
Tightening Torque 20 - 30 Nm
Page 1064 of 1574
5D1-12 TRANSFER CASE (PART TIME 4408)
Removal & Installation Procedure
1. Disconnect the negative terminal from the battery.
2. Lift up the vehicle and fix it safely.
3. Remove the drain plug and drain the oil.Reinstall the drain plug.
* If planar damper is installed, unscrew 4 bolts and remove the planar damper.
Installation Notice
Tightening Torque 19 - 30 Nm
4. Remove the breather hose.
5. Disconnect the speedometer cable connector and other cable connectors and wiring harnesses.
6. Support the transfer case with jack and remove the front and rear propeller shafts from the transfer case. Installation Notice
Front
Rear 81 - 89 Nm 70 - 80 NmTightening Torque