Page 1949 of 4179

TRANSAXLE ASSEMBLY
MT-17
D
E
F
G
H
I
J
K
L
MA
B
MT
TRANSAXLE ASSEMBLYPFP:32010
Removal and InstallationECS008BX
REMOVAL
1. Remove air cleaner, air duct, and battery. Refer to EM-15, "Removal and Installation" ,EM-133, "Removal
and Installation"
2. Remove air breather hose. Refer to MT-16, "Removal and Installation" .
3. Remove clutch operating cylinder. Refer to CL-10, "
Removal and Installation" .
CAUTION:
Do not depress clutch pedal during removal procedure.
4. Disconnect control cable from transaxle. Refer to MT-15, "
Removal and Installation" .
5. Drain gear oil from transaxle. Refer to MT-11, "
DRAINING" .
6. Disconnect park/neutral position switch, back-up lamp switch, and ground harness connectors.
7. Remove exhaust front tube and the drive shaft. Refer to EX-2, "
Removal and Installation" .
8. Remove transfer. Refer to TF-55, "
Removal and Installation" .
9. Remove starter motor. Refer to SC-25, "
Removal and Installation" .
10. Place a jack onto transaxle.
CAUTION:
When setting jack, be careful not to bring it into contact with switch.
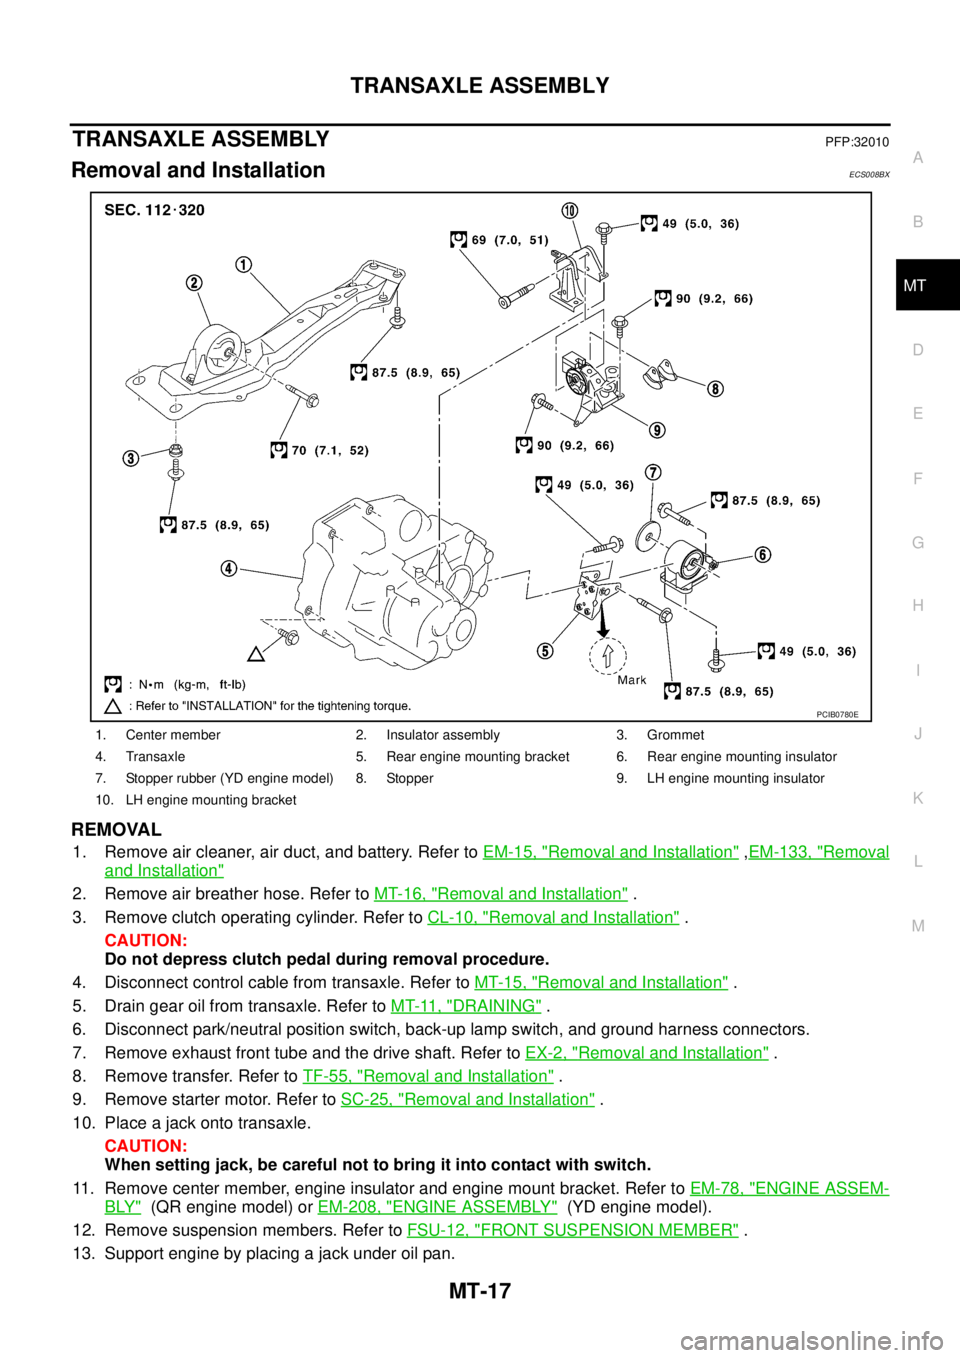
11. Remove center member, engine insulator and engine mount bracket. Refer to EM-78, "
ENGINE ASSEM-
BLY" (QR engine model) or EM-208, "ENGINE ASSEMBLY" (YD engine model).
12. Remove suspension members. Refer to FSU-12, "
FRONT SUSPENSION MEMBER" .
13. Support engine by placing a jack under oil pan.
1. Center member 2. Insulator assembly 3. Grommet
4. Transaxle 5. Rear engine mounting bracket 6. Rear engine mounting insulator
7. Stopper rubber (YD engine model) 8. Stopper 9. LH engine mounting insulator
10. LH engine mounting bracket
PCIB0780E
Page 1950 of 4179
MT-18
TRANSAXLE ASSEMBLY
14. Remove bolts securing transaxle to engine.
15. Remove transaxle from vehicle.
INSTALLATION
Paying attention to the following items, install in the reverse order of removal.
�When installing transaxle to engine, tighten bolts to the specified torque.
CAUTION:
When installing transaxle, be careful not to bring transaxle input shaft into contact with clutch
cover.
QR engine model:
YD engine model:
�After installation, check oil level, and check for leaks and loose
mechanisms. Refer to MT-11, "
Checking M/T Oil" .
MTD0062D
Bolt No. 1 2 3 4 5 6
Quantity 2 1 1 2 2 2
“ ” mm (in)40
(1.57)75
(2.95)45
(1.77)40
(1.57)30
(1.18)40
(1.57)
Tightening torque
N·m (kg - m, ft- lb)74.5
(7.6, 55)42.7
(4.4, 31)35.3
(3.6, 26 )
SCIA0353E
Bolt No. 1 2 3 4 5 6
Quantity 2 2 1 1 3 1
“ ” mm (in)55
(2.17)50
(2.76)120
(4.72)45
(1.77)40
(1.57)35
(1.38)
Tightening torque
N·m (kg - m, ft- lb)44
(4.5, 32)33.5
(3.4, 25)
SCIA0748E
Page 1951 of 4179
TRANSAXLE ASSEMBLY
MT-19
D
E
F
G
H
I
J
K
L
MA
B
MT
Component Parts (RS5F51A)ECS008BY
CASE AND HOUSING COMPONENTS
1. Clutch housing 2. Differential oil seal 3. Ball pin
4. Washer 5. Input shaft oil seal 6. Oil channel
7. Magnet 8. Back-up lamp switch 9. Oil gutter
10. Baffle plate 11. Transaxle case 12. Filler plug
13. Gasket 14. Welch plug 15. Bore plug
16. Drain plug 17. Differential oil seal 18. Park/Neutral position switch
19. Air breather tube
PCIB0781E
Page 1955 of 4179
TRANSAXLE ASSEMBLY
MT-23
D
E
F
G
H
I
J
K
L
MA
B
MT
FINAL DRIVE COMPONENTS
1. Differential side bearing outer race 2. Differential side bearing (clutch
housing side)3. Differential case
4. Final gear 5. Differential side bearing (transaxle
case side)6. Differential side bearing outer race
7. Differential side bearing adjusting
shim8. Side gear 9. Side gear thrust washer
10. Retaining pin 11. Pinion mate thrust washer 12. Pinion mate gear
13. Pinion mate shaft
PCIB0785E
Page 1956 of 4179
MT-24
TRANSAXLE ASSEMBLY
Component Parts (RS6F51A)ECS008BZ
CASE AND HOUSING COMPONENTS
1. Clutch housing 2. Differential oil seal 3. Ball pin
4. Washer 5. Input shaft oil seal 6. Oil channel
7. Magnet 8. Back-up lamp switch 9. Oil gutter
10. Baffle plate 11. Transaxle case 12. Filler plug
13. Gasket 14. Welch plug 15. Bore plug
16. Drain plug 17. Differential oil seal 18. Park/Neutral position switch
19. Air breather tube
PCIB0781E
Page 1960 of 4179
MT-28
TRANSAXLE ASSEMBLY
FINAL DRIVE COMPONENTS
Disassembly and Assembly (RS5F51A)ECS008C0
DISASSEMBLY
1. Remove drain plug and filler plug from transaxle case.
2. Remove park/neutral position switch and back-up lamp switch
from transaxle case.
3. Remove shift check and stopper bolt from transaxle case, and
then remove control assembly from transaxle case.
1. Differential side bearing outer race 2. Differential side bearing (clutch
housing side)3. Differential case
4. Final gear 5. Differential side bearing (transaxle
case side)6. Differential side bearing outer race
7. Differential side bearing adjusting shim 8. Side gear 9. Side gear thrust washer
10. Retaining pin 11. Pinion mate thrust washer 12. Pinion mate gear
13. Pinion mate shaft
PCIB0785E
SCIA0389E
Page 1961 of 4179

TRANSAXLE ASSEMBLY
MT-29
D
E
F
G
H
I
J
K
L
MA
B
MT
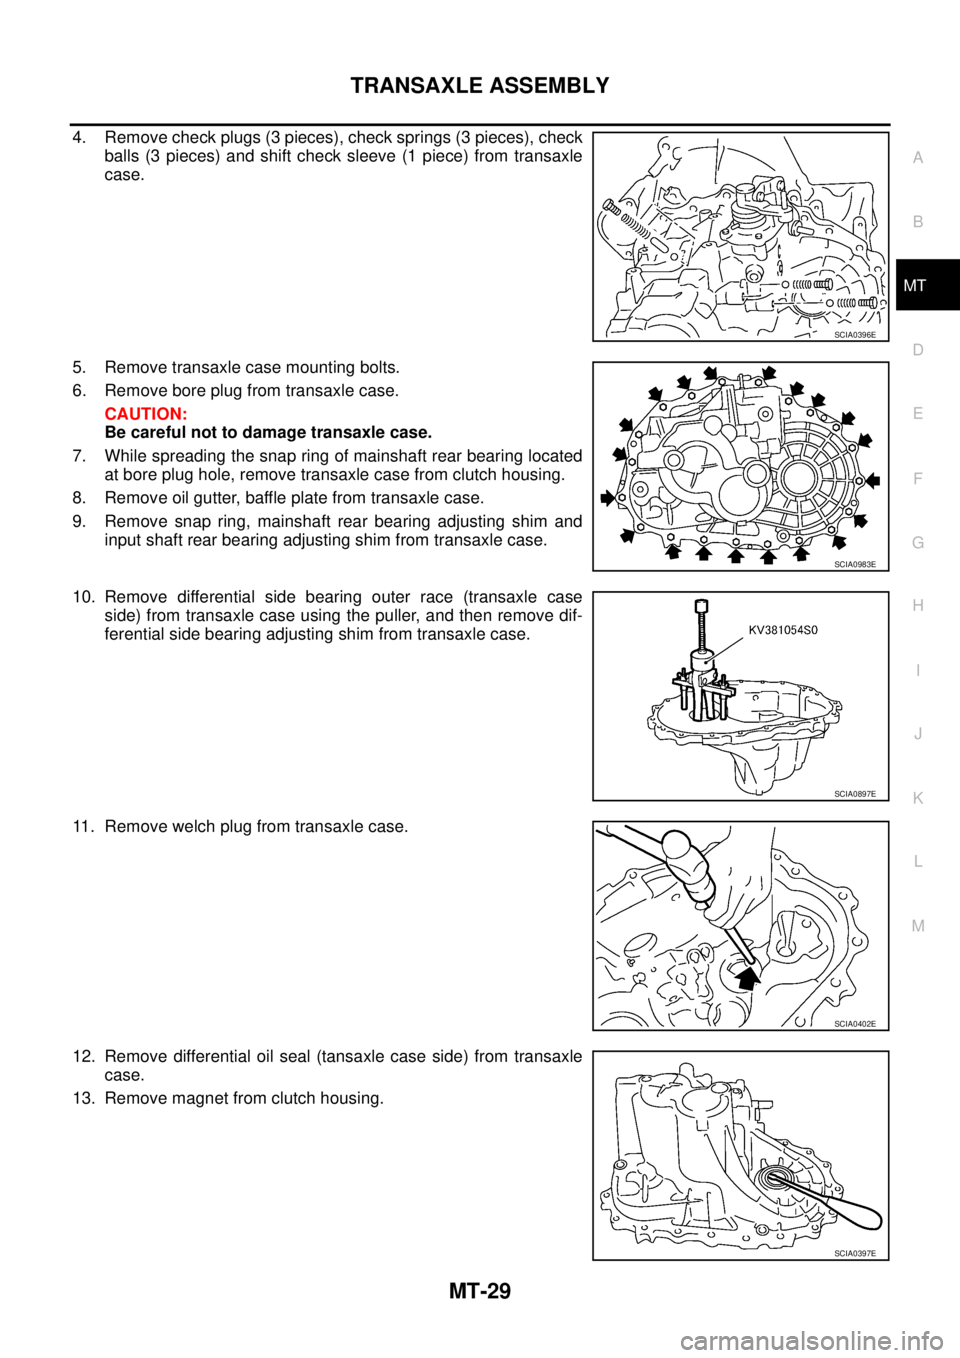
4. Remove check plugs (3 pieces), check springs (3 pieces), check
balls (3 pieces) and shift check sleeve (1 piece) from transaxle
case.
5. Remove transaxle case mounting bolts.
6. Remove bore plug from transaxle case.
CAUTION:
Be careful not to damage transaxle case.
7. While spreading the snap ring of mainshaft rear bearing located
at bore plug hole, remove transaxle case from clutch housing.
8. Remove oil gutter, baffle plate from transaxle case.
9. Remove snap ring, mainshaft rear bearing adjusting shim and
input shaft rear bearing adjusting shim from transaxle case.
10. Remove differential side bearing outer race (transaxle case
side) from transaxle case using the puller, and then remove dif-
ferential side bearing adjusting shim from transaxle case.
11. Remove welch plug from transaxle case.
12. Remove differential oil seal (tansaxle case side) from transaxle
case.
13. Remove magnet from clutch housing.
SCIA0396E
SCIA0983E
SCIA0897E
SCIA0402E
SCIA0397E
Page 1962 of 4179

MT-30
TRANSAXLE ASSEMBLY
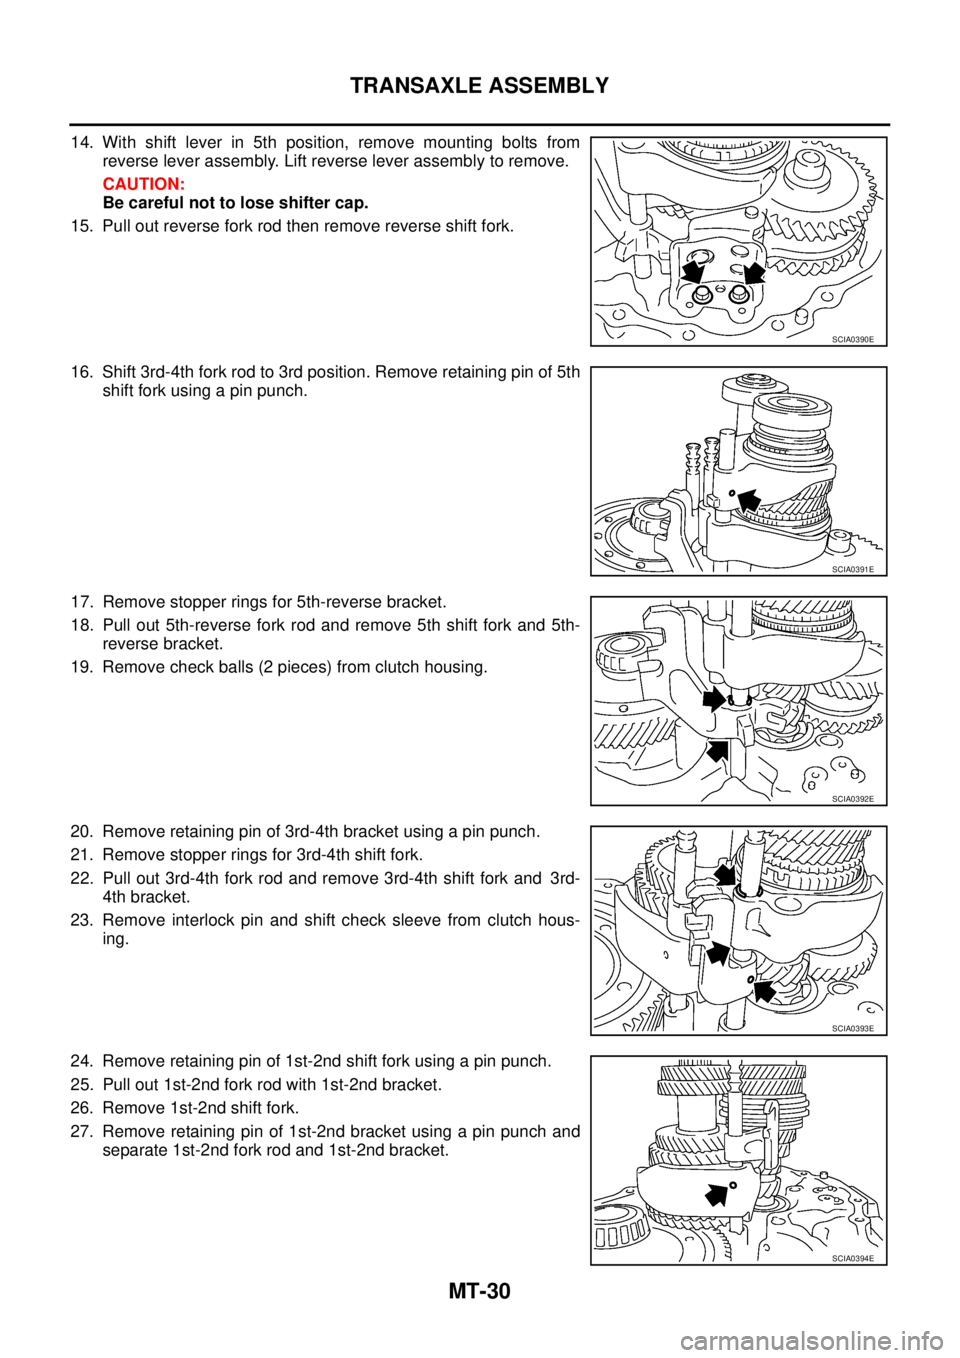
14. With shift lever in 5th position, remove mounting bolts from
reverse lever assembly. Lift reverse lever assembly to remove.
CAUTION:
Be careful not to lose shifter cap.
15. Pull out reverse fork rod then remove reverse shift fork.
16. Shift 3rd-4th fork rod to 3rd position. Remove retaining pin of 5th
shift fork using a pin punch.
17. Remove stopper rings for 5th-reverse bracket.
18. Pull out 5th-reverse fork rod and remove 5th shift fork and 5th-
reverse bracket.
19. Remove check balls (2 pieces) from clutch housing.
20. Remove retaining pin of 3rd-4th bracket using a pin punch.
21. Remove stopper rings for 3rd-4th shift fork.
22. Pull out 3rd-4th fork rod and remove 3rd-4th shift fork and 3rd-
4th bracket.
23. Remove interlock pin and shift check sleeve from clutch hous-
ing.
24. Remove retaining pin of 1st-2nd shift fork using a pin punch.
25. Pull out 1st-2nd fork rod with 1st-2nd bracket.
26. Remove 1st-2nd shift fork.
27. Remove retaining pin of 1st-2nd bracket using a pin punch and
separate 1st-2nd fork rod and 1st-2nd bracket.
SCIA0390E
SCIA0391E
SCIA0392E
SCIA0393E
SCIA0394E