Page 273 of 4179
CYLINDER BLOCK
EM-221
[YD22DDTi]
C
D
E
F
G
H
I
J
K
L
MA
EM
19. Install fuel pump bracket.
�Align the bracket with the dowel pins on cylinder block to
install.
�The two bolts used for dowel pins have a longer shanks than
the other two.
20. Install parts to engine in the reverse order of disassembly.
21. Remove engine from engine stand in the reverse order of assembly.
22. Install flywheel.
�When installing flywheel to crankshaft, be sure to correctly
align crankshaft side dowel pin and flywheel side dowel pin-
hole.
�There is a mating mark on the clutch cover side, Refer it dur-
ing installation.
�Holding ring gear with the ring stopper (special service tool),
tighten securing bolts with TORX bit (size: T55, Commercial
Service Tool).
�Tighten bolts uniformly in a crisscross manner.
PBIC2329E
PBIC2538E
PBIC2495E
PBIC2406E
Page 287 of 4179
![NISSAN X-TRAIL 2003 Service Repair Manual CYLINDER BLOCK
EM-235
[YD22DDTi]
C
D
E
F
G
H
I
J
K
L
MA
EM
FLYWHEEL DEFLECTION
�Measure the deflection of flywheel contact surface to clutch with
a dial indicator.
�Measure the deflection at 210 mm NISSAN X-TRAIL 2003 Service Repair Manual CYLINDER BLOCK
EM-235
[YD22DDTi]
C
D
E
F
G
H
I
J
K
L
MA
EM
FLYWHEEL DEFLECTION
�Measure the deflection of flywheel contact surface to clutch with
a dial indicator.
�Measure the deflection at 210 mm](/manual-img/5/57404/w960_57404-286.png)
CYLINDER BLOCK
EM-235
[YD22DDTi]
C
D
E
F
G
H
I
J
K
L
MA
EM
FLYWHEEL DEFLECTION
�Measure the deflection of flywheel contact surface to clutch with
a dial indicator.
�Measure the deflection at 210 mm (8.27 in) dia.
�If measured value is out of the standard, replace flywheel.
CAUTION:
When measuring, keep magnetic fields (such as dial indicator
stand) away from signal plate of the rear end of crankshaft.
MOVEMENT AMOUNT OF FLYWHEEL
CAUTION:
Do not disassemble double mass flywheel.
Movement Amount of Thrust (Fore-and-Aft) Direction
�Measure the movement amount of thrust (fore-and-aft) direction when 100 N (10.2 kg, 22 lb) force is
added at the portion of 125 mm (4.92 in) radius from the center of flywheel.
�If measured value is out of the standard, replace flywheel.
Movement Amount in Radial (Rotation) Direction
Check the movement amount of radial (rotation) direction with the following procedure:
1. Install a bolt to clutch cover mounting hole, and place a torque wrench on the extended line of the flywheel
center line.
�Tighten bolt at a force of 9.8 N·m (1.0 kg-m, 87 in-lb) to keep it from loosening.
2. Put a mating mark on circumferences of the two flywheel
masses without applying any load (Measurement standard
points).
3. Apply a force of 9.8 N·m (1.0 kg-m, 87 in-lb) in each direction,
and mark the movement amount on the mass on the transaxle
side.
4. Measure the dimensions of movement amounts “A” and “B” on
circumference of the flywheel on the transaxle side.
�If measured value is out of the standard, replace flywheel.Standard : 0.45 mm (0.0177 in) or less.
PBIC2646E
Standard : 1.3 mm (0.051 in) or less
Standard: 26.2 mm (1.031 in) or less.
PBIC1263E
Page 1915 of 4179

CL-1
CLUTCH
C TRANSMISSION/TRANSAXLE
CONTENTS
D
E
F
G
H
I
J
K
L
M
SECTION
A
B
CL
CLUTCH
PRECAUTIONS .......................................................... 2
Caution ..................................................................... 2
PREPARATION ........................................................... 3
Special Service Tools ............................................... 3
Commercial Service Tools ........................................ 3
NOISE, VIBRATION AND HARSHNESS (NVH)
TROUBLESHOOTING ................................................ 4
NVH Troubleshooting Chart ..................................... 4
CLUTCH ................................................................ 4
CLUTCH PEDAL ........................................................ 5
On-Vehicle Inspection and Adjustment .................... 5
Removal and Installation .......................................... 6
INSPECTION AFTER REMOVAL ......................... 6
CLUTCH FLUID .......................................................... 7
Air Bleeding Procedure ............................................ 7
CLUTCH MASTER CYLINDER .................................. 8
Removal and Installation .......................................... 8
REMOVAL ............................................................. 8
INSTALLATION ..................................................... 9
Disassembly and Assembly ..................................... 9
DISASSEMBLY ..................................................... 9
INSPECTION AFTER DISASSEMBLY ................. 9
ASSEMBLY ........................................................... 9
OPERATING CYLINDER .......................................... 10
Removal and Installation ........................................ 10REMOVAL ........................................................... 10
INSTALLATION ................................................... 10
Disassembly and Assembly .................................... 10
DISASSEMBLY ................................................... 10
INSPECTION AFTER DISASSEMBLY ................ 10
ASSEMBLY ......................................................... 10
CLUTCH PIPING ....................................................... 11
Removal and Installation ........................................ 11
CLUTCH RELEASE MECHANISM ........................... 12
Removal and Installation ........................................ 12
REMOVAL ........................................................... 12
INSPECTION AFTER REMOVAL ....................... 12
INSTALLATION ................................................... 12
CLUTCH DISC, CLUTCH COVER AND FLYWHEEL ... 14
Removal and Installation ........................................ 14
REMOVAL ........................................................... 14
INSPECTION AND ADJUSTMENT AFTER
REMOVAL ........................................................... 15
INSTALLATION ................................................... 16
SERVICE DATA AND SPECIFICATIONS (SDS) ...... 17
Clutch Control System ............................................ 17
Clutch Master Cylinder ........................................... 17
Clutch Operating Cylinder ...................................... 17
Clutch Disc ............................................................. 17
Clutch Cover ........................................................... 17
Page 1916 of 4179
CL-2
PRECAUTIONS
PRECAUTIONSPFP:00001
CautionECS004JW
�Recommended clutch fluid is brake fluid “DOT 3” or “DOT 4”. Refer to MA-17, "Fluids and Lubri-
cants".
�Never reuse drained brake fluid.
�Be careful not to splash brake fluid on painted areas.
�When removing and installing clutch piping, use Tool.
�Use new brake fluid to clean or wash all parts of master cyl-
inder and operating cylinder.
�Never use mineral oils such as gasoline or kerosene. It will
corrode the rubber parts of the hydraulic system.
WARNING:
After cleaning clutch disc, clean it with a dust collector. Do not
use compressed air.Tool number : GG94310000 or Commercial equivalent
PCIB0272E
Page 1917 of 4179
PREPARATION
CL-3
D
E
F
G
H
I
J
K
L
MA
B
CL
PREPARATIONPFP:00002
Special Service ToolsECS008B7
Commercial Service ToolsECS00CRA
Tool number
Tool nameDescription
ST20050240
Diaphragm adjusting wrenchAdjusting unevenness of diaphragm spring of
clutch cover
KV30101600
Clutch aligning bar
a: 15.9 mm (0.626 in) dia.
b: 17.9 mm (0.705 in) dia.
c: 40 mm (1.57 in) dia.Installing clutch cover and clutch disc
(QR engine model)
ST20630000
Clutch aligning bar
a: 15.8 mm (0.622 in) dia.
b: 22.9 mm (0.902 in) dia.
c: 45.0 mm (1.077 in)Installing clutch cover and clutch disc
(YD engine model)
ZZA0508D
S-NT405
S-NT405
Tool nameDescription
Pin punch
Tip diameter: 4.5 mm (0.177 in) dia.Removing and installing master cylinder
spring pin
GG94310000
Flare nut torque wrench
a: 10 mm (0.39 in)Removing and installing clutch piping
ZZA0515D
S-NT406
Page 1918 of 4179

CL-4
NOISE, VIBRATION AND HARSHNESS (NVH) TROUBLESHOOTING
NOISE, VIBRATION AND HARSHNESS (NVH) TROUBLESHOOTINGPFP:00003
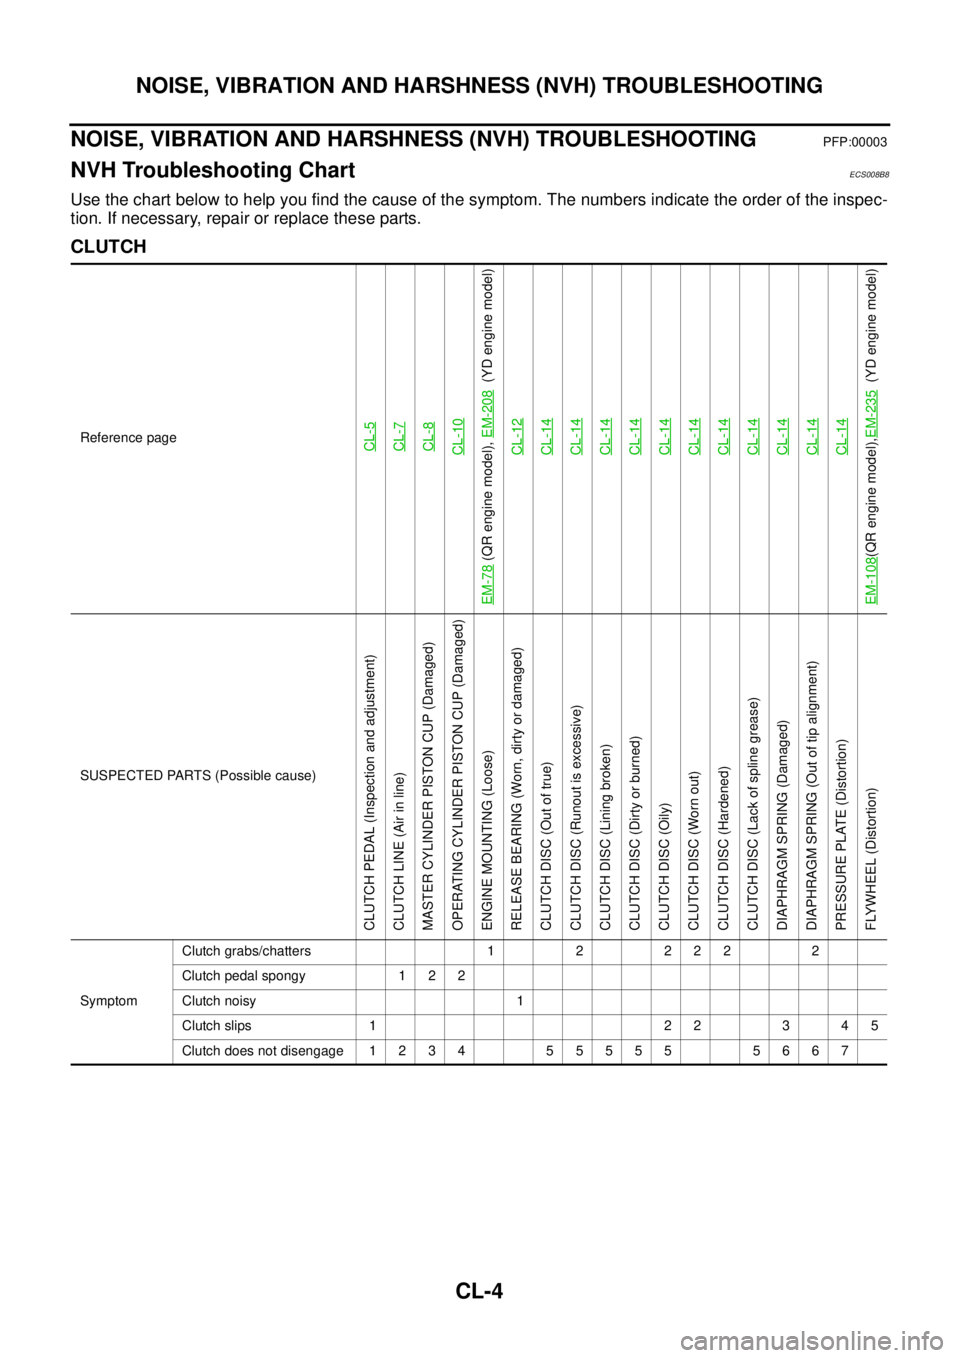
NVH Troubleshooting ChartECS008B8
Use the chart below to help you find the cause of the symptom. The numbers indicate the order of the inspec-
tion. If necessary, repair or replace these parts.
CLUTCH
Reference pageCL-5CL-7CL-8CL-10
EM-78
(QR engine model), EM-208
(YD engine model)
CL-12
CL-14CL-14CL-14CL-14CL-14CL-14CL-14CL-14CL-14CL-14CL-14
EM-108
(QR engine model),EM-235
(YD engine model)
SUSPECTED PARTS (Possible cause)
CLUTCH PEDAL (Inspection and adjustment)
CLUTCH LINE (Air in line)
MASTER CYLINDER PISTON CUP (Damaged)
OPERATING CYLINDER PISTON CUP (Damaged)
ENGINE MOUNTING (Loose)
RELEASE BEARING (Worn, dirty or damaged)
CLUTCH DISC (Out of true)
CLUTCH DISC (Runout is excessive)
CLUTCH DISC (Lining broken)
CLUTCH DISC (Dirty or burned)
CLUTCH DISC (Oily)
CLUTCH DISC (Worn out)
CLUTCH DISC (Hardened)
CLUTCH DISC (Lack of spline grease)
DIAPHRAGM SPRING (Damaged)
DIAPHRAGM SPRING (Out of tip alignment)
PRESSURE PLATE (Distortion)
FLYWHEEL (Distortion)
SymptomClutch grabs/chatters 1 2 2 2 2 2
Clutch pedal spongy 1 2 2
Clutch noisy 1
Clutch slips 1 2 2 3 4 5
Clutch does not disengage 1 2 3 4 5 5 5 5 5 5 6 6 7
Page 1919 of 4179

CLUTCH PEDAL
CL-5
D
E
F
G
H
I
J
K
L
MA
B
CL
CLUTCH PEDALPFP:46540
On-Vehicle Inspection and AdjustmentECS001WB
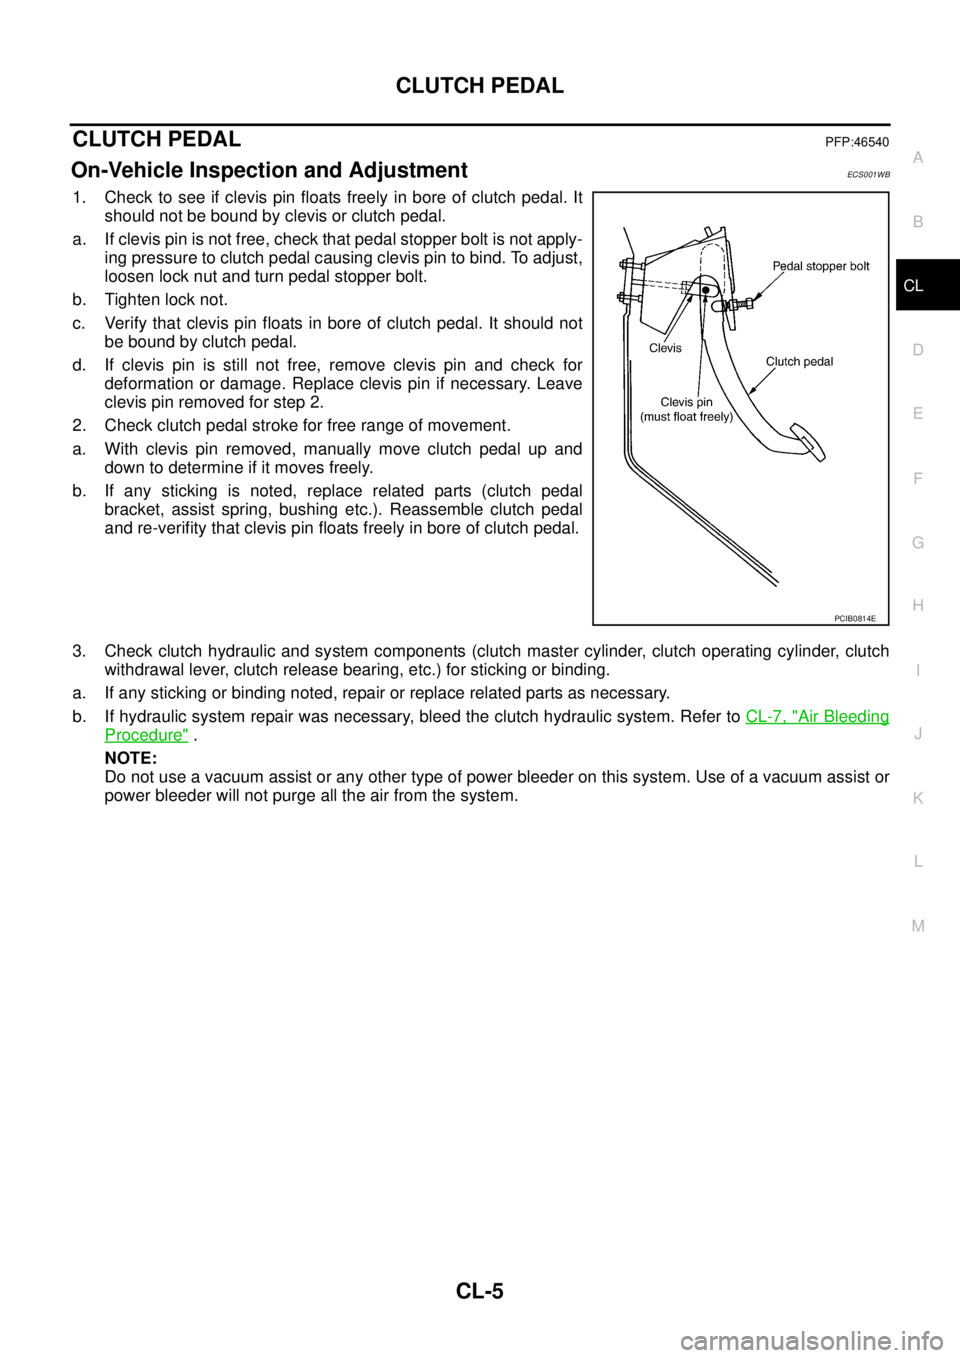
1. Check to see if clevis pin floats freely in bore of clutch pedal. It
should not be bound by clevis or clutch pedal.
a. If clevis pin is not free, check that pedal stopper bolt is not apply-
ing pressure to clutch pedal causing clevis pin to bind. To adjust,
loosen lock nut and turn pedal stopper bolt.
b. Tighten lock not.
c. Verify that clevis pin floats in bore of clutch pedal. It should not
be bound by clutch pedal.
d. If clevis pin is still not free, remove clevis pin and check for
deformation or damage. Replace clevis pin if necessary. Leave
clevis pin removed for step 2.
2. Check clutch pedal stroke for free range of movement.
a. With clevis pin removed, manually move clutch pedal up and
down to determine if it moves freely.
b. If any sticking is noted, replace related parts (clutch pedal
bracket, assist spring, bushing etc.). Reassemble clutch pedal
and re-verifity that clevis pin floats freely in bore of clutch pedal.
3. Check clutch hydraulic and system components (clutch master cylinder, clutch operating cylinder, clutch
withdrawal lever, clutch release bearing, etc.) for sticking or binding.
a. If any sticking or binding noted, repair or replace related parts as necessary.
b. If hydraulic system repair was necessary, bleed the clutch hydraulic system. Refer to CL-7, "
Air Bleeding
Procedure" .
NOTE:
Do not use a vacuum assist or any other type of power bleeder on this system. Use of a vacuum assist or
power bleeder will not purge all the air from the system.
PCIB0814E
Page 1920 of 4179
CL-6
CLUTCH PEDAL
Removal and InstallationECS001WC
—RHD model—
—LHD model—
NOTE:
Install clutch pedal assembly and check to see clevis pin floats freely in bore of clutch pedal.
INSPECTION AFTER REMOVAL
�Check clutch pedal for bend, damage, or a cracked weld. If bend, damage, or a cracked weld is found,
replace clutch pedal.
�Check assist spring for settling. If settling is found, replace assist spring.
PCIB0770E
1. Clutch pedal assembly 2. Assist spring 3. Bushing
4. Stopper rubber 5. Clevis pin 6. Bushing
7. Stopper rubber 8. Pedal stopper bolt 9. Snap pin
PCIB0771E
1. Clutch pedal assembly 2. Assist spring 3. Bushing
4. Clevis pin 5. Bushing 6. Stopper rubber
7. Pedal stopper bolt 8. Stopper rubber 9. Snap pin
10. Bracket