2003 NISSAN X-TRAIL boot
[x] Cancel search: bootPage 855 of 3066
FRONT DISC BRAKE
BR-21
C
D
E
G
H
I
J
K
L
MA
B
BR
FRONT DISC BRAKEPFP:41000
ComponentEFS000CG
WA RN ING:
lClean brake pads with a vacuum dust collector to minimize the hazard of airborne particles or
other materials.
CAUTION:
lWhen cylinder body is open, do not depress brake pedal because piston will pop out.
lBe careful not to damage piston boot or get oil on rotor. Always replace shims when replacing
pads.
lIf shims are rusted or show peeling of the rubber coat, replace them with new shims.
lIt is not necessary to remove connecting bolt except for disassembly or replacement of caliper
assembly. In this case, suspend cylinder body with wire so as not to stretch brake hose.
lBurnish the brake contact surfaces after refinishing or replacing drums or rotors, after replacing
pads or linings, or if a soft pedal occurs at very low mileage. Refer toBR-10, "
Brake Burnishing
Procedure".
InspectionEFS000CH
PAD THICKNESS
Check pad thickness by lifting vehicle, removing the wheel, and
looking through check hole on cylinder body. If necessary, use a
scale.
SFIA0328E
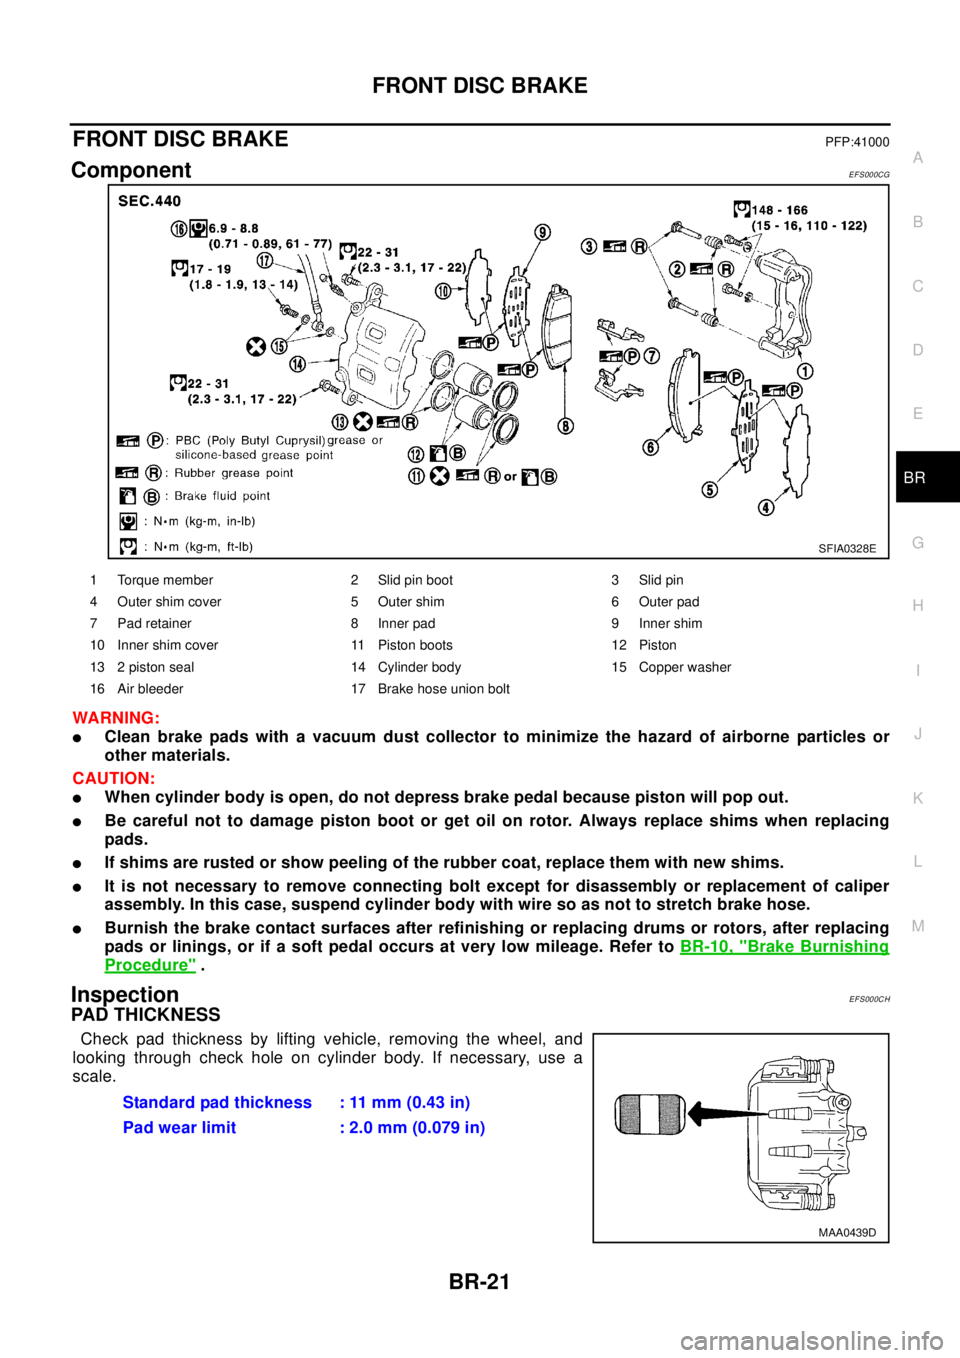
1 Torque member 2 Slid pin boot 3 Slid pin
4 Outer shim cover 5 Outer shim 6 Outer pad
7 Pad retainer 8 Inner pad 9 Inner shim
10 Inner shim cover 11 Piston boots 12 Piston
13 2 piston seal 14 Cylinder body 15 Copper washer
16 Air bleeder 17 Brake hose union bolt
Standard pad thickness : 11 mm (0.43 in)
Pad wear limit : 2.0 mm (0.079 in)
MAA0439D
Page 857 of 3066
FRONT DISC BRAKE
BR-23
C
D
E
G
H
I
J
K
L
MA
B
BR
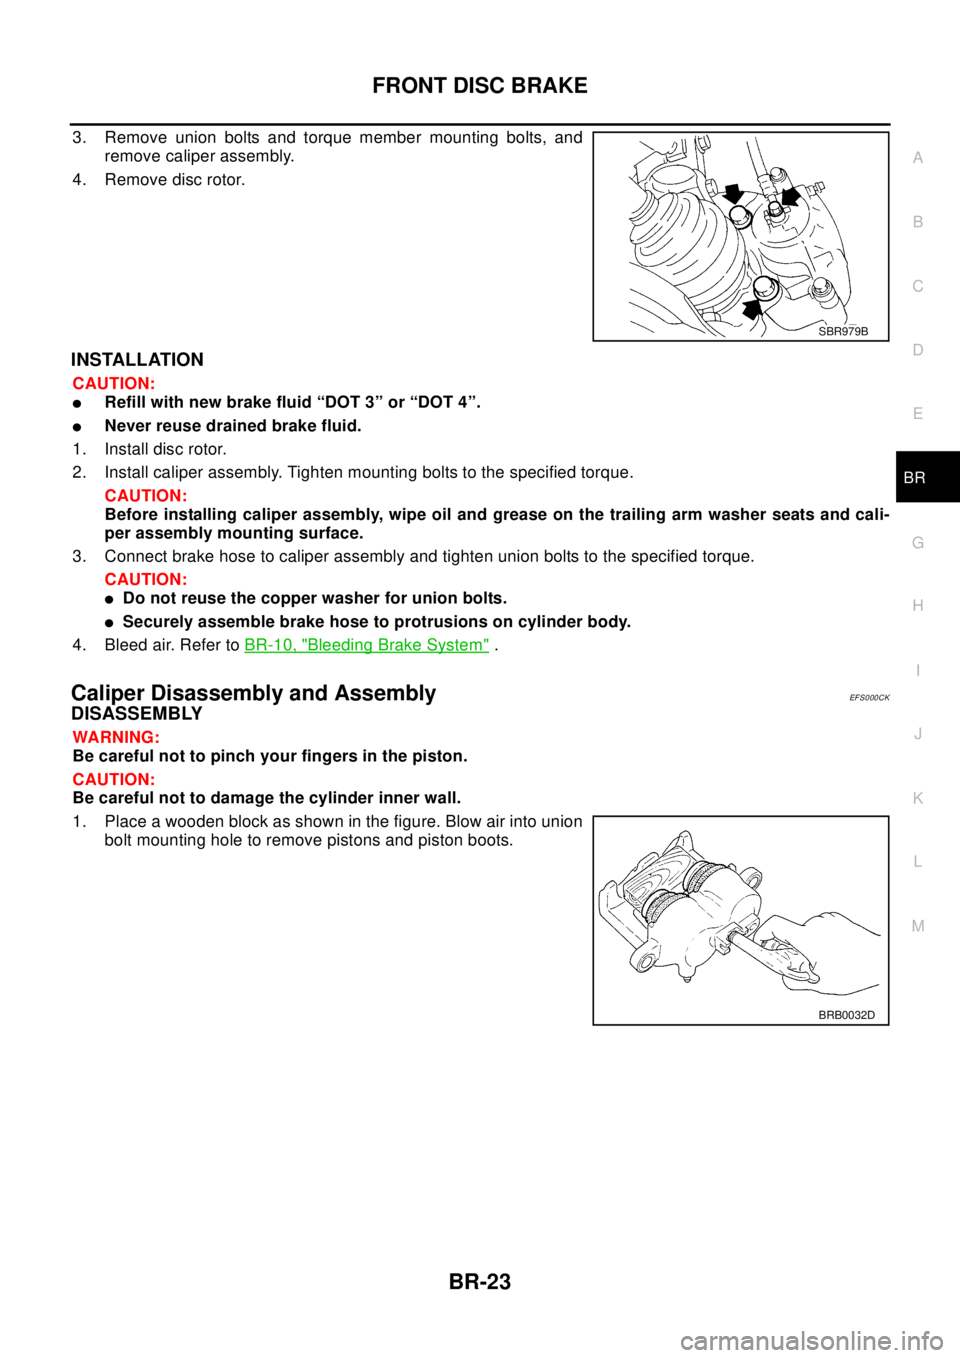
3. Remove union bolts and torque member mounting bolts, and
remove caliper assembly.
4. Remove disc rotor.
INSTALLATION
CAUTION:
lRefill with new brake fluid “DOT 3” or “DOT 4”.
lNever reuse drained brake fluid.
1. Install disc rotor.
2. Install caliper assembly. Tighten mounting bolts to the specified torque.
CAUTION:
Before installing caliper assembly, wipe oil and grease on the trailing arm washer seats and cali-
per assembly mounting surface.
3. Connect brake hose to caliper assembly and tighten union bolts to the specified torque.
CAUTION:
lDo not reuse the copper washer for union bolts.
lSecurely assemble brake hose to protrusions on cylinder body.
4. Bleed air. Refer toBR-10, "
Bleeding Brake System".
Caliper Disassembly and AssemblyEF S0 00 CK
DISASSEMBLY
WA RN ING:
Be careful not to pinch your fingers in the piston.
CAUTION:
Be careful not to damage the cylinder inner wall.
1. Place a wooden block as shown in the figure. Blow air into union
bolt mounting hole to remove pistons and piston boots.
SBR979B
BRB0032D
Page 858 of 3066
BR-24
FRONT DISC BRAKE
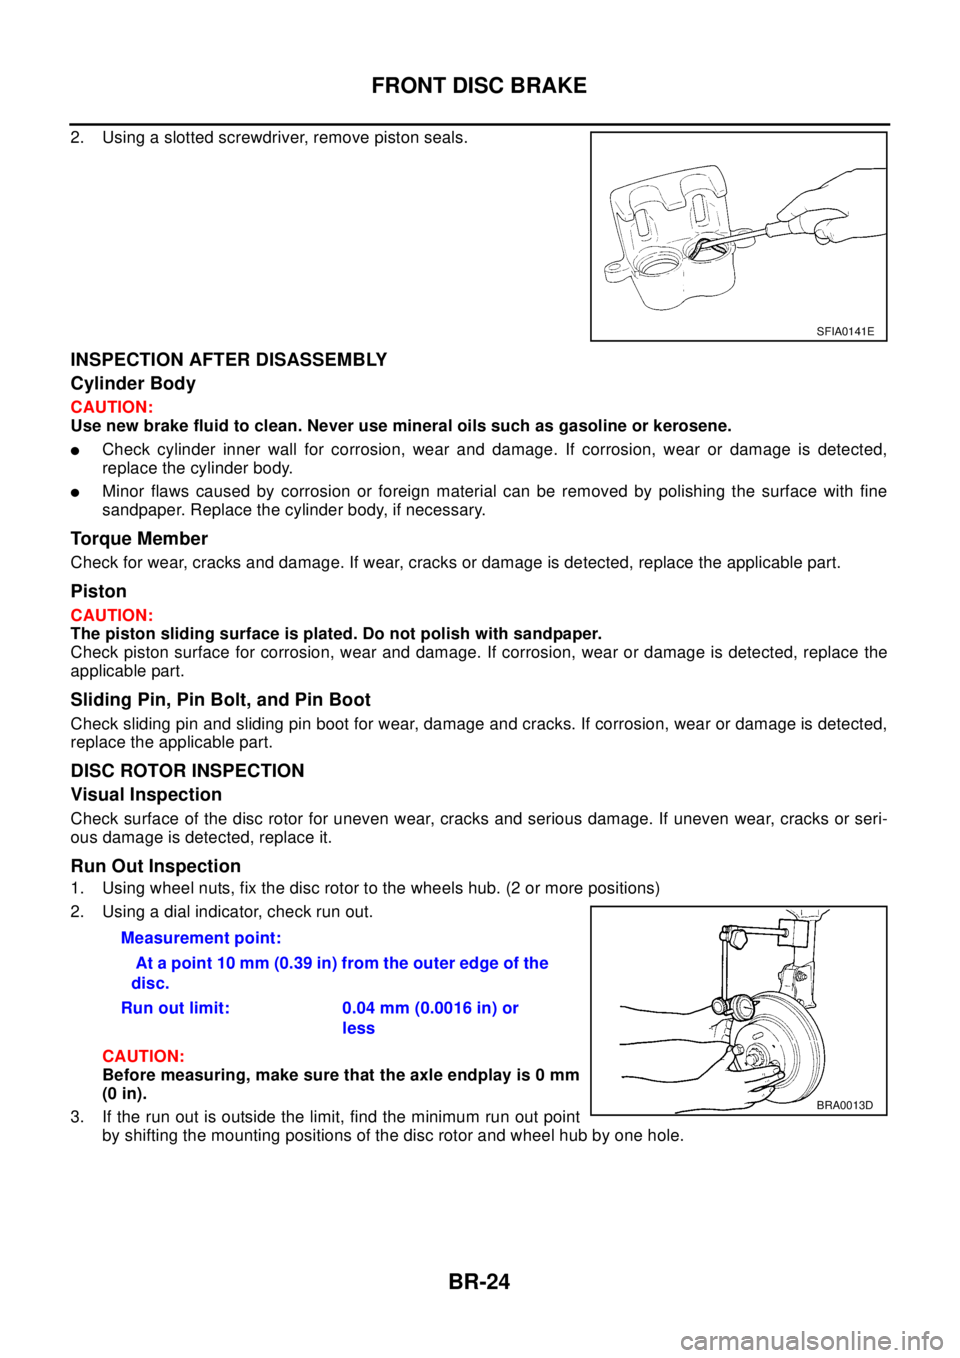
2. Using a slotted screwdriver, remove piston seals.
INSPECTION AFTER DISASSEMBLY
Cylinder Body
CAUTION:
Use new brake fluid to clean. Never use mineral oils such as gasoline or kerosene.
lCheck cylinder inner wall for corrosion, wear and damage. If corrosion, wear or damage is detected,
replace the cylinder body.
lMinor flaws caused by corrosion or foreign material can be removed by polishing the surface with fine
sandpaper. Replace the cylinder body, if necessary.
Torque Member
Check for wear, cracks and damage. If wear, cracks or damage is detected, replace the applicable part.
Piston
CAUTION:
The piston sliding surface is plated. Do not polish with sandpaper.
Check piston surface for corrosion, wear and damage. If corrosion, wear or damage is detected, replace the
applicable part.
Sliding Pin, Pin Bolt, and Pin Boot
Check sliding pin and sliding pin boot for wear, damage and cracks. If corrosion, wear or damage is detected,
replace the applicable part.
DISC ROTOR INSPECTION
Visual Inspection
Check surface of the disc rotor for uneven wear, cracks and serious damage. If uneven wear, cracks or seri-
ous damage is detected, replace it.
Run Out Inspection
1. Using wheel nuts, fix the disc rotor to the wheels hub. (2 or more positions)
2. Using a dial indicator, check run out.
CAUTION:
Before measuring, make sure that the axle endplay is 0 mm
(0 in).
3. If the run out is outside the limit, find the minimum run out point
by shifting the mounting positions of the disc rotor and wheel hub by one hole.
SFIA0141E
Measurement point:
At a point 10 mm (0.39 in) from the outer edge of the
disc.
Run out limit: 0.04 mm (0.0016 in) or
less
BRA0013D
Page 859 of 3066
FRONT DISC BRAKE
BR-25
C
D
E
G
H
I
J
K
L
MA
B
BR
Thickness Inspection
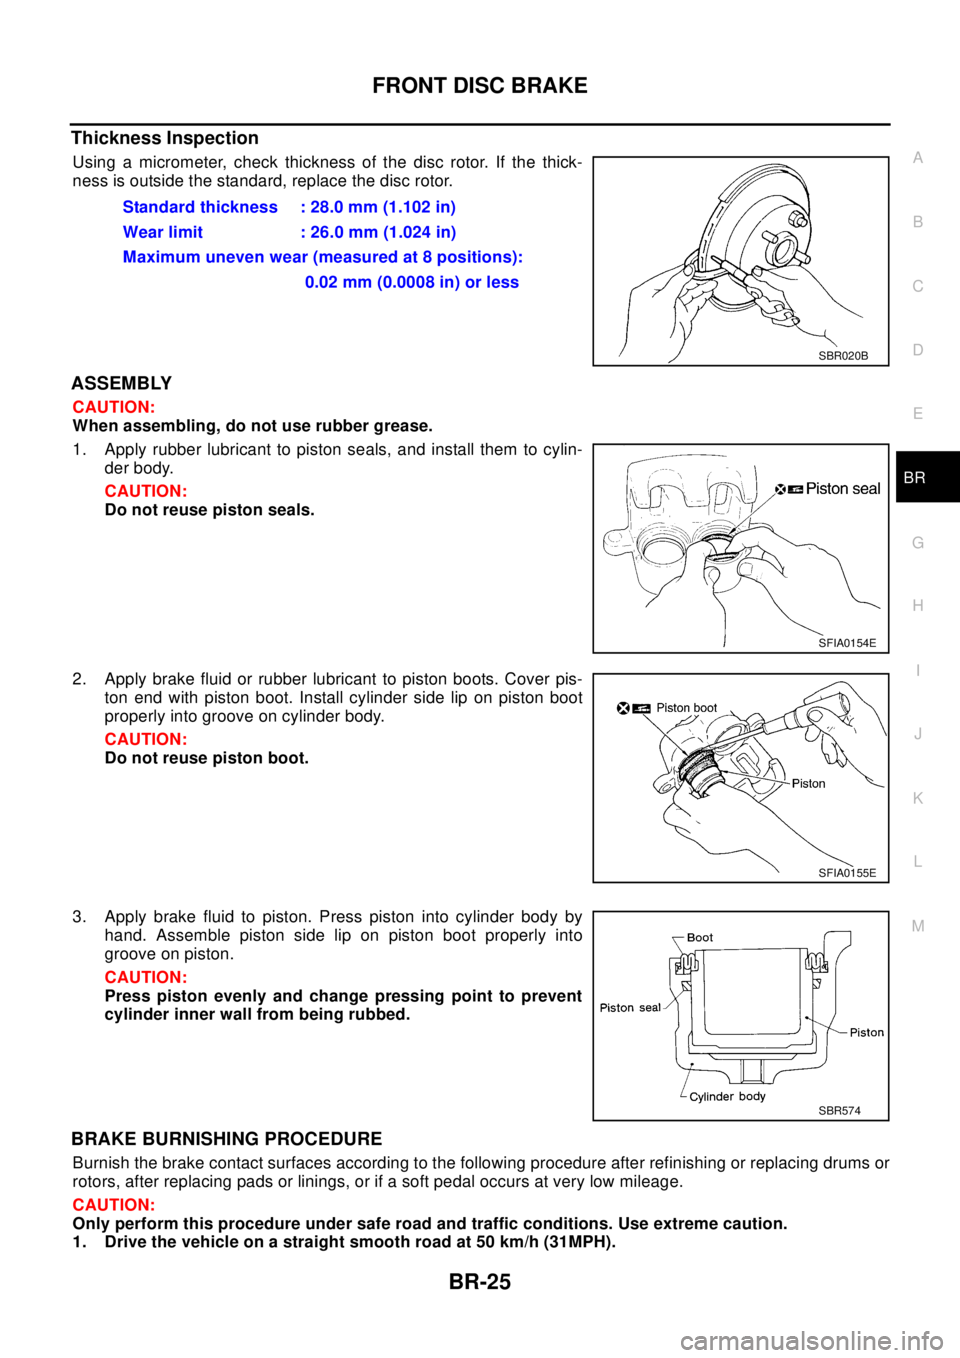
Using a micrometer, check thickness of the disc rotor. If the thick-
ness is outside the standard, replace the disc rotor.
ASSEMBLY
CAUTION:
When assembling, do not use rubber grease.
1. Apply rubber lubricant to piston seals, and install them to cylin-
der body.
CAUTION:
Do not reuse piston seals.
2. Apply brake fluid or rubber lubricant to piston boots. Cover pis-
ton end with piston boot. Install cylinder side lip on piston boot
properly into groove on cylinder body.
CAUTION:
Do not reuse piston boot.
3. Apply brake fluid to piston. Press piston into cylinder body by
hand. Assemble piston side lip on piston boot properly into
groove on piston.
CAUTION:
Press piston evenly and change pressing point to prevent
cylinder inner wall from being rubbed.
BRAKE BURNISHING PROCEDURE
Burnish the brake contact surfaces according to the following procedure after refinishing or replacing drums or
rotors, after replacing pads or linings, or if a soft pedal occurs at very low mileage.
CAUTION:
Only perform this procedure under safe road and traffic conditions. Use extreme caution.
1. Drive the vehicle on a straight smooth road at 50 km/h (31MPH).Standard thickness : 28.0 mm (1.102 in)
Wear limit : 26.0 mm (1.024 in)
Maximum uneven wear (measured at 8 positions):
0.02 mm (0.0008 in) or less
SBR020B
SFIA0154E
SFIA0155E
SBR574
Page 861 of 3066
REAR DISC BRAKE
BR-27
C
D
E
G
H
I
J
K
L
MA
B
BR
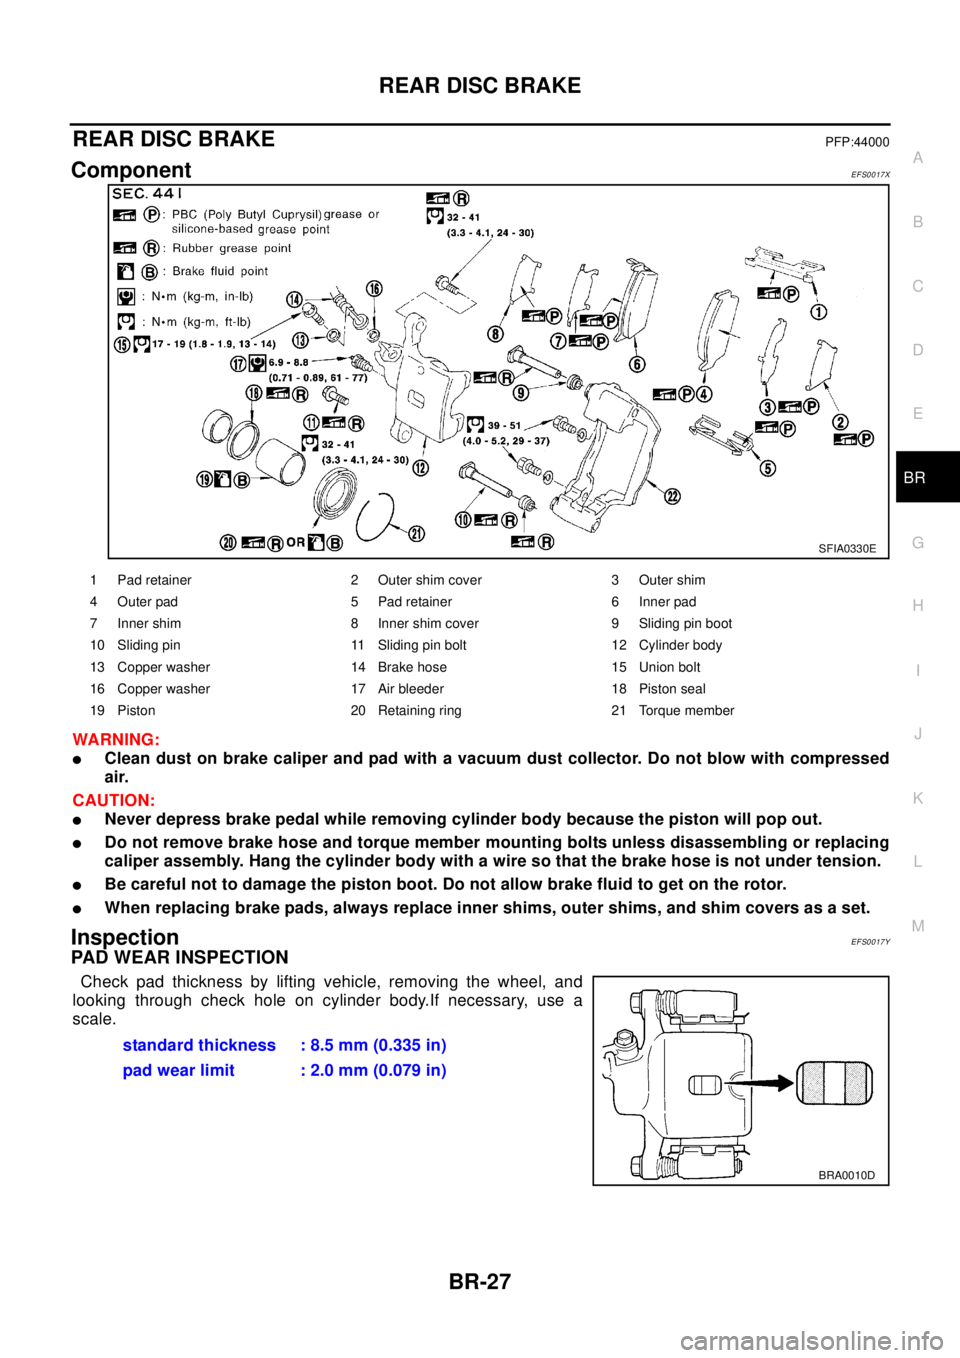
REAR DISC BRAKEPFP:44000
ComponentEFS0017X
WA RN ING:
lClean dust on brake caliper and pad with a vacuum dust collector. Do not blow with compressed
air.
CAUTION:
lNever depress brake pedal while removing cylinder body because the piston will pop out.
lDo not remove brake hose and torque member mounting bolts unless disassembling or replacing
caliper assembly. Hang the cylinder body with a wire so that the brake hose is not under tension.
lBe careful not to damage the piston boot. Do not allow brake fluid to get on the rotor.
lWhen replacing brake pads, always replace inner shims, outer shims, and shim covers as a set.
InspectionEFS0017Y
PAD WEAR INSPECTION
Check pad thickness by lifting vehicle, removing the wheel, and
looking through check hole on cylinder body.If necessary, use a
scale.
SFIA0330E
1 Pad retainer 2 Outer shim cover 3 Outer shim
4 Outer pad 5 Pad retainer 6 Inner pad
7 Inner shim 8 Inner shim cover 9 Sliding pin boot
10 Sliding pin 11 Sliding pin bolt 12 Cylinder body
13 Copper washer 14 Brake hose 15 Union bolt
16 Copper washer 17 Air bleeder 18 Piston seal
19 Piston 20 Retaining ring 21 Torque member
standard thickness : 8.5 mm (0.335 in)
pad wear limit : 2.0 mm (0.079 in)
BRA0010D
Page 863 of 3066
REAR DISC BRAKE
BR-29
C
D
E
G
H
I
J
K
L
MA
B
BR
Caliper Removal and InstallationEFS00180
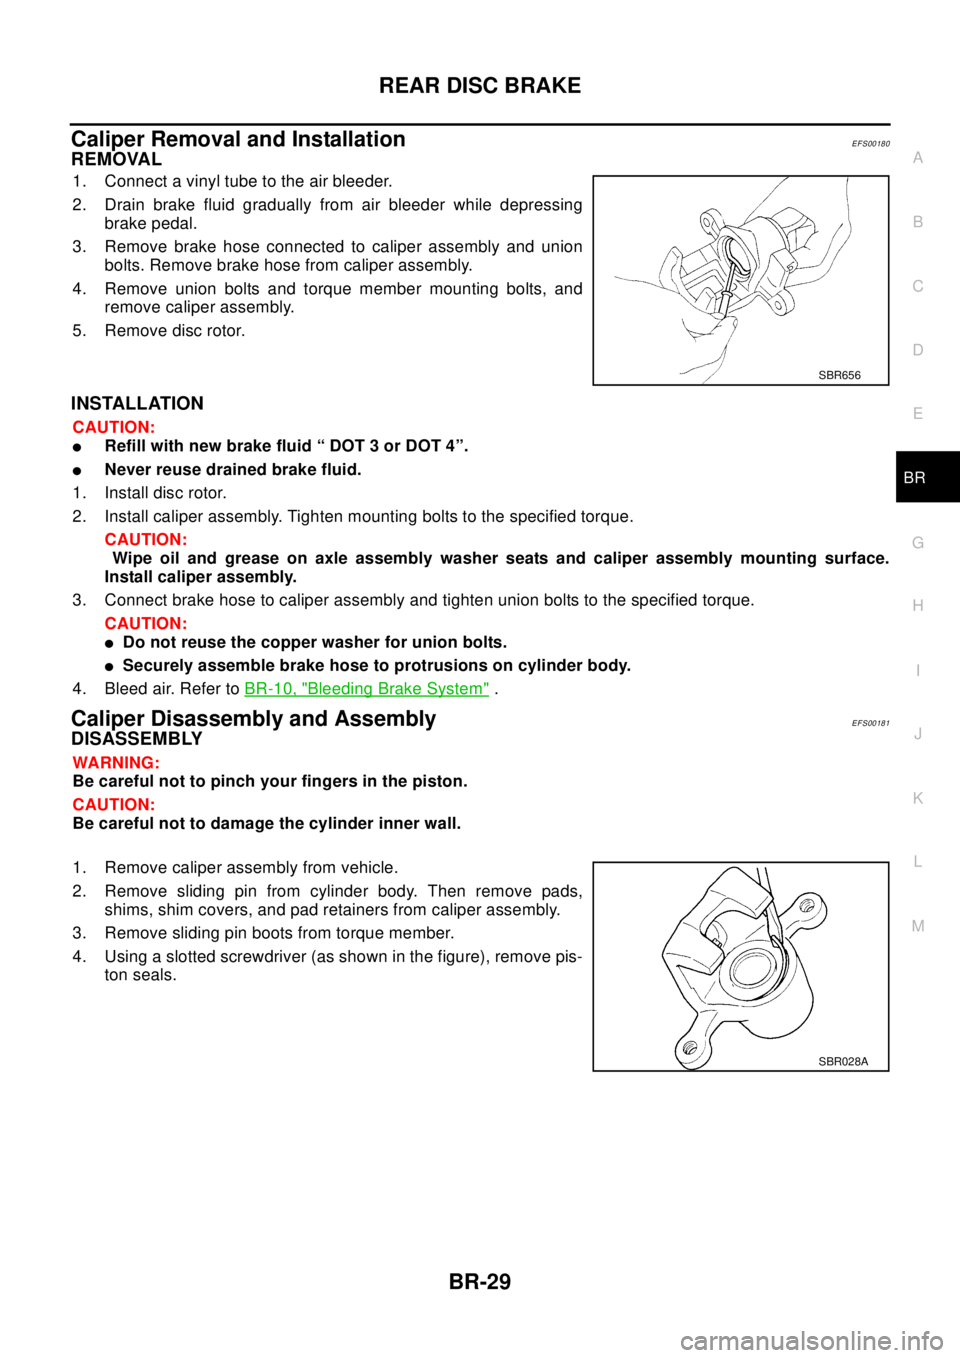
REMOVAL
1. Connect a vinyl tube to the air bleeder.
2. Drain brake fluid gradually from air bleeder while depressing
brake pedal.
3. Remove brake hose connected to caliper assembly and union
bolts. Remove brake hose from caliper assembly.
4. Remove union bolts and torque member mounting bolts, and
remove caliper assembly.
5. Remove disc rotor.
INSTALLATION
CAUTION:
lRefill with new brake fluid “ DOT 3 or DOT 4”.
lNever reuse drained brake fluid.
1. Install disc rotor.
2. Install caliper assembly. Tighten mounting bolts to the specified torque.
CAUTION:
Wipe oil and grease on axle assembly washer seats and caliper assembly mounting surface.
Install caliper assembly.
3. Connect brake hose to caliper assembly and tighten union bolts to the specified torque.
CAUTION:
lDo not reuse the copper washer for union bolts.
lSecurely assemble brake hose to protrusions on cylinder body.
4. Bleed air. Refer toBR-10, "
Bleeding Brake System".
Caliper Disassembly and AssemblyEFS00181
DISASSEMBLY
WA RN ING:
Be careful not to pinch your fingers in the piston.
CAUTION:
Be careful not to damage the cylinder inner wall.
1. Remove caliper assembly from vehicle.
2. Remove sliding pin from cylinder body. Then remove pads,
shims, shim covers, and pad retainers from caliper assembly.
3. Remove sliding pin boots from torque member.
4. Using a slotted screwdriver (as shown in the figure), remove pis-
ton seals.
SBR656
SBR028A
Page 864 of 3066
BR-30
REAR DISC BRAKE
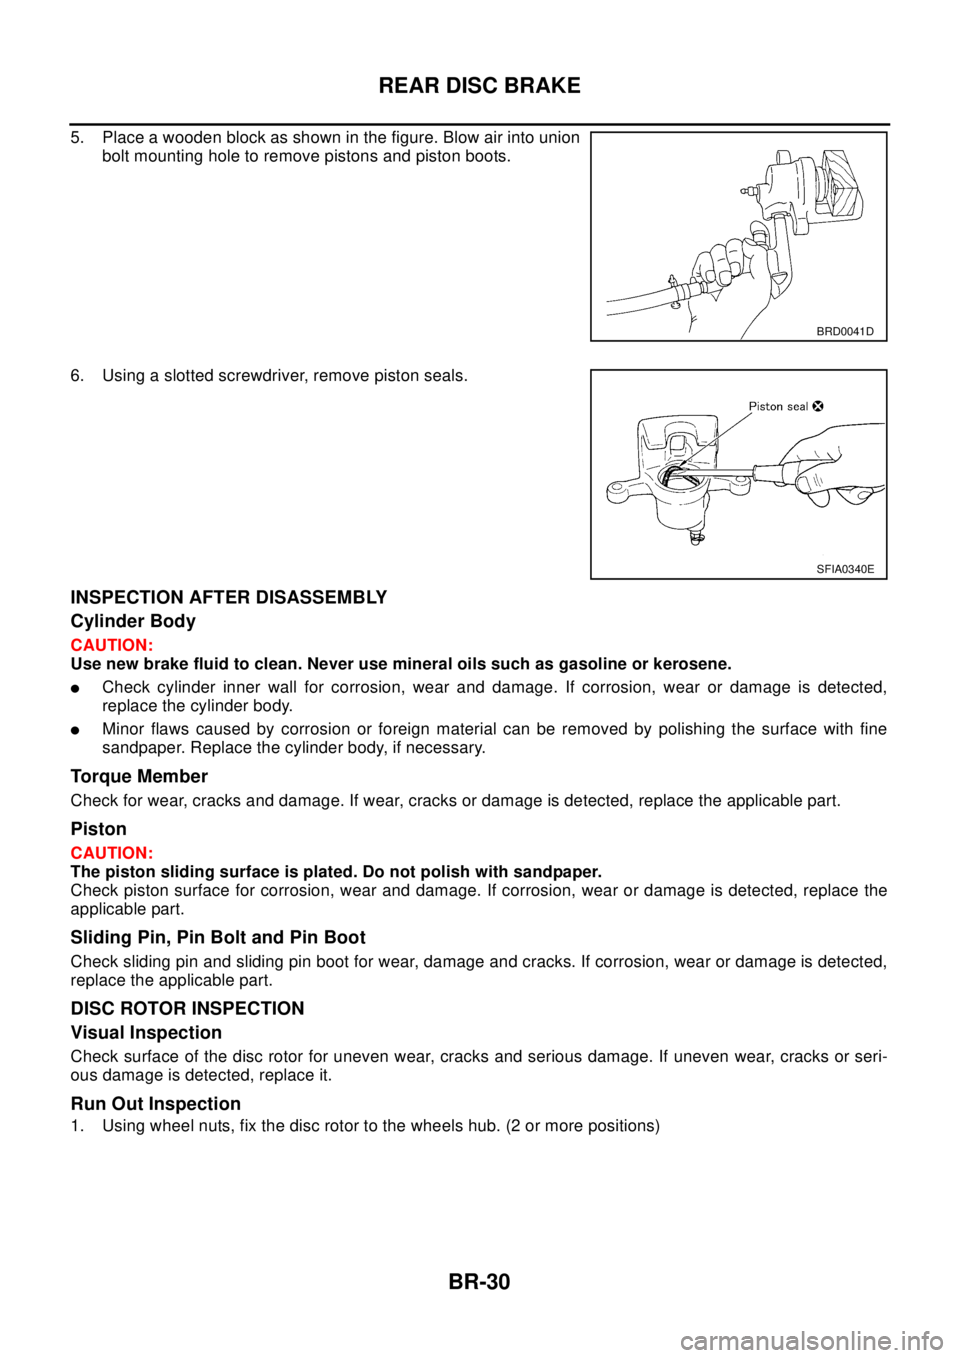
5. Place a wooden block as shown in the figure. Blow air into union
bolt mounting hole to remove pistons and piston boots.
6. Using a slotted screwdriver, remove piston seals.
INSPECTION AFTER DISASSEMBLY
Cylinder Body
CAUTION:
Use new brake fluid to clean. Never use mineral oils such as gasoline or kerosene.
lCheck cylinder inner wall for corrosion, wear and damage. If corrosion, wear or damage is detected,
replace the cylinder body.
lMinor flaws caused by corrosion or foreign material can be removed by polishing the surface with fine
sandpaper. Replace the cylinder body, if necessary.
Torque Member
Check for wear, cracks and damage. If wear, cracks or damage is detected, replace the applicable part.
Piston
CAUTION:
The piston sliding surface is plated. Do not polish with sandpaper.
Check piston surface for corrosion, wear and damage. If corrosion, wear or damage is detected, replace the
applicable part.
Sliding Pin, Pin Bolt and Pin Boot
Check sliding pin and sliding pin boot for wear, damage and cracks. If corrosion, wear or damage is detected,
replace the applicable part.
DISC ROTOR INSPECTION
Visual Inspection
Check surface of the disc rotor for uneven wear, cracks and serious damage. If uneven wear, cracks or seri-
ous damage is detected, replace it.
Run Out Inspection
1. Using wheel nuts, fix the disc rotor to the wheels hub. (2 or more positions)
BRD0041D
SFIA0340E
Page 865 of 3066
REAR DISC BRAKE
BR-31
C
D
E
G
H
I
J
K
L
MA
B
BR
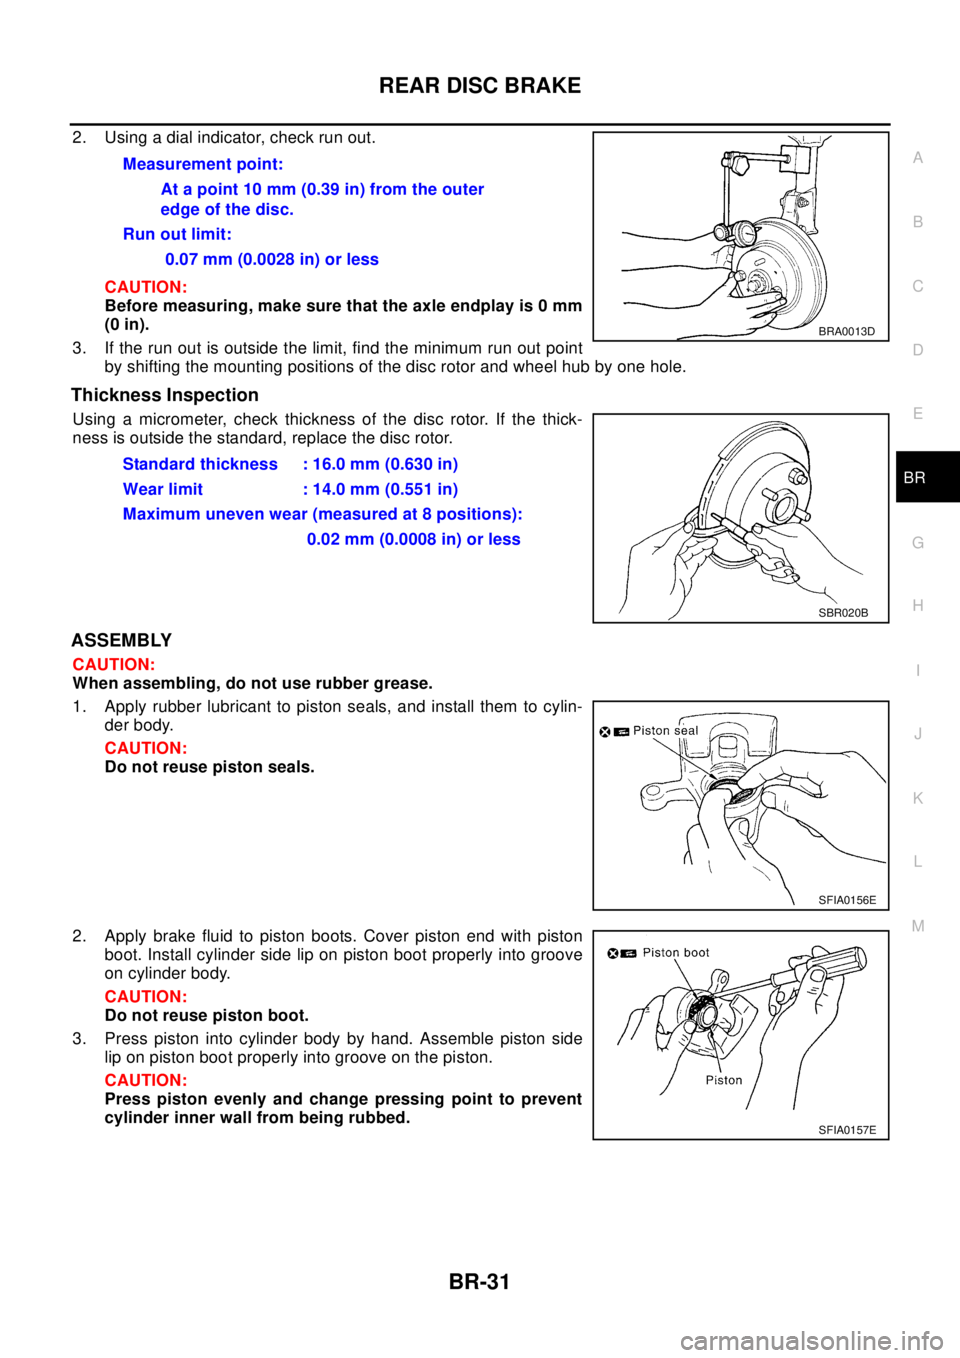
2. Using a dial indicator, check run out.
CAUTION:
Before measuring, make sure that the axle endplay is 0 mm
(0 in).
3. If the run out is outside the limit, find the minimum run out point
by shifting the mounting positions of the disc rotor and wheel hub by one hole.
Thickness Inspection
Using a micrometer, check thickness of the disc rotor. If the thick-
ness is outside the standard, replace the disc rotor.
ASSEMBLY
CAUTION:
When assembling, do not use rubber grease.
1. Apply rubber lubricant to piston seals, and install them to cylin-
der body.
CAUTION:
Do not reuse piston seals.
2. Apply brake fluid to piston boots. Cover piston end with piston
boot. Install cylinder side lip on piston boot properly into groove
on cylinder body.
CAUTION:
Do not reuse piston boot.
3. Press piston into cylinder body by hand. Assemble piston side
lip on piston boot properly into groove on the piston.
CAUTION:
Press piston evenly and change pressing point to prevent
cylinder inner wall from being rubbed.Measurement point:
At a point 10 mm (0.39 in) from the outer
edge of the disc.
Run out limit:
0.07 mm (0.0028 in) or less
BRA0013D
Standard thickness : 16.0 mm (0.630 in)
Wear limit : 14.0 mm (0.551 in)
Maximum uneven wear (measured at 8 positions):
0.02 mm (0.0008 in) or less
SBR020B
SFIA0156E
SFIA0157E