Page 3410 of 3502

SRS-36
DRIVER AIR BAG MODULE
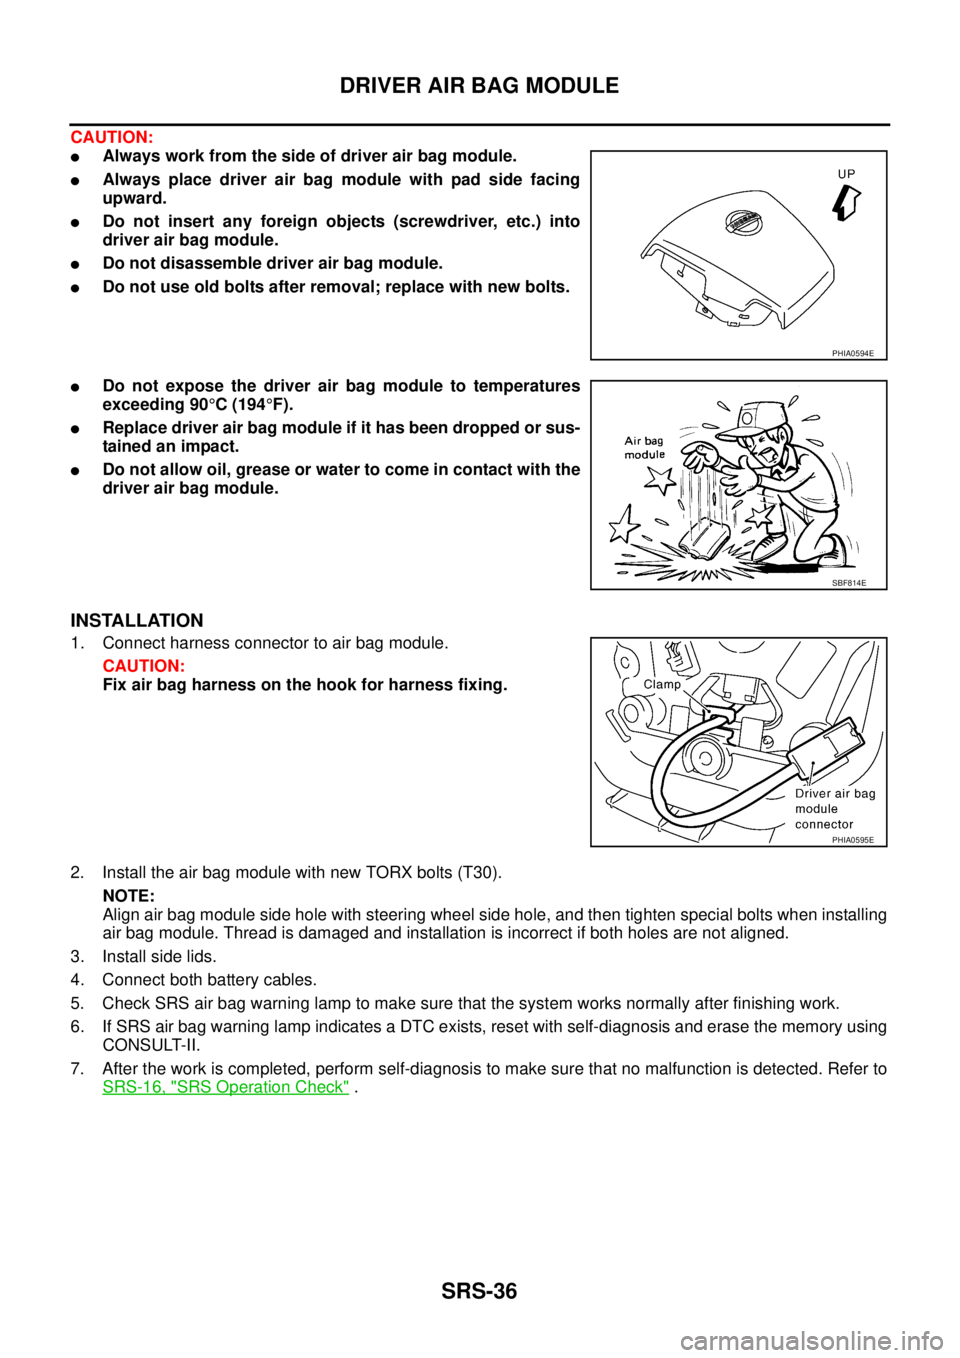
CAUTION:
�Always work from the side of driver air bag module.
�Always place driver air bag module with pad side facing
upward.
�Do not insert any foreign objects (screwdriver, etc.) into
driver air bag module.
�Do not disassemble driver air bag module.
�Do not use old bolts after removal; replace with new bolts.
�Do not expose the driver air bag module to temperatures
exceeding 90°C (194°F).
�Replace driver air bag module if it has been dropped or sus-
tained an impact.
�Do not allow oil, grease or water to come in contact with the
driver air bag module.
INSTALLATION
1. Connect harness connector to air bag module.
CAUTION:
Fix air bag harness on the hook for harness fixing.
2. Install the air bag module with new TORX bolts (T30).
NOTE:
Align air bag module side hole with steering wheel side hole, and then tighten special bolts when installing
air bag module. Thread is damaged and installation is incorrect if both holes are not aligned.
3. Install side lids.
4. Connect both battery cables.
5. Check SRS air bag warning lamp to make sure that the system works normally after finishing work.
6. If SRS air bag warning lamp indicates a DTC exists, reset with self-diagnosis and erase the memory using
CONSULT-II.
7. After the work is completed, perform self-diagnosis to make sure that no malfunction is detected. Refer to
SRS-16, "
SRS Operation Check" .
PHIA0594E
SBF814E
PHIA0595E
Page 3429 of 3502

COLLISION DIAGNOSIS
SRS-55
C
D
E
F
G
I
J
K
L
MA
B
SRS
COLLISION DIAGNOSISPFP:00015
For Frontal CollisionBHS0004O
To repair the SRS, perform the following steps.
When SRS (except the front side air bag and side curtain air bag modules) is activated in a collision:
1. Replace the diagnosis sensor unit.
2. Remove the air bag modules (except the front side air bag modules and side curtain air bag modules),
crash zone sensor assembly, bracket and seat belt pre-tensioner assemblies.
3. Check the SRS components using the table below:
–Replace any SRS components showing visible signs of damage (dents, cracks and deformation).
4. Install new air bag modules (except the front side air bag modules and side curtain air bag modules) crash
zone sensor assembly, bracket and seat belt pre-tensioner assemblies.
5. Perform self-diagnosis using CONSULT-II or “AIR BAG” warning lamp. Refer to SRS-16, "
SRS Operation
Check" for details. Ensure entire SRS operates properly.
When SRS is not activated in a collision:
1. Check the SRS components using the table below:
–Replace any SRS components showing visible signs of damage (dents, cracks and deformation).
2. Perform self-diagnosis using CONSULT-II or “AIR BAG” warning lamp. Refer to SRS-16, "
SRS Operation
Check" for details. Ensure entire SRS operates properly.
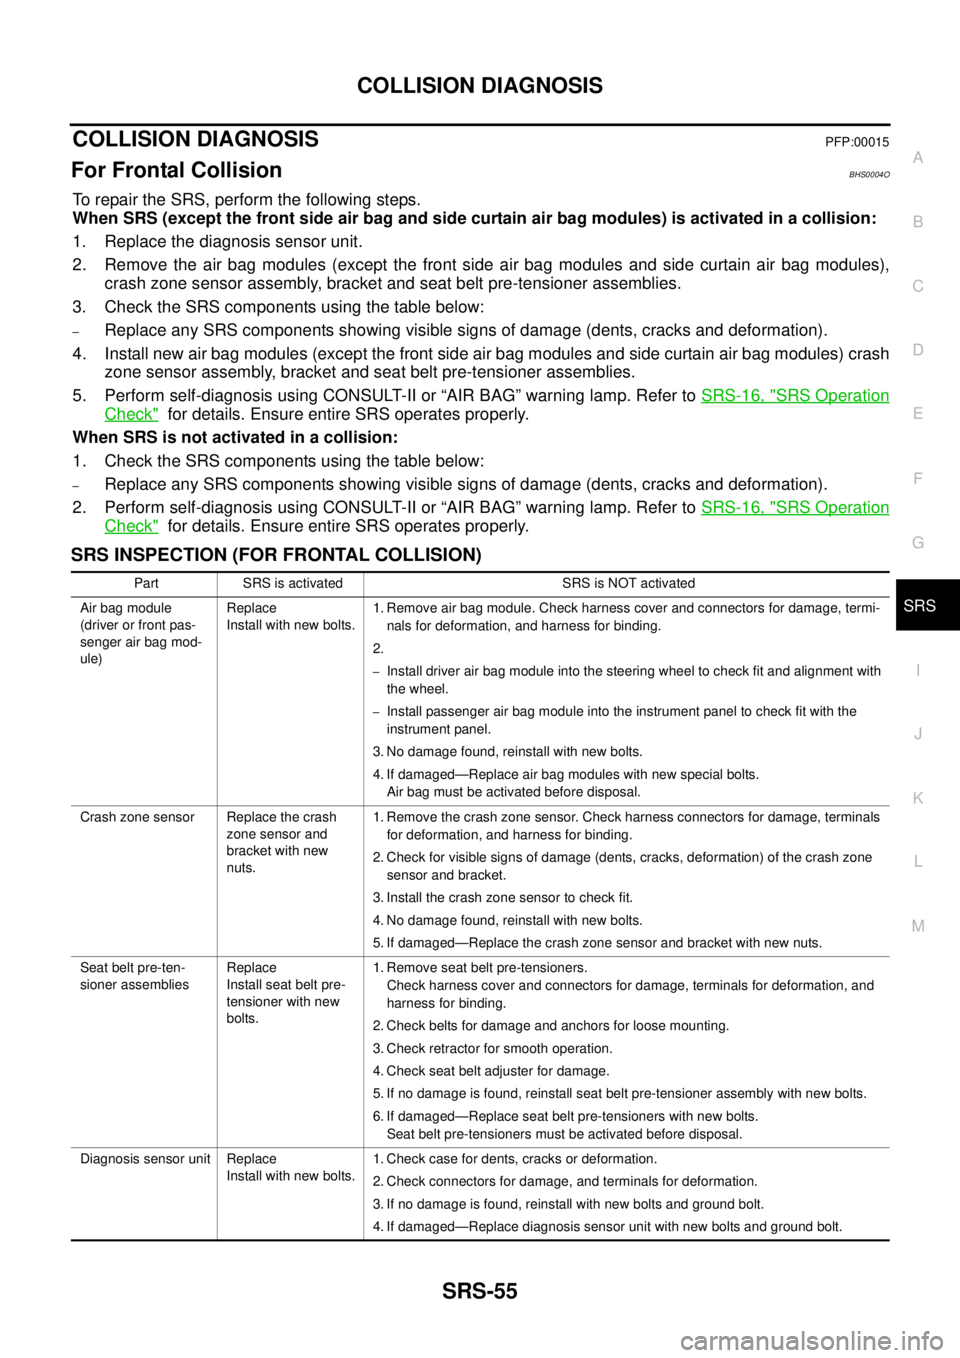
SRS INSPECTION (FOR FRONTAL COLLISION)
Part SRS is activated SRS is NOT activated
Air bag module
(driver or front pas-
senger air bag mod-
ule)Replace
Install with new bolts.1. Remove air bag module. Check harness cover and connectors for damage, termi-
nals for deformation, and harness for binding.
2.
–Install driver air bag module into the steering wheel to check fit and alignment with
the wheel.
–Install passenger air bag module into the instrument panel to check fit with the
instrument panel.
3. No damage found, reinstall with new bolts.
4. If damaged—Replace air bag modules with new special bolts.
Air bag must be activated before disposal.
Crash zone sensor Replace the crash
zone sensor and
bracket with new
nuts.1. Remove the crash zone sensor. Check harness connectors for damage, terminals
for deformation, and harness for binding.
2. Check for visible signs of damage (dents, cracks, deformation) of the crash zone
sensor and bracket.
3. Install the crash zone sensor to check fit.
4. No damage found, reinstall with new bolts.
5. If damaged—Replace the crash zone sensor and bracket with new nuts.
Seat belt pre-ten-
sioner assembliesReplace
Install seat belt pre-
tensioner with new
bolts.1. Remove seat belt pre-tensioners.
Check harness cover and connectors for damage, terminals for deformation, and
harness for binding.
2. Check belts for damage and anchors for loose mounting.
3. Check retractor for smooth operation.
4. Check seat belt adjuster for damage.
5. If no damage is found, reinstall seat belt pre-tensioner assembly with new bolts.
6. If damaged—Replace seat belt pre-tensioners with new bolts.
Seat belt pre-tensioners must be activated before disposal.
Diagnosis sensor unit Replace
Install with new bolts.1. Check case for dents, cracks or deformation.
2. Check connectors for damage, and terminals for deformation.
3. If no damage is found, reinstall with new bolts and ground bolt.
4. If damaged—Replace diagnosis sensor unit with new bolts and ground bolt.
Page 3430 of 3502

SRS-56
COLLISION DIAGNOSIS
Steering wheel 1. Visually check steering wheel for deformation.
2. Check harness (built into steering wheel) and connectors for damage, and terminals for deformation.
3. Install air bag module to check fit or alignment with steering wheel.
4. Check steering wheel for excessive free play.
5. If no damage is found, reinstall with nut.
6. If damaged—Replace.
Spiral cable 1. Visually check spiral cable and combination switch for damage.
2. Check connectors and protective tape for damage.
3. Check steering wheel for noise, binding or heavy operation.
4. If no damage is found, reinstall with screws.
5. If damaged—Replace.
Harness and connec-
tors1. Check connectors for poor connection, damage, and terminals for deformation.
2. Check harness for binding, chafing, cuts, or deformation.
3. If no damage is found, reinstall the harness and connectors.
4. If damaged—Replace damaged section of harness. Do not repair, splice or modify any SRS harness.
Instrument panel 1. Visually check instrument panel for damage.
2. If no damage is found, reinstall the instrument panel.
3. If damaged—Replace the instrument panel with bolts. Part SRS is activated SRS is NOT activated