Page 2316 of 3502
![NISSAN TEANA 2003 Service Manual EM-208
[VQ]
OIL SEAL
Removal and Installation of Front Oil SealBBS004W4
REMOVAL
1. Remove the following:
�Right side front road wheel and tire.
�Splash guard (RH)
�Drive belts; Refer to EM-128, "DRI](/manual-img/5/57392/w960_57392-2315.png "NISSAN TEANA 2003 Service Manual EM-208
[VQ]
OIL SEAL
Removal and Installation of Front Oil SealBBS004W4
REMOVAL
1. Remove the following:
�Right side front road wheel and tire.
�Splash guard (RH)
�Drive belts; Refer to EM-128, \"DRI")
EM-208
[VQ]
OIL SEAL
Removal and Installation of Front Oil SealBBS004W4
REMOVAL
1. Remove the following:
�Right side front road wheel and tire.
�Splash guard (RH)
�Drive belts; Refer to EM-128, "DRIVE BELTS" .
�Crankshaft pulley; Refer to EM-173, "TIMING CHAIN" .
2. Remove front oil seal using suitable tool.
CAUTION:
Be careful not to damage front timing chain case and crank-
shaft.
INSTALLATION
1. Apply engine oil to both oil seal lip and dust seal lip.
2. Install front oil seal.
�Install front oil seal so that each seal lip is oriented as shown
in the figure.
�Using suitable drift, press-fit until the height of front oil seal is
level with the mounting surface.
–Suitable drift: outer diameter 60 mm (2.36 in), inner diameter
50 mm (1.97 in).
CAUTION:
�Be careful not to damage front timing chain case and
crankshaft.
�Press-fit straight and avoid causing burrs or tilting oil
seal.
3. Install in the reverse order of removal after this step.
Removal and Installation of Rear Oil SealBBS004W5
REMOVAL
1. Remove engine assembly from vehicle, and separate front suspension member and transaxle from
engine. Refer to EM-223, "
ENGINE ASSEMBLY" .
2. Install engine sub-attachment with engine stand shaft [SST: KV10117001 and KV10106500] to right side
of cylinder block, then lift engine, and mount it onto engine stand [SST: ST0501S000]. Refer to EM-228,
"CYLINDER BLOCK" .
3. Remove drive plate. Refer to EM-228, "
CYLINDER BLOCK" .
4. Remove oil pan (upper). Refer to EM-145, "
OIL PAN AND OIL STRAINER" .
SEM829E
SEM715A
SEM829E
Page 2317 of 3502
OIL SEAL
EM-209
[VQ]
C
D
E
F
G
H
I
J
K
L
MA
EM
5. Use seal cutter (SST) to cut away liquid gasket and remove rear
oil seal retainer.
CAUTION:
Be careful not to damage mating surfaces.
NOTE:
Regard both rear oil seal and retainer as an assembly.
INSTALLATION
1. Remove old liquid gasket on mating surface of cylinder block and oil pan (upper) using scraper.
2. Apply new engine oil to both oil seal lip and dust seal lip of new rear oil seal retainer.
3. Apply a continuous bead of liquid gasket with tube presser [SST:
WS39930000] to new rear oil seal retainer as shown in the fig-
ure.
Use Genuine Liquid Gasket or equivalent.
�Assembly should be done within 5 minutes after coating.
4. Install rear oil seal retainer to cylinder block. Refer to EM-228, "
CYLINDER BLOCK" .
5. Install in the reverse order of removal after this step.
PBIC1612E
PBIC2649E
Page 2319 of 3502
![NISSAN TEANA 2003 Service Manual CYLINDER HEAD
EM-211
[VQ]
C
D
E
F
G
H
I
J
K
L
MA
EM
CAUTION:
Always use a fully changed battery to obtain specified engine speed.
�If the engine speed is out of specified range, check battery liquid](/manual-img/5/57392/w960_57392-2318.png "NISSAN TEANA 2003 Service Manual CYLINDER HEAD
EM-211
[VQ]
C
D
E
F
G
H
I
J
K
L
MA
EM
CAUTION:
Always use a fully changed battery to obtain specified engine speed.
�If the engine speed is out of specified range, check battery liquid")
CYLINDER HEAD
EM-211
[VQ]
C
D
E
F
G
H
I
J
K
L
MA
EM
CAUTION:
Always use a fully changed battery to obtain specified engine speed.
�If the engine speed is out of specified range, check battery liquid for proper gravity. Check engine
speed again with normal battery gravity.
�If compression pressure is below minimum value, check valve clearances and parts associated with
combustion chamber (valve, valve seat, piston, piston ring, cylinder bore, cylinder head, cylinder head
gasket). After the checking, measure compression pressure again.
�If some cylinders have low compression pressure, pour small amount of engine oil into the spark plug
hole of the cylinder to re-check it for compression.
–If the added engine oil improves the compression, piston rings may be worn out or damaged. Check the
piston rings and replace if necessary.
–If the compression pressure remains at low level despite the addition of engine oil, valves may be mal-
functioning. Check valves for damage. Replace valve or valve seat accordingly.
�If two adjacent cylinders have respectively low compression pressure and their compression remains
low even after the addition of engine oil, cylinder head gasket is leaking. In such a case, replace cylin-
der head gasket.
9. After inspection is completed, install removed parts.
10. Start engine, and make sure that engine runs smoothly.
11. Perform trouble diagnosis. If DTC appears, erase it. Refer to EC-394, "
TROUBLE DIAGNOSIS" .
Removal and InstallationBBS004W7
REMOVAL
1. Remove engine assembly from vehicle, and separate front suspension member and transaxle from
engine. Refer to EM-223, "
ENGINE ASSEMBLY" .
2. Install engine sub-attachment with engine stand shaft [SST: KV10117001 and KV10106500] to right side
of cylinder block, then lift engine, and mount it onto engine stand [SST: ST0501S000]. Refer to EM-228,
"CYLINDER BLOCK" .
1. Cylinder head (left bank) 2. Cylinder head bolt 3. Cylinder head (right bank)
4. Cylinder head gasket (right bank) 5. Cylinder head gasket (left bank) 6. Oil level gauge
PBIC2479E
Page 2321 of 3502
![NISSAN TEANA 2003 Service Manual CYLINDER HEAD
EM-213
[VQ]
C
D
E
F
G
H
I
J
K
L
MA
EM
Cylinder Head Distortion
NOTE:
When performing this inspection, cylinder block distortion should be also checking. Refer to EM-248, "
CYLIN-
DER B](/manual-img/5/57392/w960_57392-2320.png "NISSAN TEANA 2003 Service Manual CYLINDER HEAD
EM-213
[VQ]
C
D
E
F
G
H
I
J
K
L
MA
EM
Cylinder Head Distortion
NOTE:
When performing this inspection, cylinder block distortion should be also checking. Refer to EM-248, \"
CYLIN-
DER B")
CYLINDER HEAD
EM-213
[VQ]
C
D
E
F
G
H
I
J
K
L
MA
EM
Cylinder Head Distortion
NOTE:
When performing this inspection, cylinder block distortion should be also checking. Refer to EM-248, "
CYLIN-
DER BLOCK DISTORTION" .
1. Wipe off oil and remove scale, gasket, sealant and carbon deposits from surface of cylinder head with
scraper.
CAUTION:
Use utmost care not to allow gasket debris to enter passages for engine oil or engine coolant.
2. At each of several locations on bottom surface of cylinder head,
measure the distortion in six directions.
�If it exceeds the limit, replace cylinder head.
INSTALLATION
1. Install new cylinder head gaskets.
2. Turn crankshaft until No. 1 piston is set at TDC.
�Crankshaft key should line up with the right bank cylinder cen-
ter line as shown in the figure.
3. Install cylinder head follow the steps below to tighten cylinder
head bolts in numerical order as shown in the figure.
a. Apply new engine oil to threads and seat surfaces of cylinder
head bolts.
b. Tighten all cylinder head bolts.
c. Completely loosen all cylinder head bolts.
CAUTION:
In step “c”, loosen bolts in the reverse order of that indi-
cated in the figure.
d. Tighten all cylinder head bolts.Limit : 0.1 mm (0.004 in)
SEM861E
SEM532G
: 98.1 N·m (10 kg-m, 72 ft-lb)
: 0 N·m (0 kg-m, 0 ft-lb)
: 39.2 N·m (4.0 kg-m, 29 ft-lb)
PBIC2057E
Page 2337 of 3502
![NISSAN TEANA 2003 Service Manual CYLINDER BLOCK
EM-229
[VQ]
C
D
E
F
G
H
I
J
K
L
MA
EM
DISASSEMBLY
NOTE:
Show VQ35DE (with main bearing beam, connecting rod bearing cap is tighten by bolts) as an example unless
the figure includes s](/manual-img/5/57392/w960_57392-2336.png "NISSAN TEANA 2003 Service Manual CYLINDER BLOCK
EM-229
[VQ]
C
D
E
F
G
H
I
J
K
L
MA
EM
DISASSEMBLY
NOTE:
Show VQ35DE (with main bearing beam, connecting rod bearing cap is tighten by bolts) as an example unless
the figure includes s")
CYLINDER BLOCK
EM-229
[VQ]
C
D
E
F
G
H
I
J
K
L
MA
EM
DISASSEMBLY
NOTE:
Show VQ35DE (with main bearing beam, connecting rod bearing cap is tighten by bolts) as an example unless
the figure includes specification.
1. Remove engine assembly from vehicle, and separate front suspension member and transaxle from
engine. Refer to EM-223, "
ENGINE ASSEMBLY" .
2. Remove exhaust manifolds (right and left banks). Refer to EM-140, "
EXHAUST MANIFOLD AND THREE
WAY CATALYST" .
3. Install engine sub-attachment with engine stand shaft (SST) to
right side of cylinder block.
�Use spacer to engine front side.
4. Lift engine, and mount it onto engine stand (SST).
1. Reinforcement plate 2. Drive plate 3. Rear oil seal retainer
4. Knock sensor 5. Cylinder block 6. Thrust bearing (upper)
7. Main bearing (upper) 8. Crankshaft 9. Key
10. Thrust bearing (lower) 11. Main bearing (lower) 12. Main bearing cap
13. Main bearing cap bolt 14. Main bearing beam 15. Baffle plate
16. Connecting rod nut 17. Connecting rod bolt 18. Connecting rod bearing cap
19. Connecting rod bearing 20. Connecting rod 21. Snap ring
22. Piston pin 23. Piston 24. Oil ring
25. Second ring 26. Top ring 27. Pilot converter
28. Oil jet
PBIC2486E
PBIC2618E
Page 2338 of 3502
![NISSAN TEANA 2003 Service Manual EM-230
[VQ]
CYLINDER BLOCK
�A widely use engine stand can be used.
CAUTION:
Use engine stand that has a load capacity [approximately
220 kg (441 lb) or more] large enough for supporting the
engine w](/manual-img/5/57392/w960_57392-2337.png "NISSAN TEANA 2003 Service Manual EM-230
[VQ]
CYLINDER BLOCK
�A widely use engine stand can be used.
CAUTION:
Use engine stand that has a load capacity [approximately
220 kg (441 lb) or more] large enough for supporting the
engine w")
EM-230
[VQ]
CYLINDER BLOCK
�A widely use engine stand can be used.
CAUTION:
Use engine stand that has a load capacity [approximately
220 kg (441 lb) or more] large enough for supporting the
engine weight.
NOTE:
This example is engine stand for holding at transaxle mount-
ing side with drive plate removed.
5. Drain engine oil. Refer to LU-21, "
Changing Engine Oil" .
6. Drain engine coolant by removing water drain plugs from cylin-
der block both sides at “A” and “D” and cylinder block front side
at “B” as shown in the figure.
NOTE:
Water drain plug at the right bank side for VQ35DE is also used
as a connector of water pipe for oil cooler. Refer to LU-23, "
OIL
COOLER (VQ35DE)" .
7. Remove drive plate. Fix crankshaft pulley with pulley holder [SST: KV10109300], and remove mounting
bolts.
�Loosen mounting bolts in diagonal order.
CAUTION:
�Do not disassemble drive plate.
�Do not place drive plate with signal plate facing down.
�When handling signal plate, take care not to damage or
scratch it.
�Handle signal plate in a manner that prevents it from
becoming magnetized.
8. Remove cylinder head. Refer to EM-210, "
CYLINDER HEAD" .
9. Remove knock sensor.
CAUTION:
Carefully handle sensor avoiding shocks.
PBIC0085E
PBIC2487E
SEM760G
Page 2341 of 3502
CYLINDER BLOCK
EM-233
[VQ]
C
D
E
F
G
H
I
J
K
L
MA
EM
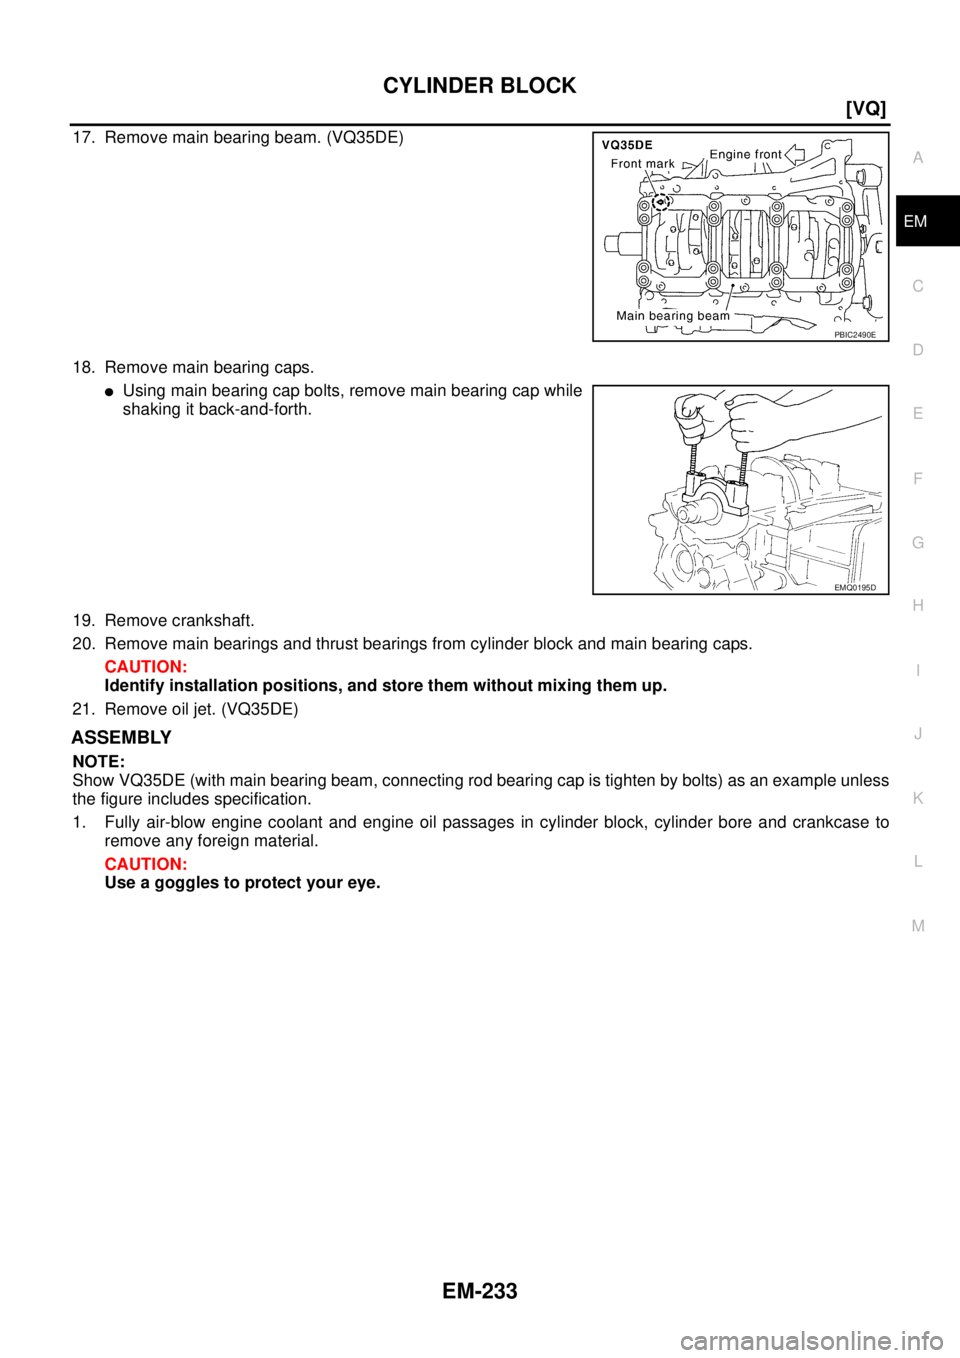
17. Remove main bearing beam. (VQ35DE)
18. Remove main bearing caps.
�Using main bearing cap bolts, remove main bearing cap while
shaking it back-and-forth.
19. Remove crankshaft.
20. Remove main bearings and thrust bearings from cylinder block and main bearing caps.
CAUTION:
Identify installation positions, and store them without mixing them up.
21. Remove oil jet. (VQ35DE)
ASSEMBLY
NOTE:
Show VQ35DE (with main bearing beam, connecting rod bearing cap is tighten by bolts) as an example unless
the figure includes specification.
1. Fully air-blow engine coolant and engine oil passages in cylinder block, cylinder bore and crankcase to
remove any foreign material.
CAUTION:
Use a goggles to protect your eye.
PBIC2490E
EMQ0195D
Page 2342 of 3502
![NISSAN TEANA 2003 Service Manual EM-234
[VQ]
CYLINDER BLOCK
2. Install each plug to cylinder block as shown in the figure.
NOTE:
Water drain plug at the right bank side for VQ35DE is also used
as a connector of water pipe for oil c](/manual-img/5/57392/w960_57392-2341.png "NISSAN TEANA 2003 Service Manual EM-234
[VQ]
CYLINDER BLOCK
2. Install each plug to cylinder block as shown in the figure.
NOTE:
Water drain plug at the right bank side for VQ35DE is also used
as a connector of water pipe for oil c")
EM-234
[VQ]
CYLINDER BLOCK
2. Install each plug to cylinder block as shown in the figure.
NOTE:
Water drain plug at the right bank side for VQ35DE is also used
as a connector of water pipe for oil cooler. Refer to LU-23, "
OIL
COOLER (VQ35DE)" .
�Apply sealant to the thread of water drain plug “A”.
Use Anaerobic Liquid Gasket or equivalent.
�Apply sealant to the thread of water drain plugs “B” and “D”.
Use Genuine Liquid Gasket or equivalent.
�Apply sealant to the thread of plug “C”.
Use Thread Locking Sealant or equivalent.
�Replace washers with new one.
�Tighten each plug as specified below.
3. Install oil jet. (VQ35DE)
�Insert oil jet dowel pin into cylinder block dowel pin hole, and
tighten mounting bolts.
4. Install main bearings and thrust bearings as follows:
a. Remove dust, dirt, and engine oil on bearing mating surfaces of cylinder block and main bearing caps.
PBIC2487E
Part WasherTightening torque
VQ23DE VQ35DE
A Yes 62.0 N·m (6.3 kg-m, 46 ft-lb)
B No 9.8 N·m (1.0 kg-m, 87 in-lb)
C Yes 62.0 N·m (6.3 kg-m, 46 ft-lb)
D No 19.6 N·m (2.0 kg-m, 14 ft-lb) 39.2 N·m (4.0 kg-m, 29 ft-lb)
PBIC2488E
![NISSAN TEANA 2003 Service Manual OIL SEAL
EM-209
[VQ]
C
D
E
F
G
H
I
J
K
L
MA
EM
5. Use seal cutter (SST) to cut away liquid gasket and remove rear
oil seal retainer.
CAUTION:
Be careful not to damage mating surfaces.
NOTE:
Regard b](/manual-img/5/57392/w960_57392-2316.png "NISSAN TEANA 2003 Service Manual OIL SEAL
EM-209
[VQ]
C
D
E
F
G
H
I
J
K
L
MA
EM
5. Use seal cutter (SST) to cut away liquid gasket and remove rear
oil seal retainer.
CAUTION:
Be careful not to damage mating surfaces.
NOTE:
Regard b")