Page 108 of 167
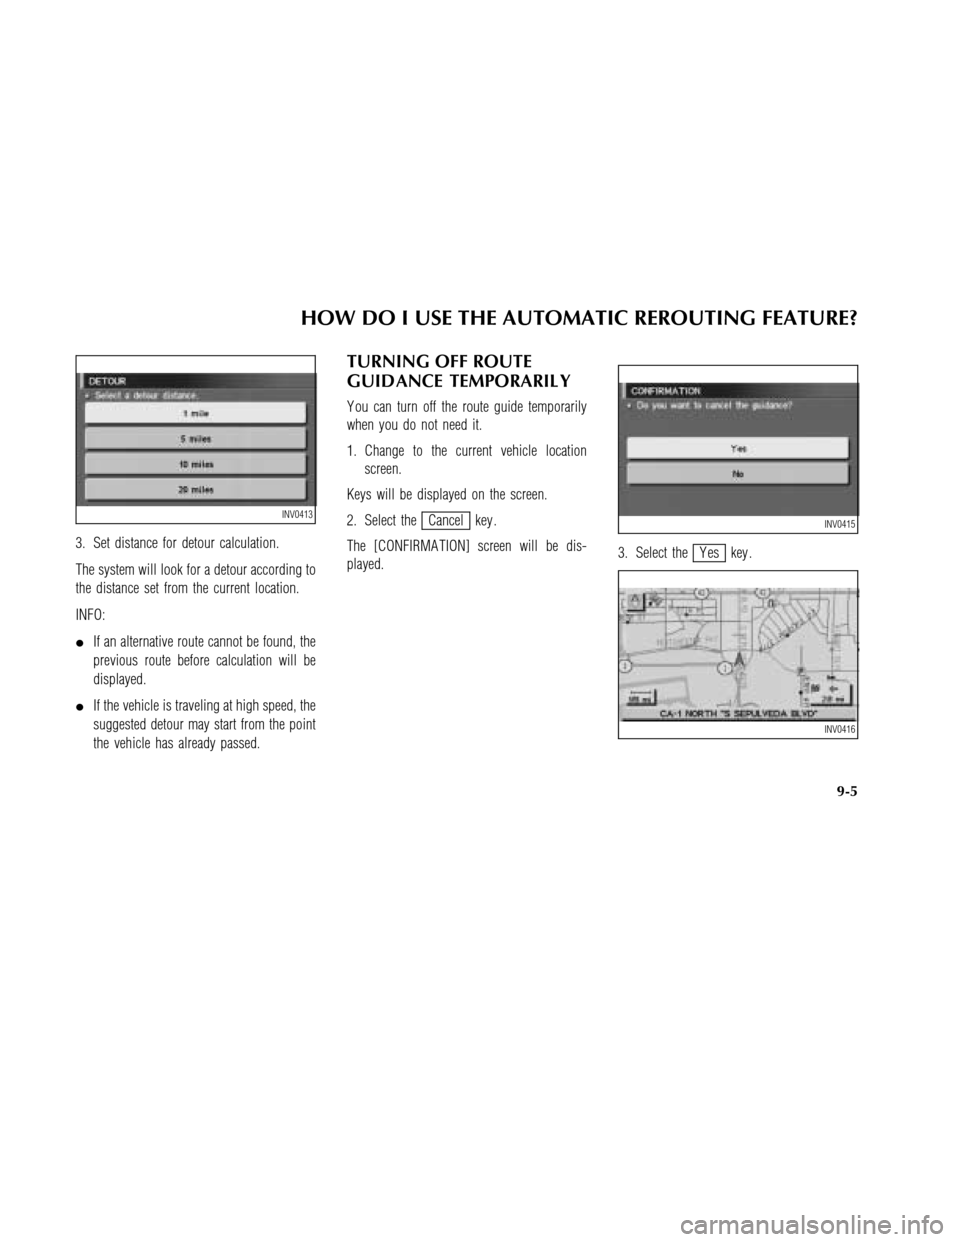
3. Set distance for detour calculation.
The system will look for a detour according to
the distance set from the current location.
INFO:
�If an alternative route cannot be found, the
previous route before calculation will be
displayed.
�If the vehicle is traveling at high speed, the
suggested detour may start from the point
the vehicle has already passed.
TURNING OFF ROUTE
GUIDANCE TEMPORARIL Y
Y ou can turn off the route guide temporarily
when you do not need it.
1. Change to the current vehicle location
screen.
Keys will be displayed on the screen.
2. Select the
Cancel key .
The [CONFIRMA TION] screen will be dis-
played.3. Select the
Y es key .
INV0413INV0415
INV0416
HOW DO I USE THE AUTOMATIC REROUTING FEATURE?
9-5
Page 113 of 167

REQUESTING CURRENT
VOICE INFORMA TION
This is available during route guidance, from
the time after the route calculation is completed
until the vehicle arrives at the destination.
1. T ouch the
Voice key .
The current condition will be announced.
INFO:
�If you touch the
Voice key when you are
off the suggested route and when the au-tomatic re-route function is off, the voice
will announce: “Proceed to the highlighted
route.”
�If you touch the
Voice key when you are
going in the wrong direction, the voice will
announce: “Please make a legal U-turn if
possible.”
NOTES ON THE VOICE
GUIDANCE
�The voice guidance in this system should
be regarded as a supplementary function.
When driving your vehicle, check the route
on the map display and follow the actual
road and all traffic regulations.
�The voice guidance is activated only for
junctions with certain conditions. In some
cases you may need to turn, even if there
is no voice guidance
�The content of the voice guidance may vary ,
depending on the direction of the turn andthe type of junction with other roads.
�The route guidance will be activated at vari-
ous times depending on the situation.
�When the vehicle is off the suggested route,
route guidance is not available. The system
will not inform you of this; please refer to
the map display and request rerouting.
�At freeway junctions, the road numbers and
directions may not accurately correspond
with the voice guidance.
�At freeway exits, the street names may not
accurately correspond with the voice guid-
ance.
�The displayed street names may sometimes
differ from the actual names or “UNKNOWN
STREET NAME” may be displayed.
Please refer to “Automatic rerouting” on page
9-2.
�When the green indicator on the
Guide Volume key is not illuminated, the
INV0494
HOW DO I USE THE VOICE GUIDANCE FEATURE?
10-4
Page 114 of 167

voice guidance is not available.
�The voice guidance will start when the ve-
hicle enters the suggested route. Before en-
tering the route, refer to the map display for
the direction.
�When the vehicle approaches a waypoint,
the voice will say , “Y ou have arrived at
waypoint 1 (2, 3, 4,...).” The guidance will
switch to the next route section. While the
voice guidance is not available, please refer
to the map display for the direction.
�When the vehicle approaches a destination,
the voice will say , “Y ou have arrived at your
destination. Ending route guidance.” For
the remainder of the way , please find your
direction on the map display .
�In some cases, the voice guidance ends be-
fore arrival at the destination. In such cases,
drive the vehicle by referring to the desti-
nation icon displayed on the map screen.
�When the system can judge which side thedestination (waypoint) is located on, the
voice guidance will say “on the right” after
guidance of arrival.
�Voice guidance may not operate as speci-
fied or may not operate at all due to the
angle of roads at intersection entrances and
exits.
HOW DO I USE THE VOICE GUIDANCE FEATURE?
10-5
Page 116 of 167

11 HOW DO I ADJUST THE DISPLAY?
Screen informa tion — Planview
displa y ....................................................... 11-2
Screen informa tion — Birdview
TM
displa y ....................................................... 11-2
Switching between BirdviewTMand Plan-
view displa ys ........................................ 11-3
Zooming in and out of the map ................ 11-5
Changing the displa y direction (in Planview
displa y) ...................................................... 11-6
Scrolling the map ...................................... 11-8
Displa ying the complete route to the
destina tion ................................................. 11-8
Displa ying turn list .................................... 11-9
Requesting the simula tion drive to the
destina tion ............................................... 11-10
Displa ying the track ........................... 11-11
GPS informa tion displa y ......................... 11-12
Upda ting the current vehicle loca tion and
the direction ...................................... 11-13
Changing the displa y mode ................... 11-15
Changing the displa y color...................... 11-16Adjusting the displa y brightness ............. 11-18
Setting automa tic beep sound ................ 11-19
How to handle the displa y ...................... 11-20
Characteristics of liquid cryst al
displa y ................................................ 11-20
Maintenance of the displa y ................ 11-21
Page 117 of 167

SCREEN INFORMA TION —
PLANVIEW DISPLA Y
Direction key:
This indicates and sets the direction of the map
on the display .
Please refer to “Changing the display direc-
tion” on page 11-6.
Map scale:
This display indicates the scale on the current
map.
V ehicle icon:
This icon indicates your vehicle and the direc-
tion of travel.
GPS indicator:
This will tell you the strength of the GPS signal
received.
Please refer to “Accuracy of positioning” on
page 2-2.
:
This will indicate the approximate distance of
route and traveling time to the destination. This
indicator will appear when you set the desti-
nation with the route guidance ON.
:
When the route guidance is OFF or when routecalculation is not started after you set the des-
tination, it will show the direction and approxi-
mate straight distance to the destination.
SCREEN INFORMA TION —
BIRD VIEWTMDISPLA Y
Map scale:
This display indicates the scale on the current
map.
By using the ZM− ZM+ buttons, you can
change the scale of the map.
INV0419
INV0422
HOW DO I ADJUST THE DISPLAY?
11-2
Page 118 of 167
Height and distance on BirdviewTMdisplay
Height ofviewDistance
between gridsDepth ofdistance
512,000 feet 160 milesapprox. 2,240
miles
128,000 feet 40 miles approx. 560 miles
64,000 feet 20 miles approx. 280 miles
32,000 feet 10 miles approx. 140 miles
16,000 feet 4.0 miles approx. 70 miles
8,000 feet 2.0 miles approx. 35 miles
4,000 feet 1.0 mileapprox. 17-1/2
miles
2,000 feet 1/2 mileapprox. 8-3/4
miles
1,000 feet 1/4 mileapprox. 4-3/8
miles
Height of view: 1,000 feet
Height of view: 16,000 feet
SWITCHING BETWEEN BIRD-
VIEWTMand PLANVIEW DIS-
PLAYS
BirdviewTMscreen displays the view from
above, looking down toward the direction the
vehicle is traveling. This combines the detailed
display close to the vehicle and the long dis-
tance view in one screen.
INV0423
INV0424
INV0420
HOW DO I ADJUST THE DISPLAY?
11-3
Page 119 of 167
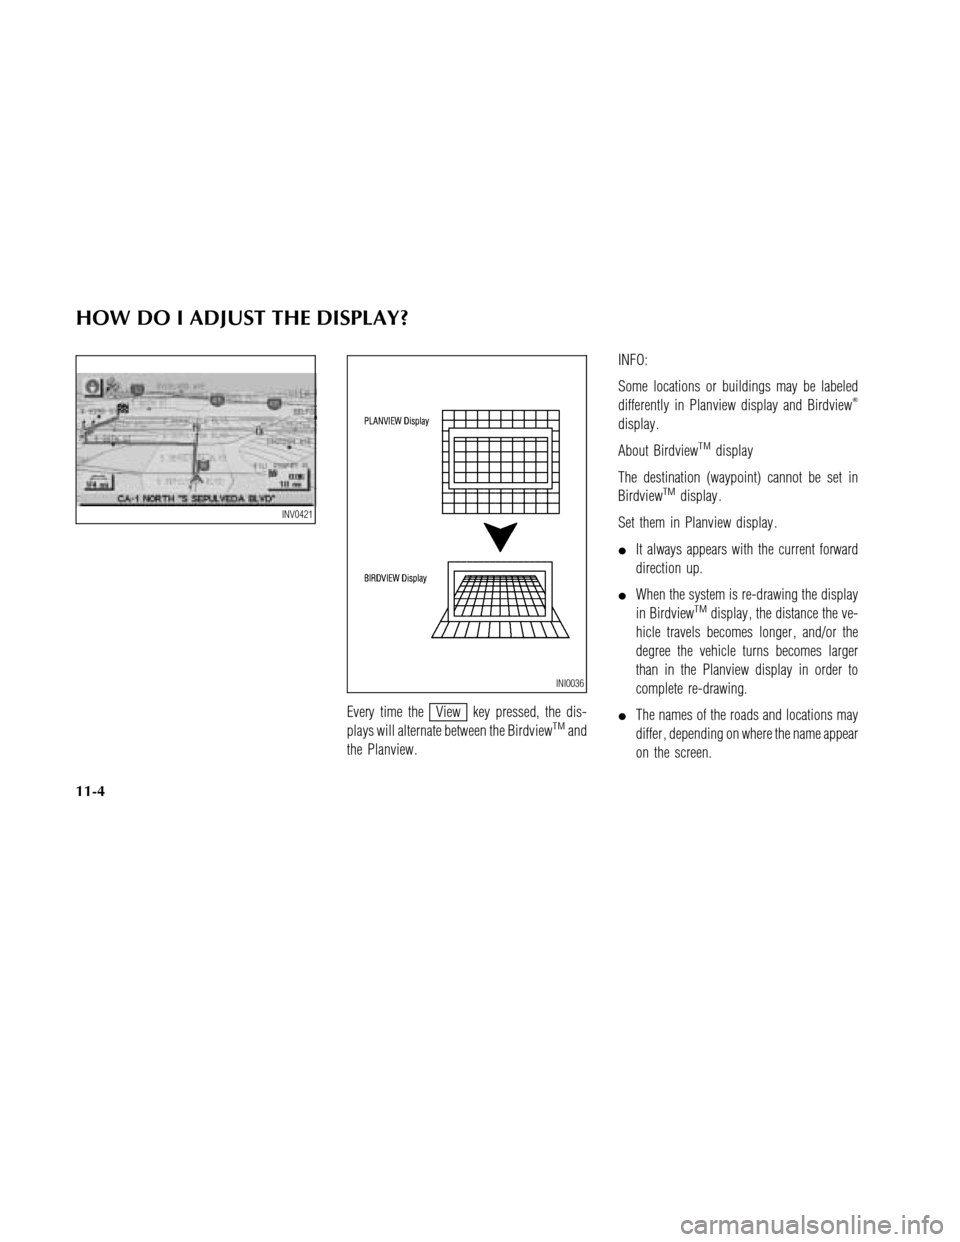
Every time theView key pressed, the dis-
plays will alternate between the BirdviewTMand
the Planview.INFO:
Some locations or buildings may be labeled
differently in Planview display and Birdview
�
display .
About Birdview
TMdisplay
The destination (waypoint) cannot be set in
Birdview
TMdisplay .
Set them in Planview display .
�It always appears with the current forward
direction up.
�When the system is re-drawing the display
in Birdview
TMdisplay , the distance the ve-
hicle travels becomes longer , and/or the
degree the vehicle turns becomes larger
than in the Planview display in order to
complete re-drawing.
�The names of the roads and locations may
differ , depending on where the name appear
on the screen.
INV0421
INI0036
HOW DO I ADJUST THE DISPLAY?
11-4
Page 120 of 167

�In order to avoid complication of the map,
all road names are not always shown on the
screen. When the display re-draws the map,
a road name which is shown on the pre-
vious screen may not appear on the new
screen.
ZOOMING IN AND OUT OF
THE MAP
Use the ZM− / ZM+ button to change the
scale of the display and height view.
Nine map scales are available from the most
detailed (1 : 10,000) to the widest (1 : 20.48
million).
Each time the ZM+ button is pressed, the
map scale will change one level to display a
more detailed map.
Each time the ZM− button is pressed, the
map scale will change one level to display a
map that shows a wider area.The chosen map scale will be displayed on the
left side of the screen.
INFO:
By pressing the button repeatedly , you can skip
the levels to reach the map of desired scale.
Scale level on the Planview display
Map scale Actual distance
1 : 20.48 million 160 miles
1 : 5.12 million 40 miles
1 : 1.28 million 10 miles
1 : 320,000 2.5 miles
1 : 160,000 1 mile
1 : 80,000 1/2 mile
1 : 40,000 1/4 mile
1 : 20,000 1/8 mile
1 : 10,000 1/16 mile
Scales on the BirdviewTMis listed on page
11-3. Most detailed level (1: 10,000)
The widest level (1: 20.48 million)
INV0425
INV0426
HOW DO I ADJUST THE DISPLAY?
11-5