2003 NISSAN 350Z ECO mode
[x] Cancel search: ECO modePage 77 of 227
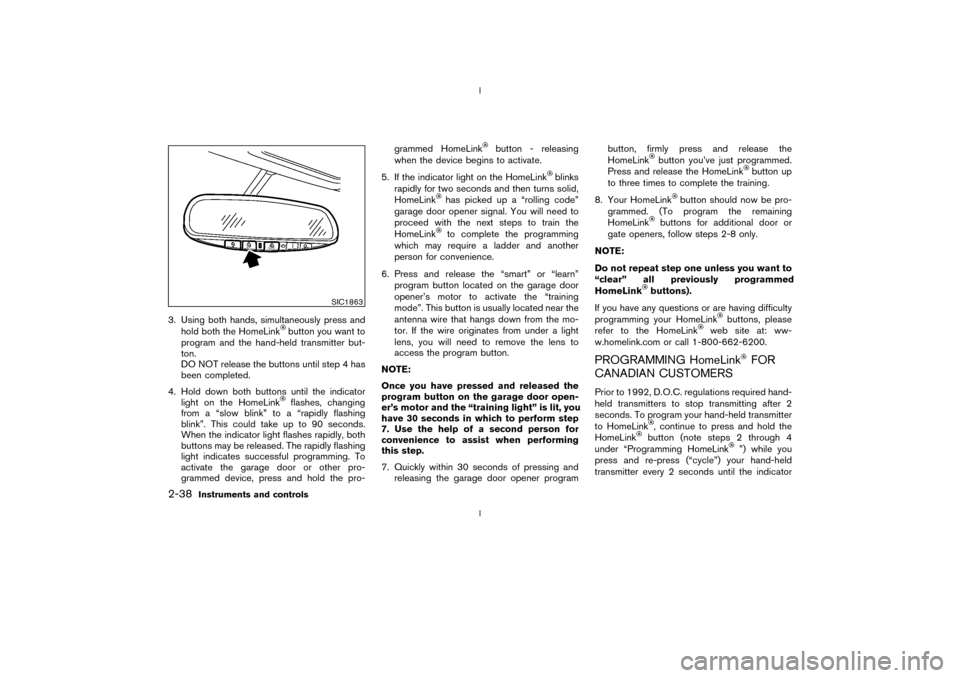
3. Using both hands, simultaneously press and
hold both the HomeLink
button you want to
program and the hand-held transmitter but-
ton.
DO NOT release the buttons until step 4 has
been completed.
4. Hold down both buttons until the indicator
light on the HomeLinkflashes, changing
from a ªslow blinkº to a ªrapidly flashing
blinkº. This could take up to 90 seconds.
When the indicator light flashes rapidly, both
buttons may be released. The rapidly flashing
light indicates successful programming. To
activate the garage door or other pro-
grammed device, press and hold the pro-grammed HomeLink
button - releasing
when the device begins to activate.
5. If the indicator light on the HomeLink
blinks
rapidly for two seconds and then turns solid,
HomeLink
has picked up a ªrolling codeº
garage door opener signal. You will need to
proceed with the next steps to train the
HomeLinkto complete the programming
which may require a ladder and another
person for convenience.
6. Press and release the ªsmartº or ªlearnº
program button located on the garage door
opener's motor to activate the ªtraining
modeº. This button is usually located near the
antenna wire that hangs down from the mo-
tor. If the wire originates from under a light
lens, you will need to remove the lens to
access the program button.
NOTE:
Once you have pressed and released the
program button on the garage door open-
er's motor and the ªtraining lightº is lit, you
have 30 seconds in which to perform step
7. Use the help of a second person for
convenience to assist when performing
this step.
7. Quickly within 30 seconds of pressing and
releasing the garage door opener programbutton, firmly press and release the
HomeLink
button you've just programmed.
Press and release the HomeLink
button up
to three times to complete the training.
8. Your HomeLink
button should now be pro-
grammed. (To program the remaining
HomeLink
buttons for additional door or
gate openers, follow steps 2-8 only.
NOTE:
Do not repeat step one unless you want to
ªclearº all previously programmed
HomeLinkbuttons).
If you have any questions or are having difficulty
programming your HomeLink
buttons, please
refer to the HomeLink
web site at: ww-
w.homelink.com or call 1-800-662-6200.
PROGRAMMING HomeLink
FOR
CANADIAN CUSTOMERS
Prior to 1992, D.O.C. regulations required hand-
held transmitters to stop transmitting after 2
seconds. To program your hand-held transmitter
to HomeLink
, continue to press and hold the
HomeLinkbutton (note steps 2 through 4
under ªProgramming HomeLink
º) while you
press and re-press (ªcycleº) your hand-held
transmitter every 2 seconds until the indicator
SIC1863
2-38
Instruments and controls
Z
02.9.13/Z33-D/V5.0
X
Page 86 of 227
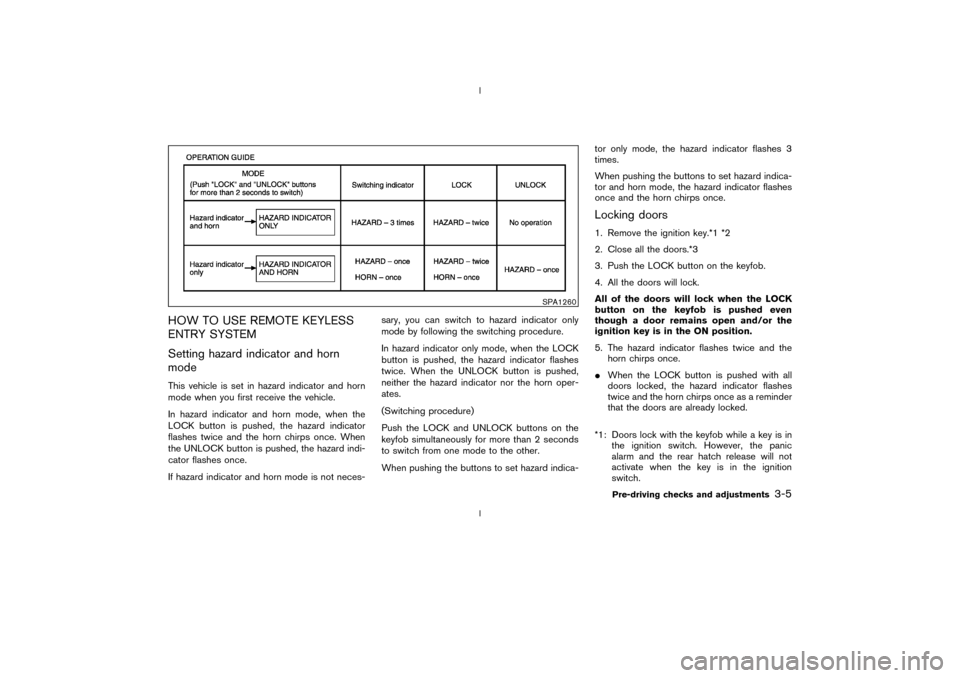
HOW TO USE REMOTE KEYLESS
ENTRY SYSTEM
Setting hazard indicator and horn
modeThis vehicle is set in hazard indicator and horn
mode when you first receive the vehicle.
In hazard indicator and horn mode, when the
LOCK button is pushed, the hazard indicator
flashes twice and the horn chirps once. When
the UNLOCK button is pushed, the hazard indi-
cator flashes once.
If hazard indicator and horn mode is not neces-sary, you can switch to hazard indicator only
mode by following the switching procedure.
In hazard indicator only mode, when the LOCK
button is pushed, the hazard indicator flashes
twice. When the UNLOCK button is pushed,
neither the hazard indicator nor the horn oper-
ates.
(Switching procedure)
Push the LOCK and UNLOCK buttons on the
keyfob simultaneously for more than 2 seconds
to switch from one mode to the other.
When pushing the buttons to set hazard indica-tor only mode, the hazard indicator flashes 3
times.
When pushing the buttons to set hazard indica-
tor and horn mode, the hazard indicator flashes
once and the horn chirps once.
Locking doors1. Remove the ignition key.*1 *2
2. Close all the doors.*3
3. Push the LOCK button on the keyfob.
4. All the doors will lock.
All of the doors will lock when the LOCK
button on the keyfob is pushed even
though a door remains open and/or the
ignition key is in the ON position.
5. The hazard indicator flashes twice and the
horn chirps once.
IWhen the LOCK button is pushed with all
doors locked, the hazard indicator flashes
twice and the horn chirps once as a reminder
that the doors are already locked.
*1: Doors lock with the keyfob while a key is in
the ignition switch. However, the panic
alarm and the rear hatch release will not
activate when the key is in the ignition
switch.
SPA1260
Pre-driving checks and adjustments
3-5
Z
02.9.13/Z33-D/V5.0
X
Page 100 of 227
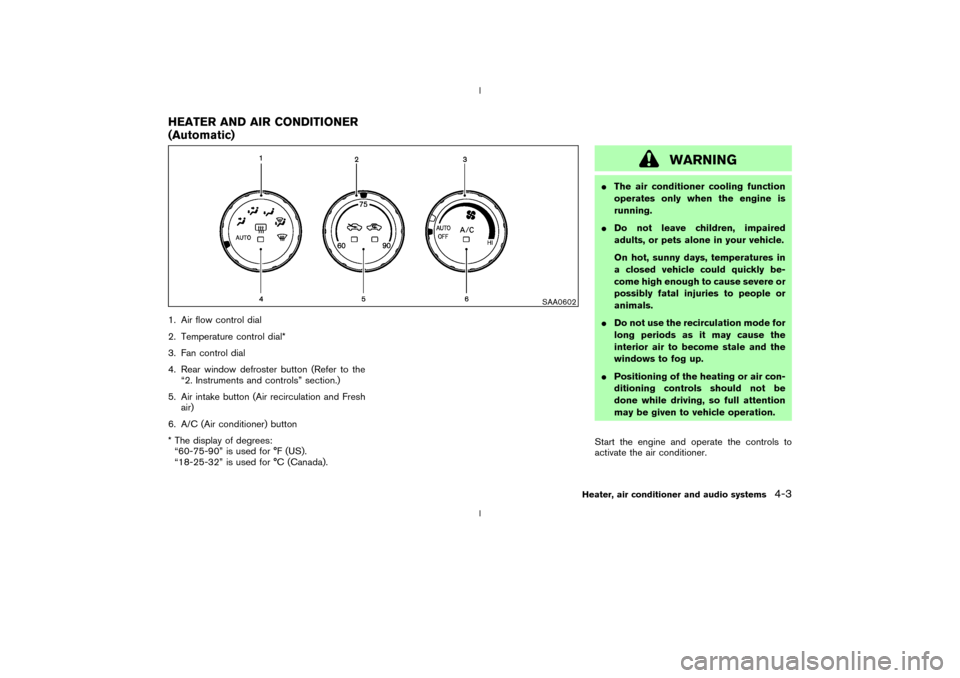
1. Air flow control dial
2. Temperature control dial*
3. Fan control dial
4. Rear window defroster button (Refer to the
ª2. Instruments and controlsº section.)
5. Air intake button (Air recirculation and Fresh
air)
6. A/C (Air conditioner) button
* The display of degrees:
ª60-75-90º is used for ÉF (US).
ª18-25-32º is used for ÉC (Canada).
WARNING
IThe air conditioner cooling function
operates only when the engine is
running.
IDo not leave children, impaired
adults, or pets alone in your vehicle.
On hot, sunny days, temperatures in
a closed vehicle could quickly be-
come high enough to cause severe or
possibly fatal injuries to people or
animals.
IDo not use the recirculation mode for
long periods as it may cause the
interior air to become stale and the
windows to fog up.
IPositioning of the heating or air con-
ditioning controls should not be
done while driving, so full attention
may be given to vehicle operation.
Start the engine and operate the controls to
activate the air conditioner.
SAA0602
HEATER AND AIR CONDITIONER
(Automatic)
Heater, air conditioner and audio systems
4-3
Z
02.9.13/Z33-D/V5.0
X
Page 101 of 227

AUTOMATIC OPERATION
Cooling and/or dehumidified heating
(AUTO)This mode may be normally used all year round
as the system automatically works to keep a
constant temperature. Air flow distribution and
fan speed are also controlled automatically.
1. Turn the fan control dial and air flow control
dial to the AUTO position.
2. Turn the temperature control dial to set the
desired temperature.
IAdjust the temperature to about 75ÉF (24ÉC)
for normal operation.
IThe temperature of the passenger compart-
ment will be maintained automatically. Air
flow distribution and fan speed are also con-
trolled automatically.Heating (AUTO; A/C off)The air conditioner does not activate. When you
need to heat only, use this mode.
1. Turn the fan control dial and air flow control
dial to the AUTO position.
2. Push the A/C button to turn off the air
conditioner. (The A/C button indicator light
will turn off.)3. Turn the temperature control dial to set the
desired temperature.
IThe temperature of the passenger compart-
ment will be maintained automatically. Air
flow distribution and fan speed are also con-
trolled automatically.
IDo not set the temperature lower than the
outside air temperature. Otherwise the sys-
tem may not work properly.
INot recommended if windows fog up.
Dehumidified defrosting or defogging1. Turn the fan control dial to the desired posi-
tion.
2. Turn the air flow control dial to the DEF
position.
3. Turn the temperature control dial to set the
desired temperature.
ITo quickly remove ice from the outside of the
windows, turn the fan control dial to the
maximum position.
IAs soon as possible after the windshield is
clean, turn the air flow control dial to the
AUTO position to return to the auto mode.
IWhen the air flow control dial is turned to theor
position, the air conditioner
will automatically be turned on at outsidetemperatures above 23ÉF (þ5ÉC) to defog
the windshield, and the air recirculate mode
will automatically be turned off.
Outside air is drawn into the passenger
compartment to improve the defogging per-
formance.
MANUAL OPERATION
Fan speed controlTurn the fan control dial
to manually con-
trol the fan speed.
Turn the dial to the AUTO position to return to
automatic control of the fan speed.
Air recirculation/Fresh airEach time the air intake button is pushed, the
indicator light on the button will alternate
(Air recirculation) and
(Fresh air).
When the
indicator light is on, the interior
air is recirculated. (When the air recirculation
mode is selected with the A/C indicator off while
the fan control dial is in the AUTO position, the
air conditioner will turn on.)
When theindicator light is on, the outside
air is drawn into the passenger compartment.
IWhen the air intake button is pushed for
longer than 1.5 seconds, both indicator lights
4-4
Heater, air conditioner and audio systems
Z
02.9.13/Z33-D/V5.0
X
Page 102 of 227
(
and
) will flash twice, and then
the intake air will be controlled automatically.
During this AUTO mode, the indicator light of
the currently selected mode illuminates.
IWhen the air flow control dial is in the
or
position, the air recirculation
mode does not activate.
Air flow controlTurning the air flow control dial selects the air
outlet to:
: Air flows from center and side ventila-
tors.: Air flows from center and side ventila-
tors and foot outlets.: Air flows mainly from foot outlets.: Air flows from defroster and foot out-
lets.: Air flows mainly from defroster outlets.
To turn the system offTurn the fan control dial to the OFF position.OPERATING TIPSWhen the engine coolant temperature and out-
side air temperature are low, the air flow from the
foot outlets may not operate for a maximum of150 seconds. However, this is not a malfunction.
After the coolant temperature warms up, the air
flow from the foot outlets will operate normally.
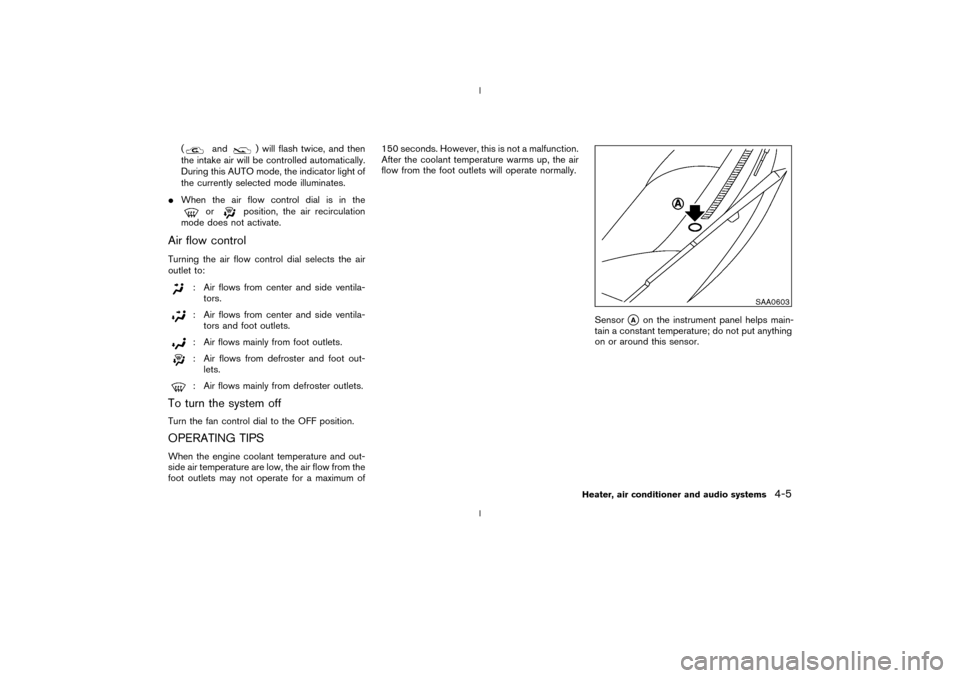
Sensor
qA
on the instrument panel helps main-
tain a constant temperature; do not put anything
on or around this sensor.
SAA0603
Heater, air conditioner and audio systems
4-5
Z
02.9.13/Z33-D/V5.0
X
Page 107 of 227
Audio main operationON×OFF/Volume control:
Turn the ignition key to ACC or ON, and then
push the ON×OFF/VOL (Volume) control knob
while the system is off to call up the mode (radio
or CD) which was playing immediately before
the system was turned off. When no CD is
loaded, the radio will come on. While the system
is on, pushing the ON×OFF/VOL control knob
turns the system off.
Turn the ON×OFF/VOL control knob to adjust
the volume.
AUDIO button (BASS, TREBLE, FADER,
BALANCE):
Press the AUDIO button to change the selecting
mode as follows.
BASS®TREBLE®FADER®BALANCE
To adjust Bass, Treble, Fader and Balance,
press the AUDIO button until the desired mode
(BASS, TREBLE, FADER or BALANCE) ap-
pears in the display. Press the TUNE
(
,
) or SEEK (
,
) button
to adjust Bass and Treble to the desired level.
Use the TUNE or SEEK button also to adjust
Fader or Balance modes. Fader adjusts the
sound level between the front and rear speakersand Balance adjusts the sound between the
right and left speakers.
After 10 seconds, the radio or CD display
reappears. Once the sound quality is set to the
desired level, press the AUDIO button repeat-
edly until the radio or CD display appears.
DISP DISPLAY CHANGE:
Push the DISP button for more than 1.5 seconds
to adjust the digital clock display. See ªClockº in
the ª2. Instruments and controlsº section for the
clock adjustment operation.
When the DISP button is pushed for less than
1.5 seconds while the compact disc is being
played, the display will show the CD play time.FM-AM radio operation
FM/AM band select:
Pushing the FM band select button will change
the band as follows:
FM1®FM2®FM1
To select the AM band, push the AM band select
button.
When FM or AM band select button is pushed
while the ignition switch is in the ACC or ON, the
radio will come on at the station last played.
The last station played will also come on whenthe power knob is turned to ON.
If a compact disc is playing when the FM or AM
band select button is turned to ON, the compact
disc will automatically be turned off and the last
radio station played will come on.
The FM stereo indicator ST will glow during FM
stereo reception. When the stereo broadcast
signal is weak, the radio will automatically
change from stereo to monaural reception.
TUNE (Tuning):WARNING
The radio should not be tuned while
driving so full attention may be given to
vehicle operation.
Use the TUNE button
or
for manual
tuning. To move quickly through the channels,
hold either side of the TUNE button down for
more than 0.5 seconds.
SEEK tuning:
Push the SEEK button
or
to tune
from high to low or low to high frequencies and
stops at the next broadcasting station.
4-10
Heater, air conditioner and audio systems
Z
02.9.13/Z33-D/V5.0
X
Page 109 of 227

skipped through, the first program will be
played.) When the
(APS REW) button is
pushed, the program being played returns to its
beginning. Push several times to skip back
through programs. The compact disc will go
back the number of times the button is pushed.
SCAN tuning:
When the SCAN tuning button is pushed while
the CD is being played, the beginning of all the
tracks of CD will be played for 10 seconds in
sequence.
Pushing the button again during this 10 second
period will stop SCAN tuning. If the SCAN
tuning button is not pushed within 10 seconds,
SCAN tuning moves to the next CD program.
MIX MIX play:
When the MIX button is pushed while the com-
pact disc is being played, programs will be
played at random, not following the sequence on
the compact disc. The same program may be
repeated twice. Push the MIX button again to
return to the normal play mode.
REPEAT (RPT) play:
When the RPT button is pushed while the
compact disc is being played, the play pattern
can be changed as follows:
CD EJECT:
When the CD EJECT button is pushed with the
compact disc loaded, the compact disc will be
ejected.
When this button is pushed while the compact
disc is being played, the compact disc will come
out and the system will turn off.
If the compact disc comes out and is not
removed, it will be pulled back into the slot
to protect it. (without 8 cm diameter com-
pact discs)
CD IN indicator:
CD IN indicator appears on the display when the
CD is loaded with the system on.
4-12
Heater, air conditioner and audio systems
Z
02.9.13/Z33-D/V5.0
X
Page 111 of 227

Audio main operationHead unit:
The tape deck employs a permalloy head which
allows for improved reproduction of high fre-
quency ranges. Noise is also greatly reduced by
the combined use of the Dolby NR (Noise
Reduction) system. The auto loudness circuit
enhances the low frequency range automatically
in both radio reception and tape and CD play-
back.
ON×OFF/Volume control:
Turn the ignition key to ACC or ON, and then
push the ON×OFF/VOL (Volume) control knob
while the system is off to call up the mode (radio,
tape or CD) which was playing immediately
before the system was turned off. When no CD
or tape is loaded, the radio will come on. While
the system is on, pushing the ON×OFF/VOL
control knob turns the system off.
Turn the ON×OFF/VOL control knob to adjust
the volume.
AUDIO button (BASS, TREBLE, FADER,
BALANCE and NR (Dolby)):
Press the AUDIO button to change the selecting
mode as follows.
BASS®TREBLE®FADER®BALANCE®
NR (when cassette playing)To adjust Bass, Treble, Fader and Balance,
press the AUDIO button until the desired mode
(BASS, TREBLE, FADER or BALANCE) ap-
pears in the display. Press the TUNE
(
,
) or SEEK (
,
) button
to adjust Bass and Treble to the desired level.
Use the TUNE or SEEK button also to adjust
Fader or Balance modes. Fader adjusts the
sound level between the front and rear speakers
and Balance adjusts the sound between the
right and left speakers.
To change the NR (Dolby) mode to OFF or ON,
press the
or
(TUNE) button while
cassette tape is playing. When Dolby is ON, the
display indicates themark.
After 10 seconds, the radio, tape or CD display
reappears. Once the sound quality is set to the
desired level, press the AUDIO button repeat-
edly until the radio, tape or CD display appears.
Dolby noise reduction manufactured under li-
cense from Dolby Laboratories Licensing Cor-
poration. Dolby NR and the double-D symbol
are trademarks of Dolby Laboratories Li-
censing Corporation.
Metal or chrome tape usage:
The cassette player will be automatically set to
high performance play when playing a metal or
chrome cassette tape.
DISP DISPLAY CHANGE:
Push the DISP button for more than 1.5 seconds
to adjust the digital clock display. See ªClockº in
the ª2. Instruments and controlsº section for the
clock adjustment operation.
When the DISP button is pushed for less than
1.5 seconds while the compact disc is being
played, the display will show the CD play time.FM-AM radio operation
FM/AM band select:
Pushing the FM/AM band select button will
change the band as follows:
AM®FM1®FM2®AM
When FM/AM band select button is pushed
while the ignition switch is in the ACC or ON, the
radio will come on at the station last played.
The last station played will also come on when
the ON×OFF/VOL control knob is pushed to ON.
If a compact disc or tape is playing when the
FM/AM band select button is turned to ON, the
compact disc or tape will automatically be
turned off and the last radio station played will
come on.
The FM stereo indicator ST will glow during FM
stereo reception. When the stereo broadcast
signal is weak, the radio will automatically
4-14
Heater, air conditioner and audio systems
Z
02.9.13/Z33-D/V5.0
X