2003 NISSAN 350Z hood open
[x] Cancel search: hood openPage 41 of 227

1. Headlight and turn signal switch (P.2-21)
2. Instrument brightness control switch
(P.2-23)
3. Driver supplemental air bag (P.1-6)/Horn
(P.2-24)
4. Meters/gauges (P.2-3)5. Cruise control main/set switch (P.5-15)
6. Trip computer mode/setting switch (P.2-8)
7. Windshield wiper/washer switch (P.2-19)
8. Center ventilator (P.4-2)
9. Cup holder (P.2-30)
10. Passenger supplemental air bag (P.1-6)11. Side ventilator (P.4-2)
12. VDC (Vehicle dynamic control) OFF switch
(P.2-26) or TCS (Traction control system)
OFF switch (P.2-26)
13. Fuel filler lid opener switch (P.3-10)
14. Hood lock release handle (P.3-8)
15. Fuse box (P.8-23)
16. Tilting steering wheel lock lever (P.3-12)
17. Ignition switch/steering lock (P.5-5)
18. Navigation system* or Instrument pocket
(P.2-29)
19. Rear window and outside mirror (if so
equipped) defroster switch (P.2-21)
20. Heater/air conditioner control (P.4-3)
21. Audio system (P.4-6)/Clock (P.2-27)
22. Heated seat switch (P.2-25)
23. Hazard warning flasher switch (P.2-24)
24. Ashtray (P.2-28) or Tray (P.2-30)
See the page indicated in parentheses for
operating details.
*: Refer to the separate Navigation System
Owner's Manual.
SIC1943
INSTRUMENT PANEL2-2
Instruments and controls
Z
02.9.13/Z33-D/V5.0
X
Page 56 of 227

The security condition will be shown by the
security indicator light.VEHICLE SECURITY SYSTEMThe vehicle security system provides visual and
audio alarm signals if parts of the vehicle are
disturbed.How to activate the vehicle security
system1. Close all windows.
The system can be activated even if the
windows are open.2. Remove the key from the ignition switch.
3. Close and lock all doors, hood and rear
hatch.
Lock all doors by pressing the LOCK button
on the keyfob. When using the keyfob, the
hazard indicators flash twice to indicate all
doors are locked.
4. Confirm that the security indicator light
comes on. The security indicator light glows
for about 30 seconds and then blinks. The
system is now activated. If, during this 30
second time period, the door is unlocked by
the key or the keyfob, or the ignition key is
turned to ACC or ON, the system will not
activate.
IIf the key is turned slowly toward the
rear of the vehicle when locking the
door, the system may not activate. If the
key is returned beyond the vertical po-
sition toward the front of the vehicle to
remove the key, the system may be
deactivated. If the indicator light fails to
glow for 30 seconds, unlock the door
once and lock it again.
IEven when the driver and/or passengers
are in the vehicle, the system will acti-
vate with all doors, hood and rear hatch
locked and ignition key off. Turn theignition key to ACC to turn the system
off.
Vehicle security system operationThe security system will give the following alarm:
IThe headlights blink and the horn sounds
intermittently.
IThe alarm automatically turns off after ap-
proximately 1 minute. However, the alarm
reactivates if the vehicle is tampered with
again. The alarm can be shut off by unlocking
a door with the key, or by pressing the
UNLOCK button on the keyfob.
The alarm is activated by:
IOpening the door without using the key or
keyfob.
IOpening the rear hatch without using the rear
hatch release switch or keyfob.
IOpening the hood.How to stop alarmThe alarm will stop only by unlocking a door with
the key, or by pressing the UNLOCK button on
keyfob. The alarm will not stop if the ignition
switch is turned to ACC or ON.
If the system does not operate as de-
SIC1699
Instruments and controls
2-17
Z
02.9.13/Z33-D/V5.0
X
Page 82 of 227

3 Pre-driving checks and adjustmentsKeys ........................................................................................... 3-2
Doors......................................................................................... 3-2
Locking with key (Driver's side) ................................... 3-3
Locking with inside lock knob ...................................... 3-3
Locking with power door lock switch ......................... 3-4
Remote keyless entry system ............................................. 3-4
How to use remote keyless entry system.................. 3-5
Battery replacement ........................................................ 3-7
Hood ......................................................................................... 3-8
Rear hatch ............................................................................... 3-9
Opener operation ............................................................. 3-9Secondary rear hatch release .................................... 3-10
Fuel filler lid ........................................................................... 3-10
Opener operation .......................................................... 3-10
Fuel filler cap .................................................................. 3-11
Steering wheel ..................................................................... 3-12
Tilt operation ................................................................... 3-12
Mirrors .................................................................................... 3-13
Inside mirror .................................................................... 3-13
Automatic anti-glare inside mirror
(if so equipped).............................................................. 3-13
Outside mirrors .............................................................. 3-14
Z
02.9.13/Z33-D/V5.0
X
Page 89 of 227

could void the user's authority to operate
the equipment. This device complies with
Part 15 of the FCC Rules and RSS-210 of
Industry Canada. Operation is subject to
the following two conditions: (1) This de-
vice may not cause harmful interference,
and (2) this device must accept any inter-
ference received, including interference
that may cause undesired operation of the
device.
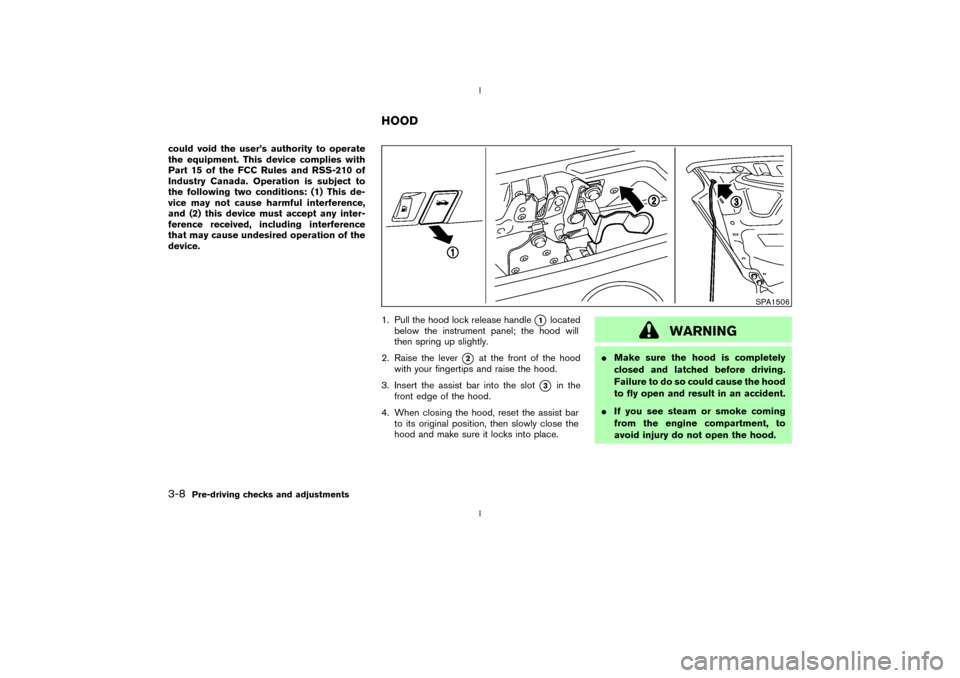
1. Pull the hood lock release handle
q1
located
below the instrument panel; the hood will
then spring up slightly.
2. Raise the lever
q2
at the front of the hood
with your fingertips and raise the hood.
3. Insert the assist bar into the slot
q3
in the
front edge of the hood.
4. When closing the hood, reset the assist bar
to its original position, then slowly close the
hood and make sure it locks into place.
WARNING
IMake sure the hood is completely
closed and latched before driving.
Failure to do so could cause the hood
to fly open and result in an accident.
IIf you see steam or smoke coming
from the engine compartment, to
avoid injury do not open the hood.
SPA1506
HOOD
3-8
Pre-driving checks and adjustments
Z
02.9.13/Z33-D/V5.0
X
Page 152 of 227

WARNING
IDo not continue to drive if your ve-
hicle overheats. Doing so could
cause a vehicle fire.
ITo avoid the danger of being scalded,
never remove the radiator cap while
the engine is still hot. When the ra-
diator cap is removed, pressurized
hot water will spurt out, possibly
causing serious injury.
IDo not open the hood if steam is
coming out.
If your vehicle is overheating (indicated by an
extremely high temperature gauge reading), or if
you feel a lack of engine power, detect abnormal
noise, etc., take the following steps:
1. Move the vehicle safely off the road, apply the
parking brake and move the shift lever to the
N (Neutral) position (automatic transmission
to the P (Park) position).
Do not stop the engine.
2. Turn off the air conditioner switch. Open all
the windows, move the heater or air condi-tioner temperature control to maximum hot
and fan control to high speed.
3. If engine overheating is caused by climbing a
long hill on a hot day, run the engine at a fast
idle (approximately 1,500 rpm) until the tem-
perature gauge indication returns to normal.
4. Get out of the vehicle. Look and listen for
steam or coolant escaping from the radiator
before opening the hood. Wait until no steam
or coolant can be seen before proceeding.
5. Open the engine hood.
WARNING
If steam or water is coming from the
engine, stand clear to prevent getting
burned.
6. Visually check if the cooling fan is running.
The radiator hoses and radiator should not
leak water.
If coolant is leaking or the cooling fan does
not run, stop the engine.
WARNING
IBe careful not to allow your hands,
hair, jewelry or clothing to come into
contact with, or to get caught in the
cooling fan, or drive belt.
IThe engine cooling fan can start at
any time when the coolant tempera-
ture is high.
7. After the engine cools down, check the cool-
ant level in the reservoir tank with the engine
running. Add coolant to the reservoir tank if
necessary. Have your vehicle repaired at the
nearest NISSAN dealer.
IF YOUR VEHICLE OVERHEATS
In case of emergency
6-9
Z
02.9.13/Z33-D/V5.0
X
Page 157 of 227

In order to maintain the appearance of your
vehicle, it is important to take proper care of it.
In the following cases, please wash your vehicle
as soon as possible to protect the paint surface.
IAfter a rainfall to prevent possible damage
from acid rain
IAfter driving on coastal roads
IWhen contaminants such as soot, bird drop-
pings, tree sap, metal particles or bugs get on
the paint surface
IWhen dust or mud builds up on the surface
Whenever possible, store or park your vehicleinside a garage or in a covered area.
When it is necessary to park outside, park in a
shady area or protect the vehicle with a body
cover.
Be careful not to scratch the paint surface
when putting on or removing the body
cover.
WASHINGThoroughly rinse surface dirt off the vehicle with
a wet sponge and plenty of clean water. Clean
the vehicle thoroughly using a mild soap such as
Nissan Car Wash, or a general purpose dish-
washing liquid mixed with clean, lukewarm
(never hot) water.
CAUTION
IDo not use strong household soap,
strong chemical detergents, gasoline
or solvents.
IDo not wash the vehicle in direct
sunlight or while the vehicle body is
hot, as the surface may become
water-spotted.IAvoid using tight-napped or rough
cloths, such as washing mitts. Care
must be taken when removing
caked-on dirt or other foreign sub-
stances so that the paint surface is
not scratched or damaged.
Rinse the vehicle again with plenty of clean
water.
Inside flanges, seams and folds on the doors,
hatches and hood are particularly vulnerable to
the effects of road salt. Therefore, these areas
must be regularly cleaned. Make sure that the
drain holes in the lower edge of the door are
open. Spray water under the body and in the
wheel wells to loosen the dirt and wash away
road salt.
Avoid leaving water spots on the paint surface
by using a damp chamois to dry the vehicle.
WAXINGRegular waxing protects the paint surface and
helps retain new vehicle appearance. After wax-
ing, polishing is recommended to remove
built-up residue and to avoid a weathered ap-
pearance.
If you wish to wax your vehicle, only use a wax
MAI0001
CLEANING EXTERIOR7-2
Appearance and care
Z
02.9.13/Z33-D/V5.0
X
Page 164 of 227

Tire rotation*:Tires cannot be rotated in this
vehicle.
Wheel alignment and balance:If the vehicle
pulls to either side while driving on a straight and
level road, or if you detect uneven or abnormal
tire wear, there may be a need for wheel align-
ment.
If the steering wheel or seat vibrates at normal
highway speeds, wheel balancing may be
needed.
For additional information regarding tires, refer to
ªImportant Tire Safety Informationº (US) or ªTire
Safety Informationº (Canada) in the Warranty
Information booklet.
Windshield:Clean the windshield on a regular
basis. Check the windshield at least every six
months for cracks or other damage. Have a
damaged windshield repaired by a qualified re-
pair facility.
Windshield wiper blades*:Check for cracks
or wear if they do not wipe properly.
Doors and engine hood:Check that all doors
and the engine hood operate smoothly as well as
the trunk lid or back hatch. Also make sure that
all latches lock securely. Lubricate if necessary.
Make sure that the secondary latch keeps the
hood from opening when the primary latch is
released.When driving in areas using road salt or other
corrosive materials, check lubrication frequently.
Lights*:Clean the headlights on a regular basis.
Make sure that the headlights, stop lights, tail
lights, turn signal lights, and other lights are all
operating properly and installed securely. Also
check headlight aim.
Inside the vehicleThe maintenance items listed here should be
checked on a regular basis, such as when
performing periodic maintenance, cleaning the
vehicle, etc.
Warning lights and chimes:Make sure that all
warning lights and chimes are operating prop-
erly.
Windshield wiper and washer*:Check that
the wipers and washer operate properly and that
the wipers do not streak.
Windshield defroster:Check that the air
comes out of the defroster outlets properly and
in good quantity when operating the heater or air
conditioner.
Steering wheel:Check for changes in the
steering conditions, such as excessive free play,
hard steering or strange noises.
Seats:Check seat position controls such as
seat adjusters, seatback recliner, etc. to ensurethey operate smoothly and that all latches lock
securely in every position. Check that the head
restraints move up and down smoothly and that
the locks (if equipped) hold securely in all
latched positions.
Seat belts:Check that all parts of the seat belt
system (for example, buckles, anchors, adjusters
and retractors) operate properly and smoothly,
and are installed securely. Check the belt web-
bing for cuts, fraying, wear or damage.
Accelerator pedal:Check the pedal for
smooth operation and make sure the pedal does
not catch or require uneven effort. Keep the floor
mat away from the pedal.
Clutch pedal*:Make sure the pedal operates
smoothly and check that it has the proper free
play.
Brakes:Check that the brakes do not pull the
vehicle to one side when applied.
Brake pedal and booster*:Check the pedal
for smooth operation and make sure it has the
proper distance under it when depressed fully.
Check the brake booster function. Be sure to
keep floor mat away from the pedal.
Parking brake*:Check that the lever has the
proper travel and make sure that the vehicle is
held securely on a fairly steep hill when only the
parking brake is applied.
Maintenance and do-it-yourself
8-3
Z
02.9.13/Z33-D/V5.0
X
Page 176 of 227

WARNING
Anti-freeze is poisonous and should be
stored carefully in marked containers
out of the reach of children.
CAUTION
Do not substitute engine anti-freeze
coolant for window washer solution.
This may result in damage to the paint.IKeep the battery surface clean and dry. Any
corrosion should be washed off with a solu-
tion of baking soda and water.
IMake certain the terminal connections are
clean and securely tightened.
IIf the vehicle is not to be used for 30 days or
longer, disconnect the (Ð) negative battery
terminal to prevent discharging it.
CAUTION
When the battery cable is removed from
the battery terminal, do not close either
of front doors. The automatic window
adjusting function will not work, and the
side roof panel may be damaged.
To disconnect the negative (þ) battery ter-
minal, perform the procedure in the follow-
ing order.
Otherwise, the window and the side roof
panel may contact and be damaged.
1. Close the windows.
2. Open the hood.
3. Close and lock all the doors.4. Disconnect the negative (þ) battery ter-
minal.
5. Securely close the hood.
To connect the negative (þ) battery termi-
nal, perform the procedure in the following
order. Otherwise, the window and the side
roof panel may contact and be damaged.
1. Unlock and open the driver side door.
Do not close the door.
2. Open the hood.
3. Connect the negative (þ) battery termi-
nal. Then close the hood.
4. Fully open the driver side door window.
5. Close the driver side door and the win-
dow.
WARNING
IDo not expose the battery to flames
or electrical sparks. Hydrogen gas
generated by battery action is explo-
sive. Do not allow battery fluid to
contact your skin, eyes, fabrics, or
painted surfaces. After touching a
battery or battery cap, do not touch
BATTERY
Maintenance and do-it-yourself
8-15
Z
02.9.13/Z33-D/V5.0
X