2003 NISSAN 350Z garage door opener
[x] Cancel search: garage door openerPage 76 of 227

WARNING
IDo not use the HomeLink
Universal
Transceiver with any garage door
opener that lacks safety stop and
reverse features as required by fed-
eral safety standards. (These stan-
dards became effective for opener
models manufactured after April 1,
1982). A garage door opener which
cannot detect an object in the path of
a closing garage door and then auto-
matically stop and reverse, does not
meet current federal safety stan-
dards. Using a garage door opener
without these features increases the
risk of serious injury or death.
IDuring programming, your garage
door or gate may open or close.
Make sure that people and objects
are clear of the garage door or gate
that you are programming.
IYour vehicle's engine should be
turned off while programming the
HomeLink
Universal Transceiver.
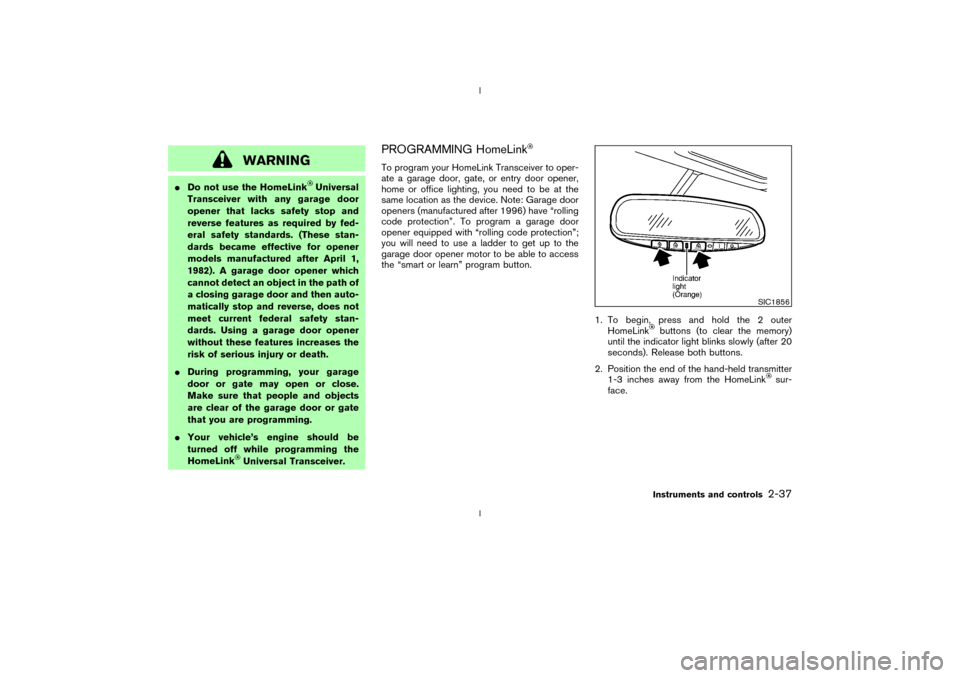
PROGRAMMING HomeLinkTo program your HomeLink Transceiver to oper-
ate a garage door, gate, or entry door opener,
home or office lighting, you need to be at the
same location as the device. Note: Garage door
openers (manufactured after 1996) have ªrolling
code protectionº. To program a garage door
opener equipped with ªrolling code protectionº;
you will need to use a ladder to get up to the
garage door opener motor to be able to access
the ªsmart or learnº program button.
1. To begin, press and hold the 2 outer
HomeLink
buttons (to clear the memory)
until the indicator light blinks slowly (after 20
seconds). Release both buttons.
2. Position the end of the hand-held transmitter
1-3 inches away from the HomeLink
sur-
face.
SIC1856
Instruments and controls
2-37
Z
02.9.13/Z33-D/V5.0
X
Page 77 of 227

3. Using both hands, simultaneously press and
hold both the HomeLink
button you want to
program and the hand-held transmitter but-
ton.
DO NOT release the buttons until step 4 has
been completed.
4. Hold down both buttons until the indicator
light on the HomeLinkflashes, changing
from a ªslow blinkº to a ªrapidly flashing
blinkº. This could take up to 90 seconds.
When the indicator light flashes rapidly, both
buttons may be released. The rapidly flashing
light indicates successful programming. To
activate the garage door or other pro-
grammed device, press and hold the pro-grammed HomeLink
button - releasing
when the device begins to activate.
5. If the indicator light on the HomeLink
blinks
rapidly for two seconds and then turns solid,
HomeLink
has picked up a ªrolling codeº
garage door opener signal. You will need to
proceed with the next steps to train the
HomeLinkto complete the programming
which may require a ladder and another
person for convenience.
6. Press and release the ªsmartº or ªlearnº
program button located on the garage door
opener's motor to activate the ªtraining
modeº. This button is usually located near the
antenna wire that hangs down from the mo-
tor. If the wire originates from under a light
lens, you will need to remove the lens to
access the program button.
NOTE:
Once you have pressed and released the
program button on the garage door open-
er's motor and the ªtraining lightº is lit, you
have 30 seconds in which to perform step
7. Use the help of a second person for
convenience to assist when performing
this step.
7. Quickly within 30 seconds of pressing and
releasing the garage door opener programbutton, firmly press and release the
HomeLink
button you've just programmed.
Press and release the HomeLink
button up
to three times to complete the training.
8. Your HomeLink
button should now be pro-
grammed. (To program the remaining
HomeLink
buttons for additional door or
gate openers, follow steps 2-8 only.
NOTE:
Do not repeat step one unless you want to
ªclearº all previously programmed
HomeLinkbuttons).
If you have any questions or are having difficulty
programming your HomeLink
buttons, please
refer to the HomeLink
web site at: ww-
w.homelink.com or call 1-800-662-6200.
PROGRAMMING HomeLink
FOR
CANADIAN CUSTOMERS
Prior to 1992, D.O.C. regulations required hand-
held transmitters to stop transmitting after 2
seconds. To program your hand-held transmitter
to HomeLink
, continue to press and hold the
HomeLinkbutton (note steps 2 through 4
under ªProgramming HomeLink
º) while you
press and re-press (ªcycleº) your hand-held
transmitter every 2 seconds until the indicator
SIC1863
2-38
Instruments and controls
Z
02.9.13/Z33-D/V5.0
X
Page 78 of 227

light flashes rapidly (indicating successful pro-
gramming).
NOTE:
If programming a garage door opener, etc.,
it is advised to unplug the device during
the ªcyclingº process to prevent possible
damage to the garage door opener compo-
nents.OPERATING THE HomeLinkUNIVERSAL TRANSCEIVERThe HomeLink
Universal Transceiver (once
programmed) may now be used to activate the
garage door, etc. To operate, simply press the
appropriate programmed HomeLink
Universal
Transceiver button. The red indicator light will
illuminate while the signal is being transmitted.
PROGRAMMING TROUBLE
DIAGNOSISIf the HomeLink
does not quickly learn the
hand-held transmitter information:
Ireplace the hand-held transmitter batteries
with new batteries.
Iposition the hand-held transmitter with its
battery area facing away from the HomeLink
surface.Ipress and hold both the HomeLink
and
hand-held transmitter buttons without inter-
ruption.
Iposition the hand-held transmitter 2 to 5
inches (50 to 127 mm) away from the
HomeLink
surface. Hold the transmitter in
that position for up to 15 seconds. If
HomeLinkis not programmed within that
time, try holding the transmitter in another
position - keeping the indicator light in view at
all times.
If you continue to have programming difficulties,
please contact the NISSAN Consumer Affairs
Department. The phone numbers are located in
the Foreword of this Owner's Manual.
CLEARING THE PROGRAMMED
INFORMATIONIndividual buttons cannot be cleared, however to
clear all programming, press and hold the two
outside buttons and release when the indicator
light begins to flash (approximately 20 seconds).
REPROGRAMMING A SINGLE
HomeLink
BUTTON
To reprogram a HomeLink
Universal Trans-
ceiver button, complete the following.
1. Press and hold the desired HomeLink
but-
ton.Do notrelease the button until step 4
has been completed.
2. When the indicator light begins to flash
slowly (after 20 seconds), position the hand-
held transmitter 2 to 5 inches (50 to 127 mm)
away from the HomeLink
surface.
3. Press and hold the hand-held transmitter
button.
4. The HomeLink
indicator light will flash, first
slowly and then rapidly. When the indicator
light begins to flash rapidly, release both
buttons.
The HomeLinkUniversal Transceiver button
has now been reprogrammed. The new device
can be activated by pushing the HomeLink
button that was just programmed. This proce-
dure will not affect any other programmed
HomeLink
buttons.
IF YOUR VEHICLE IS STOLENIf your vehicle is stolen, you should change the
codes of any non-rolling code device that has
Instruments and controls
2-39
Z
02.9.13/Z33-D/V5.0
X
Page 221 of 227

Controls, Heater and air conditioner controls
(automatic) ..................................................................... 4-3
Coolant
Capacities and recommended fuel/
lubricants ................................................................. 9-2
Changing engine coolant .................................... 8-9
Checking engine coolant level........................... 8-8
Corrosion protection ................................................... 7-5
Cruise control............................................................. 5-15
Cup holders ................................................................ 2-30
Curtain side-impact air bag system (See
supplemental side air bag and curtain side-impact
air bag system) .......................................................... 1-13
D
Daytime running light system ................................. 2-23
Defroster switch, Rear window and outside mirror
defroster switch ......................................................... 2-21
Dimensions and weights ............................................ 9-9
Door open warning light .......................................... 2-12
Drive belts ................................................................... 8-17
Driving
Cold weather driving ......................................... 5-24
Driving with automatic transmission........ 5-5, 5-9
Driving with manual transmission .......... 5-6, 5-12
Precautions when starting and driving ............ 5-2
E
Economy, Fuel............................................................ 5-17
Emission control information label ........................ 9-11
Emission control system warranty......................... 9-20Engine
Before starting the engine .................................. 5-8
Capacities and recommended fuel/
lubricants ................................................................. 9-2
Changing engine coolant .................................... 8-9
Changing engine oil and filter ......................... 8-10
Checking engine coolant level........................... 8-8
Checking engine oil level ................................. 8-10
Coolant temperature gauge ............................... 2-5
Engine block heater ........................................... 5-25
Engine compartment check locations.............. 8-7
Engine cooling system ......................................... 8-8
Engine oil .............................................................. 8-10
Engine oil and oil filter recommendation......... 9-5
Engine oil viscosity ............................................... 9-5
Engine serial number ......................................... 9-11
Engine specifications ........................................... 9-8
If your vehicle overheats ...................................... 6-9
Starting the engine ............................................... 5-8
Exhaust gas (Carbon monoxide).............................. 5-2
F
F.M.V.S.S. certification label................................... 9-11
Filter, Air cleaner housing filter .............................. 8-18
Flashers (See hazard warning flasher switch) ... 2-24
Flat tire............................................................................ 6-2
Low tire pressure warning system .................... 5-3
Floor mat cleaning ....................................................... 7-4
Fluid
Automatic transmission fluid (ATF) ................ 8-12
Brake and clutch fluid ....................................... 8-13
Brake fluid............................................................. 8-13Capacities and recommended fuel/
lubricants ................................................................. 9-2
Engine coolant ....................................................... 8-8
Engine oil .............................................................. 8-10
Power steering fluid ........................................... 8-13
Window washer fluid ......................................... 8-14
FM-AM radio with cassette player and Compact
Disc (CD) changer.................................................... 4-13
Front air bag system (See supplemental restraint
system) ......................................................................... 1-11
Front manual seat adjustment .................................. 1-3
Front power seat adjustment .................................... 1-4
Fuel
Capacities and recommended fuel/
lubricants ................................................................. 9-2
filler cap................................................................. 3-10
filler lid ................................................................... 3-10
Fuel economy ...................................................... 5-17
Fuel octane rating ................................................. 9-3
Fuel recommendation ........................................... 9-3
Gauge ...................................................................... 2-6
Fuses ............................................................................ 8-22
Fusible links ................................................................ 8-23
G
Garage door opener, HomeLink
Universal
Transceiver .................................................................. 2-36
Gas cap ....................................................................... 3-10
Gauge ............................................................................. 2-3
Engine coolant temperature gauge .................. 2-5
Fuel gauge .............................................................. 2-6
Odometer ................................................................ 2-4
Speedometer .......................................................... 2-4
Z
02.9.13/Z33-D/V5.0
X
10-2