2003 NISSAN 350Z ECO mode
[x] Cancel search: ECO modePage 112 of 227
change from stereo to monaural reception.
TUNE (Tuning):WARNING
The radio should not be tuned while
driving so full attention may be given to
vehicle operation.
Use the TUNE button
or
for manual
tuning. To move quickly through the channels,
hold either side of the TUNE button down for
more than 0.5 seconds.
SEEK tuning:
Push the SEEK button
or
to tune
from high to low or low to high frequencies and
stops at the next broadcasting station.
SCAN tuning:
Push the SCAN tuning button to tune from low
to high frequencies and stops at each broad-
casting station for 5 seconds. Pushing the but-
ton again during this 5 second period will stop
SCAN tuning and the radio will remain tuned to
that station.
If the SCAN tuning button is not pushed within 5seconds, SCAN tuning moves to the next sta-
tion.
Station memory operations:
Twelve stations can be set for the FM band (six
for FM1, six for FM2) and six stations can be set
for the AM band.
1. Tune to the desired station using the SEEK,
SCAN or TUNE button.
2. Select the desired station and keep pushing
any of the desired station and preset buttons
(1 to 6) until a beep sound is heard. (The
radio mutes when the station and preset
button is pushed.)
3. The channel indicator will then come on and
the sound will resume. Memorizing is now
complete.
4. Other buttons can be set in the same manner.
If the battery cable is disconnected, or if the fuse
blows, the radio memory will be cancelled. In
that case, reset the desired stations.
Program type:
When PTY button is pressed during FM mode,
the PTY name of the current tuned station is
displayed. During this time if the PTY data code
is zero, or the data is unreadable; the display will
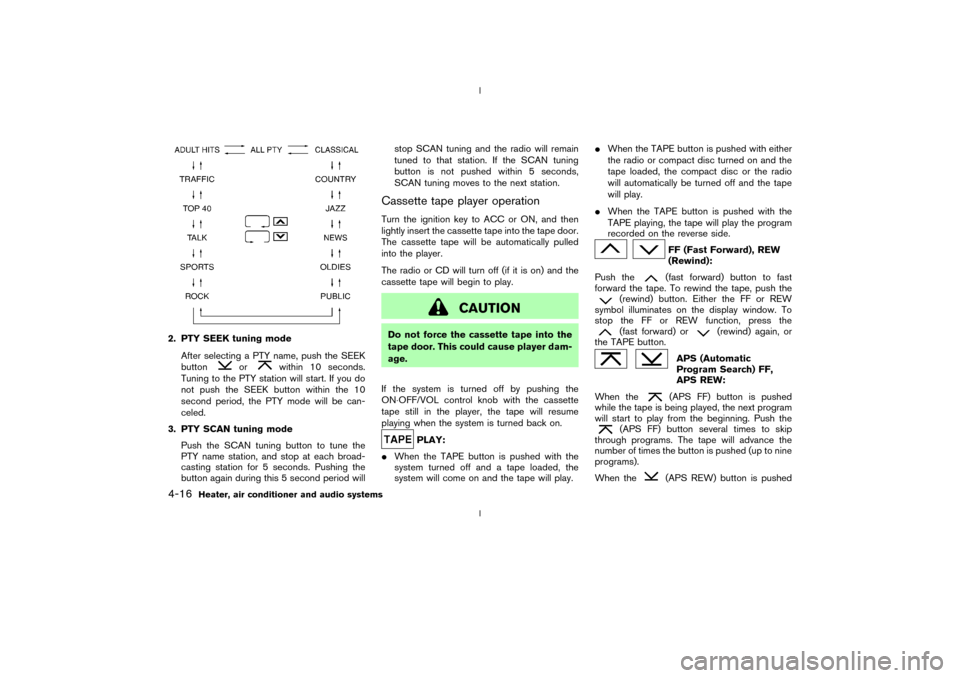
show NONE.1. PTY selection mode
PTY name selection can be done by the
up/down TUNE button
or
in the
PTY selection mode.
It is possible to shift the PTY name by one
step, with one push of the up/down TUNE
button
or
.
PTY name selection can also be achieved by
pressing the preset buttons.
Initial PTY names are stored in the preset
buttons; but these can be changed by press-
ing the preset buttons for more than 1.5
seconds when the desired PTY name is in the
display.
Heater, air conditioner and audio systems
4-15
Z
02.9.13/Z33-D/V5.0
X
Page 113 of 227
2. PTY SEEK tuning mode
After selecting a PTY name, push the SEEK
button
or
within 10 seconds.
Tuning to the PTY station will start. If you do
not push the SEEK button within the 10
second period, the PTY mode will be can-
celed.
3. PTY SCAN tuning mode
Push the SCAN tuning button to tune the
PTY name station, and stop at each broad-
casting station for 5 seconds. Pushing the
button again during this 5 second period willstop SCAN tuning and the radio will remain
tuned to that station. If the SCAN tuning
button is not pushed within 5 seconds,
SCAN tuning moves to the next station.
Cassette tape player operationTurn the ignition key to ACC or ON, and then
lightly insert the cassette tape into the tape door.
The cassette tape will be automatically pulled
into the player.
The radio or CD will turn off (if it is on) and the
cassette tape will begin to play.
CAUTION
Do not force the cassette tape into the
tape door. This could cause player dam-
age.
If the system is turned off by pushing the
ON×OFF/VOL control knob with the cassette
tape still in the player, the tape will resume
playing when the system is turned back on.
PLAY:
IWhen the TAPE button is pushed with the
system turned off and a tape loaded, the
system will come on and the tape will play.IWhen the TAPE button is pushed with either
the radio or compact disc turned on and the
tape loaded, the compact disc or the radio
will automatically be turned off and the tape
will play.
IWhen the TAPE button is pushed with the
TAPE playing, the tape will play the program
recorded on the reverse side.
FF (Fast Forward), REW
(Rewind):
Push the(fast forward) button to fast
forward the tape. To rewind the tape, push the
(rewind) button. Either the FF or REW
symbol illuminates on the display window. To
stop the FF or REW function, press the(fast forward) or
(rewind) again, or
the TAPE button.
APS (Automatic
Program Search) FF,
APS REW:
When the(APS FF) button is pushed
while the tape is being played, the next program
will start to play from the beginning. Push the
(APS FF) button several times to skip
through programs. The tape will advance the
number of times the button is pushed (up to nine
programs).
When the
(APS REW) button is pushed
4-16
Heater, air conditioner and audio systems
Z
02.9.13/Z33-D/V5.0
X
Page 116 of 227
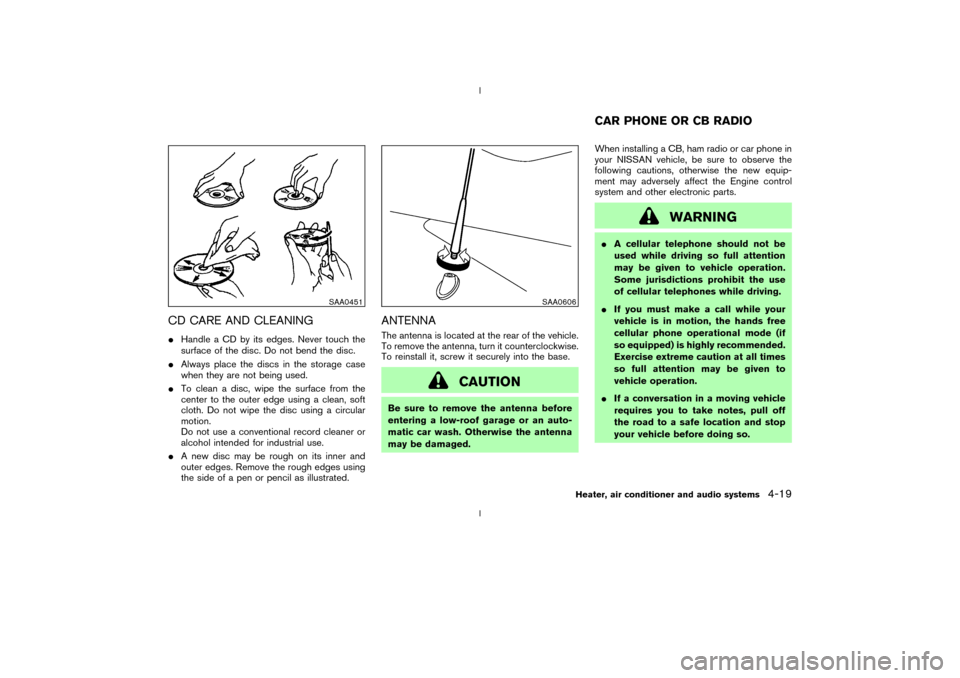
CD CARE AND CLEANINGIHandle a CD by its edges. Never touch the
surface of the disc. Do not bend the disc.
IAlways place the discs in the storage case
when they are not being used.
ITo clean a disc, wipe the surface from the
center to the outer edge using a clean, soft
cloth. Do not wipe the disc using a circular
motion.
Do not use a conventional record cleaner or
alcohol intended for industrial use.
IA new disc may be rough on its inner and
outer edges. Remove the rough edges using
the side of a pen or pencil as illustrated.
ANTENNAThe antenna is located at the rear of the vehicle.
To remove the antenna, turn it counterclockwise.
To reinstall it, screw it securely into the base.
CAUTION
Be sure to remove the antenna before
entering a low-roof garage or an auto-
matic car wash. Otherwise the antenna
may be damaged.When installing a CB, ham radio or car phone in
your NISSAN vehicle, be sure to observe the
following cautions, otherwise the new equip-
ment may adversely affect the Engine control
system and other electronic parts.
WARNING
IA cellular telephone should not be
used while driving so full attention
may be given to vehicle operation.
Some jurisdictions prohibit the use
of cellular telephones while driving.
IIf you must make a call while your
vehicle is in motion, the hands free
cellular phone operational mode (if
so equipped) is highly recommended.
Exercise extreme caution at all times
so full attention may be given to
vehicle operation.
IIf a conversation in a moving vehicle
requires you to take notes, pull off
the road to a safe location and stop
your vehicle before doing so.
SAA0451
SAA0606
CAR PHONE OR CB RADIO
Heater, air conditioner and audio systems
4-19
Z
02.9.13/Z33-D/V5.0
X
Page 119 of 227
WARNING
IDo not leave children, impaired
adults, or pets alone in your vehicle.
They could accidentally injure them-
selves or others through inadvertent
operation of the vehicle. Also, on hot,
sunny days, temperatures in a closed
vehicle could quickly become high
enough to cause severe or possibly
fatal injuries to people or animals.
IProperly secure all cargo to help pre-
vent it from sliding or shifting. Do not
place cargo higher than the seat-
backs. In a sudden stop or collision,
unsecured cargo could cause per-
sonal injury.EXHAUST GAS (Carbon monoxide)
WARNING
Do not breathe exhaust gases; they con-
tain colorless and odorless carbonmonoxide. Carbon monoxide is dan-
gerous. It can cause unconscious-
ness or death.
IIf you suspect that exhaust fumes are
entering the vehicle, drive with all
windows fully open, and have the
vehicle inspected immediately.
IDo not run the engine in closed
spaces such as a garage.
IDo not park the vehicle with the en-
gine running for any extended length
of time.
IKeep the rear hatch closed while
driving, otherwise exhaust gases
could be drawn into the passenger
compartment. If you must drive with
the rear hatch open, follow these
precautions:
1. Open all the windows.
2. Set the air recirculation mode OFF
and the fan control at the maxi-
mum position to circulate the air.
IIf electrical wiring or other cable con-nections must pass to a trailer
through the seal on the rear hatch or
the body, follow the manufacturer's
recommendation to prevent carbon
monoxide entry into the vehicle.
IIf a special body or other equipment
is added for recreational or other
usage, follow the manufacturer's rec-
ommendation to prevent carbon
monoxide entry into the vehicle.
(Some recreational vehicle appli-
ances such as stoves, refrigerator,
heaters, etc. may also generate car-
bon monoxide.)
IThe exhaust system and body should
be inspected by a qualified mechanic
whenever:
a. The vehicle is raised for service.
b. You suspect that exhaust fumes
are entering into the passenger
compartment.
c. You notice a change in the sound
of the exhaust system.PRECAUTIONS WHEN STARTING
AND DRIVING5-2
Starting and driving
Z
02.9.13/Z33-D/V5.0
X
Page 125 of 227
IMake sure the area around the vehicle is
clear.
IMaintenance items should be checked peri-
odically, for example, each time you check
engine oil.
ICheck that all windows and lights are clean.
IVisually inspect tires for their appearance and
condition. Also, check tires for proper infla-
tion.
ILock all doors.
IPosition seat and adjust head restraints.
IAdjust inside and outside mirrors.
IFasten seat belts and ask all passengers to
do likewise.
ICheck the operation of warning lights when
key is turned to the ON (3) position.1. Apply the parking brake.
2.Automatic transmission:
Move the selector lever to P (Park) or N
(Neutral). (P preferred.)
The starter is designed not to operate if the
selector lever is in one of the driving posi-
tions.
Manual transmission:
Move the shift lever to N (Neutral) position,
and depress the clutch pedal to the floor
while cranking the engine.
The starter is designed not to operate unless
the clutch pedal is fully depressed.
3. Crank the enginewith your foot off the
accelerator pedalby turning the ignition
key to START. Release the key when the
engine starts. If the engine starts, but fails to
run, repeat the above procedure.
IWhen the engine is very hard to start in
extremely cold weather or when restarting,
depress the accelerator pedal a little (ap-
proximately 1/5 to the floor) and hold it then
crank the engine. Release the key and the
accelerator pedal when the engine starts.
IWhen the engine is very hard to start be-
cause it is flooded, depress the acceleratorpedal all the way to the floor and hold it.
Crank the engine for 5 to 6 seconds. After
cranking the engine, release the accelerator
pedal. Crank the enginewith your foot off
the accelerator pedalby turning the igni-
tion key to START. Release the key when the
engine starts. If the engine starts, but fails to
run, repeat the above procedure.
CAUTION
Do not operate the starter for more than
15 seconds at a time. If the engine does
not start, turn the key off and wait 10
seconds before cranking again, other-
wise the starter could be damaged.
4.Warm-up
Allow the engine to idle for at least 30
seconds after starting. Drive at moderate
speed for a short distance first, especially in
cold weather.
BEFORE STARTING THE ENGINE STARTING THE ENGINE5-8
Starting and driving
Z
02.9.13/Z33-D/V5.0
X
Page 126 of 227
AUTOMATIC TRANSMISSION
5 speed automatic transmissionThe automatic transmission in your vehicle is
electronically controlled by a transmission con-
trol module to produce maximum power and
smooth operation.
Shown on the following pages are the recom-
mended operating procedures for this transmis-
sion. Follow these procedures for maximum ve-
hicle performance and driving enjoyment.Starting the vehicleAfter starting the engine, fully depress the foot
brake pedal and push the selector lever button
before shifting the selector lever to the R (Re-
verse), N (Neutral), D (Drive) or Manual shift
mode position. Be sure the vehicle is fully
stopped before attempting to shift the selector
lever.
This automatic transmission model is de-
signed so that the foot brake pedal must
be depressed before shifting from P (Park)
to any drive position while the ignition
switch is ON.
The selector lever cannot be moved out of
P (Park) position and into any of the other
gear positions if the ignition key is turned
to the LOCK, OFF or ACC position or if thekey is removed from the switch.
1. Keep the foot brake pedal depressed and
push the selector lever button to shift into a
driving gear.
2. Release the parking brake and foot brake,
then gradually start the vehicle in motion.
WARNING
IDo not depress the accelerator pedal
while shifting from P (Park) or N
(Neutral) to R (Reverse), D (Drive) or
manual shift mode. Always depress
the brake pedal until shifting is com-
pleted. Failure to do so could cause
you to lose control and have an acci-
dent.
ICold engine idle speed is high, so use
caution when shifting into a forward
or reverse gear before the engine has
warmed up.
IOn slippery roads, do not downshift.
This may cause a loss of control.
INever shift to P (Park) or R (Reverse)
while the vehicle is moving forward.Never shift to P (Park) or D (Drive)
while vehicle is moving rearward.
These could cause an accident.
CAUTION
When stopping the vehicle on an uphill
grade, do not hold the vehicle by de-
pressing the accelerator pedal. The foot
brakes should be used for this purpose.
DRIVING THE VEHICLE
Starting and driving
5-9
Z
02.9.13/Z33-D/V5.0
X
Page 128 of 227

shift mode. Shift range can be selected manu-
ally.
In the manual shift mode, the shift range is
displayed on the position indicator in the meter.
Shift ranges up or down one by one as follows:M1®
¬
M2®
¬
M3®
¬
M4®
¬
M5
M5 (5th):
Use this position for all normal forward driving.M4 (4th):
For driving up or down long slopes where engine
braking would be advantageous.M3 (3rd) and
M2 (2nd):
Use for hill climbing or engine braking on down-
hill grades.
M1 (1st):
Use this position when climbing steep hills
slowly or driving slowly through deep snow,
sand or mud, or for maximum engine braking on
steep downhill grades.
IRemember not to drive at high speeds for
extended periods of time in lower than
M4
range. This reduces the fuel economy.
IWhen shifting up, move the selector lever to
the + (up) side. (Shifts to higher range.)IWhen shifting down, move the selector lever
to the þ (down) side. (Shifts to lower range.)
IMoving the selector lever to the same side
twice will shift the ranges in succession.
However, if this motion is rapidly done, the
second shifting may not be completed prop-
erly.
IIn the manual shift mode, the transmis-
sion automatically shifts down to 1st
gear before the vehicle comes to a stop.
When accelerating again, it is necessary
to shift up to the desired range.
IWhen canceling the manual shift mode, re-
turn the selector lever to the D position. The
transmission returns to the normal driving
mode.
IIn the manual shift mode, the transmis-
sion may not shift to the selected gear.
This helps maintain driving performance
and reduces the chance of vehicle dam-
age or loss of control.
Accelerator downshift
Ð In D position ÐFor passing or hill climbing, fully depress the
accelerator pedal to the floor. This shifts the
transmission down into the lower gear, depend-
ing on the vehicle speed.
Fail-safeWhen the fail-safe operation occurs, the next
time the key is turned to the ON position, the
warning light will blink for approximately 8
seconds after coming on for 2 seconds. While
the vehicle can be driven under these circum-
stances please note that the gears in the auto-
matic transmission will be locked in 4th gear.
If the vehicle is driven under extreme con-
ditions, such as excessive wheel spinning
and subsequent hard braking, the fail-safe
system may be activated. This will occur
even if all electrical circuits are functioning
properly. In this case, turn the ignition key
OFF and wait for 3 seconds. Then turn the
key back to the ON position. The vehicle
should return to its normal operating con-
dition. If it does not return to its normal
operating condition, have your NISSAN
dealer check the transmission and repair if
necessary.
Starting and driving
5-11
Z
02.9.13/Z33-D/V5.0
X
Page 131 of 227

Suggested up-shift speedsShown below are suggested vehicle speeds for
shifting into a higher gear. These suggestions
relate to fuel economy and vehicle performance.
Actual up-shift speeds will vary according to
road conditions, the weather and individual driv-
ing habits.
For normal acceleration in low altitude areas
[less than 4,000 ft (1,219 m)]:
Gear change MPH (km/h)
1st to 2nd 8 (13)
2nd to 3rd 16 (26)
3rd to 4th 25 (40)
4th to 5th 28 (45)
5th to 6th 33 (53)
For quick acceleration in low altitude areas or in
high altitude areas [over 4,000 ft (1,219 m)]:
Gear change MPH (km/h)
1st to 2nd 15 (24)
2nd to 3rd 25 (40)
3rd to 4th 40 (64)
4th to 5th 45 (72)
5th to 6th 50 (80)
Suggested maximum speed in each
gearDownshift to a lower gear if the engine is not
running smoothly, or if you need to accelerate.
Do not exceed the maximum suggested speed
(shown below) in any gear. For level road driving,
use the highest gear suggested for that speed.
Always observe posted speed limits, and drive
according to the road conditions, which will
ensure safe operation. Do not over-rev the en-
gine when shifting to a lower gear as it may
cause engine damage or loss of vehicle control.
Gear MPH (km/h)
1st 35 (56)
2nd 60 (96)
3rd 85 (136)
4th Ð
5th Ð
6th ÐTo apply:pull the lever up.
To release:
1. Firmly apply foot brake.
2.Automatic transmission models:
Move the selector lever to the P (Park) posi-
tion.
Manual transmission models:
Place the shift lever in the N (Neutral) posi-
tion.
3. While pulling up on the lever slightly, push
the button and lower completely.
PD1001M
PARKING BRAKE
5-14
Starting and driving
Z
02.9.13/Z33-D/V5.0
X