2003 NISSAN 350Z ECO mode
[x] Cancel search: ECO modePage 134 of 227

SET switch. Each time you do this, the set
speed will decrease by about 1 MPH (1.6
km/h).
To resume the preset speed,push and re-
lease the RES/ACCEL set switch. The vehicle
will resume the last set cruising speed when the
vehicle speed is over 25 MPH (40 km/h).During the first 1,200 miles (2,000 km), follow
these recommendations to obtain maximum en-
gine performance and ensure the future reliability
and economy of your new vehicle. Failure to
follow these recommendations may result in
shortened engine life and reduced engine per-
formance.
IAvoid driving for long periods at constant
speed, either fast or slow. Do not run the
engine over 4,000 rpm.
IDo not accelerate at full throttle in any gear.
IAvoid quick starts.
IAvoid hard braking as much as possible.
IDo not tow a trailer for the first 500 miles
(800 km).IAccelerate slowly and smoothly. Maintain
cruising speeds with a constant accelerator
position.
IDrive at moderate speeds on the highway.
Driving at high speed will lower fuel economy.
IAvoid unnecessary stopping and braking.
Maintain a safe distance behind other ve-
hicles.
IUse a proper gear range which suits road
conditions. On level roads, shift into high gear
as soon as possible.
IAvoid unnecessary engine idling.
IKeep your engine tuned up.
SD1001M
BREAK-IN SCHEDULE INCREASING FUEL ECONOMY
Starting and driving
5-17
Z
02.9.13/Z33-D/V5.0
X
Page 135 of 227
IFollow the recommended periodic mainte-
nance schedule.
IKeep the tires inflated at the correct pres-
sure. Low pressure will increase tire wear and
waste fuel.
IKeep the front wheels in correct alignment.
Improper alignment will cause not only tire
wear but also lower fuel economy.
IAir conditioner operation lowers fuel
economy. Use the air conditioner only when
necessary.
IWhen cruising at highway speeds, it is more
economical to use the air conditioner and
leave the windows closed to reduce drag.
WARNING
IDo not stop or park the vehicle over
flammable materials such as dry
grass, waste paper or rags. They may
ignite and cause a fire.
INever leave the engine running while
the vehicle is unattended.
INever leave children unattended in
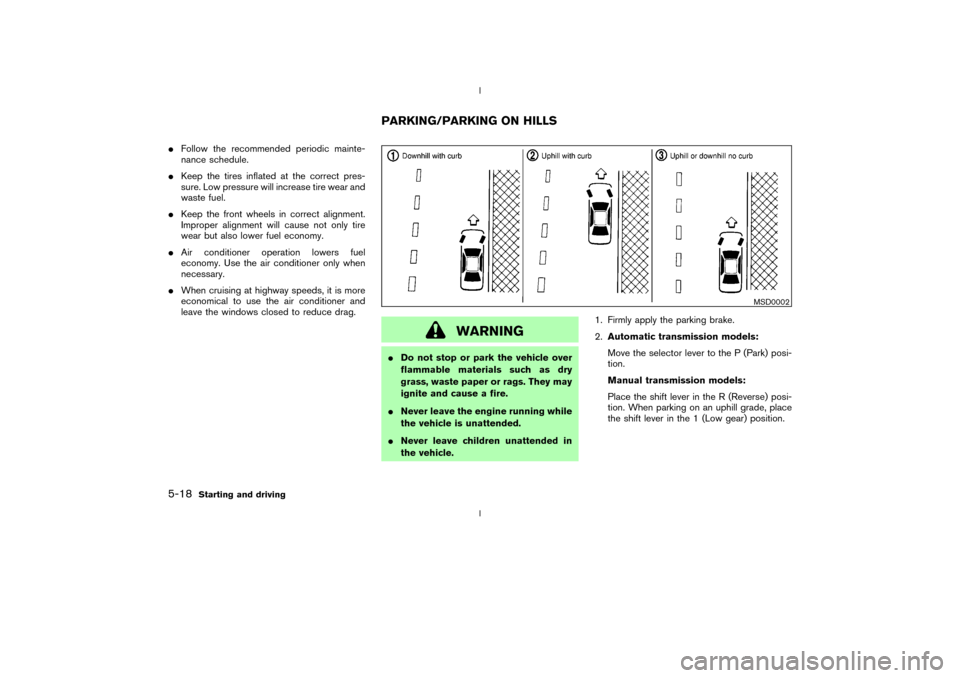
the vehicle.1. Firmly apply the parking brake.
2.Automatic transmission models:
Move the selector lever to the P (Park) posi-
tion.
Manual transmission models:
Place the shift lever in the R (Reverse) posi-
tion. When parking on an uphill grade, place
the shift lever in the 1 (Low gear) position.
MSD0002
PARKING/PARKING ON HILLS
5-18
Starting and driving
Z
02.9.13/Z33-D/V5.0
X
Page 149 of 227
For models equipped with the low tire
pressure warning system:
After adjusting tire pressure to the COLD tire
pressure, the display of the tire pressure infor-
mation may show higher pressure than the
COLD tire pressure after the vehicle has been
driven more than 1 mile (1.6 km). This is because
the tire pressurizes as the tire temperature rises.
This does not indicate a system malfunction.
WARNING
Retighten the wheel nuts when the ve-
hicle has been driven for 600 miles
(1,000 km) (also in cases of a flat tire,
etc.).Stowing the tire and toolsSecurely store the spare tire and jacking equip-
ment in the vehicle.
WARNING
IAlways make sure that the spare tire
and jacking equipment are properly
secured after use. Such items canbecome dangerous projectiles in an
accident or sudden stop.
IThe T-type spare tire and small size
spare tire are designed for emer-
gency use. See ªWheels and tiresº in
the ª8. Maintenance and do-it-
yourselfº section.To start your engine with a booster battery, the
instructions and precautions below must be
followed.
WARNING
IIf done incorrectly, jump starting can
lead to a battery explosion, resulting
in severe injury or death. It could also
damage your vehicle.
IExplosive hydrogen gas is always
present in the vicinity of the battery.
Keep all sparks and flames away
from the battery.
IDo not allow battery fluid to come
into contact with eyes, skin, cloth or
painted surfaces. Battery fluid is a
corrosive sulphuric acid solution
which can cause severe burns. If the
fluid should come into contact with
anything, immediately flush the con-
tacted area with water.
IKeep battery out of the reach of chil-
dren.
IThe booster battery must be rated atJUMP STARTING
6-6
In case of emergency
Z
02.9.13/Z33-D/V5.0
X
Page 151 of 227
CAUTION
IAlways connect positive (+) to posi-
tive (+) and negative (þ) to body
ground (for example, strut mounting
bolt, etc. Ð not to the battery).
IMake sure that cables do not touch
moving parts in the engine compart-
ment and that clamps do not contact
any other metal.
5. Start the engine of the other vehicle and let it
run for a few minutes.
6. Keep the engine speed of the other vehicle at
about 2,000 rpm, and start your engine in the
normal manner.
CAUTION
Do not keep starter motor engaged for
more than 10 seconds. If the engine
does not start right away, turn the key
off and wait 3 to 4 seconds before trying
again.7. After starting your engine, carefully discon-
nect the negative cable and then the positive
cable.
8. Replace the vent caps (if so equipped). Be
sure to dispose of the cloth used to cover the
vent holes as it may be contaminated with
corrosive acid.Do not attempt to start the engine by pushing.
CAUTION
IAutomatic transmission models can-
not be push started. Attempting to do
so may cause transmission damage.
IThree way catalyst equipped models
should not be started by pushing
since the three way catalyst may be
damaged.
INever try to start the vehicle by tow-
ing it; when the engine starts, the
forward surge could cause the ve-
hicle to collide with the tow vehicle.PUSH STARTING
6-8
In case of emergency
Z
02.9.13/Z33-D/V5.0
X
Page 154 of 227
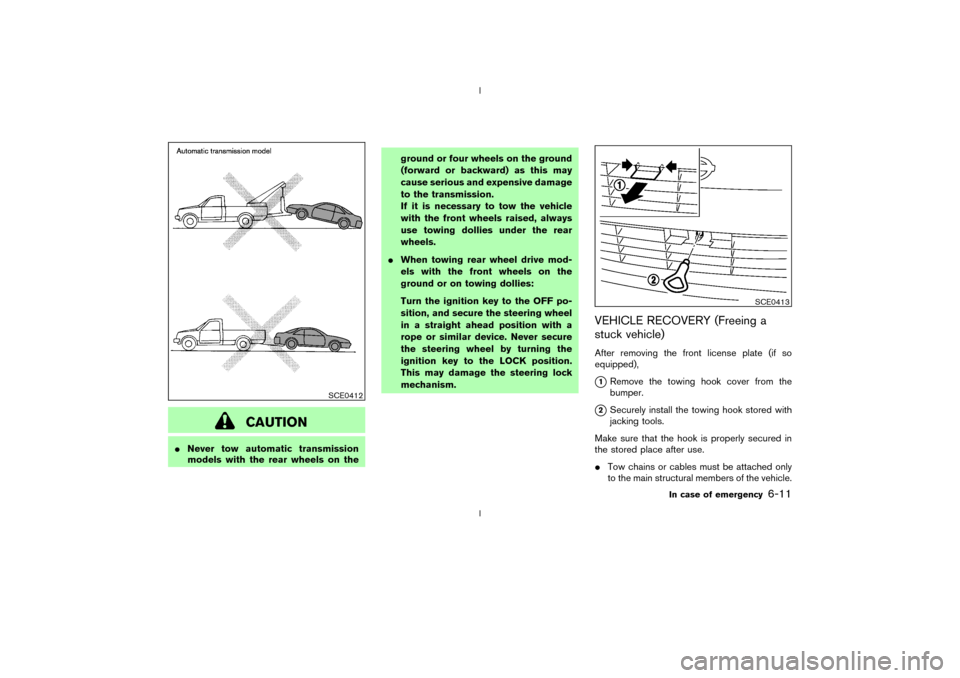
CAUTION
INever tow automatic transmission
models with the rear wheels on theground or four wheels on the ground
(forward or backward) as this may
cause serious and expensive damage
to the transmission.
If it is necessary to tow the vehicle
with the front wheels raised, always
use towing dollies under the rear
wheels.
IWhen towing rear wheel drive mod-
els with the front wheels on the
ground or on towing dollies:
Turn the ignition key to the OFF po-
sition, and secure the steering wheel
in a straight ahead position with a
rope or similar device. Never secure
the steering wheel by turning the
ignition key to the LOCK position.
This may damage the steering lock
mechanism.
VEHICLE RECOVERY (Freeing a
stuck vehicle)After removing the front license plate (if so
equipped),q1Remove the towing hook cover from the
bumper.
q2Securely install the towing hook stored with
jacking tools.
Make sure that the hook is properly secured in
the stored place after use.
ITow chains or cables must be attached only
to the main structural members of the vehicle.
SCE0412
SCE0413
In case of emergency
6-11
Z
02.9.13/Z33-D/V5.0
X
Page 159 of 227
Occasionally remove loose dust from the interior
trim, plastic parts and seats using a vacuum
cleaner or soft brush. Wipe the vinyl and leather
surfaces with a clean, soft cloth dampened in
mild soap solution, then wipe clean with a dry
soft cloth. Before using any fabric protector,
read the manufacturer's recommendations.
Some fabric protectors contain chemicals that
may stain or bleach the seat material.
Use a cloth dampened only with water, to clean
the meter and gauge lens.
CAUTION
INever use gasoline, thinner, or any
similar material.
IThe leather seats should be regularly
coated with a leather wax like saddle
soap. Never use car wax.
INever use fabric protectors unless
recommended by the manufacturer.
IDo not use glass or plastic cleaner on
meter or gauge lens covers. It may
damage the lens cover.
FLOOR MATSThe use of Genuine NISSAN floor mats can
extend the life of your vehicle carpet and make it
easier to clean the interior.No matter what
mats are used, be sure they are fitted for
your vehicle and are properly positioned in
the footwell to prevent interference with
pedal operation.Mats should be maintained
with regular cleaning and replaced if they be-
come excessively worn.
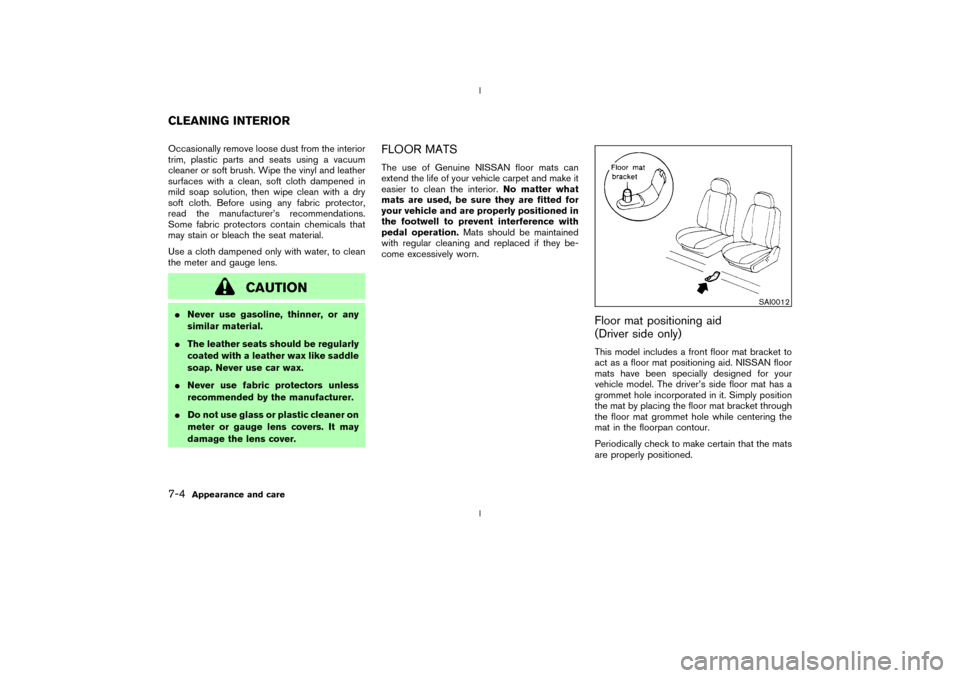
Floor mat positioning aid
(Driver side only)This model includes a front floor mat bracket to
act as a floor mat positioning aid. NISSAN floor
mats have been specially designed for your
vehicle model. The driver's side floor mat has a
grommet hole incorporated in it. Simply position
the mat by placing the floor mat bracket through
the floor mat grommet hole while centering the
mat in the floorpan contour.
Periodically check to make certain that the mats
are properly positioned.
SAI0012
CLEANING INTERIOR7-4
Appearance and care
Z
02.9.13/Z33-D/V5.0
X
Page 192 of 227

All season tiresNISSAN specifies all season tires on some
models to provide good performance for use all
year around, including snowy and icy road con-
ditions. All season tires are identified by ALL
SEASON and/or M&S on the tire sidewall. Snow
tires have better snow traction than all season
tires and may be more appropriate in some
areas.Summer tiresNISSAN specifies summer tires on some models
to provide superior performance on dry roads.
Summer tire performance in snow and ice will be
substantially reduced. Summer tires do not have
the tire traction rating M&S on the tire sidewall.
If you operate your vehicle in snowy or icy
conditions, NISSAN recommends the use of
snow or all season tires on all four wheels.Snow tiresIf snow tires are needed, it is necessary to select
tires equivalent in size and load rating to the
original equipment tires. If you do not, it can
adversely affect the safety and handling of your
vehicle.
Generally, snow tires will have lower speed
ratings than factory equipped tires and may not
match the potential maximum vehicle speed.Never exceed the maximum speed rating of the
tire.
If you operate your vehicle in snowy or icy
conditions, NISSAN recommends the use of
snow or all season tires on all four wheels.
For additional traction on icy roads, studded tires
may be used. However, some provinces and
states prohibit their use. Check local, state and
provincial laws before installing studded tires.
Skid and traction capabilities of studded snow
tires, on wet or dry surfaces, may be poorer than
that of non-studded snow tires.
TIRE CHAINSUse of tire chains may be prohibited according
to location. Check the local laws before installing
tire chains. When installing tire chains, make
sure they are of proper size for the tires on your
vehicle and are installed according to the chain
manufacturer's suggestions.Use only SAE
class S chains.Class ªSº chains are used on
vehicles with restricted tire to vehicle clearance.
Vehicles that can use Class ªSº chains are
designed to meet the SAE standard minimum
clearances between the tire and the closest
vehicle suspension or body component required
to accommodate the use of a winter traction
device (tire chains or cables). The minimum
clearances are determined using the factory
equipped tire size. Other types may damageyour vehicle. Use chain tensioners when recom-
mended by the tire chain manufacturer to ensure
a tight fit. Loose end links of the tire chain must
be secured or removed to prevent the possibility
of whipping action damage to the fenders or
undercarriage. If possible, avoid fully loading
your vehicle when using tire chains. In addition,
drive at a reduced speed. Otherwise, your ve-
hicle may be damaged and/or vehicle handling
and performance may be adversely affected.
INever install tire chains on a T-type
spare tire.
IDo not use the chains on dry roads.
ITire chains must be installed only on the
rear wheels and not on the front wheels.
CHANGING WHEELS AND TIRES
Tire rotationTires cannot be rotated in this vehicle, as front
tires are different size from rear tires and the
direction of wheel rotation is fixed in each tire.
A pin is on the front brake rotor to prevent the
rear wheels from being installed in place of the
front wheels. The spare tire can be installed in
place of the front and rear wheels. When install-
ing the spare tire in the front wheel, the hole in
the spare tire wheel must be aligned with the pin
on the brake rotor.
Maintenance and do-it-yourself
8-31
Z
02.9.13/Z33-D/V5.0
X
Page 194 of 227
replacement and/or system reset-
ting. (For models with the low tire
pressure warning system)
IDo not install a deformed wheel or
tire even if it has been repaired. Such
wheels or tires could have structural
damage and could fail without warn-
ing.
IThe use of retread tire is not recom-
mended.
IFor additional information regarding
tires, refer to ªImportant Tire Safety
Informationº (US) or ªTire Safety In-
formationº (Canada) in the Warranty
Information booklet.
Wheel balanceUnbalanced wheels may affect vehicle handling
and tire life. Even with regular use, wheels can
get out of balance. Therefore, they should be
balanced as required.
Wheel balance service should be performed
with the wheels off the vehicle. Spin balancing
the front wheels on the vehicle could lead to
transmission damage.For additional information regarding tires, refer to
ªImportant Tire Safety Informationº (US) or ªTire
Safety Informationº (Canada) in the Warranty
Information booklet.
Care of wheelsIWash the wheels when washing the vehicle
to maintain their appearance.
IClean the inner side of the wheels when the
wheel is changed or the underside of the
vehicle is washed.
IDo not use abrasive cleaners when washing
the wheels.
IInspect wheel rims regularly for dents or
corrosion. Such damage may cause loss of
pressure or poor seal at the tire bead.
INISSAN recommends that the road wheels
be waxed to protect against road salt in areas
where it is used during winter.Spare tire (T-type spare tire)Observe the following precautions if the T-type
spare tire must be used, otherwise your vehicle
could be damaged or involved in an accident.
CAUTION
IThe T-type spare tire should be used
only for emergency. It should be re-
placed by the standard tire at the first
opportunity.
IDrive carefully while the T-type spare
tire is installed.
Avoid sharp turns and abrupt braking
while driving.
IPeriodically check the T-type spare
tire inflation pressure, and always
keep it at 60 psi (420 kPa, 4.2 bar).
IAlways keep the pressure of the full
size spare tire (if so equipped) at the
recommended pressure for standard
tires, as indicated on the tire placard.
For tire placard location, see ªTire
placardº in the ª9. Technical and con-
sumer informationº.
IDo not drive your vehicle at speeds
faster than 50 MPH (80 km/h).
IDo not use tire chains on a T-type
Maintenance and do-it-yourself
8-33
Z
02.9.13/Z33-D/V5.0
X