2003 NISSAN 350Z set clock
[x] Cancel search: set clockPage 41 of 227
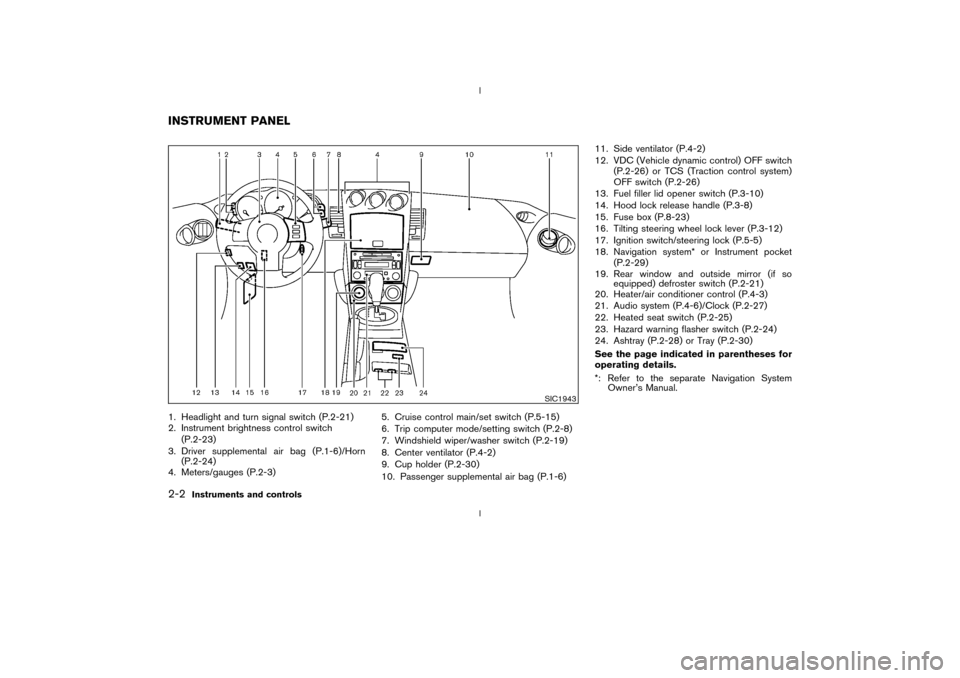
1. Headlight and turn signal switch (P.2-21)
2. Instrument brightness control switch
(P.2-23)
3. Driver supplemental air bag (P.1-6)/Horn
(P.2-24)
4. Meters/gauges (P.2-3)5. Cruise control main/set switch (P.5-15)
6. Trip computer mode/setting switch (P.2-8)
7. Windshield wiper/washer switch (P.2-19)
8. Center ventilator (P.4-2)
9. Cup holder (P.2-30)
10. Passenger supplemental air bag (P.1-6)11. Side ventilator (P.4-2)
12. VDC (Vehicle dynamic control) OFF switch
(P.2-26) or TCS (Traction control system)
OFF switch (P.2-26)
13. Fuel filler lid opener switch (P.3-10)
14. Hood lock release handle (P.3-8)
15. Fuse box (P.8-23)
16. Tilting steering wheel lock lever (P.3-12)
17. Ignition switch/steering lock (P.5-5)
18. Navigation system* or Instrument pocket
(P.2-29)
19. Rear window and outside mirror (if so
equipped) defroster switch (P.2-21)
20. Heater/air conditioner control (P.4-3)
21. Audio system (P.4-6)/Clock (P.2-27)
22. Heated seat switch (P.2-25)
23. Hazard warning flasher switch (P.2-24)
24. Ashtray (P.2-28) or Tray (P.2-30)
See the page indicated in parentheses for
operating details.
*: Refer to the separate Navigation System
Owner's Manual.
SIC1943
INSTRUMENT PANEL2-2
Instruments and controls
Z
02.9.13/Z33-D/V5.0
X
Page 66 of 227
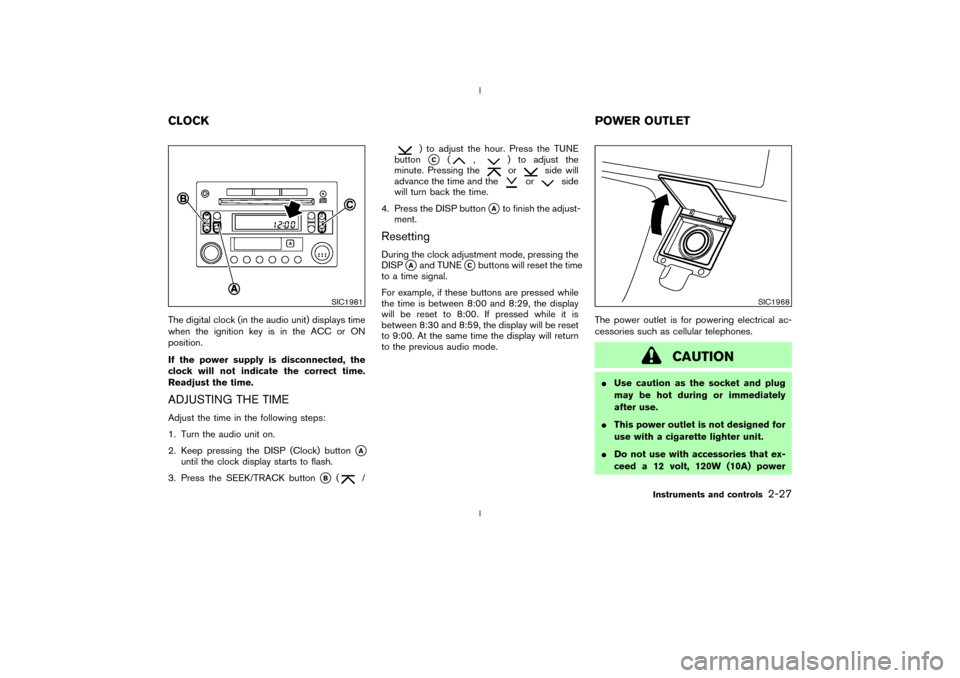
The digital clock (in the audio unit) displays time
when the ignition key is in the ACC or ON
position.
If the power supply is disconnected, the
clock will not indicate the correct time.
Readjust the time.ADJUSTING THE TIMEAdjust the time in the following steps:
1. Turn the audio unit on.
2. Keep pressing the DISP (Clock) button
qA
until the clock display starts to flash.
3. Press the SEEK/TRACK button
qB
(
/
) to adjust the hour. Press the TUNE
buttonqC
(
,
) to adjust the
minute. Pressing theor
side will
advance the time and the
or
side
will turn back the time.
4. Press the DISP button
qAto finish the adjust-
ment.
ResettingDuring the clock adjustment mode, pressing the
DISP
qAand TUNE
qCbuttons will reset the time
to a time signal.
For example, if these buttons are pressed while
the time is between 8:00 and 8:29, the display
will be reset to 8:00. If pressed while it is
between 8:30 and 8:59, the display will be reset
to 9:00. At the same time the display will return
to the previous audio mode.The power outlet is for powering electrical ac-
cessories such as cellular telephones.
CAUTION
IUse caution as the socket and plug
may be hot during or immediately
after use.
IThis power outlet is not designed for
use with a cigarette lighter unit.
IDo not use with accessories that ex-
ceed a 12 volt, 120W (10A) power
SIC1981
SIC1968
CLOCKPOWER OUTLET
Instruments and controls
2-27
Z
02.9.13/Z33-D/V5.0
X
Page 104 of 227

FM RADIO RECEPTIONRange: FM range is normally limited to 25 to 30
miles (40 to 48 km), with monaural (single
channel) FM having slightly more range than
stereo FM. External influences may sometimes
interfere with FM station reception even if the FM
station is within 25 miles (40 km). The strength
of the FM signal is directly related to the distance
between the transmitter and receiver. FM signals
follow a line-of-sight path, exhibiting many of the
same characteristics as light. For example they
will reflect off objects.
Fade and drift: As your vehicle moves away froma station transmitter, the signals will tend to fade
and/or drift.
Static and flutter: During signal interference from
buildings, large hills or due to antenna position,
usually in conjunction with increased distance
from the station transmitter, static or flutter can
be heard. This can be reduced by adjusting the
treble control counterclockwise to reduce treble
response.
Multipath reception: Because of the reflective
characteristics of FM signals, direct and re-
flected signals reach the receiver at the same
time. The signals may cancel each other, result-
ing in momentary flutter or loss of sound.
AM RADIO RECEPTIONAM signals, because of their low frequency, can
bend around objects and skip along the ground.
In addition, the signals can be bounced off the
ionosphere and bent back to earth. Because of
these characteristics. AM signals are also sub-
ject to interference as they travel from transmitter
to receiver.
Fading: Occurs while the vehicle is passing
through freeway underpasses or in areas with
many tall buildings. It can also occur for several
seconds during ionospheric turbulence even in
areas where no obstacles exist.
Static: Caused by thunderstorms, electricalpower lines, electric signs and even traffic lights.
AUDIO OPERATION PRECAUTIONS
Cassette playerITo maintain good quality sound,
NISSAN recommends using cassette
tapes of 60 minutes or shorter in length.
ICassette tapes should be removed from
the player when not in use. Store cas-
settes in their protective cases and
away from direct sunlight, heat, dust,
moisture and magnetic sources.
IDirect sunlight can cause the cassette to
become deformed. The use of deformed
cassettes may cause the cassette to jam
in the player.
IDo not use cassettes with labels which
are peeling and loose. If used, the label
could jam in the player.
IIf a cassette has loose tape, insert a
pencil through one of the cassette hubs
and rewind the tape firmly around the
hubs. Loose tape may cause tape jam-
ming and wavering sound quality.
IOver a period of time, the playback
head, capstan and pinch roller may col-
lect a tape coating residue as the tape is
SAA0306
Heater, air conditioner and audio systems
4-7
Z
02.9.13/Z33-D/V5.0
X
Page 107 of 227
Audio main operationON×OFF/Volume control:
Turn the ignition key to ACC or ON, and then
push the ON×OFF/VOL (Volume) control knob
while the system is off to call up the mode (radio
or CD) which was playing immediately before
the system was turned off. When no CD is
loaded, the radio will come on. While the system
is on, pushing the ON×OFF/VOL control knob
turns the system off.
Turn the ON×OFF/VOL control knob to adjust
the volume.
AUDIO button (BASS, TREBLE, FADER,
BALANCE):
Press the AUDIO button to change the selecting
mode as follows.
BASS®TREBLE®FADER®BALANCE
To adjust Bass, Treble, Fader and Balance,
press the AUDIO button until the desired mode
(BASS, TREBLE, FADER or BALANCE) ap-
pears in the display. Press the TUNE
(
,
) or SEEK (
,
) button
to adjust Bass and Treble to the desired level.
Use the TUNE or SEEK button also to adjust
Fader or Balance modes. Fader adjusts the
sound level between the front and rear speakersand Balance adjusts the sound between the
right and left speakers.
After 10 seconds, the radio or CD display
reappears. Once the sound quality is set to the
desired level, press the AUDIO button repeat-
edly until the radio or CD display appears.
DISP DISPLAY CHANGE:
Push the DISP button for more than 1.5 seconds
to adjust the digital clock display. See ªClockº in
the ª2. Instruments and controlsº section for the
clock adjustment operation.
When the DISP button is pushed for less than
1.5 seconds while the compact disc is being
played, the display will show the CD play time.FM-AM radio operation
FM/AM band select:
Pushing the FM band select button will change
the band as follows:
FM1®FM2®FM1
To select the AM band, push the AM band select
button.
When FM or AM band select button is pushed
while the ignition switch is in the ACC or ON, the
radio will come on at the station last played.
The last station played will also come on whenthe power knob is turned to ON.
If a compact disc is playing when the FM or AM
band select button is turned to ON, the compact
disc will automatically be turned off and the last
radio station played will come on.
The FM stereo indicator ST will glow during FM
stereo reception. When the stereo broadcast
signal is weak, the radio will automatically
change from stereo to monaural reception.
TUNE (Tuning):WARNING
The radio should not be tuned while
driving so full attention may be given to
vehicle operation.
Use the TUNE button
or
for manual
tuning. To move quickly through the channels,
hold either side of the TUNE button down for
more than 0.5 seconds.
SEEK tuning:
Push the SEEK button
or
to tune
from high to low or low to high frequencies and
stops at the next broadcasting station.
4-10
Heater, air conditioner and audio systems
Z
02.9.13/Z33-D/V5.0
X
Page 110 of 227
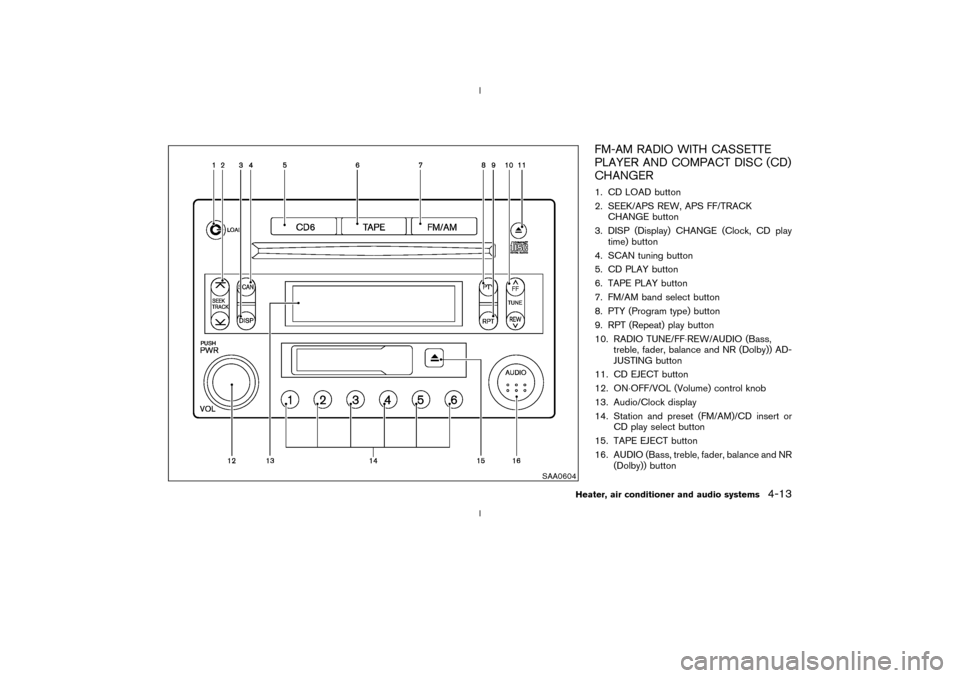
FM-AM RADIO WITH CASSETTE
PLAYER AND COMPACT DISC (CD)
CHANGER1. CD LOAD button
2. SEEK/APS REW, APS FF/TRACK
CHANGE button
3. DISP (Display) CHANGE (Clock, CD play
time) button
4. SCAN tuning button
5. CD PLAY button
6. TAPE PLAY button
7. FM/AM band select button
8. PTY (Program type) button
9. RPT (Repeat) play button
10. RADIO TUNE/FF×REW/AUDIO (Bass,
treble, fader, balance and NR (Dolby)) AD-
JUSTING button
11. CD EJECT button
12. ON×OFF/VOL (Volume) control knob
13. Audio/Clock display
14. Station and preset (FM/AM)/CD insert or
CD play select button
15. TAPE EJECT button
16. AUDIO (Bass, treble, fader, balance and NR
(Dolby)) button
SAA0604
Heater, air conditioner and audio systems
4-13
Z
02.9.13/Z33-D/V5.0
X
Page 111 of 227

Audio main operationHead unit:
The tape deck employs a permalloy head which
allows for improved reproduction of high fre-
quency ranges. Noise is also greatly reduced by
the combined use of the Dolby NR (Noise
Reduction) system. The auto loudness circuit
enhances the low frequency range automatically
in both radio reception and tape and CD play-
back.
ON×OFF/Volume control:
Turn the ignition key to ACC or ON, and then
push the ON×OFF/VOL (Volume) control knob
while the system is off to call up the mode (radio,
tape or CD) which was playing immediately
before the system was turned off. When no CD
or tape is loaded, the radio will come on. While
the system is on, pushing the ON×OFF/VOL
control knob turns the system off.
Turn the ON×OFF/VOL control knob to adjust
the volume.
AUDIO button (BASS, TREBLE, FADER,
BALANCE and NR (Dolby)):
Press the AUDIO button to change the selecting
mode as follows.
BASS®TREBLE®FADER®BALANCE®
NR (when cassette playing)To adjust Bass, Treble, Fader and Balance,
press the AUDIO button until the desired mode
(BASS, TREBLE, FADER or BALANCE) ap-
pears in the display. Press the TUNE
(
,
) or SEEK (
,
) button
to adjust Bass and Treble to the desired level.
Use the TUNE or SEEK button also to adjust
Fader or Balance modes. Fader adjusts the
sound level between the front and rear speakers
and Balance adjusts the sound between the
right and left speakers.
To change the NR (Dolby) mode to OFF or ON,
press the
or
(TUNE) button while
cassette tape is playing. When Dolby is ON, the
display indicates themark.
After 10 seconds, the radio, tape or CD display
reappears. Once the sound quality is set to the
desired level, press the AUDIO button repeat-
edly until the radio, tape or CD display appears.
Dolby noise reduction manufactured under li-
cense from Dolby Laboratories Licensing Cor-
poration. Dolby NR and the double-D symbol
are trademarks of Dolby Laboratories Li-
censing Corporation.
Metal or chrome tape usage:
The cassette player will be automatically set to
high performance play when playing a metal or
chrome cassette tape.
DISP DISPLAY CHANGE:
Push the DISP button for more than 1.5 seconds
to adjust the digital clock display. See ªClockº in
the ª2. Instruments and controlsº section for the
clock adjustment operation.
When the DISP button is pushed for less than
1.5 seconds while the compact disc is being
played, the display will show the CD play time.FM-AM radio operation
FM/AM band select:
Pushing the FM/AM band select button will
change the band as follows:
AM®FM1®FM2®AM
When FM/AM band select button is pushed
while the ignition switch is in the ACC or ON, the
radio will come on at the station last played.
The last station played will also come on when
the ON×OFF/VOL control knob is pushed to ON.
If a compact disc or tape is playing when the
FM/AM band select button is turned to ON, the
compact disc or tape will automatically be
turned off and the last radio station played will
come on.
The FM stereo indicator ST will glow during FM
stereo reception. When the stereo broadcast
signal is weak, the radio will automatically
4-14
Heater, air conditioner and audio systems
Z
02.9.13/Z33-D/V5.0
X
Page 146 of 227
verse), or the automatic transmission
into P (Park).
INever change tires when the vehicle
is on a slope, ice or slippery areas.
This is hazardous.
INever change tires if oncoming traffic
is close to your vehicle. Wait for pro-
fessional road assistance.
IWhen a spare tire is mounted or a
wheel is replaced, tire pressure will
not be indicated and the low tire
pressure warning system will not
function. Contact your NISSAN
dealer as soon as possible for tire
replacement and/or system reset-
ting. (For models with the low tire
pressure warning system)
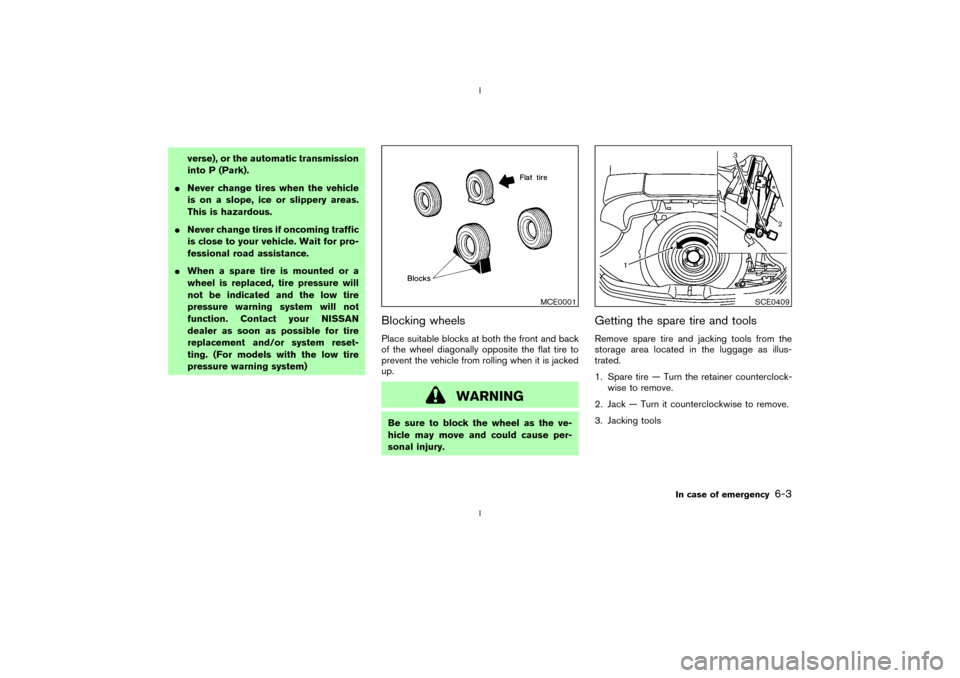
Blocking wheelsPlace suitable blocks at both the front and back
of the wheel diagonally opposite the flat tire to
prevent the vehicle from rolling when it is jacked
up.
WARNING
Be sure to block the wheel as the ve-
hicle may move and could cause per-
sonal injury.
Getting the spare tire and toolsRemove spare tire and jacking tools from the
storage area located in the luggage as illus-
trated.
1. Spare tire Ð Turn the retainer counterclock-
wise to remove.
2. Jack Ð Turn it counterclockwise to remove.
3. Jacking tools
MCE0001
SCE0409
In case of emergency
6-3
Z
02.9.13/Z33-D/V5.0
X
Page 220 of 227

10 Index
A
ABS (Anti-lock brake system)................................ 5-20
Air bag ON/OFF switch .......................................... 1-21
Air bag system
Front (See supplemental front air bag
system) .................................................................. 1-11
Side and curtain (See supplemental side air bag
and curtain side-impact air bag system) ...... 1-13
Air bag warning labels ............................................. 1-16
Air bag warning light .................................... 1-16, 2-14
Air cleaner housing filter.......................................... 8-18
Air conditioner
Air conditioner operation ..................................... 4-3
Air conditioner service ................................ 4-3, 4-6
Air conditioner specification label .................. 9-12
Air conditioning system refrigerant and lubricant
recommendations ......................................... 4-6, 9-6
Heater and air conditioner (automatic)............ 4-3
Alcohol, drugs and driving......................................... 5-5
Anchor point location, Top tether strap ............. 1-27
Anti-lock Brake System (ABS) .............................. 5-20
Anti-lock brake warning light.................................. 2-11
Appearance care
Exterior appearance care .................................... 7-2
Interior appearance care ..................................... 7-4
Ashtrays (See cigarette lighter and ashtray)...... 2-28
Audible reminders ..................................................... 2-16
Audio operation precautions ..................................... 4-7Audio system ................................................................ 4-6
Autochanger
Compact Disc (CD) ........................................... 4-17
Automatic
Anti-glare inside mirror ...................................... 3-13
Automatic transmission fluid (ATF) ................ 8-12
Driving with automatic transmission........ 5-5, 5-9
Transmission selector lever lock release ...... 5-12
Avoiding collision and rollover .................................. 5-4
B
Battery .......................................................................... 8-15
Battery saver system ......................................... 2-22
Battery replacement, (See remote keyless entry
system) ........................................................................... 3-7
Before starting the engine ......................................... 5-8
Belts (See drive belts) ............................................. 8-17
Brake
Anti-lock brake system (ABS) ......................... 5-20
Brake and clutch fluid ....................................... 8-13
Brake booster ...................................................... 8-22
Brake fluid............................................................. 8-13
Brake pedal .......................................................... 8-21
Brake pedal check ............................................. 8-21
Brake system ....................................................... 5-20
Parking brake check............................... 5-14, 8-21
Parking brake operation .................................... 5-14
Warning light ....................................................... 2-12Break-in schedule ..................................................... 5-17
Bulb check/instrument panel.................................. 2-11
Bulb replacement ...................................................... 8-25
C
Capacities and recommended fuel/lubricants...... 9-2
Car phone or CB radio............................................ 4-19
Cassette player (See audio system) .................... 4-16
Catalytic converter, Three way catalyst ................. 5-3
CD care and cleaning .............................................. 4-19
Child restraints ........................................................... 1-25
Top tether strap anchor point location ......... 1-27
Installation on front passenger seat............... 1-28
Precautions on child restraints........................ 1-25
With top tether strap ......................................... 1-27
Child safety ................................................................. 1-20
Chimes, Audible reminders..................................... 2-16
Cigarette lighter and ashtray .................................. 2-28
Circuit breaker, Fusible link .................................... 8-23
Cleaning exterior and interior .......................... 7-2, 7-4
Clock ............................................................................ 2-27
Clutch fluid.................................................................. 8-14
Cold weather driving ................................................ 5-24
Compact Disc (CD) changer operation .............. 4-17
Compact Disc (CD) player (See audio
system) ......................................................................... 4-11
Compact spare tire ................................................... 8-33
Console box................................................................ 2-31
Z
02.9.13/Z33-D/V5.0
X