2003 NISSAN 350Z audio
[x] Cancel search: audioPage 5 of 227

Table of
Contents
Seats, restraints and supplemental air bag systemsInstruments and controlsPre-driving checks and adjustmentsHeater, air conditioner and audio systemsStarting and drivingIn case of emergencyAppearance and careMaintenance and do-it-yourselfTechnical and consumer informationIndex
Z
02.9.13/Z33-D/V5.0
X
Page 41 of 227

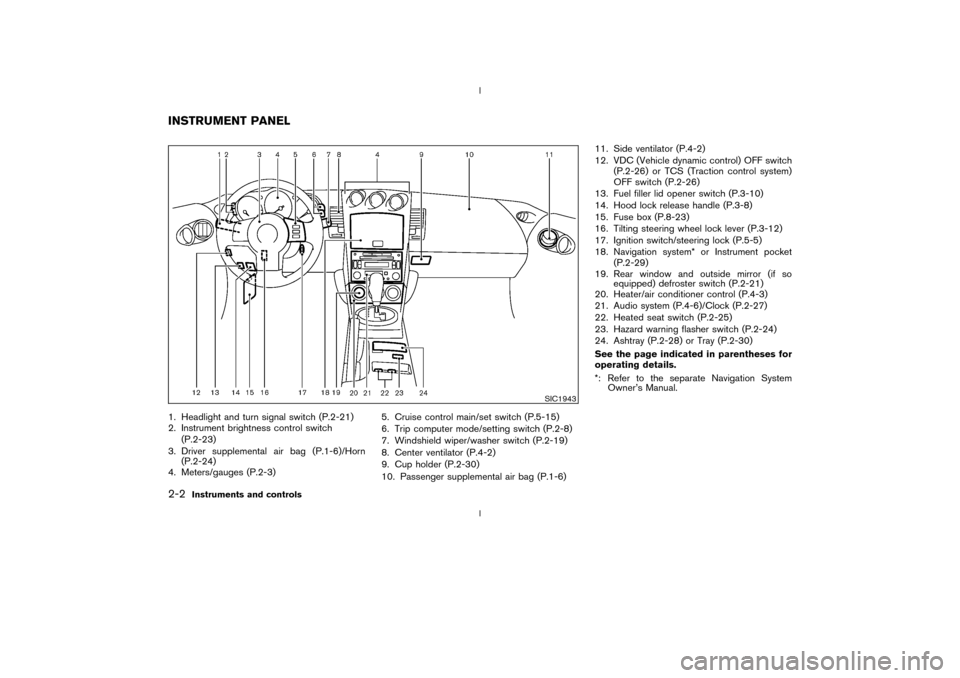
1. Headlight and turn signal switch (P.2-21)
2. Instrument brightness control switch
(P.2-23)
3. Driver supplemental air bag (P.1-6)/Horn
(P.2-24)
4. Meters/gauges (P.2-3)5. Cruise control main/set switch (P.5-15)
6. Trip computer mode/setting switch (P.2-8)
7. Windshield wiper/washer switch (P.2-19)
8. Center ventilator (P.4-2)
9. Cup holder (P.2-30)
10. Passenger supplemental air bag (P.1-6)11. Side ventilator (P.4-2)
12. VDC (Vehicle dynamic control) OFF switch
(P.2-26) or TCS (Traction control system)
OFF switch (P.2-26)
13. Fuel filler lid opener switch (P.3-10)
14. Hood lock release handle (P.3-8)
15. Fuse box (P.8-23)
16. Tilting steering wheel lock lever (P.3-12)
17. Ignition switch/steering lock (P.5-5)
18. Navigation system* or Instrument pocket
(P.2-29)
19. Rear window and outside mirror (if so
equipped) defroster switch (P.2-21)
20. Heater/air conditioner control (P.4-3)
21. Audio system (P.4-6)/Clock (P.2-27)
22. Heated seat switch (P.2-25)
23. Hazard warning flasher switch (P.2-24)
24. Ashtray (P.2-28) or Tray (P.2-30)
See the page indicated in parentheses for
operating details.
*: Refer to the separate Navigation System
Owner's Manual.
SIC1943
INSTRUMENT PANEL2-2
Instruments and controls
Z
02.9.13/Z33-D/V5.0
X
Page 56 of 227

The security condition will be shown by the
security indicator light.VEHICLE SECURITY SYSTEMThe vehicle security system provides visual and
audio alarm signals if parts of the vehicle are
disturbed.How to activate the vehicle security
system1. Close all windows.
The system can be activated even if the
windows are open.2. Remove the key from the ignition switch.
3. Close and lock all doors, hood and rear
hatch.
Lock all doors by pressing the LOCK button
on the keyfob. When using the keyfob, the
hazard indicators flash twice to indicate all
doors are locked.
4. Confirm that the security indicator light
comes on. The security indicator light glows
for about 30 seconds and then blinks. The
system is now activated. If, during this 30
second time period, the door is unlocked by
the key or the keyfob, or the ignition key is
turned to ACC or ON, the system will not
activate.
IIf the key is turned slowly toward the
rear of the vehicle when locking the
door, the system may not activate. If the
key is returned beyond the vertical po-
sition toward the front of the vehicle to
remove the key, the system may be
deactivated. If the indicator light fails to
glow for 30 seconds, unlock the door
once and lock it again.
IEven when the driver and/or passengers
are in the vehicle, the system will acti-
vate with all doors, hood and rear hatch
locked and ignition key off. Turn theignition key to ACC to turn the system
off.
Vehicle security system operationThe security system will give the following alarm:
IThe headlights blink and the horn sounds
intermittently.
IThe alarm automatically turns off after ap-
proximately 1 minute. However, the alarm
reactivates if the vehicle is tampered with
again. The alarm can be shut off by unlocking
a door with the key, or by pressing the
UNLOCK button on the keyfob.
The alarm is activated by:
IOpening the door without using the key or
keyfob.
IOpening the rear hatch without using the rear
hatch release switch or keyfob.
IOpening the hood.How to stop alarmThe alarm will stop only by unlocking a door with
the key, or by pressing the UNLOCK button on
keyfob. The alarm will not stop if the ignition
switch is turned to ACC or ON.
If the system does not operate as de-
SIC1699
Instruments and controls
2-17
Z
02.9.13/Z33-D/V5.0
X
Page 66 of 227

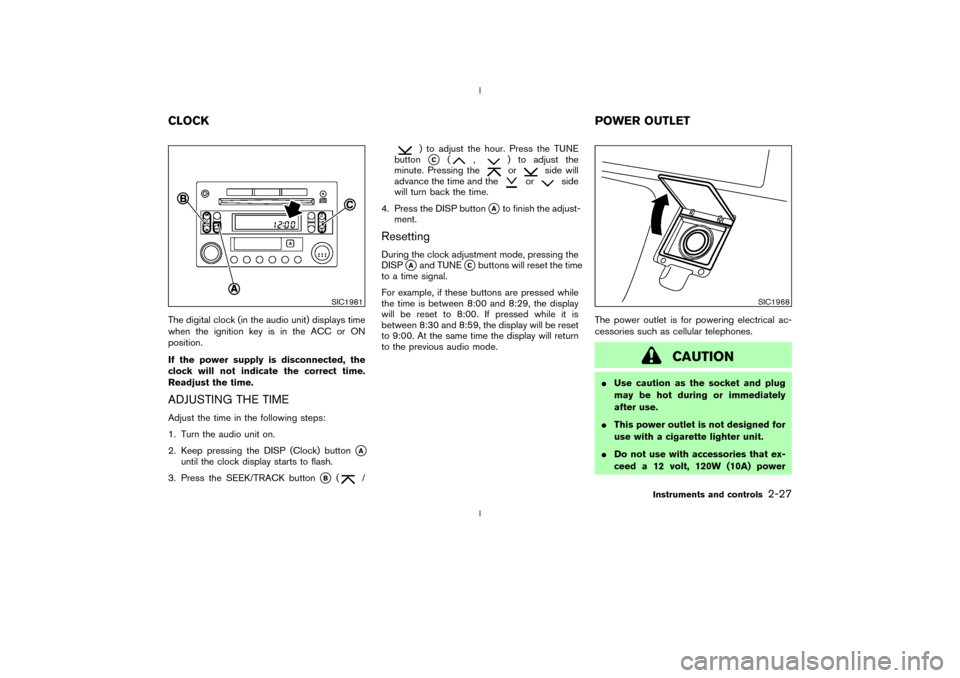
The digital clock (in the audio unit) displays time
when the ignition key is in the ACC or ON
position.
If the power supply is disconnected, the
clock will not indicate the correct time.
Readjust the time.ADJUSTING THE TIMEAdjust the time in the following steps:
1. Turn the audio unit on.
2. Keep pressing the DISP (Clock) button
qA
until the clock display starts to flash.
3. Press the SEEK/TRACK button
qB
(
/
) to adjust the hour. Press the TUNE
buttonqC
(
,
) to adjust the
minute. Pressing theor
side will
advance the time and the
or
side
will turn back the time.
4. Press the DISP button
qAto finish the adjust-
ment.
ResettingDuring the clock adjustment mode, pressing the
DISP
qAand TUNE
qCbuttons will reset the time
to a time signal.
For example, if these buttons are pressed while
the time is between 8:00 and 8:29, the display
will be reset to 8:00. If pressed while it is
between 8:30 and 8:59, the display will be reset
to 9:00. At the same time the display will return
to the previous audio mode.The power outlet is for powering electrical ac-
cessories such as cellular telephones.
CAUTION
IUse caution as the socket and plug
may be hot during or immediately
after use.
IThis power outlet is not designed for
use with a cigarette lighter unit.
IDo not use with accessories that ex-
ceed a 12 volt, 120W (10A) power
SIC1981
SIC1968
CLOCKPOWER OUTLET
Instruments and controls
2-27
Z
02.9.13/Z33-D/V5.0
X
Page 98 of 227

4 Heater, air conditioner and audio systemsVentilators ................................................................................ 4-2
Center ................................................................................. 4-2
Side ..................................................................................... 4-2
Heater and air conditioner (Automatic) ............................ 4-3
Automatic operation ........................................................ 4-4
Manual operation .............................................................. 4-4
Operating tips ................................................................... 4-5
Servicing air conditioner ...................................................... 4-6
Audio system........................................................................... 4-6FM radio reception .......................................................... 4-7
AM radio reception .......................................................... 4-7
Audio operation precautions ......................................... 4-7
FM-AM radio with compact disc (CD) player .......... 4-9
FM-AM radio with cassette player and compact disc
(CD) changer .................................................................. 4-13
CD care and cleaning .................................................. 4-19
Antenna ............................................................................ 4-19
Car phone or CB radio .................................................... 4-19
Z
02.9.13/Z33-D/V5.0
X
Page 99 of 227

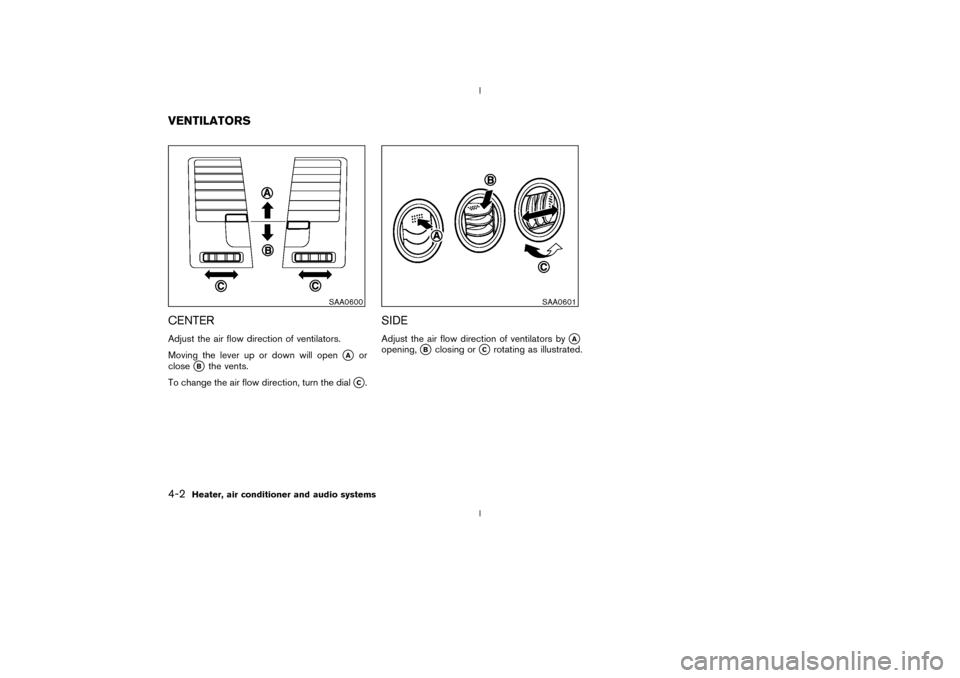
CENTERAdjust the air flow direction of ventilators.
Moving the lever up or down will open
qA
or
close
qB
the vents.
To change the air flow direction, turn the dial
qC.
SIDEAdjust the air flow direction of ventilators by
qA
opening,
qB
closing or
qC
rotating as illustrated.
SAA0600
SAA0601
VENTILATORS4-2
Heater, air conditioner and audio systems
Z
02.9.13/Z33-D/V5.0
X
Page 100 of 227

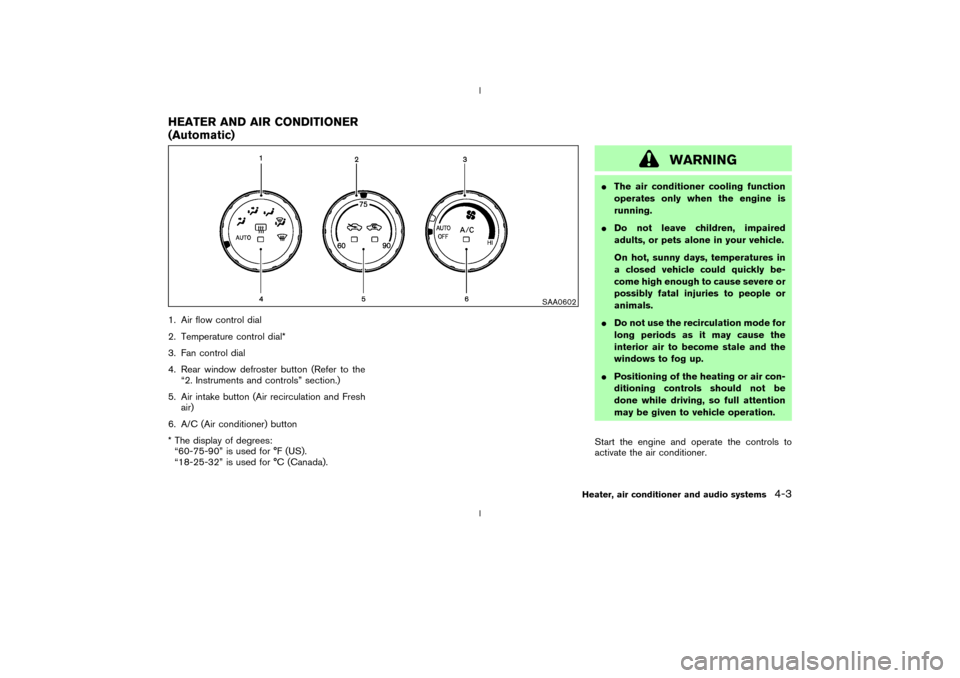
1. Air flow control dial
2. Temperature control dial*
3. Fan control dial
4. Rear window defroster button (Refer to the
ª2. Instruments and controlsº section.)
5. Air intake button (Air recirculation and Fresh
air)
6. A/C (Air conditioner) button
* The display of degrees:
ª60-75-90º is used for ÉF (US).
ª18-25-32º is used for ÉC (Canada).
WARNING
IThe air conditioner cooling function
operates only when the engine is
running.
IDo not leave children, impaired
adults, or pets alone in your vehicle.
On hot, sunny days, temperatures in
a closed vehicle could quickly be-
come high enough to cause severe or
possibly fatal injuries to people or
animals.
IDo not use the recirculation mode for
long periods as it may cause the
interior air to become stale and the
windows to fog up.
IPositioning of the heating or air con-
ditioning controls should not be
done while driving, so full attention
may be given to vehicle operation.
Start the engine and operate the controls to
activate the air conditioner.
SAA0602
HEATER AND AIR CONDITIONER
(Automatic)
Heater, air conditioner and audio systems
4-3
Z
02.9.13/Z33-D/V5.0
X
Page 101 of 227

AUTOMATIC OPERATION
Cooling and/or dehumidified heating
(AUTO)This mode may be normally used all year round
as the system automatically works to keep a
constant temperature. Air flow distribution and
fan speed are also controlled automatically.
1. Turn the fan control dial and air flow control
dial to the AUTO position.
2. Turn the temperature control dial to set the
desired temperature.
IAdjust the temperature to about 75ÉF (24ÉC)
for normal operation.
IThe temperature of the passenger compart-
ment will be maintained automatically. Air
flow distribution and fan speed are also con-
trolled automatically.Heating (AUTO; A/C off)The air conditioner does not activate. When you
need to heat only, use this mode.
1. Turn the fan control dial and air flow control
dial to the AUTO position.
2. Push the A/C button to turn off the air
conditioner. (The A/C button indicator light
will turn off.)3. Turn the temperature control dial to set the
desired temperature.
IThe temperature of the passenger compart-
ment will be maintained automatically. Air
flow distribution and fan speed are also con-
trolled automatically.
IDo not set the temperature lower than the
outside air temperature. Otherwise the sys-
tem may not work properly.
INot recommended if windows fog up.
Dehumidified defrosting or defogging1. Turn the fan control dial to the desired posi-
tion.
2. Turn the air flow control dial to the DEF
position.
3. Turn the temperature control dial to set the
desired temperature.
ITo quickly remove ice from the outside of the
windows, turn the fan control dial to the
maximum position.
IAs soon as possible after the windshield is
clean, turn the air flow control dial to the
AUTO position to return to the auto mode.
IWhen the air flow control dial is turned to theor
position, the air conditioner
will automatically be turned on at outsidetemperatures above 23ÉF (þ5ÉC) to defog
the windshield, and the air recirculate mode
will automatically be turned off.
Outside air is drawn into the passenger
compartment to improve the defogging per-
formance.
MANUAL OPERATION
Fan speed controlTurn the fan control dial
to manually con-
trol the fan speed.
Turn the dial to the AUTO position to return to
automatic control of the fan speed.
Air recirculation/Fresh airEach time the air intake button is pushed, the
indicator light on the button will alternate
(Air recirculation) and
(Fresh air).
When the
indicator light is on, the interior
air is recirculated. (When the air recirculation
mode is selected with the A/C indicator off while
the fan control dial is in the AUTO position, the
air conditioner will turn on.)
When theindicator light is on, the outside
air is drawn into the passenger compartment.
IWhen the air intake button is pushed for
longer than 1.5 seconds, both indicator lights
4-4
Heater, air conditioner and audio systems
Z
02.9.13/Z33-D/V5.0
X