Page 91 of 360
.
Easy-entry/exit feature
With the easy-entry/exit feature activated
the")
91 Controls in detail
Seats
Seats
Information on seat adjustment can be
found in the “Getting started” section
(�page 34).
Easy-entry/exit feature
With the easy-entry/exit feature activated
the steering wheel tilts upwards. This
allows easier entry into and exit from the
vehicle when the driver’s door is opened.
However, the engine must be turned off.The easy-entry/exit feature can be
switched on or off in the individual setting
menu
CONVENIENCE
- EASY-ENTRY FEATURE
ACTIVATE
(�page 128).
When the key is inserted in the starter
switch and the driver’s door is closed, the
steering wheel returns to the last position
set for it.
Warning!
G
You must ensure that no one can become
trapped or injured by the moving steering
wheel when the easy-entry/exit feature is
activated, the driver’s door is being opened
and the engine is turned off. Do not leave
children unattended in the vehicle, or with
access to an unlocked vehicle. Unsuper-
vised use of vehicle equipment may cause
an accident and/or serious personal injury.
iTo cancel the procedure, press the
steering wheel adjustment stalk
(�page 22) or the memory button
(�page 98).
Page 97 of 360

97 Controls in detail
Memory function
Memory function
The memory button and stored position
switch are located on the door.
You can store up to three different settings
per key.
The following settings are saved for each
stored position:�
Driver’s seat and seat backrest posi-
tion
�
Steering wheel position
�
Driver’s side exterior rear view mirror
position
�
Passenger side exterior rear view mir-
ror position
�
Front passenger seat position
These key-dependent memory settings
can be deactivated if desired
(
�page 129).
!Prior to operating the vehicle, the driv-
er should check and adjust the seat
height, seat position fore and aft, and
seat backrest angle if necessary, to en-
sure adequate control, reach and com-
fort. The head restraint should also be
adjusted for proper height. Also see air-
bag section (
�page 55) for proper seat
positioning.
In addition, adjust the steering wheel to
ensure adequate control, reach, opera-
tion and comfort. Both the inside and
outside rear view mirrors should be ad-
justed for adequate rear vision.
Fasten seat belts. Infants and small
children should be seated in a properly
secured restraint system that complies
with U.S. Federal Motor Vehicle Safety
Standards 213 and 225 and Canadian
Motor Vehicle Safety Standards 213
and 210.2.
Warning!
G
Do not activate the memory function while
driving. Activating the memory function
while driving could cause the driver to lose
control of the vehicle.
Page 98 of 360
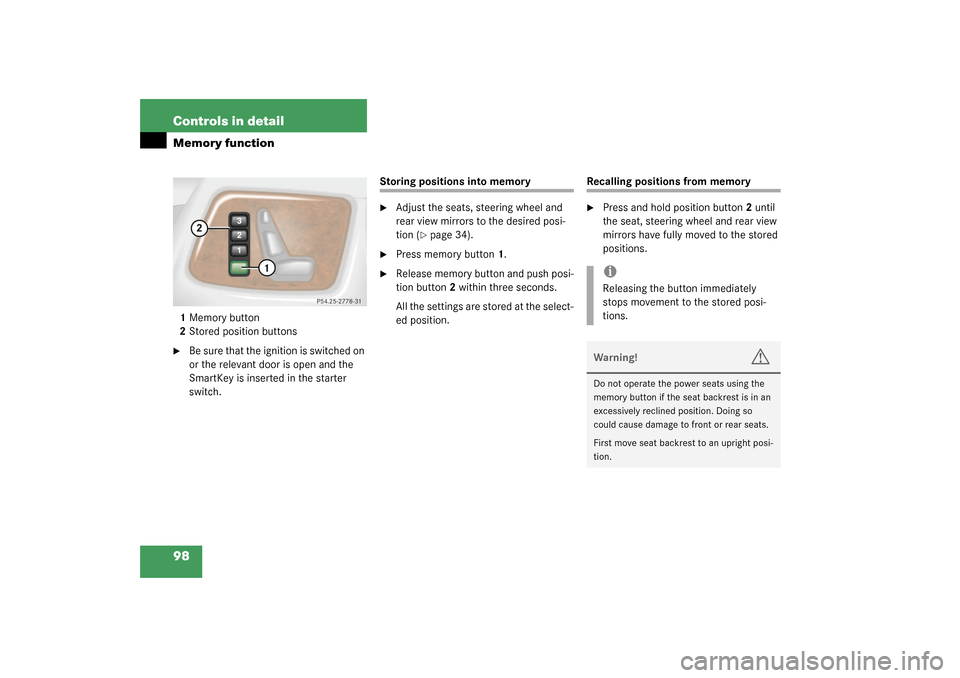
98 Controls in detailMemory function1Memory button
2Stored position buttons�
Be sure that the ignition is switched on
or the relevant door is open and the
SmartKey is inserted in the starter
switch.
Storing positions into memory�
Adjust the seats, steering wheel and
rear view mirrors to the desired posi-
tion (
�page 34).
�
Press memory button1.
�
Release memory button and push posi-
tion button2 within three seconds.
All the settings are stored at the select-
ed position.
Recalling positions from memory�
Press and hold position button2 until
the seat, steering wheel and rear view
mirrors have fully moved to the stored
positions.iReleasing the button immediately
stops movement to the stored posi-
tions.Warning!
G
Do not operate the power seats using the
memory button if the seat backrest is in an
excessively reclined position. Doing so
could cause damage to front or rear seats.
First move seat backrest to an upright posi-
tion.
Page 100 of 360
.
Exterior lamp switch
The exterior lam")
100 Controls in detailLighting
LightingFor notes on how to switch on the head-
lamps and use the turn signals, see the
“Getting started” section (
�page 46).
Exterior lamp switch
The exterior lamp switch is located on the
dashboard to the left of the steering wheel
M
Off
U
Automatic headlamp mode
C
Parking lamps (also side marker
lamps, tail lamps, license plate
lamps, instrument panel lamps)
Canada only: When engine is run-
ning, the low beam is additionally
switched on.
B
Parking lamps plus low beam or
high beam headlamps (combination
switch pushed forward).
ˆ
Standing lamps, right (turn left one
stop)
‚
Standing lamps, left (turn left two
stops)
iIf you remove the key and open the
driver’s door while the parking lamps or
low beam headlamps are switched on,
then �
a warning sounds
�
$
appears in the multifunction
display
�
the message
SWITCH OFF LIGHTS
appears in the multifunction display
iWith the daytime running lamp mode
activated and the engine running, the
low beam headlamps cannot be
switched off manually.
Page 103 of 360
103 Controls in detail
Lighting
Switching on rear fog lamp�
Check that the low beam headlamps
are switched on.
�
Pull out exterior lamp switch to second
stop.
The yellow indicator lamp
†
in the
lamp switch lights up.
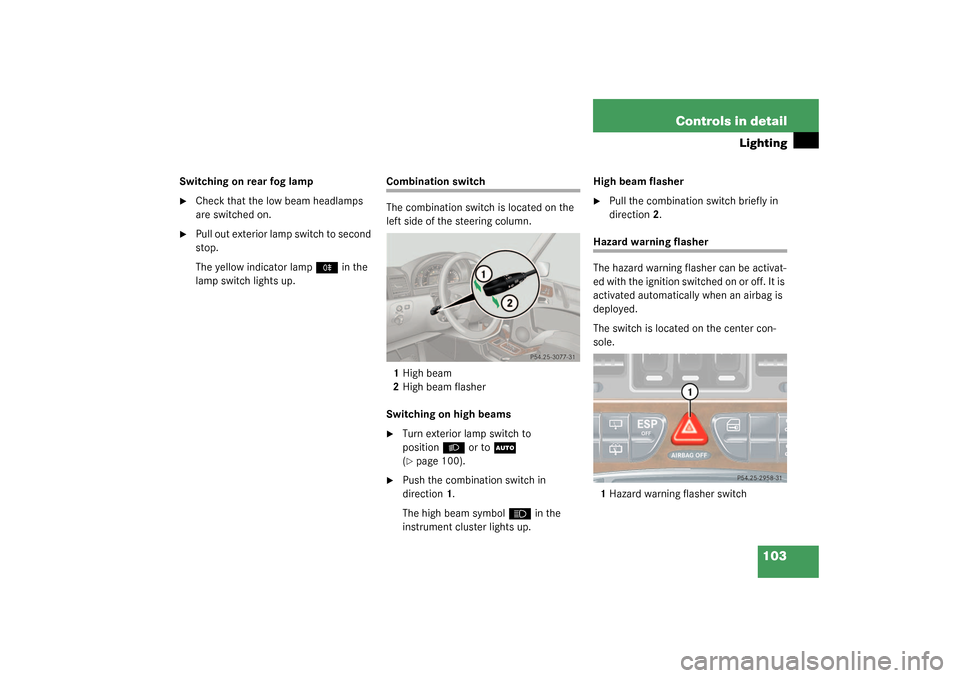
Combination switch
The combination switch is located on the
left side of the steering column.
1High beam
2High beam flasher
Switching on high beams�
Turn exterior lamp switch to
position
B
or to
U
(
�page 100).
�
Push the combination switch in
direction1.
The high beam symbol
A
in the
instrument cluster lights up.High beam flasher
�
Pull the combination switch briefly in
direction2.
Hazard warning flasher
The hazard warning flasher can be activat-
ed with the ignition switched on or off. It is
activated automatically when an airbag is
deployed.
The switch is located on the center con-
sole.
1Hazard warning flasher switch
Page 109 of 360

109 Controls in detail
Instrument cluster
�
Turn the SmartKey in the starter switch
to position1 or2.
�
Call up the trip odometer and main
odometer by pressing button
è
or
ÿ
on the multifunction steering
wheel (�page 112).
�
Press button
j
or
k
until the
coolant temperature display appears.During severe operating conditions and
stop-and-go city traffic, the coolant tem-
perature may rise close to 248°F (120°C).
The engine should not be operated with
the coolant temperature above 248°F
(120°C). Doing so may cause serious en-
gine damage which is not covered by the
Mercedes-Benz Limited Warranty.
Trip odometer�
Make sure you are viewing the trip
odometer and main odometer
(�page 111) in the multifunction dis-
play.
�
Press and hold the reset knob on the in-
strument cluster (
�page 108) until the
trip odometer is reset.
Tachometer
The red marking on the tachometer de-
notes excessive engine speed.
To help protect the engine, the fuel supply
is interrupted if the engine is operated
within the red marking.
iExcessive coolant temperatures trigger
a warning in the multifunction display
(�page 252).
!Avoid driving at excessive engine
speeds, as it may result in serious en-
gine damage that is not covered by the
Mercedes-Benz Limited Warranty.
Page 111 of 360

111 Controls in detail
Control system
Control system
The control system is activated as soon as
the key in the starter switch is turned to
position1. The control system enables you
to�
call up information about your vehicle
�
change vehicle settings
For example, you can use the control sys-
tem to find out when your vehicle is next
due for service, to set the language for
messages in the instrument cluster display
and much more.
The control system relays information to
the multifunction display.
Multifunction display
1Trip odometer
2Main odometer
3Outside temperature
4Clock
1
5Current gear selector lever position
6Transfer case program mode
Warning!
G
A driver’s attention to the road and traffic
conditions must always be his /her primary
focus when driving.
For your safety and the safety of others, se-
lecting features through the multifunction
steering wheel should only be done by the
driver when traffic and road conditions per-
mit it to be done safely.
Bear in mind that at a speed of just 30 mph
(approximately 50 km/h), your vehicle is
covering a distance of 44 feet (approximate-
ly 13.5 m) every second.
1See separate operating instructions for the
COMAND system for clock setting.
Page 112 of 360

112 Controls in detailControl systemMultifunction steering wheel
The displays in the multifunction display
and the settings in the control system are
controlled by the buttons on the multifunc-
tion steering wheel.Pressing any of the buttons on the multi-
function steering wheel will alter what is
shown in the multifunction display.
The information available in the multifunc-
tion display is arranged in menus, each
containing a number of functions or sub-
menus.
The individual functions are then found
within the relevant menu (radio or CD op-
erations under
AUDIO
, for example). These
functions serve to call up relevant informa-
tion or to customize the settings for your
vehicle.
1
Multifunction display in the speed-
ometerOperating the control system
2
Selecting the submenu or setting
the volumeç
down / to decrease
æ
up / to increase
3
Telephone*í
to take a call
ì
to end a call
4
Menu systemsè
for next menu
ÿ
for previous menu
5
Moving within a menuj
for next display
k
for previous display