Page 3 of 360

Contents
Introduction.......................................... 9
Product information ................................ 9
Operator’s Manual ............................... 10
Service and warranty information .. 10
Important notice for California
retail buyers and lessees of
Mercedes-Benz automobiles .......... 11
Maintenance .................................. 12
Roadside Assistance ...................... 12
Change of address or ownership.... 13
Operating your vehicle outside the
USA or Canada............................... 13
Where to find it .................................... 15
Symbols ............................................... 16
Operating safety .................................. 17
Proper use of the vehicle ............... 17
Problems with your vehicle .................. 18
Reporting safety defects...................... 19
Reporting safety defects ................ 19
At a glance.......................................... 21
Cockpit ................................................. 22
Instrument cluster ................................ 24
Multifunction steering wheel ................ 26
Center console ..................................... 27
Upper part ...................................... 27
Lower part ...................................... 28
Overhead control panel ........................ 29
Door control panel................................ 30Getting started................................... 31
Unlocking ............................................. 32
Unlocking with the SmartKey.......... 32
Adjusting .............................................. 34
Seats............................................... 34
Steering wheel ................................ 37
Mirrors ............................................ 38Driving .................................................. 40
Fastening the seat belt ................... 40
Starting the engine ......................... 43
Switching on headlamps ................. 46
Turn signals and high beam ............ 46
Windshield wipers ........................... 47
Rear window wiper/washer ............ 48
Problems while driving .................... 49
Parking and locking .............................. 50
Parking brake ................................. 50
Switching off headlamps................. 51
Turning off engine ........................... 51
Safety and Security........................... 53
Occupant safety ................................... 54
Airbags ........................................... 55
Seat belts ....................................... 60
Children in the vehicle .................... 63
Blocking rear door window
operation ........................................ 69
Panic alarm .......................................... 70
Page 23 of 360
23 At a glance
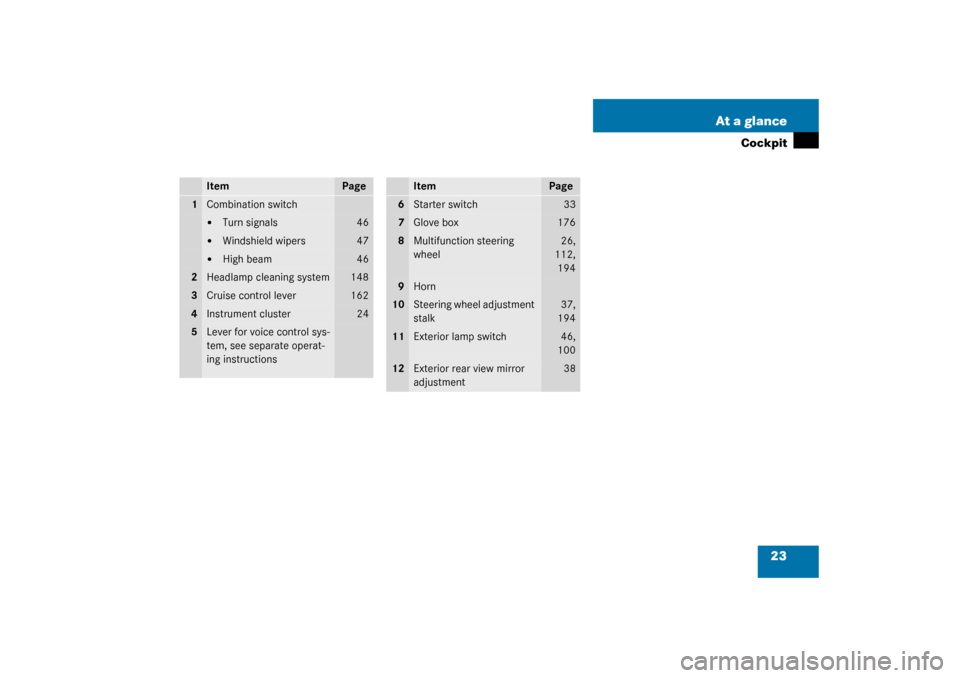
Cockpit
Item
Page
1
Combination switch�
Turn signals
46
�
Windshield wipers
47
�
High beam
46
2
Headlamp cleaning system
148
3
Cruise control lever
162
4
Instrument cluster
24
5
Lever for voice control sys-
tem, see separate operat-
ing instructions
Item
Page
6
Starter switch
33
7
Glove box
176
8
Multifunction steering
wheel
26,
112,
194
9
Horn
10
Steering wheel adjustment
stalk
37,
194
11
Exterior lamp switch
46,
100
12
Exterior rear view mirror
adjustment
38
Page 25 of 360
25 At a glance
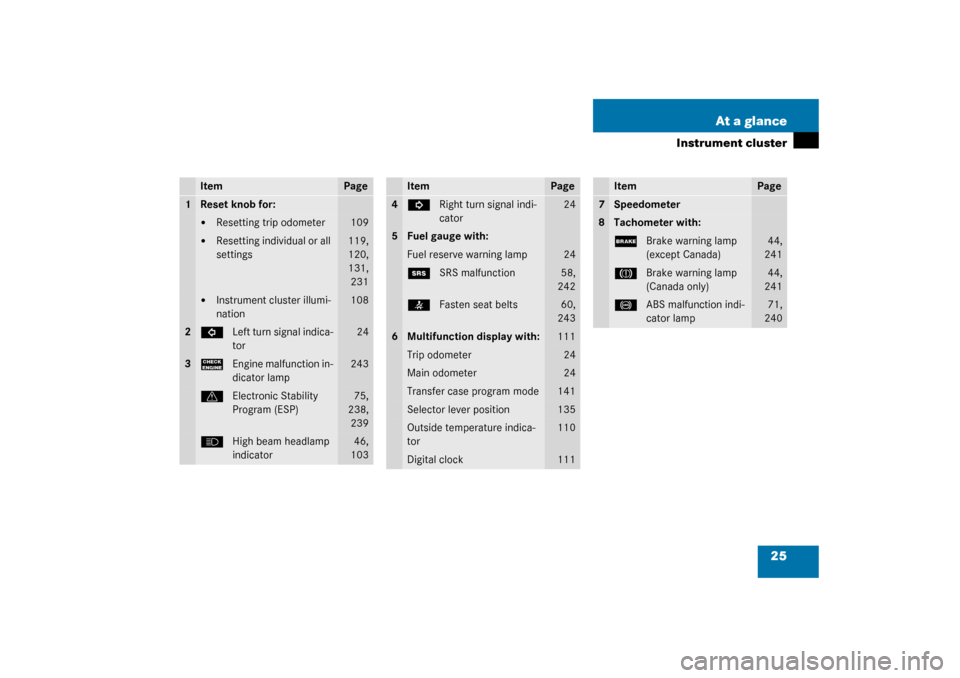
Instrument cluster
Item
Page
1
Reset knob for:�
Resetting trip odometer
109
�
Resetting individual or all
settings
119,
120,
131,
231
�
Instrument cluster illumi-
nation
108
2
L
Left turn signal indica-
tor
24
3
?
Engine malfunction in-
dicator lamp
243
v
Electronic Stability
Program (ESP)
75,
238,
239
A
High beam headlamp
indicator
46,
103
Item
Page
4
K
Right turn signal indi-
cator
24
5
Fuel gauge with:Fuel reserve warning lamp
24
1
SRS malfunction
58,
242
<
Fasten seat belts
60,
243
6
Multifunction display with:
111
Trip odometer
24
Main odometer
24
Transfer case program mode
141
Selector lever position
135
Outside temperature indica-
tor
110
Digital clock
111
Item
Page
7
Speedometer
8
Tachometer with:;
Brake warning lamp
(except Canada)
44,
241
3
Brake warning lamp
(Canada only)
44,
241
-
ABS malfunction indi-
cator lamp
71,
240
Page 46 of 360
46 Getting startedDrivingSwitching on headlampsExterior lamp switch1Off
2Low beam headlamps on�
Turn the switch to
B
.
More information can be found in the
“Controls in detail” section (�page 100).
Turn signals and high beam
The combination switch is on the left of the
steering column.Combination switch1Turn signals, right
2Turn signals, left�
Press combination switch up1 or
down2.
The switch is automatically canceled
when the steering wheel is turned a
sufficient degree.High beam
�
Push the combination switch forward.
The high beam symbol
A
in the
instrument cluster lights up.
More information can be found in the
“Controls in detail” section (
�page 103).
iTo signal minor directional changes,
move combination switch to point of
resistance only and release. The turn
signal blinks three times.
Page 100 of 360
.
Exterior lamp switch
The exterior lam")
100 Controls in detailLighting
LightingFor notes on how to switch on the head-
lamps and use the turn signals, see the
“Getting started” section (
�page 46).
Exterior lamp switch
The exterior lamp switch is located on the
dashboard to the left of the steering wheel
M
Off
U
Automatic headlamp mode
C
Parking lamps (also side marker
lamps, tail lamps, license plate
lamps, instrument panel lamps)
Canada only: When engine is run-
ning, the low beam is additionally
switched on.
B
Parking lamps plus low beam or
high beam headlamps (combination
switch pushed forward).
ˆ
Standing lamps, right (turn left one
stop)
‚
Standing lamps, left (turn left two
stops)
iIf you remove the key and open the
driver’s door while the parking lamps or
low beam headlamps are switched on,
then �
a warning sounds
�
$
appears in the multifunction
display
�
the message
SWITCH OFF LIGHTS
appears in the multifunction display
iWith the daytime running lamp mode
activated and the engine running, the
low beam headlamps cannot be
switched off manually.
Page 102 of 360

102 Controls in detailLightingDaytime running lamp mode�
Turn exterior lamp switch to
position
M
or
U
.
When the engine is running, the low beam
headlamps are automatically switched on.
In low ambient light conditions the parking
lamps will also switch on.
Canada only
When you shift from a driving position to
positionN orP, the low beam switches off
(three minutes delay).
For nighttime driving, you should turn the
exterior lamp switch to position
B
to
permit activation of the high beam head-
lamps.
USA only
The high beam headlamps can also be ac-
tivated when driving with the daytime run-
ning lamp mode activated and exterior
lamp switch in position
M
.To activate the daytime running lamp
mode, see “Setting daytime running lamp
mode” (
�page 124).
Locator lighting and night security illu-
mination
Locator lighting and night security illumi-
nation are described in the control system
section under “Setting locator lighting”
(
�page 125) and “Setting night security il-
lumination” (
�page 125).
Exterior rear view mirror lamps
If the vehicle is centrally unlocked in the
darkness, the lamps in the exterior rear
view mirrors light up.If a door is opened, the lamp on this side
goes out. If no doors are opened, the
lamps go out:
�
when the ignition is switched on
�
after a maximum of 40 seconds
Switching on front fog lamps
�
Check that the low beam headlamps
are switched on.
�
Pull out exterior lamp switch to first
stop.
The green indicator lamp
‡
in the
lamp switch lights up.
iSee notes on the exterior lamp switch
(�page 100).
iFog lamps will operate with the parking
lamps and/or the low beam headlamps
on. Fog lamps should only be used in
conjunction with low beam headlamps.
Consult your State or Province Motor
Vehicle Regulations regarding allow-
able lamp operation.
Page 103 of 360
103 Controls in detail
Lighting
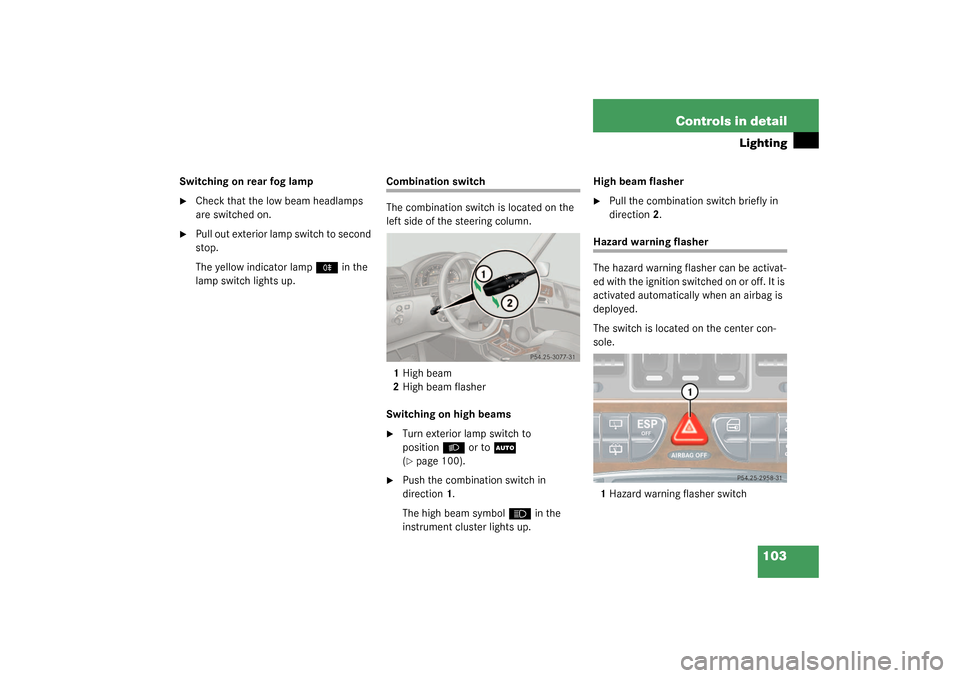
Switching on rear fog lamp�
Check that the low beam headlamps
are switched on.
�
Pull out exterior lamp switch to second
stop.
The yellow indicator lamp
†
in the
lamp switch lights up.
Combination switch
The combination switch is located on the
left side of the steering column.
1High beam
2High beam flasher
Switching on high beams�
Turn exterior lamp switch to
position
B
or to
U
(
�page 100).
�
Push the combination switch in
direction1.
The high beam symbol
A
in the
instrument cluster lights up.High beam flasher
�
Pull the combination switch briefly in
direction2.
Hazard warning flasher
The hazard warning flasher can be activat-
ed with the ignition switched on or off. It is
activated automatically when an airbag is
deployed.
The switch is located on the center con-
sole.
1Hazard warning flasher switch
Page 260 of 360

260 Practical hintsWhat to do if …Display
Possible cause
Suggested solution
Category
.
BRAKE LAMP
VISIT WORKSHOP!
Brake lamp illumination is delayed or
lamp is permanently on.
�
Visit an authorized
Mercedes-Benz Light Truck
Center as soon as possible.
2
BRAKE LAMP, L
CHECK LAMP!
The left brake lamp is malfunction-
ing.
�
Visit an authorized
Mercedes-Benz Center as
soon as possible.
2
BRAKE LAMP, R
CHECK LAMP!
The right brake lamp is malfunction-
ing.
�
Visit an authorized
Mercedes-Benz Center as
soon as possible.
2
DISPLAY DEFECTIVE
VISIT WORKSHOP!
The display for the lamps or the sys-
tem is malfunctioning.
�
Visit an authorized
Mercedes-Benz Light Truck
Center as soon as possible.
2
FRONT FOGLAMP, L
CHECK LAMP!
The left front fog lamp is malfunc-
tioning.
�
Replace the bulb as soon as
possible.
2
FRONT FOGLAMP, R
CHECK LAMP!
The right front fog lamp is malfunc-
tioning.
�
Replace the bulb as soon as
possible.
2
HIGH BEAM, L
CHECK LAMP!
The left high beam lamp is malfunc-
tioning.
�
Replace the bulb as soon as
possible.
2
HIGH BEAM, R
CHECK LAMP!
The right high beam lamp is malfunc-
tioning.
�
Replace the bulb as soon as
possible.
2