Page 261 of 360

261 Practical hints
What to do if …
.
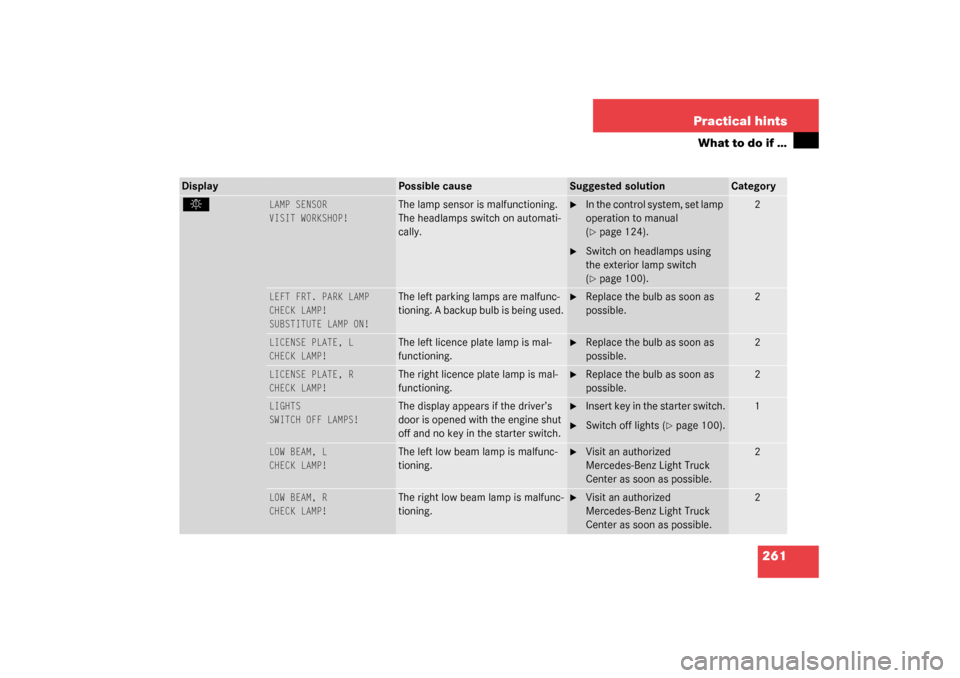
LAMP SENSOR
VISIT WORKSHOP!
The lamp sensor is malfunctioning.
The headlamps switch on automati-
cally.
�
In the control system, set lamp
operation to manual
(�page 124).
�
Switch on headlamps using
the exterior lamp switch
(�page 100).
2
LEFT FRT. PARK LAMP
CHECK LAMP!
SUBSTITUTE LAMP ON!
The left parking lamps are malfunc-
tioning. A backup bulb is being used.
�
Replace the bulb as soon as
possible.
2
LICENSE PLATE, L
CHECK LAMP!
The left licence plate lamp is mal-
functioning.
�
Replace the bulb as soon as
possible.
2
LICENSE PLATE, R
CHECK LAMP!
The right licence plate lamp is mal-
functioning.
�
Replace the bulb as soon as
possible.
2
LIGHTS
SWITCH OFF LAMPS!
The display appears if the driver’s
door is opened with the engine shut
off and no key in the starter switch.
�
Insert key in the starter switch.
�
Switch off lights (
�page 100).
1
LOW BEAM, L
CHECK LAMP!
The left low beam lamp is malfunc-
tioning.
�
Visit an authorized
Mercedes-Benz Light Truck
Center as soon as possible.
2
LOW BEAM, R
CHECK LAMP!
The right low beam lamp is malfunc-
tioning.
�
Visit an authorized
Mercedes-Benz Light Truck
Center as soon as possible.
2
Display
Possible cause
Suggested solution
Category
Page 270 of 360
270 Practical hintsWhere will I find ...?Spare wheel
The spare wheel is located under a cover
on the outside of the vehicle’s tailgate.
The spare wheel rim is mounted with a full
size tire of the same type as on the vehicle,
and is fully functional.
For rim and tire specifications, refer to
(�page 313).
Removing cover
1Cover ring
2Key
3Tab
�
Open lock for cover ring1 with key2
for the spare wheel cover.
�
Fold tab3 downwards.
4Cover plate
�
Pull cover ring1 slightly outwards in di-
rection of arrows and remove.
�
Pull cover plate4 upward towards you.5Catch
6Recess
iWhen replacing cover plate4, make
sure that catch5 engages in recess6.
Ensure that the lock faces downwards
when mounting cover ring1.
For safety reasons, check regularly that
the spare wheel is securely fastened.
Page 272 of 360
272 Practical hintsUnlocking/locking in an emergency
Unlocking/locking in an emergencyUnlocking the vehicle
If you are unable to unlock the vehicle with
the SmartKey, open the driver’s door and
the tailgate using the mechanical key.
The passenger door cannot be unlocked
manually.
1Mechanical key locking tab
2Mechanical key
�
Move locking tab1 in direction of ar-
row and slide the mechanical key2 out
of the housing.Unlocking the driver’s door
�
Unlock the door with the mechanical
k e y . T o d o s o , p u s h t h e m e ch a n i c a l k e y
in the lock until it stops and turn it to
the left.
Unlocking the tailgate
�
Unlock the tailgate with the mechani-
cal key. To do so, push the mechanical
key in the lock until it stops and turn it
to the left.
iUnlocking your vehicle with the me-
chanical key will trigger the anti-theft
alarm system. To cancel the alarm, do
one of the following:�
Press button
Œ
or
‹
on the
SmartKey.
�
Insert the key in the starter switch.
Page 273 of 360

273 Practical hints
Unlocking/locking in an emergency
Locking the vehicle
If you are unable to lock the vehicle with
the SmartKey, lock it with the mechanical
key as follows:�
Close the passenger doors and the tail-
gate.
�
Press the central locking switch in the
cockpit (
�page 90).
�
Check to see whether the locking
knobs on the passenger doors are still
visible. If necessary, push them down
manually.
�
Slide the mechanical key out of the
SmartKey.
�
Lock the driver’s door with the me-
chanical key.
�
Lock the tailgate if necessary with the
mechanical key.
Changing batteries in the SmartKey
If the batteries in the SmartKey are dis-
charged, the vehicle can no longer be
locked or unlocked. It is recommended to
have the batteries replaced at an autho-
rized Mercedes-Benz Light Truck Center.
Batteries contain materials that can harm
the environment if disposed of improperly.
Recycling of batteries is the preferred
method of disposal. Many states require
sellers of batteries to accept old batteries
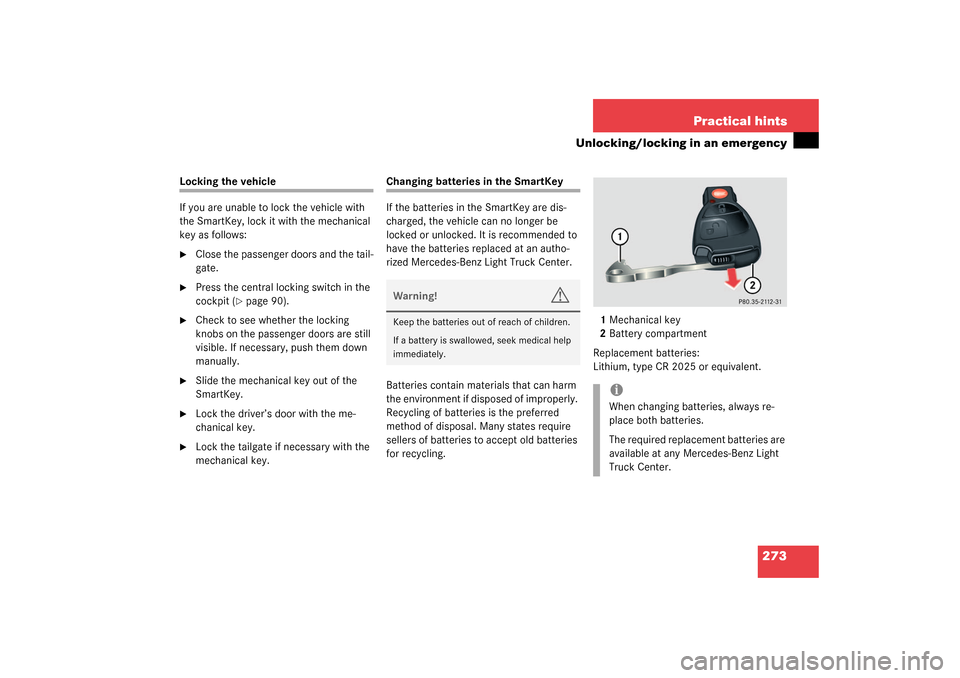
for recycling.1Mechanical key
2Battery compartment
Replacement batteries:
Lithium, type CR 2025 or equivalent.Warning!
G
Keep the batteries out of reach of children.
If a battery is swallowed, seek medical help
immediately.
iWhen changing batteries, always re-
place both batteries.
The required replacement batteries are
available at any Mercedes-Benz Light
Truck Center.
Page 274 of 360
274 Practical hintsUnlocking/locking in an emergency�
Remove mechanical key1
(�page 272).
�
Insert the mechanical key in side open-
ing and push briefly gray slide.
Battery compartment2 is unlatched.
�
Pull battery compartment2 out of the
key housing in direction of arrow.
�
Remove the batteries.
3Battery
4Contact spring
�
Using a lint-free cloth, insert new bat-
teries under the contact spring with the
plus (+) side facing up.
�
Return battery compartment into hous-
ing until locked in place.
�
Slide mechanical key1 back into the
SmartKey.
Fuel filler flap
The emergency release is in the cargo area
behind the rear panel trim.
1Edge protection
2Rear panel trim�
Open the tailgate.
�
Remove edge protection1 from the
door pillar.
�
Remove rear panel trim2.
iWhen inserting the batteries, make
sure that they are clean and free of lint.
��
Page 276 of 360
276 Practical hintsOpening/closing in an emergency
Opening/closing in an emergencySliding/pop-up roof
You can open or close the sliding/pop-up
roof manually in the case of power failure.
The sliding/pop-up roof drive is located on
the left side of the cargo area behind the
rear panel trim.
1Edge protection
2Rear panel trim�
Open the tailgate.
�
Remove edge protection1 from door
pillar.
�
Remove rear panel trim2.3Key (vehicle tool kit)
4Screwdriver (vehicle tool kit)
�
Fit key3 into hexagon nut of drive.
�
Insert screwdriver4 into the key as a
lever.
�
Turn crank 3 clockwise to:�
close slide roof
�
raise roof at the rear
�
Turn crank 3 counterclockwise to:�
open slide roof
�
lower roof at the rear
iDo not disconnect electrical connec-
tors.
Page 289 of 360

289 Practical hints
Replacing wiper blades
Replacing wiper blades
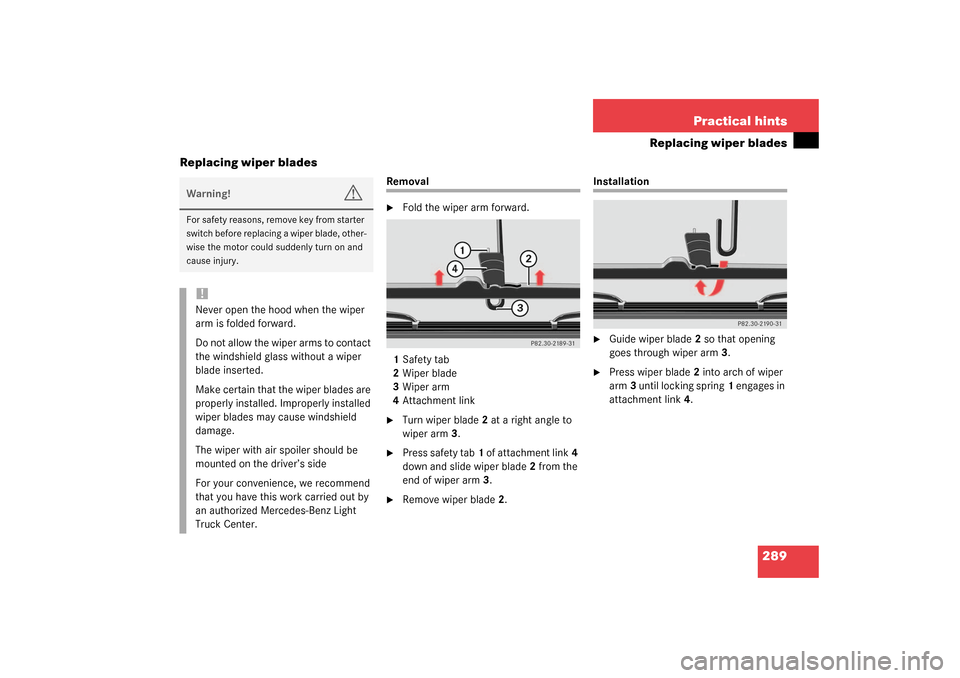
Removal�
Fold the wiper arm forward.
1Safety tab
2Wiper blade
3Wiper arm
4Attachment link
�
Turn wiper blade2 at a right angle to
wiper arm3.
�
Press safety tab1 of attachment link4
down and slide wiper blade2 from the
end of wiper arm3.
�
Remove wiper blade2.
Installation�
Guide wiper blade2 so that opening
goes through wiper arm3.
�
Press wiper blade2 into arch of wiper
arm3 until locking spring1 engages in
attachment link4.
Warning!
G
For safety reasons, remove key from starter
switch before replacing a wiper blade, other-
wise the motor could suddenly turn on and
cause injury.!Never open the hood when the wiper
arm is folded forward.
Do not allow the wiper arms to contact
the windshield glass without a wiper
blade inserted.
Make certain that the wiper blades are
properly installed. Improperly installed
wiper blades may cause windshield
damage.
The wiper with air spoiler should be
mounted on the driver’s side
For your convenience, we recommend
that you have this work carried out by
an authorized Mercedes-Benz Light
Truck Center.
Page 296 of 360

296 Practical hintsBatteryDisconnecting the battery�
Turn off all electrical consumers.
�
Disconnect the battery negative lead.
�
Remove the cover from the positive ter-
minal.
�
Disconnect the battery positive lead.
�
Remove the breather hose from the
battery.
Reconnecting the battery�
Turn off all electrical consumers.
�
Connect the positive lead and fasten its
cover.
�
Connect the negative lead.
�
Install the breather hose.
!Never loosen or detach battery termi-
nal clamps while the engine is running
or the key is in the starter switch. Oth-
erwise the alternator and other elec-
tronic components could be severely
damaged.
iWith a disconnected battery�
you will no longer be able to turn
the key in the starter switch
�
the selector lever will remain
locked in positionP
!Never invert the terminal connections.!The battery, its filler caps and the vent
tube must always be securely installed
when the vehicle is in operation.
iThe following procedures must be car-
ried out following any interruption of
battery power (e.g. due to reconnec-
tion):�
Set the clock (see COMAND opera-
tor’s manual).
�
Resynchronize the front seat head
restraints and seat adjustment fore,
aft (
�page 93).
�
Resynchronize the ESP
(�page 257).