Page 9 of 4500

Fig. 5: ABS & TRACTION Actuator - Electronic Brake Force Distribution
Courtesy of TOYOTA MOTOR SALES, U.S.A., INC.
Operation description
The skid control ECU receives the speed signal from each speed sensor to detect the slip condition
<0052004900030057004b00480003005a004b00480048004f0056000300440051004700030056004800510047005600030057004b00480003004600520051005700550052004f00030056004c004a00510044004f00030057005200030057004b0048000300
560052004f004800510052004c004700110003[
The solenoid valve controls the oil pressure of each wheel cylinder and splits the control power
properly between the front and rear wheels and the right and rear wheels.
Both of the ABS warning lamp and the brake warning lamp come on to indicate a malfunction in
the EBD system.
c. BA (Brake Assist)
The primary purpose of the brake assist system is to provide an auxiliary brake force to assist the
driver who cannot generate a large enough brake force during emergency braking, thus helping to
maximize the vehicle's brake performance.
Page 2016 of 4500

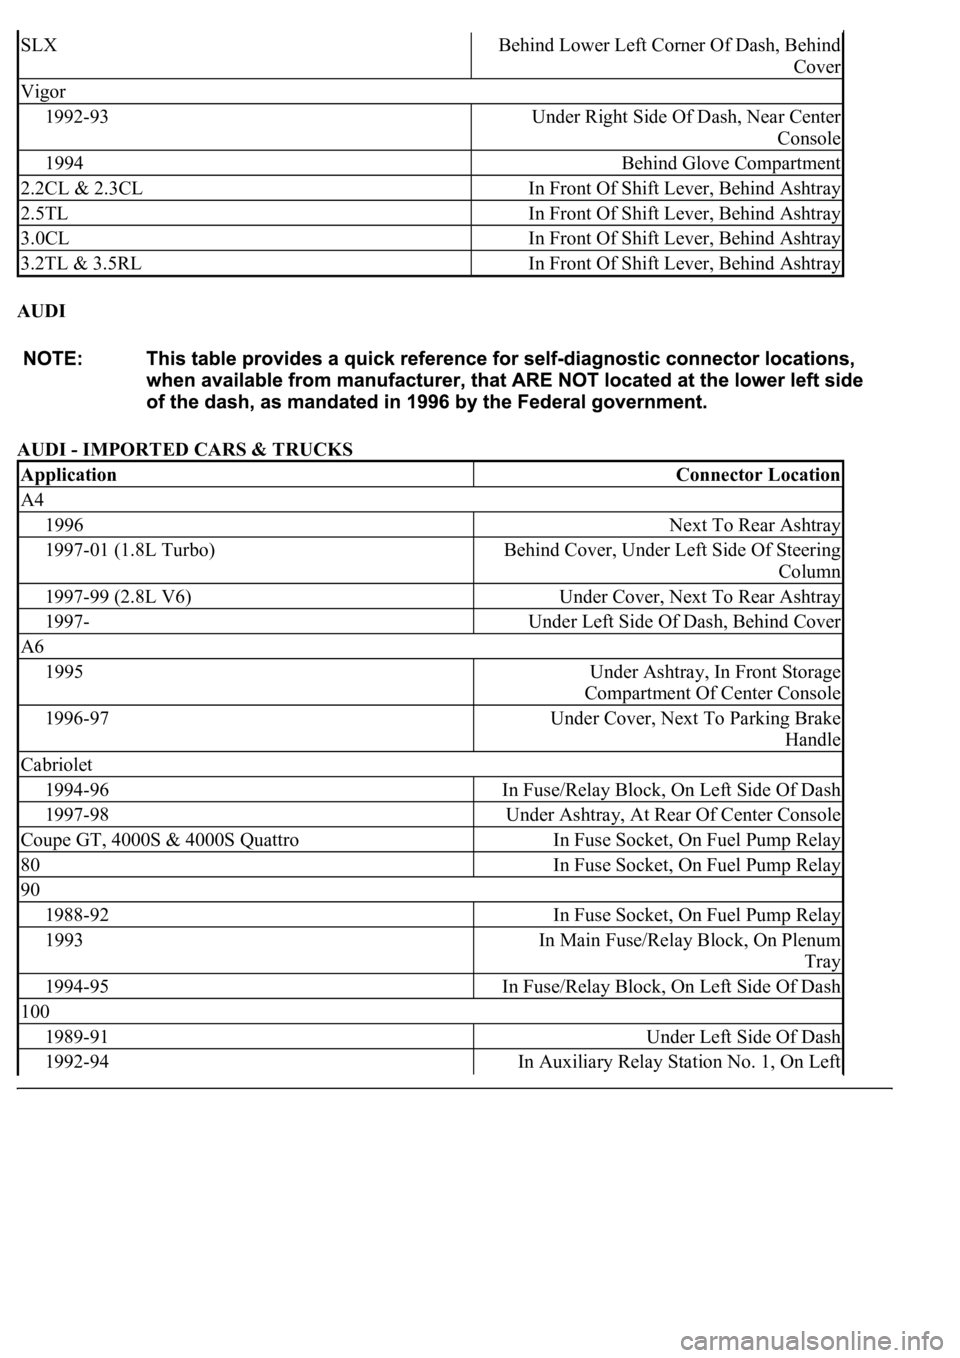
AUDI
AUDI - IMPORTED CARS & TRUCKS
SLXBehind Lower Left Corner Of Dash, Behind
Cover
Vigor
1992-93Under Right Side Of Dash, Near Center
Console
1994Behind Glove Compartment
2.2CL & 2.3CLIn Front Of Shift Lever, Behind Ashtray
2.5TLIn Front Of Shift Lever, Behind Ashtray
3.0CLIn Front Of Shift Lever, Behind Ashtray
3.2TL & 3.5RLIn Front Of Shift Lever, Behind Ashtray
ApplicationConnector Location
A4
1996Next To Rear Ashtray
1997-01 (1.8L Turbo)Behind Cover, Under Left Side Of Steering
Column
1997-99 (2.8L V6)Under Cover, Next To Rear Ashtray
1997-Under Left Side Of Dash, Behind Cover
A6
1995Under Ashtray, In Front Storage
Compartment Of Center Console
1996-97Under Cover, Next To Parking Brake
Handle
Cabriolet
1994-96In Fuse/Relay Block, On Left Side Of Dash
1997-98Under Ashtray, At Rear Of Center Console
Coupe GT, 4000S & 4000S QuattroIn Fuse Socket, On Fuel Pump Relay
80In Fuse Socket, On Fuel Pump Relay
90
1988-92In Fuse Socket, On Fuel Pump Relay
1993In Main Fuse/Relay Block, On Plenum
Tray
1994-95In Fuse/Relay Block, On Left Side Of Dash
100
1989-91Under Left Side Of Dash
1992-94In Auxiliary Relay Station No. 1, On Left
Page 2993 of 4500
1.REMOVE HOOD INSULATOR
a. Using a clip remover, disengage the 10 clips and remove the insulator.
2.REMOVE HOOD TO RADIATOR SUPPORT SEAL
a. Using a clip remover, disengage the 13 clips and remove the seal.
3.REMOVE AUXILIARY CATCH RELEASE LEVER ASSY
a. Disconnect the snap and remote control rod No. 2 in the direction indicated by the arrow marks in
the illustration.
HINT:
If snap are damaged during removal, replace them.
b. Remove the 2 bolts and lever.
Fig. 9: Removing Auxiliary Catch Release Lever Assy
Courtesy of TOYOTA MOTOR SALES, U.S.A., INC.
4.REMOVE RADIATOR GRILLE
a. Remove the 6 bolts and inside radiator
grille together with the outside radiator grille and radiator
Page 2994 of 4500
grille protector.
b. Remove the protector.
c. Remove the 8 screws and inside radiator grille.
d. w/ Pre-collision safety system:
Remove the 4 nuts and radiator grille garnish.
Fig. 10: Removing Bolts And Inside Radiator Grille
Courtesy of TOYOTA MOTOR SALES, U.S.A., INC.
5.REMOVE HOOD AUXILIARY CATCH HOOK ASSY
a. Remove the bolt and hook.
Page 3010 of 4500
j. w/ Pre-collision safety system:
Inspect the SRS warning lamp (see DIAGNOSIS SYSTEM
).
k. w/ Pre-collision safety system:
Adjust the millimeter wave radar sensor (see ADJUSTMENT
).
Fig. 26: Inspecting SRS Warning Lamp
Courtesy of TOYOTA MOTOR SALES, U.S.A., INC.
d.INSTALL HOOD AUXILIARY CATCH HOOK ASSY
a. Install the hook with the bolt.
Torque: 8.0 N.m (82 kgf.cm, 71 in..lbf)
Page 3011 of 4500
Fig. 27: Installing Hood Auxiliary Catch Hook Assy
Courtesy of TOYOTA MOTOR SALES, U.S.A., INC.
e.INSTALL RADIATOR GRILLE
a. w/ Pre-collision safety system:
Install the radiator grille garnish to the inside radiator grille with 4 new nuts.
b. Install the inside radiator grille to the outside radiator grille with the 8 screws.
c. Install the radiator grille protector.
d. Install the radiator grille with the 6 bolts.
Torque: 8.0 N.m (82 kgf.cm, 71 in..lbf)
Page 3012 of 4500
Fig. 28: Installing Radiator Grille Garnish To Inside Radiator Grille With New Nuts
Courtesy of TOYOTA MOTOR SALES, U.S.A., INC.
f.INSTALL AUXILIARY CATCH RELEASE LEVER ASSY
a. Install the lever with the 2 bolts.
Torque: 8.0 N.m (82 kgf.cm, 71 in..lbf)
b. Connect the rod and lock the snap as shown in the illustration.