2003 Lancia Ypsilon Owner handbook (in English)
-
 1
1 -
 2
2 -
 3
3 -
 4
4 -
 5
5 -
 6
6 -
 7
7 -
 8
8 -
 9
9 -
 10
10 -
 11
11 -
 12
12 -
 13
13 -
 14
14 -
 15
15 -
 16
16 -
 17
17 -
 18
18 -
 19
19 -
 20
20 -
 21
21 -
 22
22 -
 23
23 -
 24
24 -
 25
25 -
 26
26 -
 27
27 -
 28
28 -
 29
29 -
 30
30 -
 31
31 -
 32
32 -
 33
33 -
 34
34 -
 35
35 -
 36
36 -
 37
37 -
 38
38 -
 39
39 -
 40
40 -
 41
41 -
 42
42 -
 43
43 -
 44
44 -
 45
45 -
 46
46 -
 47
47 -
 48
48 -
 49
49 -
 50
50 -
 51
51 -
 52
52 -
 53
53 -
 54
54 -
 55
55 -
 56
56 -
 57
57 -
 58
58 -
 59
59 -
 60
60 -
 61
61 -
 62
62 -
 63
63 -
 64
64 -
 65
65 -
 66
66 -
 67
67 -
 68
68 -
 69
69 -
 70
70 -
 71
71 -
 72
72 -
 73
73 -
 74
74 -
 75
75 -
 76
76 -
 77
77 -
 78
78 -
 79
79 -
 80
80 -
 81
81 -
 82
82 -
 83
83 -
 84
84 -
 85
85 -
 86
86 -
 87
87 -
 88
88 -
 89
89 -
 90
90 -
 91
91 -
 92
92 -
 93
93 -
 94
94 -
 95
95 -
 96
96 -
 97
97 -
 98
98 -
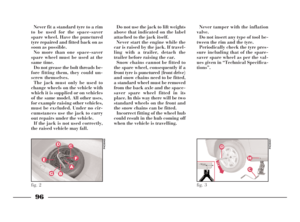 99
99 -
 100
100 -
 101
101 -
 102
102 -
 103
103 -
 104
104 -
 105
105 -
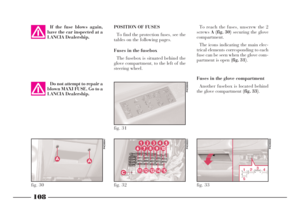
 106
106 -
 107
107 -
 108
108 -
 109
109 -
 110
110 -
 111
111 -
 112
112 -
 113
113 -
 114
114 -
 115
115 -
 116
116 -
 117
117 -
 118
118 -
 119
119 -
 120
120 -
 121
121 -
 122
122 -
 123
123 -
 124
124 -
 125
125 -
 126
126 -
 127
127 -
 128
128 -
 129
129 -
 130
130 -
 131
131 -
 132
132 -
 133
133 -
 134
134 -
 135
135 -
 136
136 -
 137
137 -
 138
138 -
 139
139 -
 140
140 -
 141
141 -
 142
142 -
 143
143 -
 144
144 -
 145
145 -
 146
146 -
 147
147 -
 148
148 -
 149
149 -
 150
150 -
 151
151 -
 152
152 -
 153
153 -
 154
154 -
 155
155 -
 156
156 -
 157
157 -
 158
158 -
 159
159 -
 160
160 -
 161
161 -
 162
162 -
 163
163 -
 164
164 -
 165
165 -
 166
166 -
 167
167 -
 168
168 -
 169
169 -
 170
170 -
 171
171 -
 172
172 -
 173
173 -
 174
174 -
 175
175 -
 176
176 -
 177
177 -
 178
178 -
 179
179 -
 180
180 -
 181
181 -
 182
182 -
 183
183 -
 184
184 -
 185
185 -
 186
186 -
 187
187 -
 188
188 -
 189
189 -
 190
190
 14
G
E- the mechanical key code to be
given to the LANCIA Dealership
when ordering duplicate keys;
F- the spaces for stickers bearing
the code of any remote controls pro-
vided.
The code numbers on th")
 15
G
DUPLICATE KEYS
If you ask for extra keys, remember
that all the keys, both the new ones
and those you already possess, must
be stored in the memory (up to a
maximum of 7). Go directly to your
nea")
 IGNITION SWITCH
The key can turn through four posi-
tions(fig. 5):
–STOP:engine off, key can be re-
moved and the steering column is
locked. Some electrical devices can be
used (e.g. sound system, c")
 17
G
STEERING COLUMN LOCK
To set: remove the ignition key from
theSTOPorPARKposition, and
turn the steering wheel until it locks.
To release: move the steering wheel
slightly as you turn the ignition")
 18
G
HEAD RESTRAINTS (fig. 8)The rear head restraints (fig. 9)can
be removed to fold the seat back:
– press tabs Aand remove the head
restraint.
To refit, fit it in the holes until you
hear a click.")
 19
G
ACCESS TO THE BACK SEATS
(fig. 10)
You can easily get into the back
seats from either side.
Pull handle Aup to fold the seat
back down and slide the seat forwards
(only for the passenger seat).
A")
 20
G
Electrically-adjustable (fig. 14)
The mirrors can only be adjusted
electrically when the ignition key is at
MAR.
All you need to do is press any of the
four directions on switch Ato perform
this")
 21
G
SEAT BELTS
HOW TO USE THE SEAT BELTS
(for the front and back side seats)
(fig. 16)
Pull the seat belt out gently; if the
belt jams, let it rewind for a short
stretch, then pull it out again witho")