2003 Hyundai H-1 (Grand Starex) belt
[x] Cancel search: beltPage 8 of 173

1-1
BEFORE DRIVING YOUR VEHICLE
BEFORE DRIVING YOUR VEHICLE BEFORE DRIVING YOUR VEHICLE
BEFORE DRIVING YOUR VEHICLE
BEFORE DRIVING YOUR VEHICLE
B000A01P-GAT 1.1.
1.1.
1.
BEFORE DRIVING
BEFORE DRIVING BEFORE DRIVING
BEFORE DRIVING
BEFORE DRIVING
YY
YY
Y
OUR
OUR OUR
OUR
OUR VEHICLE
VEHICLE VEHICLE
VEHICLE
VEHICLE
B010B01P-GAT Before entering the vehicle
Before entering the vehicle Before entering the vehicle
Before entering the vehicle
Before entering the vehicle
o Check that windows, mirrors and lights are clean.
o Check if any tire is low or flat.
o Look for fluid leaks.
o Check that area is clear if you’re about to back up.
B010C03P-GAT After entering the vehicle
After entering the vehicle After entering the vehicle
After entering the vehicle
After entering the vehicle
o Lock all doors.
o The driver and passengers are wearing prop- erly adjusted seat belts.
o The head restraints are properly adjusted, if so equipped.
o Adjust inside and outside mirrors.
o Check warning lights for correct operation, with the ignition key in the position "ON".
o Check all gauges, for normal operation.
B010A01P-GAT
BEFORE DRIVING YOUR VEHICLE
BEFORE DRIVING YOUR VEHICLE BEFORE DRIVING YOUR VEHICLE
BEFORE DRIVING YOUR VEHICLE
BEFORE DRIVING YOUR VEHICLE
SAFETY CHECKS
SAFETY CHECKS SAFETY CHECKS
SAFETY CHECKS
SAFETY CHECKS
Be sure you know your vehicle and its equip-
ment and how to use it safely.
B020A01P-GATRUNNING-IN RECOMMENDATIONS
RUNNING-IN RECOMMENDATIONS RUNNING-IN RECOMMENDATIONS
RUNNING-IN RECOMMENDATIONS
RUNNING-IN RECOMMENDATIONS During the running-in period for the first
1,000km(600miles), it is advisable to drive your new vehicle using the following precautions asa guideline to aid long life as well as futureeconomy and performance.
1. Do not race the engine at high speeds.
2. Avoid rapid starting, acceleration, braking and prolonged high-speed running.
3. Keep to the running-in speed limit shown below. B030A01P-GAT
BEFORE OPERATION
BEFORE OPERATION BEFORE OPERATION
BEFORE OPERATION
BEFORE OPERATION
PRECAUTIONS FOR NEW VEHICLE
PRECAUTIONS FOR NEW VEHICLE PRECAUTIONS FOR NEW VEHICLE
PRECAUTIONS FOR NEW VEHICLE
PRECAUTIONS FOR NEW VEHICLE The performance and life of a vehicle depend
largely on how the vehicle is handled when new.
To maintain the parts smoothly and sustain
high performance for a long time to come, besure to observe the following points.
Make sure that your vehicle does not miss
Make sure that your vehicle does not miss Make sure that your vehicle does not miss
Make sure that your vehicle does not miss
Make sure that your vehicle does not miss the first 5,000 km inspections.
the first 5,000 km inspections. the first 5,000 km inspections.
the first 5,000 km inspections.
the first 5,000 km inspections.
After the first 5,000 km of driving, take your vehicle
to your nearest service shop for inspection.
Drive range
1st
2nd 3rd4th 5thRunning-in speed
0~25(0~16)
20~50(13~31) 30~80(19~50)
40~(25~)50~(32~) km/h (mph)
WARNING: (Diesel only)
WARNING: (Diesel only) WARNING: (Diesel only)
WARNING: (Diesel only)
WARNING: (Diesel only)
To ensure that sufficient vacuum exists with-
To ensure that sufficient vacuum exists with- To ensure that sufficient vacuum exists with-
To ensure that sufficient vacuum exists with-
To ensure that sufficient vacuum exists with-in the brake system during cold weather
in the brake system during cold weather in the brake system during cold weather
in the brake system during cold weather
in the brake system during cold weather
start-up conditions, it is necessary to run
start-up conditions, it is necessary to run start-up conditions, it is necessary to run
start-up conditions, it is necessary to run
start-up conditions, it is necessary to run
the engine at idle after starting the engine.
the engine at idle after starting the engine. the engine at idle after starting the engine.
the engine at idle after starting the engine.
the engine at idle after starting the engine.
NOTE:
NOTE: NOTE:
NOTE:
NOTE:
Fluid levels, such as engine oil, engine cool-
Fluid levels, such as engine oil, engine cool- Fluid levels, such as engine oil, engine cool-
Fluid levels, such as engine oil, engine cool-
Fluid levels, such as engine oil, engine cool-ant, brake fluid, and windshield washer flu-
ant, brake fluid, and windshield washer flu- ant, brake fluid, and windshield washer flu-
ant, brake fluid, and windshield washer flu-
ant, brake fluid, and windshield washer flu-
id, should be checked daily and/or weekly,
id, should be checked daily and/or weekly, id, should be checked daily and/or weekly,
id, should be checked daily and/or weekly,
id, should be checked daily and/or weekly,
or whenever you refuel.
or whenever you refuel. or whenever you refuel.
or whenever you refuel.
or whenever you refuel.
Further details are described in the "CON-
Further details are described in the "CON- Further details are described in the "CON-
Further details are described in the "CON-
Further details are described in the "CON-SUMER INFORMATION" section.
SUMER INFORMATION" section. SUMER INFORMATION" section.
SUMER INFORMATION" section.
SUMER INFORMATION" section.
11
11
1
Please note that the legal speed limits dis-
played must be adhered to.
4. Do not exceed loading limits.
5. Refrain from towing a trailer.
Page 16 of 173

1-9
BEFORE DRIVING YOUR VEHICLE
BEFORE DRIVING YOUR VEHICLE BEFORE DRIVING YOUR VEHICLE
BEFORE DRIVING YOUR VEHICLE
BEFORE DRIVING YOUR VEHICLE
Set the inside lock button to the locked position, and close the door. B150A01P-GATCENTRAL DOOR LOCKS
CENTRAL DOOR LOCKS CENTRAL DOOR LOCKS
CENTRAL DOOR LOCKS
CENTRAL DOOR LOCKS
(Minibus,
(Minibus, (Minibus,
(Minibus,
(Minibus, VV
VV
V an) an)
an) an)
an) (If installed)
(If installed) (If installed)
(If installed)
(If installed)
B130B01P-GAG
Lock button
The central door locking system is located on the driver's door lock button. It is operated bydepressing the door lock button. If the rear dooris open when the button is depressed, the doorwill remain locked when closed. If the front dooris open when the button is depressed, the doorwill lock when closed. NOTE:
NOTE: NOTE:
NOTE:
NOTE:
When the front door lock button is de-
When the front door lock button is de- When the front door lock button is de-
When the front door lock button is de-
When the front door lock button is de-
pressed, the front and slide doors will lock.
pressed, the front and slide doors will lock. pressed, the front and slide doors will lock.
pressed, the front and slide doors will lock.
pressed, the front and slide doors will lock.
When the front door lock button is pulled
When the front door lock button is pulled When the front door lock button is pulled
When the front door lock button is pulled
When the front door lock button is pulled
up, the front and slide doors will unlock.
up, the front and slide doors will unlock. up, the front and slide doors will unlock.
up, the front and slide doors will unlock.
up, the front and slide doors will unlock.
The operation of the tailgate door locking is
The operation of the tailgate door locking is The operation of the tailgate door locking is
The operation of the tailgate door locking is
The operation of the tailgate door locking is
identical to the central door locking system.
identical to the central door locking system. identical to the central door locking system.
identical to the central door locking system.
identical to the central door locking system.
Set the inside lock button to the locked position,
and close the door.
Be careful not to lock the doors while the key is
inside the vehicle.
B130C01P-GATTo lock the slide door without a key
To lock the slide door without a key To lock the slide door without a key
To lock the slide door without a key
To lock the slide door without a key
B130C01P-GAG/GT10191A
VANMINIBUS
Lock Unlock
B130B01P-GAT
To lock the front doors without a key
To lock the front doors without a key To lock the front doors without a key
To lock the front doors without a key
To lock the front doors without a key
B130B01P-GAG
Lock button
Also, when combined with the proper
Also, when combined with the proper Also, when combined with the proper
Also, when combined with the proper
Also, when combined with the proper
use of seat belts, locking the doors helps
use of seat belts, locking the doors helps use of seat belts, locking the doors helps
use of seat belts, locking the doors helps
use of seat belts, locking the doors helps
keep occupants from being ejected from
keep occupants from being ejected from keep occupants from being ejected from
keep occupants from being ejected from
keep occupants from being ejected from
the car in case of an accident.
the car in case of an accident. the car in case of an accident.
the car in case of an accident.
the car in case of an accident.
oo
oo
o
Before opening the door, always look for
Before opening the door, always look for Before opening the door, always look for
Before opening the door, always look for
Before opening the door, always look for
and avoid oncoming traffic.
and avoid oncoming traffic. and avoid oncoming traffic.
and avoid oncoming traffic.
and avoid oncoming traffic.
B040B01A-AAT Locking and Unlocking Front Doors
Locking and Unlocking Front Doors Locking and Unlocking Front Doors
Locking and Unlocking Front Doors
Locking and Unlocking Front Doors
With a Key
With a Key With a Key
With a Key
With a Key
HA1217
o The door can be locked or unlocked with a key.
o Lock the door by turning the key toward the front of the vehicle and unlock it by turning the key toward the rear. LOCK
UNLOCK
Page 25 of 173

BEFORE DRIVING YOUR VEHICLE
BEFORE DRIVING YOUR VEHICLE BEFORE DRIVING YOUR VEHICLE
BEFORE DRIVING YOUR VEHICLE
BEFORE DRIVING YOUR VEHICLE
1-18 B080C01A-AAT
Adjusting Seatback Angle
Adjusting Seatback Angle Adjusting Seatback Angle
Adjusting Seatback Angle
Adjusting Seatback Angle
B080C01A-AAG
To recline the seatback, lean forward to take
your weight off it, then pull up on the recliner control lever at the outside edge of the seat.Now lean back until the desired seatback angleis achieved. To lock the seatback into position,release the recliner control lever.
WARNING:
WARNING: WARNING:
WARNING:
WARNING:
To minimize risk of personal injury in the
To minimize risk of personal injury in the To minimize risk of personal injury in the
To minimize risk of personal injury in the
To minimize risk of personal injury in the event of a collision
event of a collision event of a collision
event of a collision
event of a collision
or a sudden stop, both
or a sudden stop, both or a sudden stop, both
or a sudden stop, both
or a sudden stop, both
the driver and passenger seatbacks should
the driver and passenger seatbacks should the driver and passenger seatbacks should
the driver and passenger seatbacks should
the driver and passenger seatbacks should
always be
always be always be
always be
always be
in an upright position while the
in an upright position while the in an upright position while the
in an upright position while the
in an upright position while the
vehicle is in motion. The protection provid-
vehicle is in motion. The protection provid- vehicle is in motion. The protection provid-
vehicle is in motion. The protection provid-
vehicle is in motion. The protection provid-
ed ed
ed ed
ed
by the seat belts and airbags may be
by the seat belts and airbags may be by the seat belts and airbags may be
by the seat belts and airbags may be
by the seat belts and airbags may be
reduced significantly when the seatbacks
reduced significantly when the seatbacks reduced significantly when the seatbacks
reduced significantly when the seatbacks
reduced significantly when the seatbacks
are reclined. There is greater risk that the
are reclined. There is greater risk that the are reclined. There is greater risk that the
are reclined. There is greater risk that the
are reclined. There is greater risk that the
driver and passenger will slide
driver and passenger will slide driver and passenger will slide
driver and passenger will slide
driver and passenger will slide under the
under the under the
under the
under the
belt resulting in serious injury if a crash
belt resulting in serious injury if a crash belt resulting in serious injury if a crash
belt resulting in serious injury if a crash
belt resulting in serious injury if a crash
occurs when the seatbacks
occurs when the seatbacks occurs when the seatbacks
occurs when the seatbacks
occurs when the seatbacks are reclined.
are reclined. are reclined.
are reclined.
are reclined.
B080A01A-AAT
ADJUSTABLE FRONT SEATS
ADJUSTABLE FRONT SEATS ADJUSTABLE FRONT SEATS
ADJUSTABLE FRONT SEATS
ADJUSTABLE FRONT SEATS
WARNING:
WARNING: WARNING:
WARNING:
WARNING:
Never attempt to adjust the seat while the
Never attempt to adjust the seat while the Never attempt to adjust the seat while the
Never attempt to adjust the seat while the
Never attempt to adjust the seat while thevehicle is moving. This could result in loss
vehicle is moving. This could result in loss vehicle is moving. This could result in loss
vehicle is moving. This could result in loss
vehicle is moving. This could result in loss
of control, and an accident causing death,
of control, and an accident causing death, of control, and an accident causing death,
of control, and an accident causing death,
of control, and an accident causing death,
serious injury, or property damage.
serious injury, or property damage. serious injury, or property damage.
serious injury, or property damage.
serious injury, or property damage.
B080B01A-AAT Adjusting Seat Forward and Rearward
Adjusting Seat Forward and Rearward Adjusting Seat Forward and Rearward
Adjusting Seat Forward and Rearward
Adjusting Seat Forward and Rearward
B080B01A-AAG
To move the seat toward the front or rear, pull
the lock release lever upward. This releases the seat on its track so you can move it forward
or rearward to the desired position. When you
find the position you want, release the lever andslide the seat forward or rearward on its trackuntil it locks into the position and cannot bemoved further.
CAUTION:
CAUTION: CAUTION:
CAUTION:
CAUTION:
Never try to operate the main switch and
Never try to operate the main switch and Never try to operate the main switch and
Never try to operate the main switch and
Never try to operate the main switch and sub switch in opposing directions at the
sub switch in opposing directions at the sub switch in opposing directions at the
sub switch in opposing directions at the
sub switch in opposing directions at the
same time. If this is done, the window will
same time. If this is done, the window will same time. If this is done, the window will
same time. If this is done, the window will
same time. If this is done, the window will
stop and cannot be opened or closed.
stop and cannot be opened or closed. stop and cannot be opened or closed.
stop and cannot be opened or closed.
stop and cannot be opened or closed.
WARNING:
WARNING: WARNING:
WARNING:
WARNING:
oo
oo
o
Be careful that head or hands and body
Be careful that head or hands and body Be careful that head or hands and body
Be careful that head or hands and body
Be careful that head or hands and body
are not trapped by a closing window.
are not trapped by a closing window. are not trapped by a closing window.
are not trapped by a closing window.
are not trapped by a closing window.
oo
oo
o If passengers remain in the car when you
If passengers remain in the car when you If passengers remain in the car when you
If passengers remain in the car when you
If passengers remain in the car when you
leave, especially if a child remains alone,
leave, especially if a child remains alone, leave, especially if a child remains alone,
leave, especially if a child remains alone,
leave, especially if a child remains alone,
always remove the ignition key for their
always remove the ignition key for their always remove the ignition key for their
always remove the ignition key for their
always remove the ignition key for their
safety.
safety. safety.
safety.
safety.
HSR2308
Close
Open
Page 26 of 173

1-19
BEFORE DRIVING YOUR VEHICLE
BEFORE DRIVING YOUR VEHICLE BEFORE DRIVING YOUR VEHICLE
BEFORE DRIVING YOUR VEHICLE
BEFORE DRIVING YOUR VEHICLE
B290A01P-GATSECOND SEAT (Minibus)
SECOND SEAT (Minibus) SECOND SEAT (Minibus)
SECOND SEAT (Minibus)
SECOND SEAT (Minibus)
Adjusting Seat Forward and Rearward
Adjusting Seat Forward and Rearward Adjusting Seat Forward and Rearward
Adjusting Seat Forward and Rearward
Adjusting Seat Forward and Rearward
B290A01P-GAG
Pull the lever up and hold it while you slide the seat forward or backward to desired position.Release the lever to lock the seat in position. B290B01P-GAT
To rotate (Second seats: type 1)
To rotate (Second seats: type 1) To rotate (Second seats: type 1)
To rotate (Second seats: type 1)
To rotate (Second seats: type 1)
B290B01P-GAG
(a)
(b)
B270A01P-GAT
SEAT WARMER (Driver's seat only)
SEAT WARMER (Driver's seat only) SEAT WARMER (Driver's seat only)
SEAT WARMER (Driver's seat only)
SEAT WARMER (Driver's seat only)
(Minibus)
(Minibus) (Minibus)
(Minibus)
(Minibus)
(If installed)
(If installed) (If installed)
(If installed)
(If installed)
B270A01P-GAG
The seat warmer is provided to warm the front
seats during cold weather. With the ignition key in the "ON" position, push the switch to warmthe driver's seat.
During mild weather or under conditions where
the operation of the seat warmer is not needed,keep the switch in the "OFF" position. To increase the amount of lumbar support, turn
the handle forward. To decrease it turn thehandle toward the rear.
1. Minimum support
2. Maximum support
B260B01P
1 2
The seat belt cannot provide full protection
The seat belt cannot provide full protection The seat belt cannot provide full protection
The seat belt cannot provide full protection
The seat belt cannot provide full protection
to an occupant
to an occupant to an occupant
to an occupant
to an occupant if the seat back is reclined.
if the seat back is reclined. if the seat back is reclined.
if the seat back is reclined.
if the seat back is reclined.
B260A01P-GAT LUMBAR SUPPORT CONTROL
LUMBAR SUPPORT CONTROL LUMBAR SUPPORT CONTROL
LUMBAR SUPPORT CONTROL
LUMBAR SUPPORT CONTROL
(Driver's seat only) (If installed)
(Driver's seat only) (If installed) (Driver's seat only) (If installed)
(Driver's seat only) (If installed)
(Driver's seat only) (If installed)
B260A01P-GAG
1
2
Minibus, Van
Truck
Page 27 of 173

BEFORE DRIVING YOUR VEHICLE
BEFORE DRIVING YOUR VEHICLE BEFORE DRIVING YOUR VEHICLE
BEFORE DRIVING YOUR VEHICLE
BEFORE DRIVING YOUR VEHICLE
1-20 oo
oo
o When the seat is rotated, be sure that the
When the seat is rotated, be sure that the When the seat is rotated, be sure that the
When the seat is rotated, be sure that the
When the seat is rotated, be sure that the
seat is securely locked in position.
seat is securely locked in position. seat is securely locked in position.
seat is securely locked in position.
seat is securely locked in position.
oo
oo
o
While driving, ensure the seat is locked
While driving, ensure the seat is locked While driving, ensure the seat is locked
While driving, ensure the seat is locked
While driving, ensure the seat is locked
facing forward.
facing forward. facing forward.
facing forward.
facing forward.
If the seat is not facing forward, this may
If the seat is not facing forward, this may If the seat is not facing forward, this may
If the seat is not facing forward, this may
If the seat is not facing forward, this may
result in serious injury in the event of a
result in serious injury in the event of a result in serious injury in the event of a
result in serious injury in the event of a
result in serious injury in the event of a
sudden stop.
sudden stop. sudden stop.
sudden stop.
sudden stop.
B310A01P-GAT THIRD SEAT (Minibus)
THIRD SEAT (Minibus) THIRD SEAT (Minibus)
THIRD SEAT (Minibus)
THIRD SEAT (Minibus)
Folding the third seat
Folding the third seat Folding the third seat
Folding the third seat
Folding the third seat
B310A01P-GAG
By folding the third seat, larger articles can be stowed in the vehicle.
1. Remove the headrest and tilt the seatback fully backward.
2. Pull the belt for raising and fold the seat sideways.
B310A02P-GAG
3. Hook the securing band to the assist handleto secure the seat, and fold the legs of the seat.
B310A03P-GAG
4. Pull the loop of the securing bands to takeoff any slackness.
1. Pull the reclining lever and fold the seatback
of the front seat forward.
2. Fold the auxiliary seat.
3. Pull the lever (a) and slide the seat at the end of rearward.
4. Pull the lever (b) and incline the seatback forward.
5. Rotate the seat clockwise
6. After rotating the seat 90° or 180°, the seat can be fixed, if its back is pulled rearward ateach position.
7. Reverse the above procedure to return the seat to the original position.
B290C03P-GAT To rotate (Second seats: type 2)
To rotate (Second seats: type 2) To rotate (Second seats: type 2)
To rotate (Second seats: type 2)
To rotate (Second seats: type 2)
B290C01P-GAG
Pull the lever and rotate the seat clockwise.
WARNING:
WARNING: WARNING:
WARNING:
WARNING:
oo
oo
o
Never rotate the seat while the vehicle is
Never rotate the seat while the vehicle is Never rotate the seat while the vehicle is
Never rotate the seat while the vehicle is
Never rotate the seat while the vehicle is
in motion.
in motion. in motion.
in motion.
in motion.
Page 30 of 173

1-23
BEFORE DRIVING YOUR VEHICLE
BEFORE DRIVING YOUR VEHICLE BEFORE DRIVING YOUR VEHICLE
BEFORE DRIVING YOUR VEHICLE
BEFORE DRIVING YOUR VEHICLE
B370A01P-GATSeat belts
Seat belts Seat belts
Seat belts
Seat belts
3-point system with Emergency
3-point system with Emergency 3-point system with Emergency
3-point system with Emergency
3-point system with Emergency
Locking Retractor
Locking Retractor Locking Retractor
Locking Retractor
Locking Retractor
YR10301B
This type of belt requires no length adjustment. Once worn, the belt adjusts itself to the move-ment of wearer, but in the event of a sudden orstrong shock, the belt automatically locks tohold to wearer’s body.
B360A01P-GAT
SEAT BELTS
SEAT BELTS SEAT BELTS
SEAT BELTS
SEAT BELTS To protect you and your passengers in the
event of an accident, it is most important that the seat belts be worn correctly when you drive. WARNING:
WARNING: WARNING:
WARNING:
WARNING:
oo
oo
o
The height adjuster must be in the locked
The height adjuster must be in the locked The height adjuster must be in the locked
The height adjuster must be in the locked
The height adjuster must be in the locked
position whenever the vehicle is moving.
position whenever the vehicle is moving. position whenever the vehicle is moving.
position whenever the vehicle is moving.
position whenever the vehicle is moving.
oo
oo
o The misadjustment of height of the shoul-
The misadjustment of height of the shoul- The misadjustment of height of the shoul-
The misadjustment of height of the shoul-
The misadjustment of height of the shoul-
der belt could reduce the effectiveness
der belt could reduce the effectiveness der belt could reduce the effectiveness
der belt could reduce the effectiveness
der belt could reduce the effectiveness
of the seat belt in a crash.
of the seat belt in a crash. of the seat belt in a crash.
of the seat belt in a crash.
of the seat belt in a crash.
B350A01P-GAT
MAKING A FLAT SEAT (If installed)
MAKING A FLAT SEAT (If installed) MAKING A FLAT SEAT (If installed)
MAKING A FLAT SEAT (If installed)
MAKING A FLAT SEAT (If installed) By removing the headrestraints and fully reclin-
ing the seatbacks of the front, second and third seats, one large flat seat is achieved.
CAUTION:
CAUTION: CAUTION:
CAUTION:
CAUTION:
oo
oo
o To make a flat seat, stop the vehicle in a
To make a flat seat, stop the vehicle in a To make a flat seat, stop the vehicle in a
To make a flat seat, stop the vehicle in a
To make a flat seat, stop the vehicle in a
safe place.
safe place. safe place.
safe place.
safe place.
oo
oo
o Do not walk around on top of the seats
Do not walk around on top of the seats Do not walk around on top of the seats
Do not walk around on top of the seats
Do not walk around on top of the seats
after they have been laid flat. To avoid
after they have been laid flat. To avoid after they have been laid flat. To avoid
after they have been laid flat. To avoid
after they have been laid flat. To avoid
loosing your footing, step on the center
loosing your footing, step on the center loosing your footing, step on the center
loosing your footing, step on the center
loosing your footing, step on the center
of the seats and walk slowly.
of the seats and walk slowly. of the seats and walk slowly.
of the seats and walk slowly.
of the seats and walk slowly.
oo
oo
o To ensure the seats are locked securely,
To ensure the seats are locked securely, To ensure the seats are locked securely,
To ensure the seats are locked securely,
To ensure the seats are locked securely,
attempt to move them back and forth.
attempt to move them back and forth. attempt to move them back and forth.
attempt to move them back and forth.
attempt to move them back and forth.
oo
oo
o Do not jump on, or impact the seatbacks
Do not jump on, or impact the seatbacks Do not jump on, or impact the seatbacks
Do not jump on, or impact the seatbacks
Do not jump on, or impact the seatbacks
heavily.
heavily. heavily.
heavily.
heavily.
oo
oo
o
Never drive with the luggage or passen-
Never drive with the luggage or passen- Never drive with the luggage or passen-
Never drive with the luggage or passen-
Never drive with the luggage or passen-
gers on the flat seat. This is highly dan-
gers on the flat seat. This is highly dan- gers on the flat seat. This is highly dan-
gers on the flat seat. This is highly dan-
gers on the flat seat. This is highly dan-
gerous if heavy braking is required.
gerous if heavy braking is required. gerous if heavy braking is required.
gerous if heavy braking is required.
gerous if heavy braking is required.
oo
oo
o
To raise the seatback, sit on the seat and
To raise the seatback, sit on the seat and To raise the seatback, sit on the seat and
To raise the seatback, sit on the seat and
To raise the seatback, sit on the seat and
put a hand on the seatback and raise
put a hand on the seatback and raise put a hand on the seatback and raise
put a hand on the seatback and raise
put a hand on the seatback and raise
slowly. Never have a child do this opera-
slowly. Never have a child do this opera- slowly. Never have a child do this opera-
slowly. Never have a child do this opera-
slowly. Never have a child do this opera-
tion, or an unexpected accident may be
tion, or an unexpected accident may be tion, or an unexpected accident may be
tion, or an unexpected accident may be
tion, or an unexpected accident may be
caused.
caused. caused.
caused.
caused. B170A04A-AAT
HEIGHT ADJUSTABLE FRONT SEAT
HEIGHT ADJUSTABLE FRONT SEAT HEIGHT ADJUSTABLE FRONT SEAT
HEIGHT ADJUSTABLE FRONT SEAT
HEIGHT ADJUSTABLE FRONT SEAT
SHOULDER BELT (If installed)
SHOULDER BELT (If installed) SHOULDER BELT (If installed)
SHOULDER BELT (If installed)
SHOULDER BELT (If installed)
AX10200A
You can adjust the height of the front shoulder
belt anchor to one of the 4 positions.
If the height of the adjusting seat belt is too near
your neck, you will not be getting the most effective protection. The shoulder portion should
be adjusted so that it lies across your chest and
midway over your shoulder nearest the doorand not your neck. To adjust the height of seat belt anchor, lower
or raise the height adjuster into an appropriateposition. To raise the height adjuster, pull it up.To lower it, push it down while pressing theheight adjuster button.
Release the button to lock the anchor into
position. Try sliding the release button to makesure that it has locked into the position.
Page 31 of 173
BEFORE DRIVING YOUR VEHICLE
BEFORE DRIVING YOUR VEHICLE BEFORE DRIVING YOUR VEHICLE
BEFORE DRIVING YOUR VEHICLE
BEFORE DRIVING YOUR VEHICLE
1-24
GS10520A
B370C01P-GAT To unfasten
To unfasten To unfasten
To unfasten
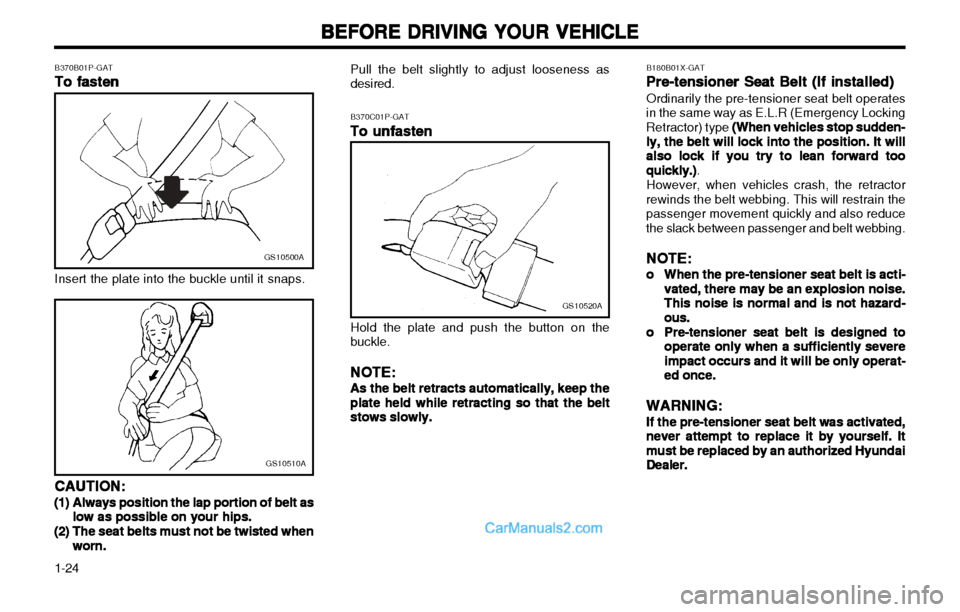
To unfasten Hold the plate and push the button on the buckle.
NOTE:
NOTE: NOTE:
NOTE:
NOTE:
As the belt retracts automatically, keep the
As the belt retracts automatically, keep the As the belt retracts automatically, keep the
As the belt retracts automatically, keep the
As the belt retracts automatically, keep the
plate held while retracting so that the belt
plate held while retracting so that the belt plate held while retracting so that the belt
plate held while retracting so that the belt
plate held while retracting so that the belt
stows slowly.
stows slowly. stows slowly.
stows slowly.
stows slowly.
Pull the belt slightly to adjust looseness asdesired.
B180B01X-GAT
Pre-tensioner Seat Belt (If installed)
Pre-tensioner Seat Belt (If installed) Pre-tensioner Seat Belt (If installed)
Pre-tensioner Seat Belt (If installed)
Pre-tensioner Seat Belt (If installed) Ordinarily the pre-tensioner seat belt operates
in the same way as E.L.R (Emergency Locking Retractor) type (When vehicles stop sudden-
(When vehicles stop sudden- (When vehicles stop sudden-
(When vehicles stop sudden-
(When vehicles stop sudden-
ly, the belt will lock into the position. It will
ly, the belt will lock into the position. It will ly, the belt will lock into the position. It will
ly, the belt will lock into the position. It will
ly, the belt will lock into the position. It will
also lock if you try to lean forward too
also lock if you try to lean forward too also lock if you try to lean forward too
also lock if you try to lean forward too
also lock if you try to lean forward too
quickly.)
quickly.) quickly.)
quickly.)
quickly.) .
However, when vehicles crash, the retractor
rewinds the belt webbing. This will restrain thepassenger movement quickly and also reducethe slack between passenger and belt webbing.
NOTE:
NOTE: NOTE:
NOTE:
NOTE:
oo
oo
o When the pre-tensioner seat belt is acti-
When the pre-tensioner seat belt is acti- When the pre-tensioner seat belt is acti-
When the pre-tensioner seat belt is acti-
When the pre-tensioner seat belt is acti-
vated,
vated, vated,
vated,
vated, there may be an explosion noise.
there may be an explosion noise. there may be an explosion noise.
there may be an explosion noise.
there may be an explosion noise.
This noise is normal and is not hazard-
This noise is normal and is not hazard- This noise is normal and is not hazard-
This noise is normal and is not hazard-
This noise is normal and is not hazard-
ous.ous.
ous.ous.
ous.
oo
oo
o Pre-tensioner seat belt is designed to
Pre-tensioner seat belt is designed to Pre-tensioner seat belt is designed to
Pre-tensioner seat belt is designed to
Pre-tensioner seat belt is designed to
operate only when a sufficiently
operate only when a sufficiently operate only when a sufficiently
operate only when a sufficiently
operate only when a sufficiently severe
severe severe
severe
severe
impact occurs and it will be only operat-
impact occurs and it will be only operat- impact occurs and it will be only operat-
impact occurs and it will be only operat-
impact occurs and it will be only operat-
ed once.
ed once. ed once.
ed once.
ed once.
WARNING:
WARNING: WARNING:
WARNING:
WARNING:
If the pre-tensioner seat belt was activated,
If the pre-tensioner seat belt was activated, If the pre-tensioner seat belt was activated,
If the pre-tensioner seat belt was activated,
If the pre-tensioner seat belt was activated, never attempt
never attempt never attempt
never attempt
never attempt to replace it by yourself. It
to replace it by yourself. It to replace it by yourself. It
to replace it by yourself. It
to replace it by yourself. It
must be replaced by an authorized Hyundai
must be replaced by an authorized Hyundai must be replaced by an authorized Hyundai
must be replaced by an authorized Hyundai
must be replaced by an authorized Hyundai
Dealer.
Dealer. Dealer.
Dealer.
Dealer.
GS10500A
B370B01P-GAT
To fasten
To fasten To fasten
To fasten
To fasten Insert the plate into the buckle until it snaps.
GS10510A
CAUTION:
CAUTION: CAUTION:
CAUTION:
CAUTION:
(1)(1)
(1)(1)
(1) Always position the lap portion of belt as
Always position the lap portion of belt as Always position the lap portion of belt as
Always position the lap portion of belt as
Always position the lap portion of belt as
low as possible on your hips.
low as possible on your hips. low as possible on your hips.
low as possible on your hips.
low as possible on your hips.
(2)(2)
(2)(2)
(2) The seat belts must not be twisted when
The seat belts must not be twisted when The seat belts must not be twisted when
The seat belts must not be twisted when
The seat belts must not be twisted when
worn.
worn. worn.
worn.
worn.
Page 32 of 173

1-25
BEFORE DRIVING YOUR VEHICLE
BEFORE DRIVING YOUR VEHICLE BEFORE DRIVING YOUR VEHICLE
BEFORE DRIVING YOUR VEHICLE
BEFORE DRIVING YOUR VEHICLE
B230A02P-GATCHILD RESTRAINT SYSTEM
CHILD RESTRAINT SYSTEM CHILD RESTRAINT SYSTEM
CHILD RESTRAINT SYSTEM
CHILD RESTRAINT SYSTEM
(Minibus, Van) (If installed)
(Minibus, Van) (If installed) (Minibus, Van) (If installed)
(Minibus, Van) (If installed)
(Minibus, Van) (If installed) Children riding in the car should sit in the rear
seat and must always be restrained to minimize the risk of injury in an accident, sudden stop orsudden maneuver. According to accident sta-tistics, children are safer when properly re-strained in the rear seats than in the front seat.Larger children should use one of the seat beltsprovided.
You are required by law to use safety restraints
for children. If small children ride in your vehicleyou must put them in a child restraint system(safety seat). Children could be injured in a crash if their
restraints are not properly secured. For smallchildren and babies, a child seat or infant seatmust be used. Before buying a particular childrestraint system, make sure it fits your car seatand seat belts, and fits your child. Follow all theinstructions provided by the manufacturer wheninstalling the child restraint system.
WARNING:
WARNING: WARNING:
WARNING:
WARNING:
oo
oo
o A child restraint system must be placed
A child restraint system must be placed A child restraint system must be placed
A child restraint system must be placed
A child restraint system must be placed
in the rear seat. Never install a child or
in the rear seat. Never install a child or in the rear seat. Never install a child or
in the rear seat. Never install a child or
in the rear seat. Never install a child or
infant seat on the front passenger's seat.
infant seat on the front passenger's seat. infant seat on the front passenger's seat.
infant seat on the front passenger's seat.
infant seat on the front passenger's seat.
Should an accident occur and cause the
Should an accident occur and cause the Should an accident occur and cause the
Should an accident occur and cause the
Should an accident occur and cause the
passenger side airbag to deploy, it could
passenger side airbag to deploy, it could passenger side airbag to deploy, it could
passenger side airbag to deploy, it could
passenger side airbag to deploy, it could
severely injure or kill an infant or child
severely injure or kill an infant or child severely injure or kill an infant or child
severely injure or kill an infant or child
severely injure or kill an infant or child
seated in an infant or child seat. Thus,
seated in an infant or child seat. Thus, seated in an infant or child seat. Thus,
seated in an infant or child seat. Thus,
seated in an infant or child seat. Thus,
only use a child restraint in the rear seat
only use a child restraint in the rear seat only use a child restraint in the rear seat
only use a child restraint in the rear seat
only use a child restraint in the rear seat
of your vehicle.
of your vehicle. of your vehicle.
of your vehicle.
of your vehicle.
B370E01P-GAT
Seat lap belts (With Static Type)
Seat lap belts (With Static Type) Seat lap belts (With Static Type)
Seat lap belts (With Static Type)
Seat lap belts (With Static Type)
(If installed)
(If installed) (If installed)
(If installed)
(If installed)
GS10530A
Tighten
Loosen
The lap belts should be adjusted by holding the
belt and latch plate at right angles to each other, and then pulling the belt as illustrated below toa snug fit around the occupant.
Holding the latch plate by hand, insert the latch
plate into the buckle.
B370D01P-GAT
SS
SS
S eat lap belts (With Non-Locking
eat lap belts (With Non-Locking eat lap belts (With Non-Locking
eat lap belts (With Non-Locking
eat lap belts (With Non-Locking
Retractor) (If installed)
Retractor) (If installed) Retractor) (If installed)
Retractor) (If installed)
Retractor) (If installed)
YR10330A
This type of lap belts are equipped with an Non-
Locking Retractor. Holding the latch plate by hand, pull it out until
the webbing is fully extended and insert the latch plate into the buckle.
When it fits snugly around your hip, the webbing
with the latch plate is automatically retracted.To release, unfasten the belt, and a light tug tothe webbing with the latch plate will cause theretractor to work automatically.