Page 209 of 415
If you do not like the stations Auto
Select has stored, you can store
other f requencies in the preset
buttons. Use the TUNE, SEEK, or
SCAN f unction to f ind the desired
f requencies, then store them in the
selected preset buttons as described
previously.
Auto Select does not erase the
f requencies that you preset pre-
viously. When you return home, turn
of f Auto Select by pressing the
A. SEL button. The preset buttons
will then select the f requencies you
originally set.
Audio System
Comf ort and Convenience Feat ures206
A.SEL
INDICATORAM/FM
BUTTON TUNE KNOB
SCAN
BUTTON A.SEL
BUTTON
PRESET BUTTONS
SEEK BAR
Page 212 of 415
�Û
CONT INUED
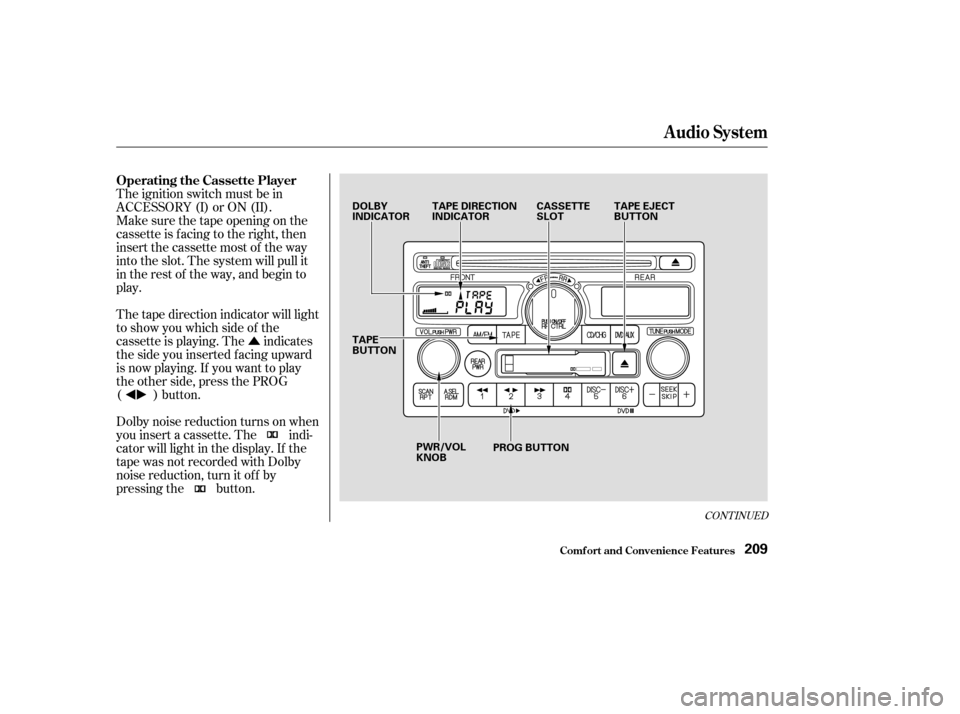
The ignition switch must be in
ACCESSORY (I) or ON (II).
Make sure the tape opening on the
cassette is facing to the right, then
insert the cassette most of the way
into the slot. The system will pull it
in the rest of the way, and begin to
play.
The tape direction indicator will light
to show you which side of the
cassette is playing. The indicates
thesideyouinsertedfacingupward
is now playing. If you want to play
the other side, press the PROG
( ) button.
Dolby noise reduction turns on when
you insert a cassette. The indi-
cator will light in the display. If the
tape was not recorded with Dolby
noise reduction, turn it of f by
pressing the button.
Audio System
Comf ort and Convenience Feat ures
Operating the Cassette Player
209
DOLBY
INDICATORTAPE DIRECTION
INDICATOR CASSETTE
SLOTTAPE EJECT
BUTTON
TAPE
BUTTON PWR/VOL
KNOB PROG BUTTON
Page 225 of 415

�Û�Ý
You can control some DVD f unctions
f rom the rear control panel in the
ceiling Make sure the rear control
operation has not been disabled with
theRRCTRLknobonthefront
panel.
Use these buttons to select the
entertainment source (radio,
cassette player, CD player/CD
changer, or DVD player/Auxiliary
device). The selected source will be
showninthedisplay.
Press this button when you want to
pause a DVD. Press this button
again to go back to Play.
To select the menu on the DVD,
press the MENU button. Use the , , , and buttons to
move to the desired menu selection,
then press the ENT button to enter
your selection.
Pressthe buttontoskiptothe
beginning of the next chapter. Press
the buttontoskipbacktothe beginning of the current chapter.
If you press the button while the
beginning of a chapter is playing, the
system skips to the beginning of the
previous chapter.
Comf ort and Convenience Feat ures
Rear Entertainment System
Operating the DVD Player f rom
the Rear Control Panel
Source Select ion But t ons
PL A Y/PA USE/PROG But t on MENU/ENT But t ons
SEEK /SK IP But t ons
222
SOURCE SELECTION
BUTTONS REAR CONTROLS
OFF INDICATOR MENU
BUTTON
SEEK/SKIP
BUTTON
CH/DISK
BUTTON
SEEK/SKIP
BUTTON
CH/DISK
BUTTON
ENT BUTTON
PLAY/PAUSE/PROG
BUTTON
Page 237 of 415

The security system helps to protect
your vehicle and valuables f rom thef t.
The horn sounds and a combination
of headlights, parking lights, side
marker lights and taillights f lashes if
someone attempts to break into your
vehicleorremovetheradio.This
alarm continues f or two minutes,
then the alarm stops. To reset an
alarming system before the two
minutes have elapsed, unlock either
f ront door with the key or the
remote transmitter.
The security system sets
automatically fifteen seconds after
you lock the doors, hood, and
tailgate. For the system to activate,
you must lock the doors f rom the
outside with the key, the lock tab,
the door lock switch, or the remote
transmitter. The security system
light next to the low oil pressure
indicator starts blinking immediately
to show you the system is settingitself .
Once the security system is set,
opening any door (without using the
key or the remote transmitter), or
the hood, will cause it to alarm. It
also alarms if the radio is removed
f rom the dashboard or the wiring is
cut.With the system set, you can still
open the tailgate with the master key
or the remote transmitter without
triggering the alarm. The alarm will
sound if the tailgate lock is f orced, or
smashed.
The security system will not set if
the hood, tailgate, or any door is not
f ully closed. If the system will not set,
check the Door Lamp Monitor on
the instrument panel (see page ),
to see if the doors and tailgate are
f ully closed. Since it is not part of the
monitor display, manually check the
hood.
Do not attempt to alter this system
or add other devices to it.
75
On EX and EX-L models
Security System
Comf ort and Convenience Feat ures234
SECURITY SYSTEM
LIGHT
Page 238 of 415
Push in the Cruise Control Master
Switch to the lef t of the steering
column. The indicator in the
switch will light.
Accelerate to the desired cruising
speedabove25mph(40km/h).Press and release the SET/decel
buttononthesteeringwheel.The
CRUISE CONTROL light on the
instrument panel comes on to
show the system is now activated.
Cruise control allows you to maintain
asetspeedabove25mph(40km/h)
without keeping your f oot on the
accelerator pedal. It should be used
f or cruising on straight, open
highways. It is not recommended f or
conditions such as city driving,
winding roads, slippery roads, heavy
rain, or bad weather. You should
have f ull control of the vehicle under
those conditions.
1.
2.3.
CONT INUED
Using the Cruise Control
Cruise Control
Comf ort and Convenience Feat ures235
CRUISE CONTROL MASTER SWITCH
RESUME/accel
CANCEL
SET/decel
Improper use of the cruise
control can lead to a crash.
Use the cruise control only
when traveling on open
highways in good weather.
Page 248 of 415
Because the f uel f ill cap is on the
driver’s side of the vehicle, park
with that side closest to the
service station pumps.
Open the f uel f ill door by pulling
onthehandletotheleftof the
driver’s seat.
In Canada, some gasolines contain
an octane-enhancing additive called
MMT. If you use such gasolines,
your emission control system
perf ormance may deteriorate and
the Malf unction Indicator Lamp on
your instrument panel may turn on.
If this happens, contact your
authorized Honda dealer f or service.
Bef ore ref ueling, make sure the rear
sliding door on the driver’s side is
closed. 1.
2.
CONT INUED
Bef ore Driving
Filling the Fuel Tank
Gasoline, Service Station Procedures
245
Pull
FUEL FILL CAP
Gasoline is highly flammable
and explosive. You can be
burned or seriously injured
when handling fuel.Stop the engine and keep
heat, sparks, and flame away.
Handle fuel only outdoors.
Wipe up spills immediately.
Page 249 of 415

Remove the f uel f ill cap slowly.
You may hear a hissing sound as
pressure inside the tank escapes.
Place the cap in the holder on the
fuel fill door.
Stop f illing the tank af ter the f uel
nozzle automatically clicks of f . Do
not try to ‘‘top off’’ the tank, leave
some room f or the f uel to expand
with temperature changes.Shift to Park or Neutral and set
the parking brake. Pull the hood
release handle located under the
lower lef t corner of the dashboard.
The hood will pop up slightly.
Screw the f uel f ill cap back on,
tighten it until it clicks several
times. If you do not properly
tighten the cap, the Malfunction
Indicator Lamp may come on (see
page ).
Push the f uel f ill door closed until
it latches.
Your vehicle has an on-board
ref ueling vapor recovery system to
help keep f uel vapors f rom going
into the atmosphere. If the fuel
nozzle keeps clicking of f even
though the tank is not full, there may
be a problem with this system.
Consult your dealer. 1.
3.
4.
5.
6.
371
Service Station Procedures
Bef ore Driving
Opening the Hood
246
HOOD RELEASE HANDLE
Page 260 of 415

This section gives you tips on
starting the engine under various
conditions, and how to operate the
automatic transmission. It also
includes important inf ormation on
parking your vehicle, the braking
system, the Traction Control System,
and f acts you need if you are
planning to tow a trailer.........................
Preparing to Drive .258
.......................
Starting the Engine .259
Starting in Cold Weather ....................
at High Altitude .259
..............
Automatic Transmission . 260
.
Shif t Lever Position Indicator . 260
................
Shif t Lever Positions . 261
..............
Engine Speed Limiter . 263
....................
Shif t Lock Release . 263
...........................................
Parking .265
.....................
The Braking System .266
.............
Brake Wear Indicators . 266
...............
Brake System Design . 267
.......................
Anti-lock Brakes .267
Important Saf ety .........................
Reminders .268
........................
ABS Indicator .268
..............
Traction Control System . 269
...............
TCS ON/OFF Switch . 270
............................
TCS Indicator .271
...............
Driving in Bad Weather . 272
...........................
Towing a Trailer .274
Driving
Driving257

.Press and release the S")
