Page 1 of 415
 to navigate through this reference.
For a printed owners manual, click on authorized manuals or go to")
2003 Odyssey Online Reference Owner's Manual Use these links (and links throughout this manual) to navigate through this reference.
For a printed owner's manual, click on authorized manuals or go to www.helminc.com. Contents
Owner's Identification Form
Introduction ........................................................................\
............................................................................. i
A Few Words About Safety ........................................................................\
.................................................. ii
Your Vehicle at a Glance ........................................................................\
....................................................... 2
Driver and Passenger Safety ........................................................................\
............................................... 5
Proper use and care of your vehicle's seat belts, and Supplemental Restraint System.
Instruments and Controls........................................................................\
.................................................. .69
Instrument panel indica tor and gauge, and how to use dashboard and steering column controls.
Comfort and Convenience Features........................................................................\
.............................. .143
How to operate the climate control system, the audio system, and other convenience features.
Before Driving ........................................................................\
...................................................... ...............243
What gasoline to use, how to break-in your new vehicle, and how to load luggage and other cargo.
Driving........................................................................\
...................................................................................257
The proper way to start the engine, shift the tr ansmission, and park, plus towing a trailer.
Maintenance........................................................................\
...................................................... ...................283
The Maintenance Schedule shows you when you need to take your vehicle to the dealer.
Appearance Care........................................................................\
...................................................... ...........343
Tips on cleaning and protecting your vehicle. Things to look for if your car ever needs body repairs.
Taking Care of the Unexpected........................................................................\
.......................................351
This section covers several problems motorists someti mes experience, and how to handle them.
Technical Information........................................................................\
...................................................... .383
ID numbers, dimensions, capaciti es, and technical information.
Warranty and Customer Relations (U.S. and Canada)..................................................................... .397
A summary of the warranties covering your new Honda, and how to contact us.
Authorized Manuals (U.S. only )........................................................................\
......................................
.401
How to order manuals and other technical literature.
Index ........................................................................\
......................................................................................... I
Service Information Summary
A summary of information you need when you pull up to the fuel pump.
Page 5 of 415
Your Vehicle at a Glance
2
INDICATOR LIGHTS
GAUGESSHIFT LEVER
HEATING AND COOLING SYSTEM
CLIMATE CONTROL SYSTEM
REAR A/C CONTROL
GLOVE BOX
AUDIO SYSTEM/
REAR ENTERTAINMENT
SYSTEM
CENTER TABLE
ACCESSORY
POWER SOCKET
PARKING BRAKE
PEDAL
FUEL FILL
DOOR RELEASE
HOOD RELEASE
HANDLE POWER WINDOW
SWITCHES POWER
DOOR LOCK
SWITCHES
(P.71)
(P.78) (P.261) (P.144)
(P.152)
(P.166)
(P.100)
(P.169,181,201,217)
(P.130)
(P.138)
(P.129)
(P.245)
(P.246)
(P.123) (P.124)
(P.92)
SEAT HEATER
SWICH
Page 73 of 415
Control L ocations
Inst rument s and Cont rols70
MIRROR
CONTROLSDIGITAL CLOCK
HEATING/COOLING CONTROLS
CLIMATE CONTROL SYSTEM
HOOD RELEASE HANDLE
FUEL FILL DOOR RELEASE (P.103)
(P.128)(P.130) (P.144)
(P.152)
(P.166)
(P.169, 181,201,217)
(P.246)
(P.245)
(P.123) (P.124) (P.92) POWER SLIDING
DOOR SWITCHES
REAR A/C
UNITCONTROL
AUDIO SYSTEM/
REAR ENTERTAINMENT
SYSTEM
POWER WINDOW
SWITCHES DOOR LOCKS
WITCHES
SEAT HEATER
SWITCH
Page 74 of 415
�Î
�Î
�Î
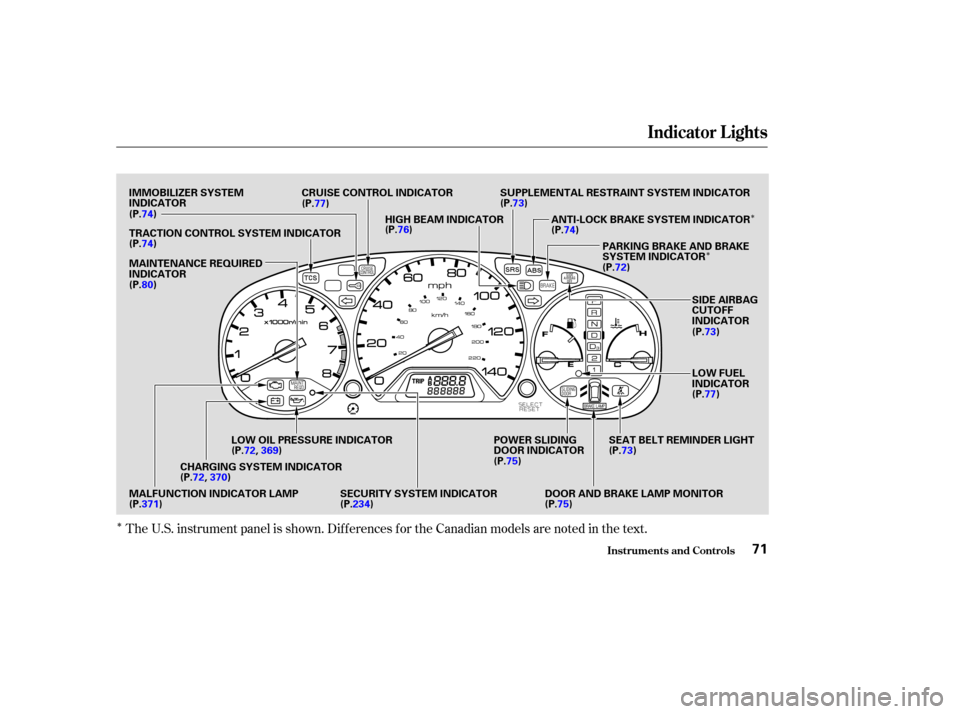
The U.S. instrument panel is shown. Dif f erences f or the Canadian models are noted in the text.
Indicator L ights
Inst rument s and Cont rols71
IMMOBILIZER SYSTEM
INDICATOR CRUISE CONTROL INDICATOR
HIGH BEAM INDICATOR SUPPLEMENTAL RESTRAINT SYSTEM INDICATOR
ANTI-LOCK BRAKE SYSTEM INDICATORPARKING BRAKE AND BRAKE
SYSTEM INDICATOR
SIDE AIRBAG
CUTOFF
INDICATOR
LOW FUEL
INDICATOR
SEAT BELT REMINDER LIGHT
DOOR AND BRAKE LAMP MONITOR
POWER SLIDING
DOOR INDICATOR
SECURITY SYSTEM INDICATOR
LOW OIL PRESSURE INDICATOR
CHARGING SYSTEM INDICATOR
MALFUNCTION INDICATOR LAMP MAINTENANCE REQUIRED
INDICATOR TRACTION CONTROL SYSTEM INDICATOR (P.74)
(P.74)
(P.80) (P.77)
(P.76) (P.73)
(P.74)
(P.72)
(P.73)
(P.77)
(P.73)
(P. 75)
(P.75)
(P.371) (P.72,
369)
(P.72, 370)
(P.234)
Page 80 of 415
This lights when you set the cruise
control. See page f or inf ormation
on operating the cruise control.This light comes on when the
washer f luid level is low. Add washer
f luid when you see this light come on
(see page ).
This light comes on as a reminder
that you must ref uel soon.
306
235Canadian models only
Indicator L ights
Inst rument s and Cont rols
Cruise Control Indicator
Washer L evel Indicator L ow Fuel Indicator
77
Page 81 of 415
U.S. ModelsCanadian Models
This shows your speed in miles per
hour (mph). The smaller inner
numbers are the speed in kilometers
per hour (km/h).
This shows your speed in kilometers
per hour (km/h). The smaller inner
numbers are the speed in miles per
hour (mph). The tachometer shows the engine
speed in revolutions per minute
(rpm). To protect the engine f rom
damage, never drive with the
tachometer needle in the red zone.The odometer shows the total dis-
tance your vehicle has been driven.
It measures miles in U.S. models and
kilometers in Canadian models.
It is illegal under U.S. f ederal law and
Canadian provincial regulations to
disconnect, reset, or alter the
odometer with the intent to change
the number of miles or kilometers
indicated.
Speedometer Odometer
T achometer
Gauges
Inst rument s and Cont rols78
TACHOMETER SPEEDOMETERFUEL GAUGE
TEMPERATURE
GAUGE
TRIP METER SELECT/RESET BUTTON
TRIP METER
MAINTENANCE
REQUIRED INDICATOR ODOMETER
Page 82 of 415

This shows how much f uel you have.
It is most accurate when the vehicle
is on level ground. It may show
slightly more or less than the actual
amount when you are driving on
curvy or hilly roads.
This shows the temperature of the
engine’s coolant. During normal
operation, the pointer should rise
from the bottom white mark to about
the middle of the gauge. In severe
driving conditions, such as very hot
weather or a long period of uphill
driving, the pointer may rise to near
the upper white mark. If it reaches
the red (Hot) mark, pull safely to the
side of the road. Turn to page f or
instructions and precautions on
checking the engine’s cooling
system.
This meter shows the number of
miles (U.S.) or kilometers (Canada)
driven since you last reset it.
There are two trip meters: Trip A
and Trip B. Switch between these
displays by pressing the Select/
Reset button repeatedly. Each trip
meter works independently, so you
can keep track of two dif f erent
distances.
To reset a trip meter, display it, and
then press and hold the Select/Reset
button until the number resets to
‘‘0.0’’.
The needle returns to the bottom
after you turn off the ignition. The
gauge shows the f uel level reading
immediately af ter you turn the
ignition switch back ON (II).
366
Gauges
Inst rument s and Cont rols
Trip Meter
Temperature GaugeFuel Gauge
79
Avoid driving with an extremely low
f uel level. Running out of f uel could
cause the engine to misf ire, damaging
the catalytic converter.
Page 105 of 415

Bef ore ref ueling, make sure the
driver’s side sliding door is f ully
closed. When you release the f uel f ill
door, the driver’s side sliding door
automatically locks so it cannot open
and interfere with the fuel door. If a
passenger attempts to unlock the
door by cycling the lock knob several
times, the door may unlock and can
be opened.
If a passenger needs to get out of the
vehicle while you are ref ueling,
instruct that person to exit on the
passenger’s side, not the driver’s
side.
Af ter you close the f uel f ill door, the
sliding door does not automatically
unlock. You must unlock it manually.When parking f acing downhill, make
sure the manual doors are latched in
the f ully-open position, then hold the
door open while allowing your
passengers to enter or exit the
vehicle. Do not pull the inside or
outside door handle, or the latch will
release and the door will slam shut.
A Not e A bout Ref ueling
Parking Facing Downhill
Manual Sliding Doors (L X Model)
Inst rument s and Cont rols102


(P.128)(P.130) (P.144)")

. The smaller inner
numbers are the speed in kilometers
per hour (km/h).
This shows your speed in kilometers
per hour (km/h). Th")