Page 83 of 415

af ter the Maintenance Required
Indicator is reset, it will come on f")
Ref er to the Maintenance Schedules
f or Normal and Severe Driving
Conditions on pages and .
For the f irst 6,000 miles (9,600 km)
af ter the Maintenance Required
Indicator is reset, it will come on f or
two seconds when you turn the
ignition switch to ON (II).Between 6,000 miles (9,600 km) and
7,500 miles (12,000 km) this
indicator will light f or two seconds
when you first turn the ignition
switch to ON (II), and then flash for
ten seconds.
If you exceed 7,500 miles (12,000
km) without having the scheduled
maintenance perf ormed, this
indicator will remain on as a constant
reminder.Your dealer will reset this indicator
af ter completing the scheduled
maintenance. If this maintenance is
done by someone other than your
Honda dealer, reset the indicator as
f ollows.
Turn of f the engine.
This indicator reminds you that it is
time to take your vehicle in for
scheduled maintenance. Press and hold the select/reset
buttonintheinstrumentpanel,
then turn the ignition switch ON
(II).
Hold the button until the indicator
resets (approximately ten
seconds).
1.
2.
3.
288 290
Gauges
Maintenance Required Indicator
Inst rument s and Cont rols80
MAINTENANCE REQUIRED
INDICATOR SELECT/RESET BUTTON
Page 84 of 415
�Î
�Î
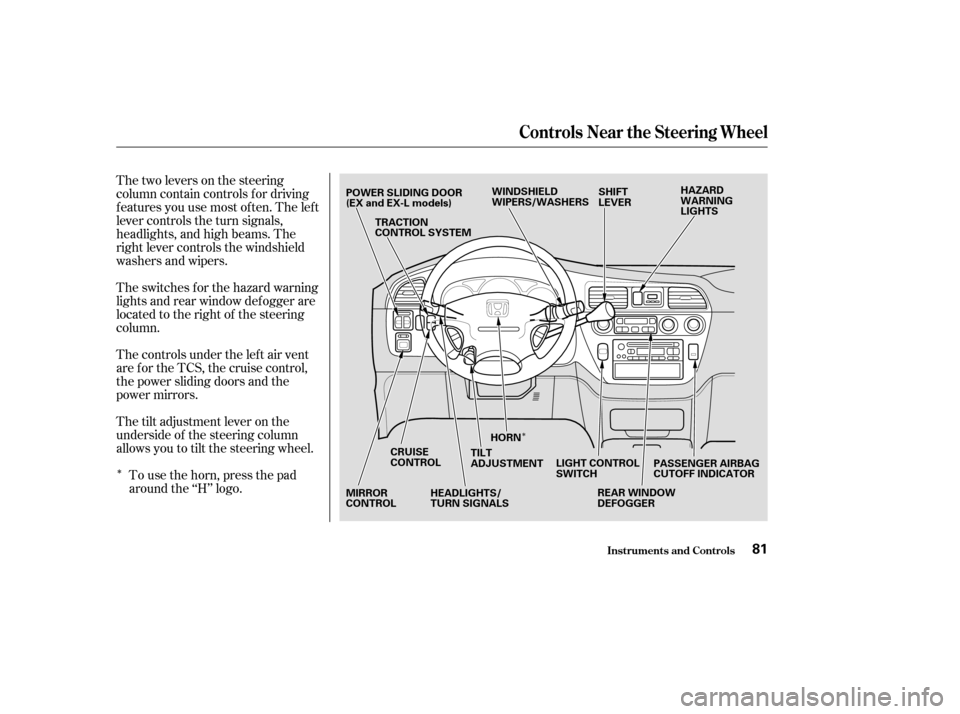
Thetwoleversonthesteering
column contain controls f or driving
f eatures you use most of ten. The lef t
lever controls the turn signals,
headlights, and high beams. The
right lever controls the windshield
washers and wipers.
The switches for the hazard warning
lights and rear window def ogger are
located to the right of the steering
column.
The controls under the lef t air vent
arefortheTCS,thecruisecontrol,
the power sliding doors and the
power mirrors.
The tilt adjustment lever on the
underside of the steering column
allows you to tilt the steering wheel.To use the horn, press the pad
around the ‘‘H’’ logo.
Inst rument s and Cont rols
Controls Near the Steering Wheel
81
POWER SLIDING DOOR
(EX and EX-L models) TRACTION
CONTROL SYSTEM HAZARD
WARNING
LIGHTS
PASSENGER AIRBAG
CUTOFF INDICATOR
WINDSHIELD
WIPERS/WASHERS
SHIFT
LEVER
REAR WINDOW
DEFOGGER
LIGHT CONTROL
SWITCH
HORN
TILT
ADJUSTMENT
HEADLIGHTS/
TURN SIGNALS
CRUISE
CONTROL
MIRROR
CONTROL
Page 85 of 415
If you leave the lights on with the
ignition switch in ACCESSORY (I)
or LOCK (0), you will hear a
reminder chime when you open the
driver’s door.
To change between low beams and
high beams, pull the turn signal lever
until you hear a click, then let go.
The blue high beam indicator will
light (see page ).To f lash the high beams, pull the
turn signal lever back lightly, then
release it. The high beams will come
on and go of f .
The high beams will stay on f or as
long as you hold the lever back, no
matter what position the headlight
switch is in.
The rotating switch on the lef t lever
controls the lights. Turning this
switch to the ‘‘ ’’ position turns
on the parking lights, taillights,
instrument panel lights, side-marker
lights, and rear license plate light.
Turning the switch to the ‘‘ ’’
position turns on the headlights. 76
Controls Near the Steering Wheel
Inst rument s and Cont rols
Headlights
82
Page 90 of 415
Make sure the rear window is clear
and you have good visibility bef ore
starting to drive.
The rear window def ogger will clear
fog, frost, and thin ice from the
window. Push the def ogger button to
turn it on and of f . The light above
the button lights to show the
def ogger is on. If you do not turn it
of f , the def ogger will shut itself of f
af ter about 15 minutes. It also shuts
of f when you turn of f the ignition.
You have to turn it on again when
you restart the vehicle.
Push the button to the left of the
clocktoturnonthehazardwarning
lights (f our-way f lashers). This
causes all f our outside turn signals
and both indicators in the instrument
panel to f lash. Use the hazard
warning lights if you need to park in
a dangerous area near heavy traffic,
or if your vehicle is disabled.
CONT INUED
Controls Near the Steering Wheel
Inst rument s and Cont rols
Rear Window Def ogger
Hazard Warning
87
EX and EX-L models
Vehicles with Navigaition System
Page 91 of 415

See page f or important saf etyinf ormation about how to properlyposition the steering wheel. 20
Make any steering wheel adjustment
bef ore you start driving.
Make sure you have securely
locked the steering wheel in place
by trying to move it up and down. Push the lever up to lock the
steering wheel in that position. Move the steering wheel to the
desired position, making sure the
wheel points toward your chest,
not toward your f ace. Make sure
you can see the instrument panel
gauges and the indicator lights.
Push the lever under the steering
column all the way down.
To adjust the steering wheel upward
or downward:
Thedefoggerwiresontheinsideof
the rear window can be accidentally
damaged. When cleaning the glass,
always wipe side to side.
3.
4.
1. 2.
Controls Near the Steering Wheel
Inst rument s and Cont rols
Steering Wheel A djustment
88
LX model
Adjusting the steering wheel
position while driving may
cause you to lose control of the
vehicle and be seriously injured
inacrash.
Adjust the steering wheel only
when the vehicle is stopped.
Page 93 of 415

The Immobilizer System protects
your vehicle f rom thef t. A properly-
coded master or valet key must be
used in the ignition switch f or the
engine to start. If an improperly-
coded key (or other device) is used,
the engine’s f uel system is disabled.
When you turn the ignition switch to
ON (II), the Immobilizer System
indicator should come on f or a f ew
seconds, then go out. If the indicator
starts to blink, it means the system
does not recognize the coding of the
key. Turn the ignition switch to
LOCK (0), remove the key, reinsert
it, and turn the switch to ON (II)
again.The system may not recognize your
key’s coding if another immobilizer
key or other metal object is near the
ignition switch when you insert the
key. To make sure the system
recognizes the key code:
Do not keep other immobilizer
keys on the same key ring.
Use a plastic or leather key f ob,
not metal.
Keep other keys away f rom your
vehicle’s key and the ignition
switch while trying to start the
engine. If the system repeatedly does not
recognize the coding of your key,
contact your Honda dealer.
The Immobilizer System indicator
will also blink several times when
you turn the ignition switch f rom ON
(II) to ACCESSORY (I) or LOCK (0).
Do not attempt to alter this system
or add other devices to it. Electrical
problems could result that may make
your vehicle undriveable.
If you have lost your key and you
cannot start the engine, contact your
Honda dealer.
Immobilizer System
Keys and Locks
Inst rument s and Cont rols90
Page 111 of 415
If the Power Sliding Door indicator
comes on and stays on, it indicates a
problem in the system. Turn the
MAIN switch of f to turn of f the
indicator. Have the system inspected
by your Honda dealer as soon as
possible.
If your vehicle’s battery is
disconnected or goes dead while a
sliding door is open, the power
sliding door system needs to be reset.
Af ter reconnecting the battery:
If the power sliding doors are closed,
the system will reset itself
automatically once the battery has
been reconnected.
If the power sliding doors do not
operate properly af ter resetting,
have your vehicle checked by a
Honda dealer.
Close each sliding door completely
by hand; or
Move the MAIN switch on the
dashboard to the ON position.
Push and hold the top of each door
switch until each sliding door
closes completely.
Power Sliding Door Indicat or
How t o Reset t he Power Sliding
Doors
Power Sliding Doors (EX, EX-L Models)
Inst rument s and Cont rols108
POWER SLIDING DOOR INDICATOR
Page 126 of 415

The HI or LO indicator lights and
remains lit until you turn it of f by
pushing the opposite side of the
switch lightly. The indicator will turn
off.
In HI, the heater turns of f when the
seat gets warm, and turns back on
after the seat’s temperature drops. It
continues to cycle as long as you
leave it set on HI. The HI indicator
remains lit as a reminder that you
have the heater on.
In LO, the heater runs continuously.
It does not cycle with temperature
changes.Do not use the seat heaters, even
on the LO setting, if the engine is
lef t idling f or an extended period.
They can weaken the battery,
causing hard starting. Use the HI setting only to heat the
seats quickly. Select the LO
setting when the seats f eel warm.
The HI setting draws large
amounts of current f rom the
battery.
Follow these precautions whenever
you use the seat heaters:
Because of the sensors f or the side
airbag system, there is no heater in
the passenger’s seat-back.
Both f ront seats are equipped with
seat heaters. The ignition switch
must be ON (II) to use them.The
seat heater switch is located on each
f ront door. Push the f ront of the
switch, HI, to rapidly heat up the seat.
After the seat reaches a comfortable
temperature, select LO by pushing
the back of the switch. This will keep
the seat warm.
On EX-L model
Seat Heaters
Inst rument s and Cont rols123

or LOCK (0), you will hear a
reminder chime when you open the
driver’s door.
To change between low beams and
high beams, pull the")

