Page 233 of 415
 This devicemay not cause harmf ul interf erence, and(2) this device")
As required by the FCC:This device complies with Part 15 of theFCC rules. Operation is subject to thef ollowing two conditions: (1) This devicemay not cause harmf ul interf erence, and(2) this device must accept anyinterf erence received, includinginterf erence that may cause undesiredoperation.
Changes or modif ications not expresslyapproved by the party responsible f orcompliance could void the user’sauthority to operate the equipment.
This device complies with IndustryCanada Standard RSS-210.Operation is subject to the f ollowing twoconditions: (1) this device may not causeinterf erence, and (2) this device mustaccept any interf erence that may causeundesired operation of the device.
To replace the batteries in the
remote control, put a coin in the
notch on the back. Turn it one-
quarter, then slide the cover of f .
Remove the old batteries. Make sure
the polarity of new batteries is
correct when you install them. Install
the cover by sliding it on until it
locks. The remote control uses two
AA batteries.
Rear Entertainment System
Comf ort and Convenience Feat ures
Replacing Remote Control
Batteries
230
BATTERIES
COVER
Page 235 of 415
The batteries are under the domed
covers on the back of each earpiece.
Toremoveacover,putacoininthe
notch at the bottom of the earpiece,
and turn it one-quarter to pop up the
cover. Slide the upper side of the
cover backward (away from the
headband), then lif t it up.Remove the battery and note its
polarity. Install the new battery in
the earpiece with the polarity the
same. Set the cover in place, then
slide it up until it locks. Each
headphone uses two AAA batteries.
Rear Entertainment System
Comf ort and Convenience Feat ures
Replacing Bat t eries
232
COVER
BATTERY
Page 237 of 415

The security system helps to protect
your vehicle and valuables f rom thef t.
The horn sounds and a combination
of headlights, parking lights, side
marker lights and taillights f lashes if
someone attempts to break into your
vehicleorremovetheradio.This
alarm continues f or two minutes,
then the alarm stops. To reset an
alarming system before the two
minutes have elapsed, unlock either
f ront door with the key or the
remote transmitter.
The security system sets
automatically fifteen seconds after
you lock the doors, hood, and
tailgate. For the system to activate,
you must lock the doors f rom the
outside with the key, the lock tab,
the door lock switch, or the remote
transmitter. The security system
light next to the low oil pressure
indicator starts blinking immediately
to show you the system is settingitself .
Once the security system is set,
opening any door (without using the
key or the remote transmitter), or
the hood, will cause it to alarm. It
also alarms if the radio is removed
f rom the dashboard or the wiring is
cut.With the system set, you can still
open the tailgate with the master key
or the remote transmitter without
triggering the alarm. The alarm will
sound if the tailgate lock is f orced, or
smashed.
The security system will not set if
the hood, tailgate, or any door is not
f ully closed. If the system will not set,
check the Door Lamp Monitor on
the instrument panel (see page ),
to see if the doors and tailgate are
f ully closed. Since it is not part of the
monitor display, manually check the
hood.
Do not attempt to alter this system
or add other devices to it.
75
On EX and EX-L models
Security System
Comf ort and Convenience Feat ures234
SECURITY SYSTEM
LIGHT
Page 249 of 415

Remove the f uel f ill cap slowly.
You may hear a hissing sound as
pressure inside the tank escapes.
Place the cap in the holder on the
fuel fill door.
Stop f illing the tank af ter the f uel
nozzle automatically clicks of f . Do
not try to ‘‘top off’’ the tank, leave
some room f or the f uel to expand
with temperature changes.Shift to Park or Neutral and set
the parking brake. Pull the hood
release handle located under the
lower lef t corner of the dashboard.
The hood will pop up slightly.
Screw the f uel f ill cap back on,
tighten it until it clicks several
times. If you do not properly
tighten the cap, the Malfunction
Indicator Lamp may come on (see
page ).
Push the f uel f ill door closed until
it latches.
Your vehicle has an on-board
ref ueling vapor recovery system to
help keep f uel vapors f rom going
into the atmosphere. If the fuel
nozzle keeps clicking of f even
though the tank is not full, there may
be a problem with this system.
Consult your dealer. 1.
3.
4.
5.
6.
371
Service Station Procedures
Bef ore Driving
Opening the Hood
246
HOOD RELEASE HANDLE
Page 251 of 415
Wipe the dipstick with a clean
cloth or paper towel.
Check the engine oil level every time
you f ill the vehicle with f uel. Wait a
f ew minutes af ter turning the engine
of f bef ore you check the oil.
Remove the dipstick (orange
handle).
To close the hood, lif t it up slightly to
remove the support rod f rom the
hole. Put the support rod back into
its holding clip. Lower the hood to
about a f oot (30 cm) above the
fender,thenletitdrop.
Afterclosingthehood,makesureit
is securely latched.
2.
1.
Service Station Procedures
Bef ore Driving
Oil Check
248
DIPSTICK
Page 252 of 415
Refer toon page f or inf ormation
on checking other items in your
Honda. Look at the coolant level in the
radiator reserve tank. Make sure it is
between the MAX and MIN lines. If
it is below the MIN line, see on page f or
inf ormation on adding the proper
coolant.
If it is near or below the lower mark,
see
on page .
Insert it all the way back in its tube. Remove the dipstick again and
check the level. It should be
between the upper and lower
marks.
4.
3.
297301
295
Bef ore Driving
Service Station Procedures
Owner Maintenance
Checks A dding
Engine Coolant
A dding Oil
Engine Coolant Check
249
UPPER MARK
LOWER MARK MAX
RESERVE TANK
MIN
Page 256 of 415
�Î
�Î �Î
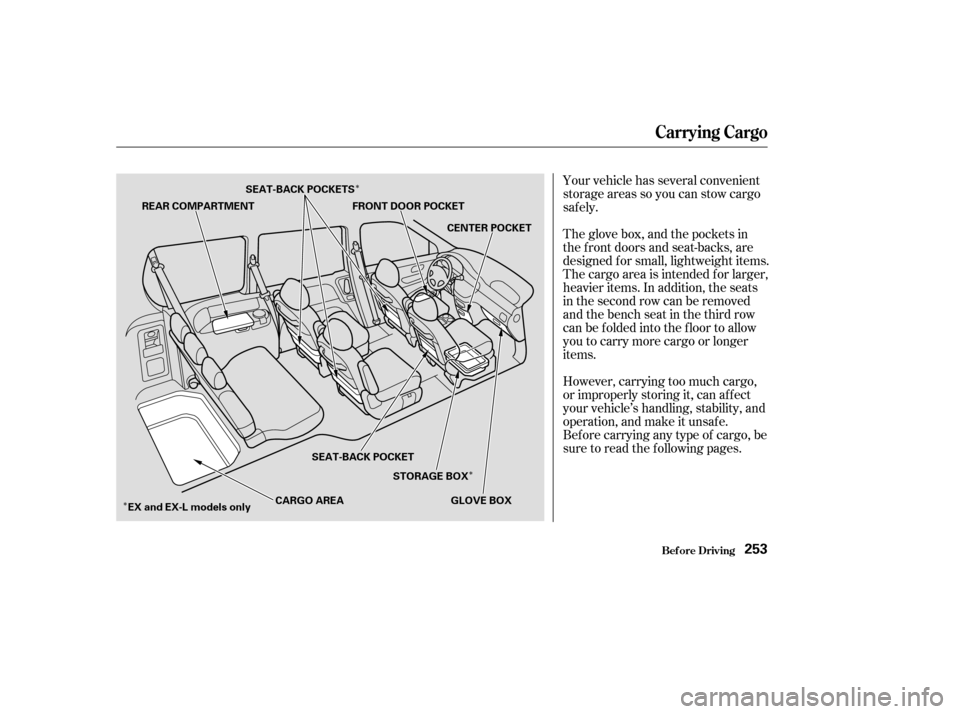
Your vehicle has several convenient
storage areas so you can stow cargo
saf ely.
The glove box, and the pockets in
the f ront doors and seat-backs, are
designed f or small, lightweight items.
The cargo area is intended f or larger,
heavier items. In addition, the seats
in the second row can be removed
andthebenchseatinthethirdrow
can be f olded into the f loor to allow
you to carry more cargo or longer
items.
However, carrying too much cargo,
or improperly storing it, can af f ect
your vehicle’s handling, stability, and
operation, and make it unsaf e.
Bef ore carrying any type of cargo, be
sure to read the f ollowing pages.
Carrying Cargo
Bef ore Driving253
REAR COMPARTMENT
FRONT DOOR POCKET
CENTER POCKET
GLOVE BOX
STORAGE BOX
SEAT-BACK POCKET
EX and EX-L models only CARGO AREA
SEAT-BACK POCKETS
Page 261 of 415

Youshoulddothefollowingchecks
and adjustments every day bef ore
you drive your vehicle.Make sure all windows, mirrors,
and outside lights are clean and
unobstructed. Remove f rost, snow,
or ice. Check the adjustment of the seat
(see page ).
Check the adjustment of the
inside and outside mirrors (see
page ).
Check the adjustment of the
steering wheel (see page ).
Fasten your seat belt. Check that
your passengers have f astened
their seat belts (see page ).Turn the ignition switch ON (II).
Check the indicator lights in the
instrument panel.
Start the engine (see page ).
Check the gauges and indicator
lights in the instrument panel (see
page ).
Check that any items you may be
carrying with you inside are stored
properly or f astened down
securely. Visually check the tires. If a tire
looks low, use a gauge to check its
pressure. Check that the hood and tailgate
arefullyclosed. Makesurethedoorsandtailgate
are securely closed and locked.
3. 2.
1.
4. 5.
6.
7.
8.
9. 11.
12. 10.
128 88
17 259
71
110
Preparing to Drive
Driving258