Page 50 of 415

Third Seat Installation:
If you are not sure how to install the
tether, or you need mounting
hardware, contact your Honda dealer. To attach the tether to the child seat,
f ollow the child seat maker’s
instructions. If a torque wrench was not used, see
your Honda dealer as soon as
possible to verif y proper installation. When installing tether hardware,
make sure the toothed washer is on
the bottom of the bolt. Tighten the
bolt to:
Attach the tether strap hook to the
tether anchorage point as shown in
the illustration, then tighten the
strap according to the child seat
maker’s instructions. Make sure the
strap is not twisted. There are three anchorage points on
the tailgate sill. The tether hardware
is installed on the center anchorage
point.If you want to use either of the
outside anchorage points, remove
the tether hardware f rom the center
anchorage point, remove the plug
f rom the anchorage point you are
going to use with a small f lat-tipped
screwdriver, then install the tether
hardware.
Protecting Children
Driver and Passenger Saf ety47
16 lbf·ft (22 N·m , 2.2 kgf·m)
Page 67 of 415

If the passenger airbag cutof f
indicator does not light, or comes on
and of f repeatedly while a child seat
is secured on the f ront passenger’s
seat, remove the child seat, then
secure it on a rear seat.
When you turn the ignition switch to
ON (II), the passenger airbag cutof f
indicator will light brief ly then go out.
This tells you that the system is
working properly.
The indicator may come on or of f a
f ew seconds later if the weight on
the f ront passenger’s seat changes.Your f ront and side airbag systems
are virtually maintenance-f ree, and
there are no parts you can saf ely
service. However, you must have
your vehicle serviced if :
Any
airbag that has deployed must be
replaced along with the control
unit, automatic seat belt
tensioners, and other related parts.
Do not try to remove or replace
anyairbagbyyourself.Thismust
be done by a Honda dealer or a
knowledgeable body shop.
Take your vehicle to
an authorized Honda dealer as
soon as possible. If you ignore this
indication, the airbags might not
inf late when you need them.
Additional Inf ormation About Your Airbags
Driver and Passenger Saf ety
Airbag Service
Your airbags ever inf late.
T he SRS indicat or light alert s yout o a problem.
64
Page 86 of 415

The Automatic Lighting Of f f eature
turns of f the headlights, parking
lights, taillights, side marker lights,
license plate lights and instrument
panel lights within 15 seconds of
removing the key from the ignition
switch and closing the driver’s door.The lights will turn on again when
you unlock or open the driver’s door.
If you unlock the door, but do not
open it within 15 seconds, the lights
will go off. With the driver’s door
open, you will hear a lights-on
reminder chime.
With the headlight switch off, the
high beam headlights come on with
reduced brightness when you turn
the ignition switch to ON (II) and
release the parking brake. They
remain on until you turn the ignition
of f , even if you set the parking brake.
The headlights revert to normal
operation when you turn them on
with the switch.
The knob on the instrument panel
controls the brightness of the instru-
ment panel lights. Turn the knob to
adjust the brightness.
This feature activates if you leave
the headlight switch in the or
position, remove the key, open,
then close the driver’s door.
If you remove the key f rom the
ignition switch with the headlight
switch on, but do not open the door
and get out, the lights will turn of f
af ter 10 minutes.
On EX and EX-L models
Controls Near the Steering Wheel
Inst rument s and Cont rols
Automatic Lighting Of f Feature
Daytime Running L ights
(Canadian Models)Instrument Panel Brightness
83
INSTRUMENT PANEL BRIGHTNESS
CONTROL KNOB
Page 93 of 415

The Immobilizer System protects
your vehicle f rom thef t. A properly-
coded master or valet key must be
used in the ignition switch f or the
engine to start. If an improperly-
coded key (or other device) is used,
the engine’s f uel system is disabled.
When you turn the ignition switch to
ON (II), the Immobilizer System
indicator should come on f or a f ew
seconds, then go out. If the indicator
starts to blink, it means the system
does not recognize the coding of the
key. Turn the ignition switch to
LOCK (0), remove the key, reinsert
it, and turn the switch to ON (II)
again.The system may not recognize your
key’s coding if another immobilizer
key or other metal object is near the
ignition switch when you insert the
key. To make sure the system
recognizes the key code:
Do not keep other immobilizer
keys on the same key ring.
Use a plastic or leather key f ob,
not metal.
Keep other keys away f rom your
vehicle’s key and the ignition
switch while trying to start the
engine. If the system repeatedly does not
recognize the coding of your key,
contact your Honda dealer.
The Immobilizer System indicator
will also blink several times when
you turn the ignition switch f rom ON
(II) to ACCESSORY (I) or LOCK (0).
Do not attempt to alter this system
or add other devices to it. Electrical
problems could result that may make
your vehicle undriveable.
If you have lost your key and you
cannot start the engine, contact your
Honda dealer.
Immobilizer System
Keys and Locks
Inst rument s and Cont rols90
Page 94 of 415

�µ
If the f ront wheels are turned, the
anti-thef t lock may sometimes make
it difficult to turn the key from
LOCK to ACCESSORY. Firmly turn
the steering wheel to the lef t or to
the right as you turn the key. You can insert or
remove the key only in this position.
To switch f rom ACCESSORY to
LOCK, you must push the key in
slightly as you turn it. The shif t lever
must also be in Park. The anti-thef t
lock will lock the steering column
when you remove the key.
The ignition switch is on the right
side of the steering column. It has
f our positions:
LOCK(0)
ACCESSORY (I)
ON (II)
START (III)As required by the FCC: This device complies with Part 15 of theFCC rules. Operation is subject to thef ollowing two conditions: (1) This devicemay not cause harmf ul interf erence, and(2) this device must accept anyinterf erence received, includinginterf erence that may cause undesiredoperation.
Changes or modif ications not expresslyapproved by the party responsible f orcompliance could void the user’sauthority to operate the equipment.
This device complies with IndustryCanada Standard RSS-210.Operation is subject to the f ollowing twoconditions: (1) this device may not causeinterf erence, and (2) this device mustaccept any interf erence that may causeundesired operation of the device.
CONT INUED
LOCK (0)
Ignition Switch
Keys and Locks
Inst rument s and Cont rols91
Page 95 of 415
 when you let go of
the key.
This is the normal key
position when driving. All f eatures
and accessories on the veh")
�µ
�µ �µ
Use this position
only to start the engine. The switch
returns to ON (II) when you let go of
the key.
This is the normal key
position when driving. All f eatures
and accessories on the vehicle are
usable. Several of the lights on the
instrument panel come on as a test
when you turn the ignition switch
f rom ACCESSORY to ON. The engine will not start if the
Immobilizer System does not
recognize the key’s coding (see page
).
You will hear a reminder beeper if
you leave the key in the ignition
switch in the LOCK (0) or
ACCESSORY (I) position and open
thedriver’sdoor.Removethekeyto
turn of f the beeper. Each f ront door has a master door
lock switch. Either switch locks and
unlocks all doors and the tailgate.
Push the switch down to lock all
doors and the tailgate, and up to
unlock them.
In this position,
you can operate the audio system
and the accessory power sockets.
90
ST A RT (III)
Power Door L ocks
ON (II) A CCESSORY (I)
Keys and Locks
Inst rument s and Cont rols92
MASTER DOOR LOCK SWITCH
Page 99 of 415
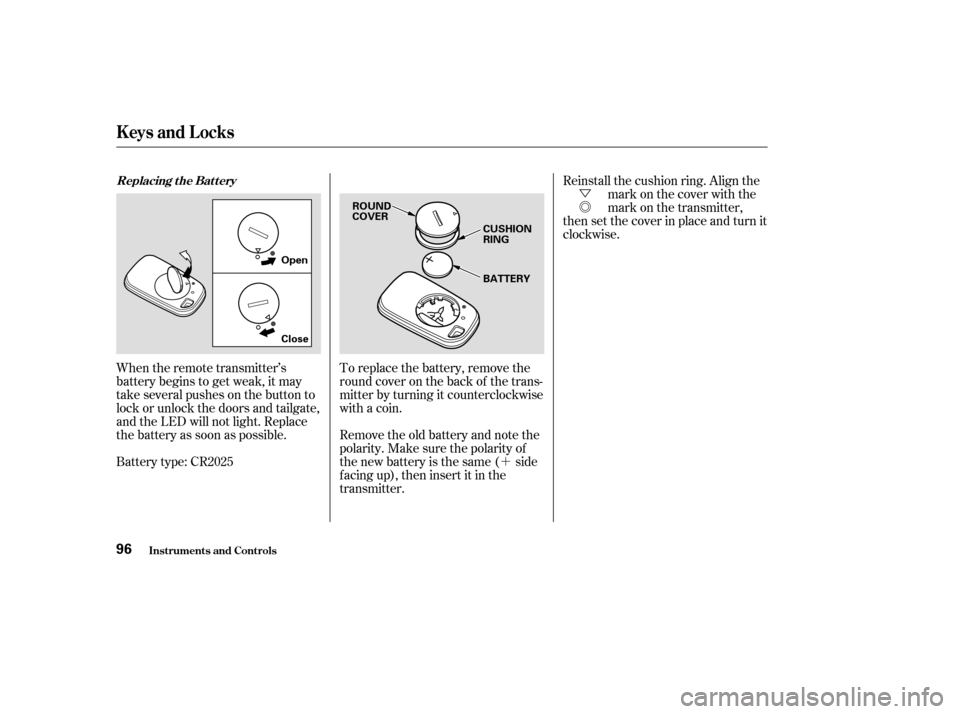
�´�Ü
�Õ
To replace the battery, remove the
round cover on the back of the trans-
mitter by turning it counterclockwise
with a coin.
Remove the old battery and note the
polarity. Make sure the polarity of
the new battery is the same ( side
f acing up), then insert it in the
transmitter.
When the remote transmitter’s
battery begins to get weak, it may
take several pushes on the button to
lock or unlock the doors and tailgate,
and the LED will not light. Replace
the battery as soon as possible.
Battery type: CR2025 Reinstall the cushion ring. Align the
mark on the cover with the
mark on the transmitter,
thensetthecoverinplaceandturnit
clockwise.
Replacing the Battery
Keys and Locks
Inst rument s and Cont rols96
Open
Close ROUND
COVER
CUSHION
RING
BATTERY
Page 112 of 415
There are bucket seats with
armrests for two front passengers,
bucket seats with armrests for two
passengers in the second row, and a
bench seat f or three passengers in
the third row.
For greater cargo capacity, the seats
in the second row can be removed,
andthebenchseatinthethirdrow
can be f olded into the f loor. Passenger Seating
Convert ible Second Row BucketSeat s
Seats
Inst rument s and Cont rols109