Page 320 of 415
�µ
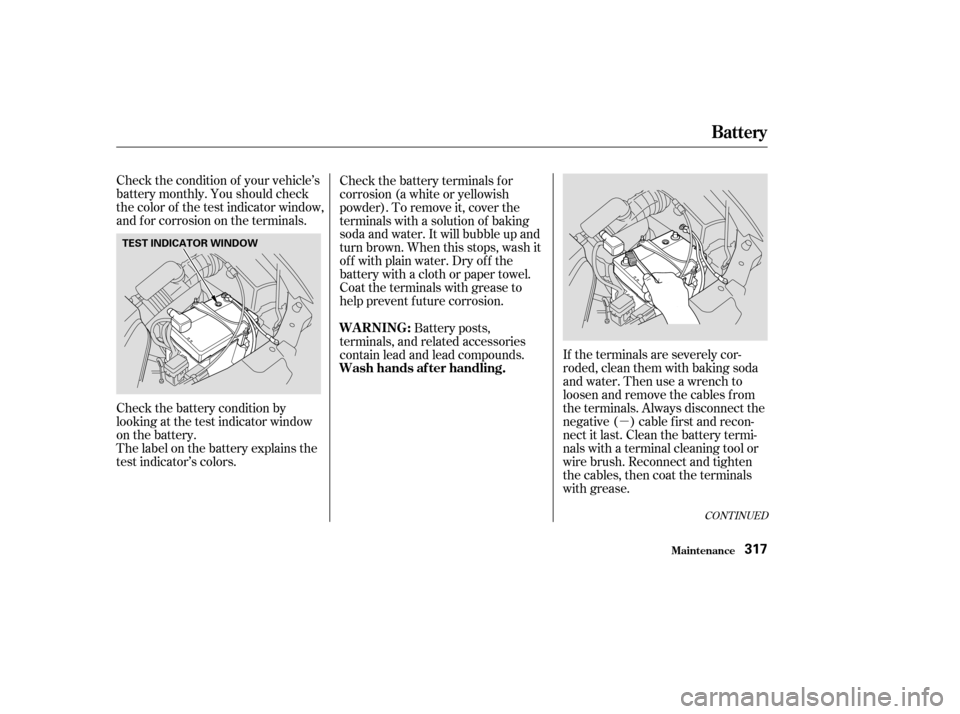
Check the condition of your vehicle’s
battery monthly. You should check
the color of the test indicator window,
and f or corrosion on the terminals.
Check the battery terminals for
corrosion (a white or yellowish
powder). To remove it, cover the
terminals with a solution of baking
soda and water. It will bubble up and
turn brown. When this stops, wash it
of f with plain water. Dry of f the
battery with a cloth or paper towel.
Coat the terminals with grease to
help prevent f uture corrosion.
If the terminals are severely cor-
roded, clean them with baking soda
and water. Then use a wrench to
loosen and remove the cables f rom
the terminals. Always disconnect the
negative ( ) cable f irst and recon-
nect it last. Clean the battery termi-
nals with a terminal cleaning tool or
wire brush. Reconnect and tighten
the cables, then coat the terminals
with grease.
Check the battery condition by
looking at the test indicator window
on the battery.
The label on the battery explains the
test indicator’s colors. Battery posts,
terminals, and related accessories
contain lead and lead compounds.
CONT INUED
Battery
Maint enance
WARNING:
Wash hands af ter handling.
317
TEST INDICATOR WINDOW
Page 323 of 415
Slide the new wiper blade into the
holder until the tabs lock.
Slide the wiper blade assembly
onto the wiper arm. Make sure it
locks in place.
Lower the wiper arm down against
the windshield.
Examine the new wiper blades. If
they have no plastic or metal rein-
f orcement along the back edge,
remove the metal reinf orcement
strips f rom the old wiper blade and
install them in the slots along the
edge of the new blade.
Remove the blade f rom its holder
by grasping the tabbed end of the
blade. Pull f irmly until the tabs
come out of the holder. Front windshield: Lower the
passenger’s side f irst, then the
driver’s side.
6.
7.
4. 5.
3.
Wiper Blades
Maint enance320
BLADE BLADE
REINFORCEMENT
Page 324 of 415
Run the air conditioning at least once
a week during the cold weather
months. Run it f or at least ten
minutes while you are driving at a
steady speed with the engine at
normal operating temperature. This
circulates the lubricating oil con-
tained in the ref rigerant.If the air conditioning does not get as
cold as before, have your dealer
check the system. Recharge the
system with Ref rigerant HFC-134a
(R-134a). (See Specif ications on page
.)
Your vehicle’s air conditioning is a
sealed system. Any major mainte-
nance, such as recharging, should be
done by a qualif ied mechanic. You
can do a couple of things to make
sure the air conditioning works
ef f iciently.
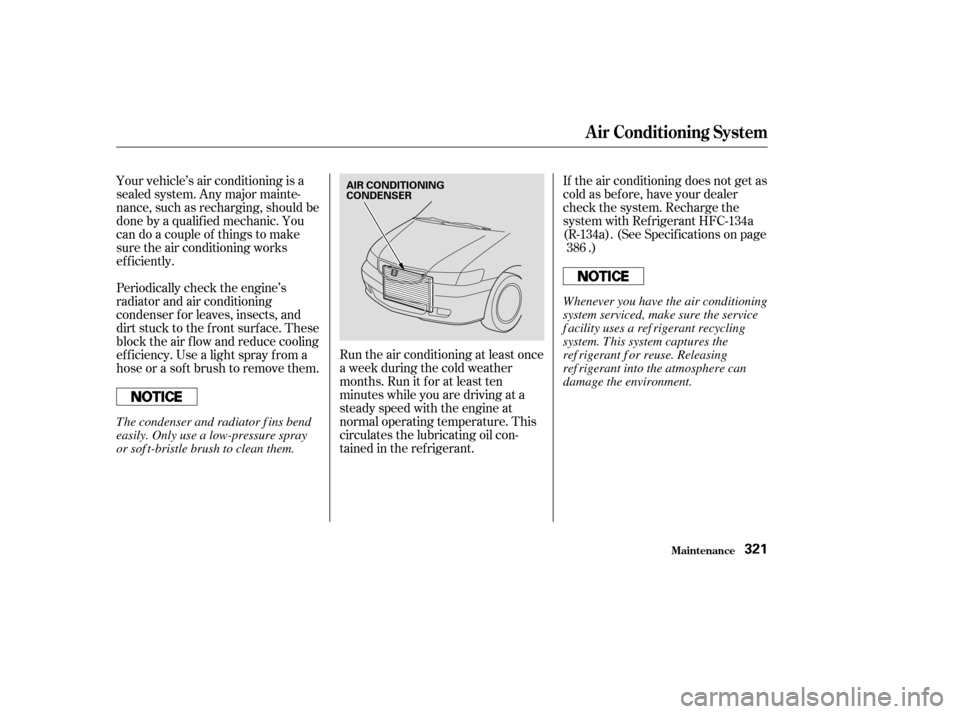
Periodically check the engine’s
radiator and air conditioning
condenser f or leaves, insects, and
dirt stuck to the f ront surf ace. These
block the air f low and reduce cooling
ef f iciency. Use a light spray f rom a
hose or a sof t brush to remove them. 386
Maint enance
A ir Condit ioning Syst em
321
AIR CONDITIONING
CONDENSER
Whenever you have the air conditioning
system serviced, make sure the service
f acility uses a ref rigerant recycling
system. This system captures the
ref rigerant f or reuse. Releasing
ref rigerant into the atmosphere can
damage the environment.
The condenser and radiator f ins bend
easily. Only use a low-pressure spray
or sof t-bristle brush to clean them.
Page 325 of 415
�µ�µ
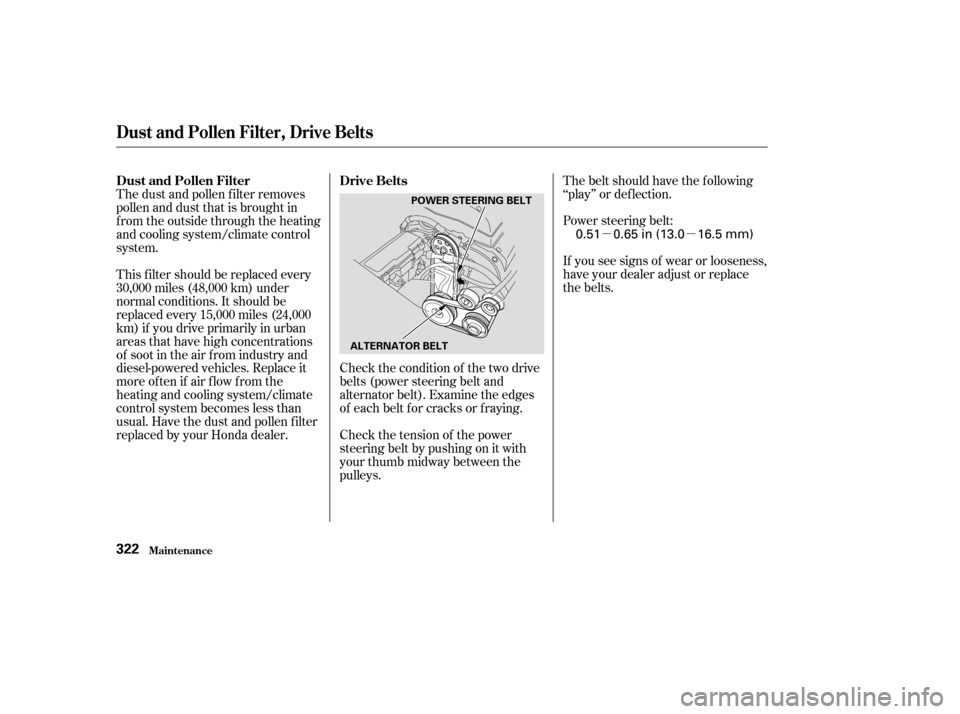
Check the condition of the two drive
belts (power steering belt and
alternator belt). Examine the edges
of each belt f or cracks or f raying. If you see signs of wear or looseness,
have your dealer adjust or replace
the belts. Power steering belt: Thebeltshouldhavethefollowing
‘‘play’’ or def lection.
Check the tension of the power
steering belt by pushing on it with
your thumb midway between the
pulleys.
The dust and pollen f ilter removes
pollen and dust that is brought in
f rom the outside through the heating
and cooling system/climate control
system.
This f ilter should be replaced every
30,000 miles (48,000 km) under
normal conditions. It should be
replaced every 15,000 miles (24,000
km) if you drive primarily in urban
areas that have high concentrations
of soot in the air f rom industry and
diesel-powered vehicles. Replace it
more of ten if air f low f rom the
heating and cooling system/climate
control system becomes less than
usual. Have the dust and pollen f ilter
replaced by your Honda dealer.
Drive Belts
Dust and Pollen Filter
Maint enance
Dust and Pollen Filter, Drive Belts
322
POWER STEERING BELT
ALTERNATOR BELT
0.51 0.65 in (13.0 16.5 mm)
Page 329 of 415
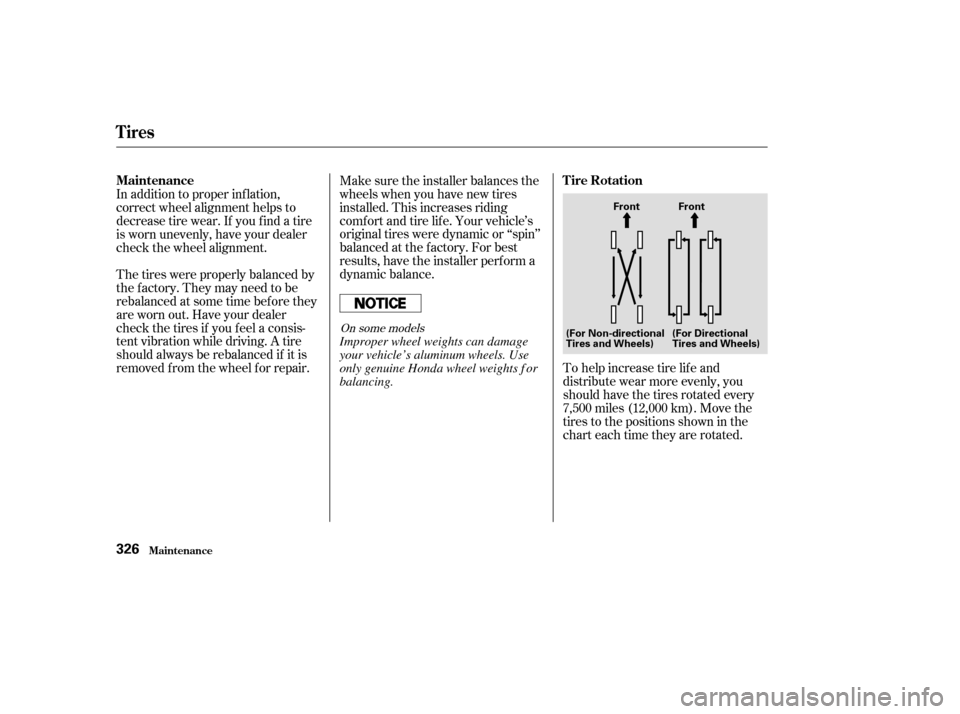
To help increase tire lif e and
distribute wear more evenly, you
should have the tires rotated every
7,500 miles (12,000 km). Move the
tires to the positions shown in the
chart each time they are rotated.
Make sure the installer balances the
wheels when you have new tires
installed. This increases riding
comf ort and tire lif e. Your vehicle’s
original tires were dynamic or ‘‘spin’’
balanced at the f actory. For best
results, have the installer perf orm a
dynamic balance.
In addition to proper inf lation,
correct wheel alignment helps to
decrease tire wear. If you f ind a tire
is worn unevenly, have your dealer
check the wheel alignment.
The tires were properly balanced by
the factory. They may need to be
rebalanced at some time bef ore they
are worn out. Have your dealer
check the tires if you f eel a consis-
tent vibration while driving. A tire
should always be rebalanced if it is
removed f rom the wheel f or repair.
On some models
Tires
Maint enance
Tire Rotation
Maintenance
326
Front Front
(For Non-directional
Tires and Wheels) (For Directional
Tires and Wheels)
Improper wheel weights can damage
your vehicle’s aluminum wheels. Use
only genuine Honda wheel weights f or
balancing.
Page 332 of 415
If you mount snow tires on your
Honda, make sure they are radial
tires of the same size and load range
as the original tires. Mount snow
tiresonallfourwheelstobalance
your vehicle’s handling in all weather
conditions. Keep in mind the traction
provided by snow tires on dry roads
may not be as high as your vehicle’s
original equipment tires. You should
drive cautiously even when the roads
areclear.Checkwiththetiredealer
f or maximum speed recommenda-
tions.Metal link-type ‘‘chains’’ should not
be used. No matter how tight they
seem to be installed, they can come
into contact with the body and
suspension, causing serious damage.
When installing cables, f ollow the
manuf acturer’s instructions and
mount them as tightly as you can.
Drive slowly with them installed. If
youhearthemcomingincontact
with the body or chassis, stop and
investigate. Make sure the cables are
installed tightly, and that they are
not contacting the brake lines or
suspension. Remove them as soon as
you begin driving on cleared roads. Because your Honda has limited tire
clearance, mount only SAE Class ‘‘S’’
cable-type traction devices on the
front tires. Use traction devices only
when required by driving conditions
or local laws. Make sure they are the
correct size f or your tires.
Snow T ires
T ire Chains
Tires
Maint enance329
Traction devices that are the wrong
size or improperly installed can
damage your vehicle’s brake lines,
suspension, body, and wheels. Stop
driving if they are hitting any part of
the vehicle.
Page 335 of 415
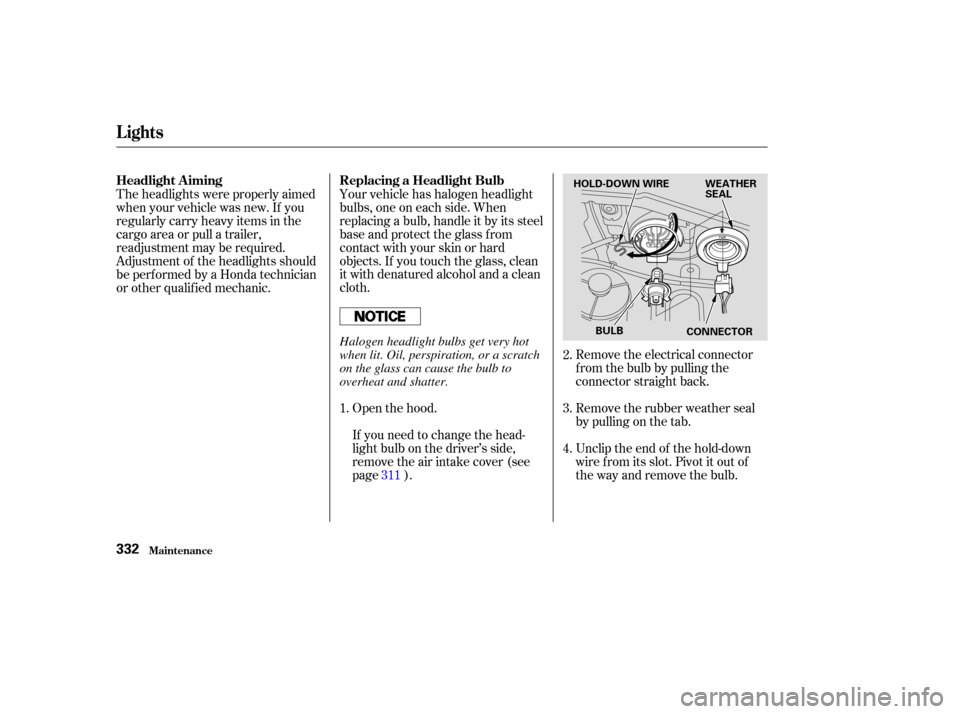
Unclip the end of the hold-down
wire f rom its slot. Pivot it out of
the way and remove the bulb. Remove the rubber weather seal
by pulling on the tab. Remove the electrical connector
f rom the bulb by pulling the
connector straight back.
Your vehicle has halogen headlight
bulbs, one on each side. When
replacing a bulb, handle it by its steel
base and protect the glass from
contactwithyourskinorhard
objects. If you touch the glass, clean
it with denatured alcohol and a clean
cloth.
Open the hood.
If you need to change the head-
light bulb on the driver’s side,
remove the air intake cover (see
page ).
Theheadlightswereproperlyaimed
when your vehicle was new. If you
regularly carry heavy items in the
cargo area or pull a trailer,
readjustment may be required.
Adjustment of the headlights should
be perf ormed by a Honda technician
or other qualif ied mechanic.
1.2.
3.
4.
311
Lights
Maint enance
Replacing a Headlight Bulb
Headlight A iming
332
HOLD-DOWN WIRE WEATHER
SEAL
BULB CONNECTOR
Halogen headlight bulbs get very hot
when lit. Oil, perspiration, or a scratch
on the glass can cause the bulb to
overheat and shatter.
Page 336 of 415
Use a f lat-tipped screwdriver to
remove the two holding clips f rom
the inner f ender.
Pull the inner f ender cover away
f rom the f ender and bumper.
If you are changing the bulb on
the driver’s side, start the engine,
turn the steering wheel all the way
to the right, and turn off the
engine. If you are changing the
bulb on the passenger’s side, turn
the steering wheel to the left.
Insert the new bulb into the hole,
making sure the tabs are in their
slots. Pivot the hold-down wire
back in place and clip the end into
the slot.
Install the rubber seal over the
back of the headlight assembly.
Make sure it is right side up; it is
marked ‘‘TOP.’’
Push the electrical connector onto
the new bulb. Make sure it is
connected securely.
Reinstall the air intake cover. (Driver’s side) Turn on the headlights to test the
new bulb.
1. 2.
3.
5.
6.
7.
8.
CONT INUED
Lights
Maint enance
Replacing the Front Side Marker/
Turn Signal and Parking L ight
Bulb
333
HOLDING CLIP