2003 GMC SIERRA DENALI ignition
[x] Cancel search: ignitionPage 287 of 428
How to Reset the CHANGE ENGINE OIL
Message
The GM Oil Life SystemTM calculates when to change
your engine oil and filter based on vehicle use.
Anytime your oil is changed, reset the system
so it can
calculate when the next oil change is required. If a
situation occurs where you can change your oil prior to
a CHANGE ENGINE
OIL message being turned on,
reset the system.
To reset the CHANGE ENGINE OIL message,
do the
following:
1. Turn the ignition key to RUN with the engine off.
2. Fully press and release the accelerator pedal three
times within five seconds.
If the CHANGE ENGINE OIL message flashes for five
seconds, the system is reset. If the system will not reset,
try the procedure again.
If the system still does not
reset, see your dealer for service.
What to Do with Used Oil
Used engine oil contains certain elements that may be
unhealthy for your skin and could even cause cancer.
Don’t let used oil stay on your skin for very long. Clean
your skin and nails with soap and water, or a good
hand cleaner. Wash or properly dispose of clothing or
rags containing used engine oil. See the manufacturer’s
warnings about the use and disposal of oil products.
Used oil can be a threat to the environment. If you
change your own oil, be sure to drain all the oil from the
filter before disposal. Never dispose of oil by putting it
in the trash, pouring it on the ground, into sewers,
or into streams or bodies of water. Instead, recycle it
by taking it to a place that collects used oil. If you have
a problem properly disposing of your used oil, ask
your dealer, a service station or a local recycling center
for help.
5-1 8
Page 313 of 428
Notice: If the other system isn’t a 12-volt system
with a negative ground, both vehicles can be
damaged.
2. Get the vehicles close enough so the jumper cables
can reach, but be sure the vehicles aren’t touching
each other. If they are, it could cause a ground
connection you don’t want. You wouldn’t be able to
start your vehicle, and the bad grounding could
damage the electrical systems.
To avoid the possibility of the vehicles rolling, set
the parking brake firmly on both vehicles involved
in the jump start procedure. Put the automatic
transmission in PARK
(P) before setting the parking
brake.
If you have a four-wheel-drive vehicle, be
sure the transfer case is in a drive gear not in
NEUTRAL.
Notice: If you leave your radio on, it could be badly
damaged. The repairs wouldn’t be covered by
your warranty.
3.
4.
Turn off the ignition on both vehicles. Unplug
unnecessary accessories plugged into the cigarette
lighter or in the accessory power outlets. Turn
off
the radio and all the lamps that aren’t needed.
This will avoid sparks and help save both batteries.
And it could save your radio!
Open the hoods and locate the positive
(+) and
negative
(-) terminal locations of the other vehicle.
Your vehicle has a remote positive
(+) jump starting
terminal and a remote negative
(-) jump starting
terminal. You should always use these remote
terminals instead of the terminals on the battery.
The remote positive
(+) terminal is located behind
a red plastic cover near the engine accessory
drive bracket.
To uncover the remote positive (+)
terminal, open the red plastic cover.
The remote negative
(-) terminal is located on the
engine drive bracket on all
V8 and diesel
engines, and on the thermostat housing on the
8.1L engine. On
V8 engines it is marked ”GND.”
See
Engine Compartment Overview on page 5-12
for more information on location.
5-44
Page 341 of 428
Follow these instructions to lower the spare tire:
1. If your vehicle is equipped with a hoist lock, open
the spare tire lock cover on the bumper and use
the ignition key to remove the lock.
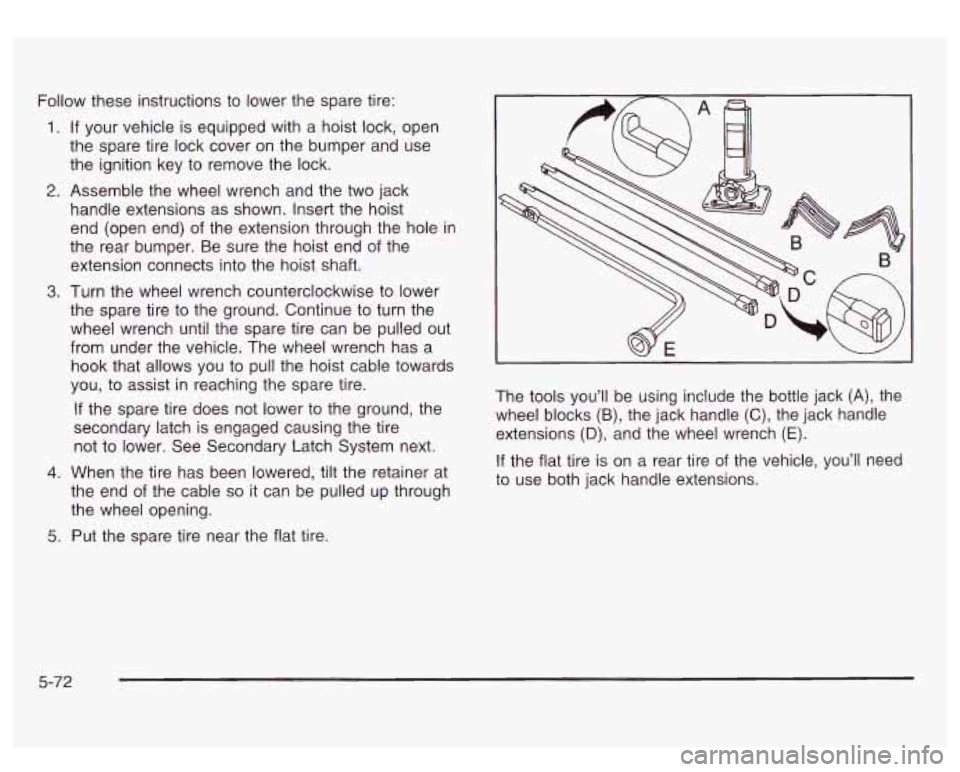
2. Assemble the wheel wrench and the two jack
handle extensions as shown. Insert the hoist
end (open end) of the extension through the hole in
the rear bumper. Be sure the hoist end of the
extension connects into the hoist shaft.
3. Turn the wheel wrench counterclockwise to lower
the spare tire to the ground. Continue to turn the
wheel wrench until the spare tire can be pulled out
from under the vehicle. The wheel wrench has a
hook that allows you to pull the hoist cable towards
you, to assist in reaching the spare tire.
If the spare tire does not lower to the ground, the
secondary latch is engaged causing the tire
not to lower. See Secondary Latch System next.
4. When the tire has been lowered, tilt the retainer at
the end of the cable
so it can be pulled up through
the wheel opening.
5. Put the spare tire near the flat tire. The
tools you’ll be using include the bottle jack
(A), the
wheel blocks
(B), the jack handle (C), the jack handle
extensions
(D), and the wheel wrench (E).
If the flat tire is on a rear tire of the vehicle, you’ll need
to use both jack handle extensions.
5-72
Page 365 of 428
Instrument Panel Fuse Block
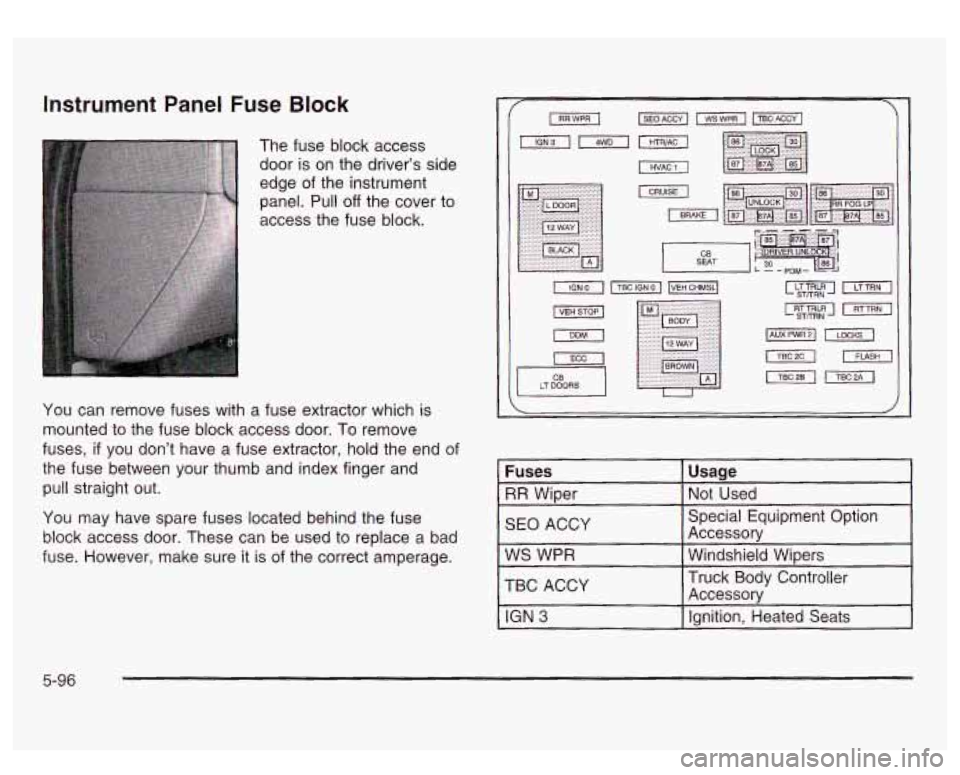
The fuse block access
door is on the driver's side
edge of the instrument
panel. Pull
off the cover to
access the fuse block.
You can remove fuses with a fuse extractor which
is
mounted to the fuse block access door. To remove
fuses,
if you don't have a fuse extractor, hold the end of
the fuse between your thumb and index finger and
pull straight out.
You may have spare fuses located behind the fuse
block access door. These can be used to replace
a bad
fuse. However, make sure it is of the correct amperage.
II
LT DOORS U
Fuses
SEO ACCY Not
Used
RR Wiper
Usage
TBC
ACCY Windshield Wipers
WS
WPR Accessory
Special Equipment Option
Ignition, Heated Seats
IGN 3
Accessory Truck Body Controller
5-96
Page 371 of 428
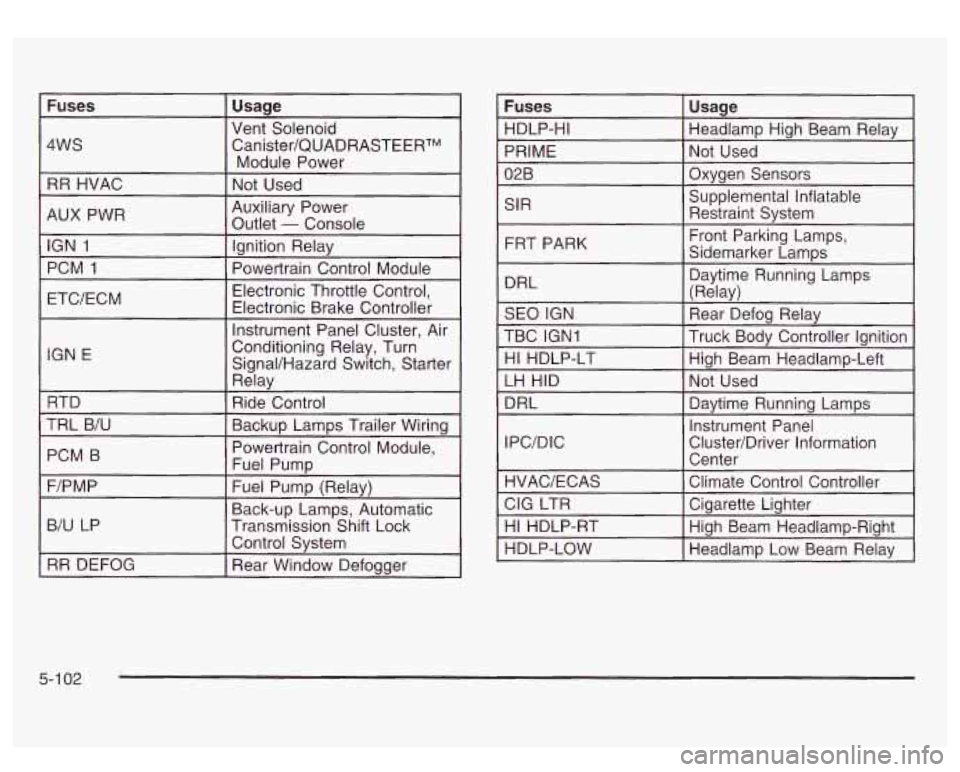
Fuses Usage
4WS Canister/QUADRASTEERTM
RR HVAC Not Used
Vent
Solenoid
Module Power
AUX PWR IGN
1 Ignition Relay
PCM
1
Auxiliary Power
Outlet
- Console
Electronic Throttle Control,
IGN E
Rday
RTD Ride Control
TRL B/U
PCM B
~~ ~-
Backup Lamps Trailer Wiring
Powertrain Control Module,
Fuel Pump
-. - . . -. . . .
F/PM P
B/U LP Transmission Shift Lock
r
Fuel Pump (Relay)
Back-up Lamps, Automatic
Control System
RR DEFOG Rear Window Defogger SIR
FRT PARK
DRL Daytime Running Lamps
I (Relav)
SEO IGN
TBC IGNI Truck Body Controller Ignition \~ ------I
Rear Defog Relay
HI HDLP-LT High Beam Headlamp-Left
LH HID Not Used
DRL Daytime Running Lamps
IPC/DIC Instrument
Panel
Cluster/Driver Information Center
5-1 02
Page 388 of 428
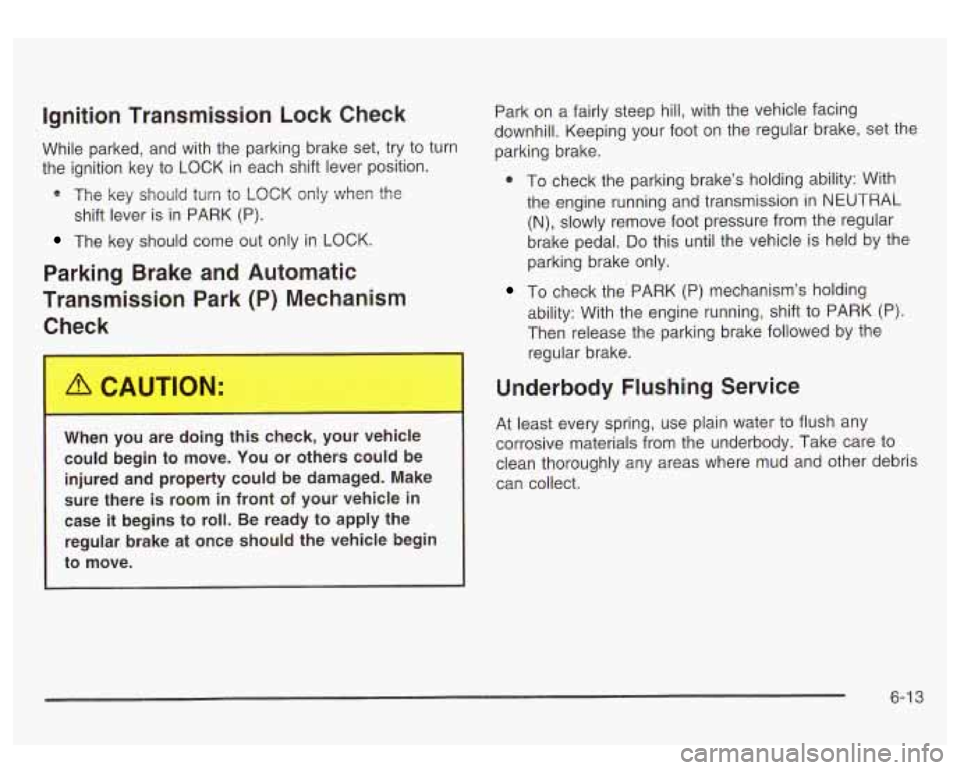
Ignition Transmission Lock Check
While parked, and with the parking brake set, try to turn
the ignition key to LOCK in each shift lever position.
* The key should turn to LOCK only when the
The key should come out only in LOCK.
shift lever
is in PARK (P).
Parking Brake and Automatic
Transmission Park (P) Mechanism
A. le1 , ..
When you are doing this check, your vehicle
could begin to move. You or others could be
injured and property could be damaged. Make
sure there
is room in front of your vehicle in
case it begins to roll. Be ready to apply the
regular brake at once should the vehicle begin
to move. Park on a
fairly steep hill, with the vehicle facing
downhill. Keeping your foot on the regular brake, set the
parking brake.
@ To check the parking brake’s holding ability: With
the engine running and transmission in
NEUTRAL
(N), slowly remove foot pressure from the regular
brake pedal.
Do this until the vehicle is held by the
parking brake only.
ability: With the engine running, shift to PARK (P).
Then release the parking brake followed by the
regular brake.
To check the PARK (P) mechanism’s holding
Underbody Flushing Service
At least every spring, use plain water to flush any
corrosive materials from the underbody. Take care to
clean thoroughly any areas where mud and other debris
can collect.
6-1 3
Page 416 of 428
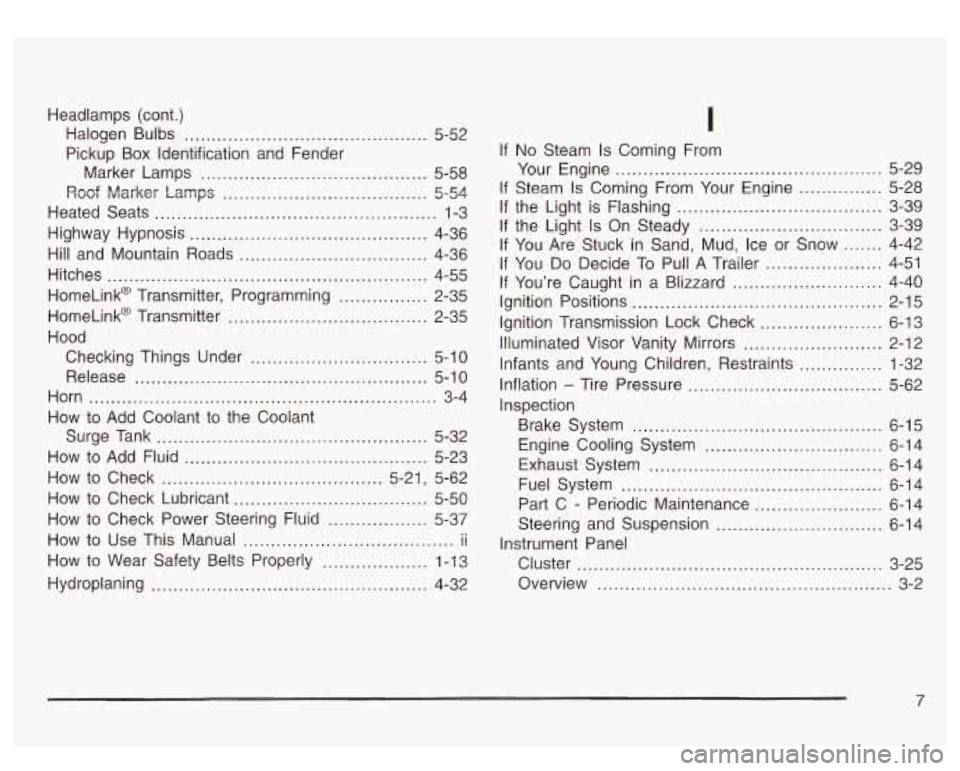
Headlamps (cont.) Halogen Bulbs
............................................ 5-52
Pickup Box Identification and Fender
Marker Lamps
......................................... 5-58
Roof Marker Lamps
..................................... 5-54
Heated Seats
................................................... 1-3
Highway Hypnosis
........................................... 4-36
Hill and Mountain Roads
.................................. 4-36
Hitches
.......................................................... 4-55
HomeLink@ Transmitter
.................................... 2-35
Hood Checking Things Under
................................ 5-10
Release
..................................................... 5-1 0
Horn ............................................................... 3-4
How to Add Coolant
to the Coolant
Surge Tank
................................................. 5-32
How
to Add Fluid ............................................ 5-23
How
to Check ........................................ 5-21, 5-62
How to Check Lubricant
................................... 5-50
How to Use This Manual
.............. ......... ii
How to Wear Safety Belts Properly ................... 1-1 3
HomeLink@ Transmitter, Programming
................ 2-35
How to Check Power Steering Fluid
.................. 5-37
Hydroplaning
.................................................. 4-32
I
if No Steam Is Coming From
Your Engine
................................................ 5-29
If Steam
Is Coming From Your Engine ............... 5-28
If the Light is Flashing ..................................... 3-39
If the Light is On Steady
................................. 3-39
If You Are Stuck in Sand, Mud, Ice or Snow
....... 4-42
If You Do Decide To Pull A Trailer ..................... 4-51
If You’re Caught in a Blizzard ........................... 4-40
Ignition Transmission Lock Check
...................... 6-13
Illuminated Visor Vanity Mirrors
......................... 2-12
infants and Young Children, Restraints
............... 1-32
Inflation
- Tire Pressure ................................... 5-62
inspection Ignition Positions
............................................. 2-15
Brake System
............................................. 6-15
Exhaust System
.......................................... 6-14
Fuel System
............................................... 6-14
Engine Cooling System
................................ 6-14
Part
C - Periodic Maintenance ....................... 6-14
Steering and Suspension
.............................. 6-14
Cluster
....................................................... 3-25
Overview
..................................................... 3-2
Instrument Panel
7