2003 GMC SIERRA DENALI ignition
[x] Cancel search: ignitionPage 168 of 428
Driver Information Center (DIC)
The DIC display is located on the instrument panel
cluster above the steering wheel. The DIC can display
information such as the trip odometer, fuel economy and
personalization features.
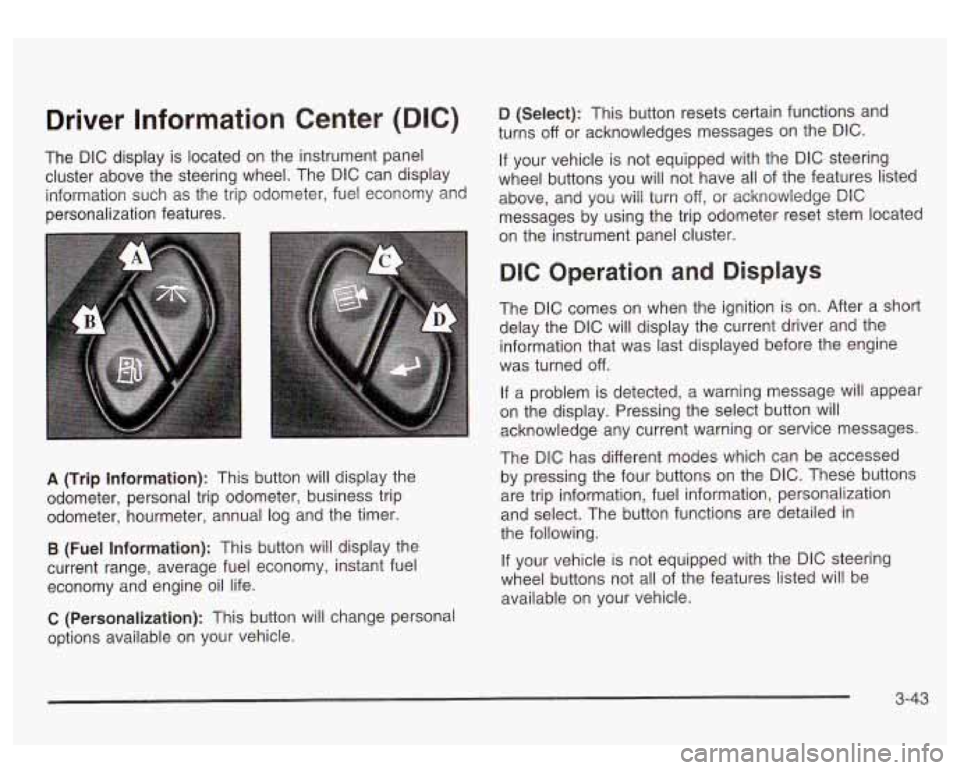
A (Trip Information): This button will display the
odometer, personal trip odometer, business trip
odometer, hourmeter, annual log and the timer.
B (Fuel Information): This button will display the
current range, average fuel economy, instant fuel
economy and engine oil life.
C (Personalization): This button will change personal
options available on your vehicle.
D (Select): This button resets certain functions and
turns
off or acknowledges messages on the DIC.
If your vehicle is not equipped with the DIC steering
wheel buttons you will not have all of the features listed
above, and you will turn off,
or acknowledge DIC
messages by using the trip odometer reset stem located
on the instrument panel cluster.
DIC Operation and Displays
The DIC comes on when the ignition is on. After a short
delay the DIC will display the current driver and the
information that was last displayed before the engine
was turned
off.
If a problem is detected, a warning message will appear
on the display. Pressing the select button will
acknowledge any current warning or service messages.
The DIC has different modes which can be accessed
by pressing the four buttons on the DIC. These buttons
are trip information, fuel information, personalization
and select. The button functions are detailed in
the following.
If your vehicle is not equipped with the DIC steering
wheel buttons not all of the features listed will be
available on your vehicle.
3-43
Page 170 of 428
To reset the personal or business trip information, do
the following: press and hold select button for two
seconds while in one of the personal or business trip
modes. This will reset all of the information for the
personal or business trip, or
if your vehicle does not
have the DIC steering wheel control buttons, press the
reset stem on the instrument panel cluster.
You can also reset the PERSONAL:
XX MI, or
BUSINESS:
XX MI, while they are displayed by pressing
the reset stem on the cluster.
If you press and hold
the reset stem or select button for four seconds,
the display
will show the distance traveled since the last
ignition cycle for the personal or business trip.
Season Odometer
Press the trip information button, or the trip odometer
reset step, until SEASON ODOMETER appears on
the display. This shows the total distance the vehicle has
been driven in either miles or kilometers. Pressing the
reset stem located on the instrument cluster with
the vehicle
off will also display the season odometer.
Hourmeter
Press the trip button to scroll to the hourmeter. The
hourmeter shows the total number of hours the engine
has run. Pressing the reset stem on the instrument
cluster will also display the hourmeter after the season
odometer is displayed.
Annual Log
Press the trip button, or the reset stem on the instrument
panel cluster, to scroll to the annual
log. The annual
log shows the mileage accumulated since
it was
last reset.
Po reset the annual log, press and hold the
select button, or the trip odometer reset stem for
approximately two seconds.
Timer
The DIC can be used as a stopwatch. Press the select
button, or the trip odometer reset stem, while TIMER
is displayed to start the timer. The display will show the
amount of time that has passed since the timer was
last reset (not including time the ignition is
off). Time will
continue to be counted as long as the ignition is on,
even
if another display is being shown on the DIC. The
timer will record up to 99 hours, 59 minutes and
59 seconds (99:59:59) after which the display will roll
back to zero.
To stop the counting of time, press the select button
briefly while TIMER is displayed.
To reset the timer to zero, press and hold the select
button, or the trip odometer reset stem, while TIMER is
displayed.
3-45
Page 173 of 428
Automatic Locking
Press the personalization button until AUTOMATIC
LOCKING appears in the display. To select your
personalization for automatic locking, press the select
button while AUTOMATIC LOCKING is displayed on the
DIC. Pressing the select button will scroll through the
following choices:
LOCK DOORS OUT
OF PARK (default): The doors
will lock when the vehicle is shifted out of PARK (P).
LOCK DOORS MANUALLY: The doors will not
be locked automatically.
LOCK DOORS WITH SPEED: The doors will lock
when the vehicle speed is above
8 mph (13 km/h) for
three seconds.
Choose one of the three options and press the
personalization button while it is displayed on the DIC to
select it and move on to the next feature. For more
information on automatic door locks see
Programmable
Automatic Doors Locks.
Automatic Unlocking
Press the personalization button until AUTOMATIC
UNLOCKING appears in the display. To select
your personalization for automatic unlocking, press the
select button while AUTOMATIC UNLOCKING is
displayed on the DIC. Pressing the select button will
scroll through the following choices:
UNLOCK ALL IN PARK (default): All of the doors will
unlock when the vehicle is shifted into PARK (P).
UNLOCK ALL AT KEY OUT:
All of the doors will
unlock when the key is taken out of the ignition.
UNLOCK DOORS MANUALLY: The doors will not be
unlocked automatically.
UNLOCK DRIVER IN PARK: The driver’s door will be
unlocked when the vehicle is shifted in PARK (P).
Choose one
of the four options and press the
personalization button while it is displayed on the DIC to
select it and move on to the next feature. For more
information on automatic door locks see
Programmable
Automatic Door Locks.
3-48
Page 174 of 428
Seat Position Recall Perimeter Lighting
Press the personalization button until SEAT POSITION
RECALL appears on the display. To select your
personalization for seat position recall, press the select
button while SEAT POSITION RECALL is displayed
on the DIC. Pressing the select button will scroll through
the following choices:
SEAT POSITION RECALL
OFF (default): The memory
seat position you saved will only be recalled when the
memory button
1 or 2 is pressed on the driver’s
door panel.
SEAT POSITION RECALL AT KEY IN: The memory
seat position you saved will be recalled when you
put the key in the ignition.
SEAT POSITION RECALL ON REMOTE: The memory
seat position you saved will be recalled when you
unlock the vehicle with the remote keyless entry
transmitter.
Choose one of the three options and press the
personalization button while it is displayed on the DIC to
select it and move on to the next feature. For more
information on seat position recall see
Memory Seat on
page 2-42.
Press the personalization button until PERIMETER
LIGHTING appears in the display. To select your
personalization for perimeter lighting, press the select
button while PERIMETER LIGHTING is displayed on the
DIC. Pressing the select button will scroll through the
following choices:
PERIMETER LIGHTING ON
(default): The headlamps
and back-up lamps will come on for
40 seconds, if it
is dark enough outside, when you unlock the vehicle
with the remote keyless entry transmitter.
PERIMETER LIGHTING
OFF: The perimeter lights will
not come on when you unlock the vehicle with the
remote keyless entry transmitter.
Choose on
of the two options and press the
personalization button while it is displayed on the DIC to
select it and move on to the next feature.
3-49
Page 177 of 428
Easy Exit Seat
Press the personalization button until EASY EXIT SEAT
appears in the display. To select your personalization
for seat position exit, press the select button while EASY
EXIT SEAT is displayed on the
DIC. Pressing the
select button will scroll through the following choices:
SEAT POSITION EXIT OFF (default): The driver’s seat
will move
to the exit position when the exit button on
the driver’s door panel is pressed.
SEAT
POSITION EXIT ON: The driver’s seat will move
to the exit position when the key is removed from the
ignition.
Choose one of the two options and press the
personalization button while
it is displayed on the DIC to
select it and move on
to the next feature. For more
information on the seat position exit see
Memory Seat
on page 2-42.
Display Units (ENG/MET)
Press the personalization button until DISPLAY UNITS
appears in the display. To select English or metric,
press the select button while DISPLAY UNITS is
displayed on the
DIC. Pressing the select button will
scroll through the following choices:
* UNITS: ENGLISH
UNITS: METRIC
If you choose English, all information will be displayed
in English units. For example, distance in miles and fuel
economy in miles per gallon.
Choose one of the two options and press the
personalization button while it is displayed on the
DIC to
select it and end out of the personalization options.
3-52
Page 183 of 428
FUEL LEVEL LOW
If the fuel level is low, this message will appear on the
DIC and you will hear a chime. Refuel as soon as
possible. Pressing the select button will acknowledge
this message and clear it from the DIC display.
CHECK OIL LEVEL
If the oil level in the vehicle is low, this message will
appear on the DIC. Check and oil level and correct it as
necessary. You may need
to let the vehicle cool or
warm up and cycle the ignition to be sure this message
will clear. Once the problem is corrected, pressing
the select button will clear this message from the DIC
display.
CHECK WASHER FLUID
If the washer fluid level is low, this message will appear
on the DIC. Adding washer fluid will clear the message.
Pressing the select button will acknowledge this
message and clear it from the DIC display.
SERVICE 4 WHEEL STEER
If a problem occurs with the 4 wheel steer system, this
message will appear on the DIC. If this message
appears, stop as soon as possible and turn
off the
vehicle. Restart the vehicle and check for the message
on the DIC display.
If the message is still displayed,
or appears again when you begin driving, the four wheel
steer system needs service.
TRACTION ACTIVE
When the traction control system had detected that any
of the vehicle’s wheels are slipping, the traction
control system will activate and this message will appear
on the DIC. For more information see “Traction Assist”
in the Index.
3-58
Page 186 of 428

Audio System@)
Notice: Before you add any sound equipment to
your vehicle
- like a tape player, CB radio, mobile
telephone or two-way radio
- be sure you can
add what you want.
If you can, it’s very important to
do
it properly. Added sound equipment may
interfere with the operation
of your vehicle’s engine,
Delphi Electronics radio or other systems, and
even damage them. Your vehicle’s systems may
interfere with the operation of sound equipment that
has been added improperly.
So, before adding sound equipment, check with
your dealer and be sure to check federal rules
covering mobile radio and telephone units.
Your audio system has been designed to operate easily
and to give years of listening pleasure. You will get
the most enjoyment out of it
if you acquaint yourself with
it first. Find out what your audio system can do and
how to operate all of its controls to be sure you’re getting
the most out of the advanced engineering that went
into it. Your vehicle
may have a feature called Retained
Accessory Power (RAP). With RAP, you can play your
audio system even after the ignition is turned
off.
See “Retained Accessory Power (RAP)” under Ignition
Positions on page
2- 15.
Setting the Time
Press and hold the HR button until the correct hour
appears on the display. Press and hold the
MN button
until the correct minute appears on the display. The time
may be set with the ignition on or
off.
To synchronize the time with an FM station broadcasting
Radio Data System
(RDS) information, press and
hold the hour and minute buttons at the same time until
RDS TIME appears on the display. To accept this
time, press and hold the hour and minute buttons, at the
same time, for another
2 seconds. If the time is not
available from the station,
NO UPDAT will appear on the
display instead.
RDS time
is broadcast once a minute. Once you have
tuned to an RDS broadcast station,
it may take a
few minutes for your time to update.
3-61
Page 189 of 428
DlSP (Display): Push this knob to switch the display
between radio station frequency and time. Time display
is available with the ignition turned off.
For RDS, push this knob to change what appears on
the display while using RDS. The display options
are station name, RDS station frequency, PTY and the
name of the program
(if available).
For XMTM (USA only,
if your radio is equipped with
XMTM Satellite Radio Service), push this knob while in
XM mode to retrieve various pieces of information
related to the current song or channel. By pressing and
releasing this knob, you may retrieve four different
categories of information: Artist, Song Title, Category
or
PTY, Channel NumberKhannel Name.
For DAB (Canada only,
if your radio is equipped with
DAB), pushing this knob switches the display between
channel name and PTY name.
To change the default on the display, push this knob
until you see the display you want, then hold the knob
for two seconds. The radio will produce one beep
and selected display will now be the default.
Finding a Station
BAND: Press this button to switch between AM, FM,
FM2, or XM1, XM2 (USA only,
if your radio is equipped
with XMTM Satellite Radio Service) or DABl, DAB2
(Canada only,
if your radio is equipped with DAB). The
display will show your selection.
TUNE: Turn this knob to choose radio stations.
For DAB (Canada only,
if your radio is equipped with
DAB), the TUNE knob allows
you to navigate the
DAB frequency range. Turning this knob will tune up or
tune down the range. The radio will display the letter
L with a number next to it (1 through 23). Each L number
refers to a frequency and there can be multiple
stations contained in one frequency. It may also take a
few seconds, once you have tuned to a frequency,
for that frequency to gather all of the stations.
Depending on how many stations are within a frequency,
with every tune up or down, you may be tuning to
another station or to another frequency. The display will
show your selections.
4 SEEK b : Press the right or the left arrow to seek
to the next or to the previous station and stay there.
The radio will seek only to stations that are in the
selected band and only to those with a strong signal.
3-64