Page 1477 of 4378
or four minutes, whichever is longer. Failure to follow this procedure may result in future oil
leakage.
Apply silicone gasket and sealant at the rear oil seal retainer-
to-cylinder block sealing surface.
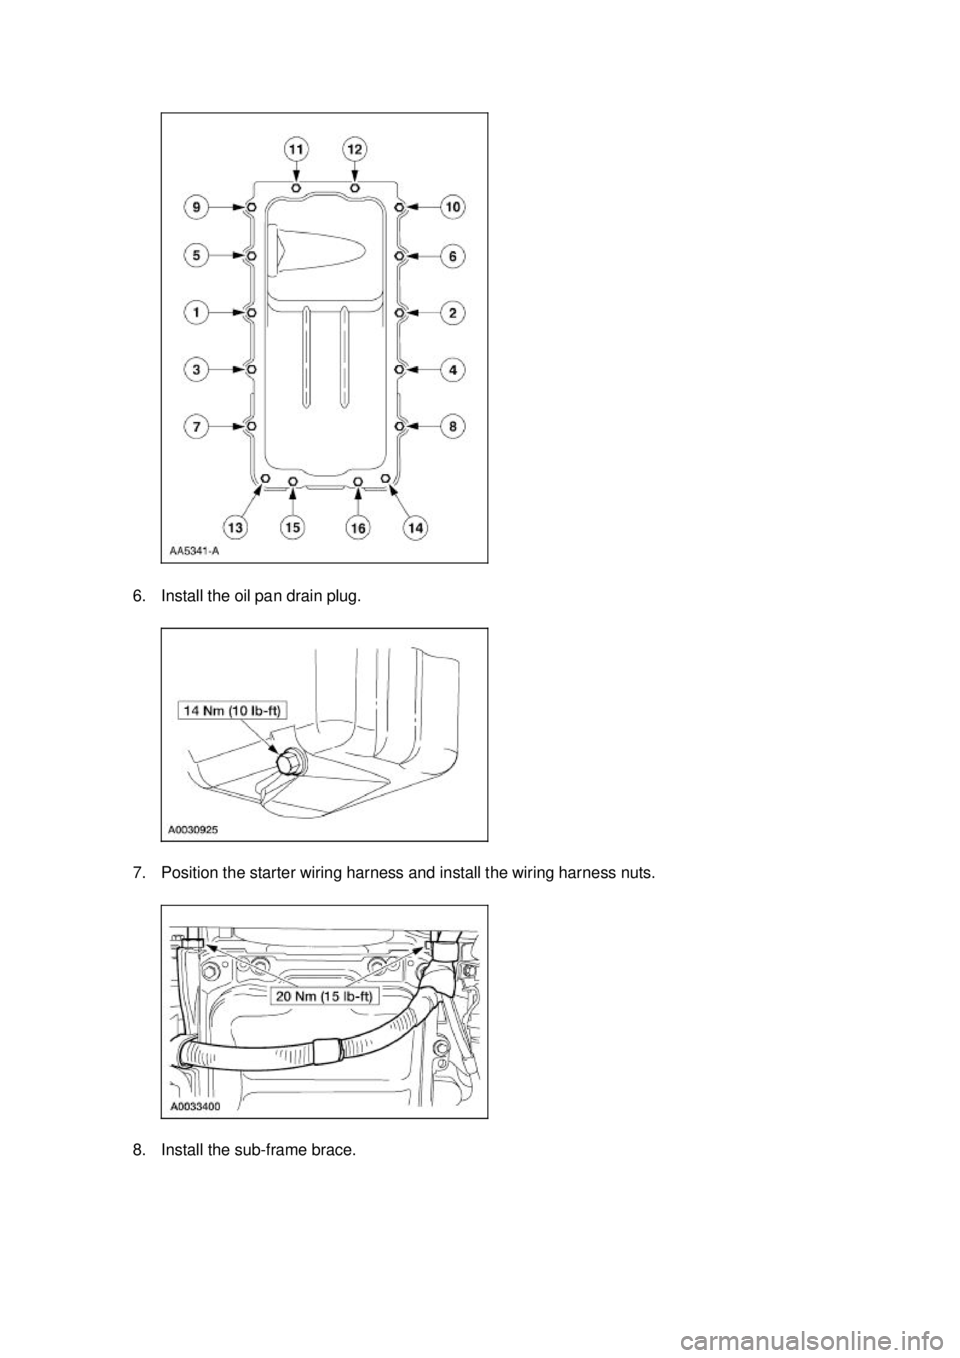
4. Install the oil pan and gasket and loosely install the bolts.
5. Tighten the bolts in the sequence shown in three stages. �zStage 1: Tighten to 2 Nm (18 lb- in).
�z Stage 2: Tighten to 20 Nm (15 lb- ft).
�z Stage 3: Tighten an additional 60 degrees. �K�l�j . 6 �b�a
112003 Mustang Workshop Manual
17. 11. 2011file:///C:/Ford/2000 - 2004/tsocache/SHEF_4464/S3B~us~en~ ...
Page 1478 of 4378
6. Install the oil pan drain plug.
7. Position the starter wiring harness and install the wiring harness nuts.
8. Install the sub-
frame brace. �K�l�j . 7 �b�a
112003 Mustang Workshop Manual
17. 11. 2011file:///C:/Ford/2000 - 2004/tsocache/SHEF_4464/S3B~us~en~ ...
Page 1480 of 4378
13. Position the safety stand aside.
14. Release the tension from the front coil springs and remove the special tool.
15. Raise the vehicle.
16. Using the special tool, lower the engine and remove the special tool.
17. Remove the special tools. �K�l�j . 9 �b�a
112003 Mustang Workshop Manual
17. 11. 2011file:///C:/Ford/2000 - 2004/tsocache/SHEF_4464/S3B~us~en~ ...
Page 1481 of 4378
18. Install the two nuts.
19. Install the transmission. For additional information, refer to
Section 308 - 03B .
20. Lower the vehicle.
21. Fill the engine crankcase with clean engine oil.
22. Install the A/C line. For additional information, refer to Section 412 - 03 .
23. Install the manifold and tube assembly— accumulator to compressor, 4.6L. For additional
information, refer to Section 412 - 03 .
24. Install the radiator sight shield.
25. Install the air cleaner outlet tube. For additional information, refer to Section 303 - 12 .
26. Install the battery ground cable. For additional information, refer to Section 414 - 01 .
27. Start the engine and check for leaks. �K�l�j . 10 �b�a
112003 Mustang Workshop Manual
17. 11. 2011file:///C:/Ford/2000 - 2004/tsocache/SHEF_4464/S3B~us~en~ ...
Page 1484 of 4378
IN-
VEHICLE REPAIR
Crankshaft Rear Seal with Retainer Plate Removal SECTION 303-
01C: Engine — Cobra 4.6L (4V) 2003 Mustang Workshop Manual Special Tool(s)
Installer, Crankshaft Rear Oil
Seal
303-
518 (T95P-6701- DH) Remover, Crankshaft Rear Oil
Seal
303-
519 (T95P-6701- EH) Installer, Crankshaft Rear Oil
Seal
303-
516 (T95P-6701- BH) Remover, Crankshaft Rear Oil
Slinger
303-
514 (T95P-6701- AH) Installer, Crankshaft Rear Oil
Slinger
303-
517 (T95P-6701- CH) Slide Hammer
100-
001 (T50T-100- A)
Material Item Specification
Super Premium SAE 5W-20
Engine Oil
XO- 5W20- QSP or equivalent WSS-
M2C153-
H �K�l�j . 1 �b�a
32003 Mustang Workshop Manual
17. 11. 2011file:///C:/Ford/2000 - 2004/tsocache/SHEF_4464/S3B~us~en~ ...
Page 1485 of 4378
1. Remove the flywheel. For additional information, refer to
Flywheel in this section.
2. Using the special tools, remove the crankshaft oil slinger.
3. Using the special tools, remove the crankshaft rear oil seal (6701).
Installation 1. Using the special tools, install the crankshaft rear oil seal. �zLubricate the oil seal using clean engine oil.
2. Using the special tool, install the crankshaft oil slinger. �K�l�j . 2 �b�a
32003 Mustang Workshop Manual
17. 11. 2011file:///C:/Ford/2000 - 2004/tsocache/SHEF_4464/S3B~us~en~ ...
Page 1504 of 4378
49. Remove the auxiliary crankshaft pulley. For additional information, refer to
Crankshaft Pulley —
Auxiliary in this section.
50. Remove the clutch. For additional information, refer to Section 308 - 01 .
51. Remove the transmission wiring harness. 1. Remove the RH oxygen sensor connector from the bracket.
2. Disconnect the transmission wiring connector and remove the harness.
52. NOTE: LH is shown, RH is similar.
Remove the right and left exhaust manifold flange nuts, and position the exhaust manifold
aside.
53. Drain the engine oil. �zInstall the drain plug when finished. �K�l�j . 12 �b�a
172003 Mustang Workshop Manual
17. 11. 2011file:///C:/Ford/2000 - 2004/tsocache/SHEF_4464/S3B~us~en~ ...
Page 1505 of 4378
54. Remove the nut and the wiring harness bracket.
55. Disconnect the oil pressure sender electrical connector.
56. Disconnect the generator electrical connector.
57. Remove the generator B + nut and disconnect the B + cable. �K�l�j . 13 �b�a
172003 Mustang Workshop Manual
17. 11. 2011file:///C:/Ford/2000 - 2004/tsocache/SHEF_4464/S3B~us~en~ ...


 2003 Mustang Workshop Manual Special Tool(s)
Installer, Crankshaft Rear Oil
Seal")


