Page 1570 of 4378
56.
NOTE: If the valve cover is not secured within four minutes, the sealant must be removed and
the sealing area cleaned with metal surface cleaner. Allow to dry until there is no sign of
wetness, or four minutes, whichever is longer. Failure to follow this procedure can result in
future oil leakage.
Apply silicone gasket and sealant in the locations shown.
57. NOTE: RH is shown, LH is similar. Inspect and install new O- ring seals if necessary.
Install the valve covers and tighten the bolts in the sequence shown. �K�l�j . 21 �b�a
352003 Mustang Workshop Manual
17. 11. 2011file:///C:/Ford/2000 - 2004/tsocache/SHEF_4464/S3B~us~en~ ...
Page 1571 of 4378
58. Lubricate the front oil seal and the engine front cover with clean engine oil.
59. Using the special tools, install the front oil seal.
60.
NOTE: If the crankshaft pulley is not installed within four minutes, the sealant must be removed
and the sealing area cleaned with metal surface cleaner. Allow to dry until there is no sign of
wetness, or four minutes, whichever is longer. Failure to follow this procedure can result in
future oil leakage.
Apply silicone gasket and sealant to the Woodruff key on the crankshaft pulley.
61. Using the special tool, install the crankshaft pulley. �K�l�j . 22 �b�a
352003 Mustang Workshop Manual
17. 11. 2011file:///C:/Ford/2000 - 2004/tsocache/SHEF_4464/S3B~us~en~ ...
Page 1575 of 4378
71. Position the wiring harness onto the engine and attach it to the four fuel supply manifold studs.
72. Connect the eight fuel injector electrical connectors.
73.
NOTE: RH is shown, LH is similar.
Install the RH and LH ignition coils and connect the electrical connectors.
74. Install the harness support bracket. �K�l�j . 26 �b�a
352003 Mustang Workshop Manual
17. 11. 2011file:///C:/Ford/2000 - 2004/tsocache/SHEF_4464/S3B~us~en~ ...
Page 1582 of 4378
99. Install the special tools.
100. Attach the special tool to a floor crane and the engine, and remove the engine from the stand.
101. NOTE: If not secured within four minutes, the sealant must be removed and the sealing surface
must be cleaned with metal surface cleaner. Allow the surface to dry until there is no sign of
wetness or four minutes, whichever is longer. Failure to follow this procedure can result in future
oil leakage.
Apply a 4 mm (0.16 in) bead of silicone gasket and sealant around the rear oil seal retainer
plate sealing surface. Also apply a bead of silicone gasket and sealant at the junction where the
cylinder block, oil pan and rear oil seal retainer plate meet. �K�l�j . 33 �b�a
352003 Mustang Workshop Manual
17. 11. 2011file:///C:/Ford/2000 - 2004/tsocache/SHEF_4464/S3B~us~en~ ...
Page 1583 of 4378
102. Install the rear oil seal retainer plate and tighten the bolts in the sequence shown.
�zTighten bolts No. 1- 6 to 10 Nm (89 lb-in).
�z Tighten bolts No. 7 and 8 to 20 Nm (15 lb- ft)
�z Tighten bolts No. 7 and 8 an additional 60 degrees.
103. Using the special tools, install the crankshaft rear main seal.
104. Using the special tool, install the crankshaft oil slinger. �K�l�j . 34 �b�a
352003 Mustang Workshop Manual
17. 11. 2011file:///C:/Ford/2000 - 2004/tsocache/SHEF_4464/S3B~us~en~ ...
Page 1585 of 4378
INSTALLATION
Engine
Installation
1. Install the engine in the vehicle and remove the floor crane and the special tool.
SECTION 303-
01C: Engine — Cobra 4.6L (4V) 2003 Mustang Workshop Manual Special Tool(s)
Lifting Bracket, Engine
303-
D087 (D93P-6001- A1) Lifting Bracket, Engine
303-
D088 (D93P-6001- A2) Spreader Bar
303-
D089 (D93P-6001- A3) or
equivalent
Material Item Specification
SAE 5W-
20 Premium Synthetic
Blend Engine Oil
XO- 5W20- QSP or equivalent WSS-
M2C153-
H Motorcraft Premium Engine
Coolant
VC
-4-A (in Canada CXC- 10; in
Oregon VC- 5) or equivalent ESE-
M97B44-
A Motorcraft Premium Gold
Engine Coolant
VC
-7-A (in Oregon VC-7- B) or
equivalent WSS-
M97B51-
A1 Threadlock and Sealer
E0AZ-
19554- AA WSK-
M2G351-
A5 PAG Refrigerant Compressor
Oil (R-
134a Systems)
F7AZ- 19589- DA (MC YN-12- C) WSH-
M1C231-
B �K�l�j . 1 �b�a
172003 Mustang Workshop Manual
17. 11. 2011file:///C:/Ford/2000 - 2004/tsocache/SHEF_4464/S3B~us~en~ ...
Page 1586 of 4378
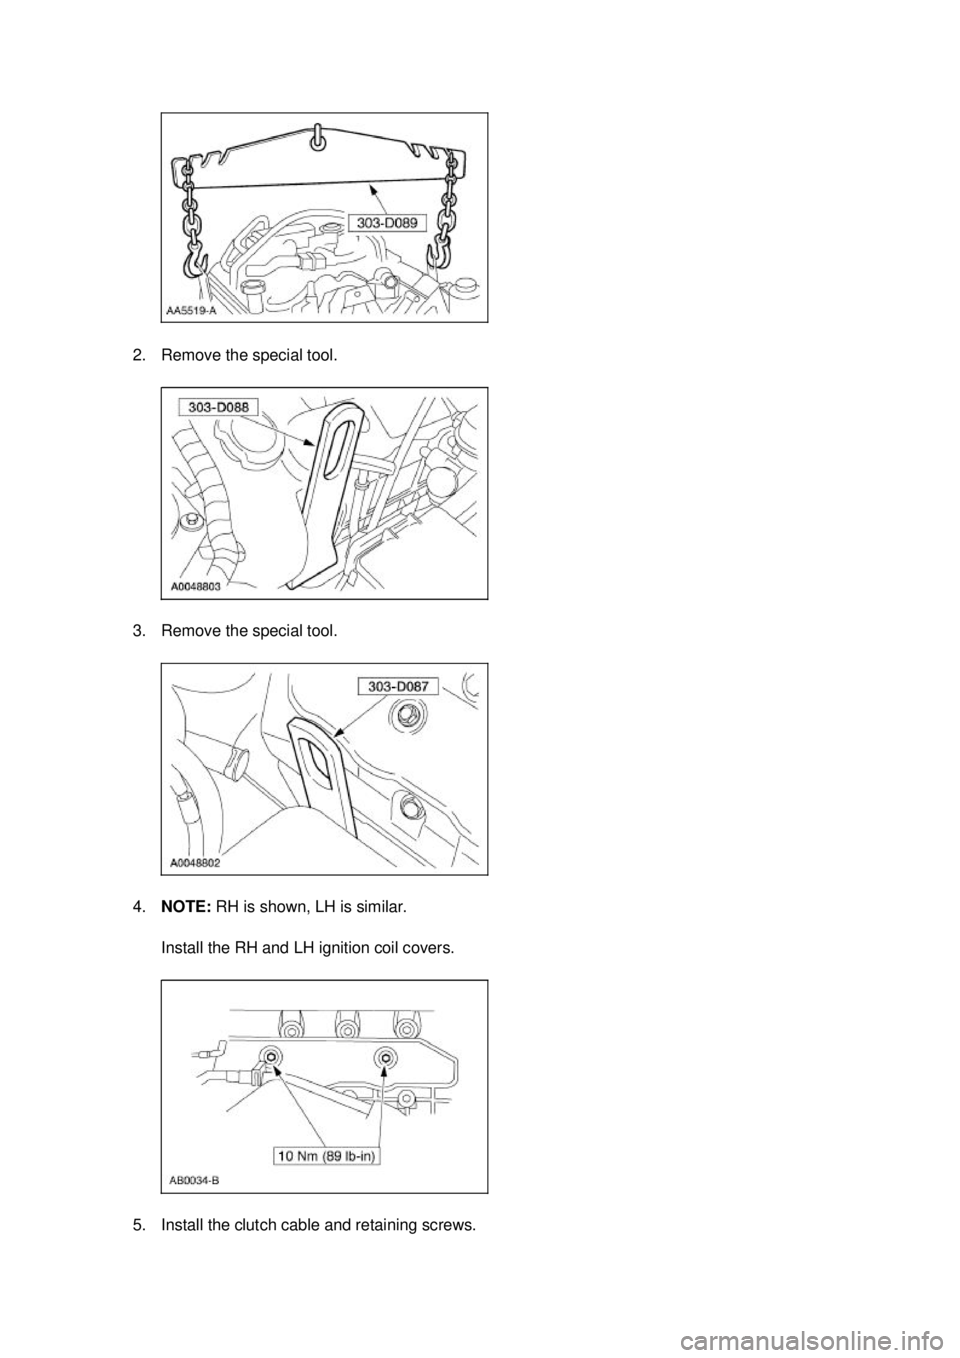
2. Remove the special tool.
3. Remove the special tool.
4.
NOTE: RH is shown, LH is similar.
Install the RH and LH ignition coil covers.
5. Install the clutch cable and retaining screws. �K�l�j . 2 �b�a
172003 Mustang Workshop Manual
17. 11. 2011file:///C:/Ford/2000 - 2004/tsocache/SHEF_4464/S3B~us~en~ ...
Page 1588 of 4378
10. Connect the lower radiator hose.
11. Connect the hose to the oil filter adapter.
12. Attach the B + terminal cable and install the nut.
13. Connect the generator electrical connector.
14. Install the ground cable and the nut. �K�l�j . 4 �b�a
172003 Mustang Workshop Manual
17. 11. 2011file:///C:/Ford/2000 - 2004/tsocache/SHEF_4464/S3B~us~en~ ...


.
�z Tighten bolts No. 7 and 8 to 20 Nm (15 lb- ft)
�z Tighten")
 2003 Mustang Workshop Manual Sp")