Page 957 of 4378
9. Position the accelerator cable bracket and install the bolts.
10. Connect the accelerator and speed control cables to the throttle body cam.
11. Connect the EVAP return tube and the TP sensor electrical connector.
12. Connect the vacuum hose and the IAC valve electrical connector. �K�l�j . 7 �b�a
82003 Mustang Workshop Manual
17. 11. 2011file:///C:/Ford/2000 - 2004/tsocache/SHEF_4464/S3B~us~en~ ...
Page 959 of 4378

IN-
VEHICLE REPAIR
Lower Intake Manifold
Removal 1. Remove the upper intake manifold. For additional information, refer to Upper Intake Manifold in
this section.
2. Partially drain the cooling system. For additional information, refer to Section 303 - 03A .
3. Relieve the fuel system pressure. For additional information, refer to Section 310 - 00 .
4. Disconnect the fuel rail pressure (FRP) sensor electrical connector and vacuum hose.
5. Disconnect the fuel supply tube spring lock coupling. For additional information, refer to Section 310 - 00 .
6. Disconnect and position the engine wire harness aside.
7. Disconnect the intake manifold runner control (IMRC) electrical connector.
SECTION 303-
01A: Engine — 3.8L 2003 Mustang Workshop Manual Material
Item Specification
Silicone Gasket and Sealant
F7AZ-
19554- EA or equivalent WSE-
M4G323-
A4 Metal Surface Cleaner
F4AZ-
19A536- RA or
equivalent WSE-
M5B392- A �K�l�j . 1 �b�a
92003 Mustang Workshop Manual
17. 11. 2011file:///C:/Ford/2000 - 2004/tsocache/SHEF_4464/S3B~us~en~ ...
Page 966 of 4378
11. Install the heater bypass tube. For additional information, refer to
Section 303 - 03A .
12. Connect the IMRC electrical connector.
13. Position and connect the engine wire harness. Install the pin- type retainers.
14. Connect the fuel supply tube spring lock coupling. For additional information, refer to Section 310 - 00 .
15. Connect the FRP sensor electrical connector and the vacuum hose. �K�l�j . 8 �b�a
92003 Mustang Workshop Manual
17. 11. 2011file:///C:/Ford/2000 - 2004/tsocache/SHEF_4464/S3B~us~en~ ...
Page 979 of 4378
7. Disconnect the upper radiator hose and the bypass hose.
8. Remove the camshaft position (CMP) sensor.
9. Remove the heater water outlet tube. For additional information, refer to
Section 303 - 03A .
10. Remove the camshaft synchronizer assembly.
11. Disconnect the lower radiator hose. �K�l�j . 2 �b�a
92003 Mustang Workshop Manual
17. 11. 2011file:///C:/Ford/2000 - 2004/tsocache/SHEF_4464/S3B~us~en~ ...
Page 980 of 4378
12. Disconnect the crankshaft position sensor electrical connector.
13. Remove the wiring harness pin-
type retainer.
14. Remove the oil filter.
15. Remove the retainers and the water pump. �K�l�j . 3 �b�a
92003 Mustang Workshop Manual
17. 11. 2011file:///C:/Ford/2000 - 2004/tsocache/SHEF_4464/S3B~us~en~ ...
Page 984 of 4378
9. Connect the crankshaft position sensor electrical connector.
10. Connect the lower radiator hose.
11. Install the camshaft synchronizer assembly. For additional information, refer to Section 303 - 14 .
12. Install the heater water outlet tube. For additional information, refer to Section 303 - 13 .
13. Install the camshaft position (CMP) sensor, and connect the electrical connector. �K�l�j . 7 �b�a
92003 Mustang Workshop Manual
17. 11. 2011file:///C:/Ford/2000 - 2004/tsocache/SHEF_4464/S3B~us~en~ ...
Page 1002 of 4378
IN-
VEHICLE REPAIR
Timing Chain
Removal 1. Remove the timing cover. For additional information, refer to Engine Front Cover in this section.
2. Remove the camshaft position sensor drive gear. 1. Remove the bolt.
2. Remove the camshaft position sensor drive gear.
3. Rotate the crankshaft (6303) until the timing marks and keyways align.
4. Compress and install a retaining pin to hold the timing chain tensioner (6L266).
5. Remove the camshaft sprocket (6256), the crankshaft sprocket (6306) and the timing chain/belt (6268) as an assembly.
SECTION 303-
01A: Engine — 3.8L 2003 Mustang Workshop Manual �K�l�j . 1 �b�a
52003 Mustang Workshop Manual
17. 11. 2011file:///C:/Ford/2000 - 2004/tsocache/SHEF_4464/S3B~us~en~ ...
Page 1005 of 4378
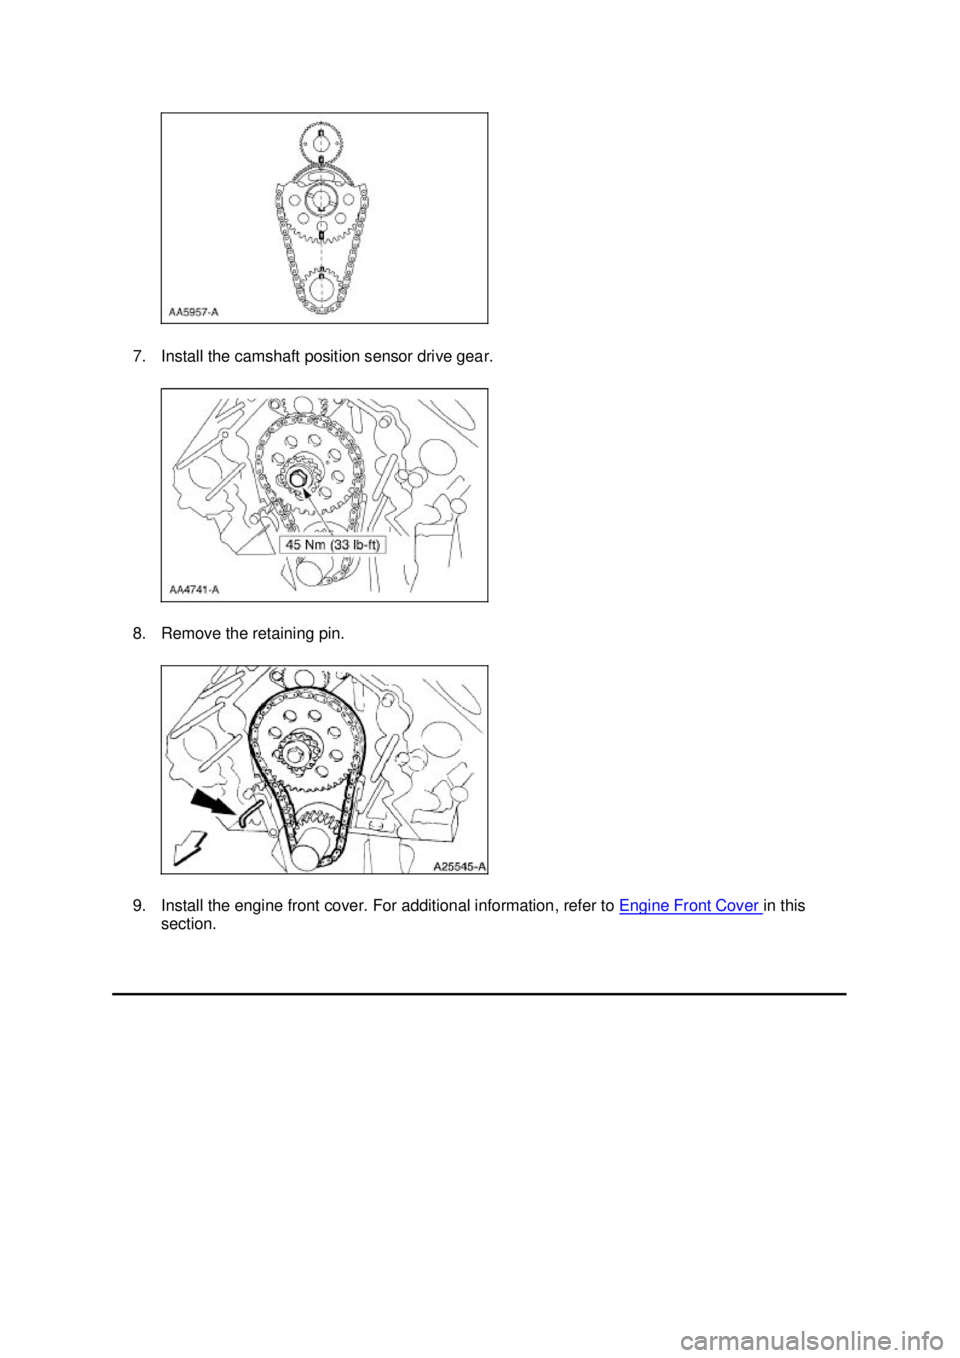
7. Install the camshaft position sensor drive gear.
8. Remove the retaining pin.
9. Install the engine front cover. For additional information, refer to
Engine Front Cover in this
section. �K�l�j . 4 �b�a
52003 Mustang Workshop Manual
17. 11. 2011file:///C:/Ford/2000 - 2004/tsocache/SHEF_4464/S3B~us~en~ ...


 sensor.
9. Remove the heater water outlet tube. For additional information, refer to
Section 303 - 0")