2003 DODGE RAM seats
[x] Cancel search: seatsPage 644 of 2895
WARNING: DURING AND FOLLOWING ANY SEAT
BELT OR CHILD RESTRAINT ANCHOR SERVICE,
CAREFULLY INSPECT ALL SEAT BELTS, BUCKLES,
MOUNTING HARDWARE, RETRACTORS, TETHER
STRAPS, AND ANCHORS FOR PROPER INSTALLA-
TION, OPERATION, OR DAMAGE. REPLACE ANY
BELT THAT IS CUT, FRAYED, OR TORN.
STRAIGHTEN ANY BELT THAT IS TWISTED.
TIGHTEN ANY LOOSE FASTENERS. REPLACE ANY
BELT THAT HAS A DAMAGED OR INOPERATIVE
BUCKLE OR RETRACTOR. REPLACE ANY BELT
THAT HAS A BENT OR DAMAGED LATCH PLATE
OR ANCHOR PLATE. REPLACE ANY CHILD
RESTRAINT ANCHOR OR THE UNIT TO WHICH THE
ANCHOR IS INTEGRAL THAT HAS BEEN BENT OR
DAMAGED. NEVER ATTEMPT TO REPAIR A SEAT
BELT OR CHILD RESTRAINT COMPONENT.
ALWAYS REPLACE DAMAGED OR FAULTY SEAT
BELT AND CHILD RESTRAINT COMPONENTS WITH
THE CORRECT, NEW AND UNUSED REPLACEMENT
PARTS LISTED IN THE DAIMLERCHRYSLER MOPAR
PARTS CATALOG.
(1) Position the rear outboard seat belt and retrac-
tor to the retractor mounting hole in the lower inner
C-pillar (Fig. 39).
(2) Engage the hook on the upper retractor bracket
into the slot in the lower inner C-pillar above the
retractor mounting hole.
(3) Install and tighten the screw that secures the
lower retractor bracket to the lower inner C-pillar
below the retractor mounting hole. Tighten the screw
to 40 N´m (29 ft. lbs.).
(4) Position the seat belt web guide to the inner
C-pillar near the belt line.
(5) Install and tighten the screw that secures the
seat belt web guide to the inner C-pillar. Tighten the
screw to 2 N´m (20 in. lbs.).
(6) Reinstall the upper and lower trim onto the
inner C-pillar. (Refer to 23 - BODY/INTERIOR/C-
PILLAR UPPER TRIM - INSTALLATION) and
(Refer to 23 - BODY/INTERIOR/C-PILLAR LOWER
TRIM - INSTALLATION).
(7) Position the seat belt turning loop onto the
upper inner C-pillar.
(8) Install and tighten the screw that secures the
seat belt turning loop to the C-pillar. Tighten the
screw to 40 N´m (29 ft. lbs.).
(9) Engage the lower snap features of the new trim
cover over the rear outboard seat belt turning loop
and, using hand pressure, press firmly and evenly on
the top of the trim cover until it snaps into place.
(10) Position the lower seat belt anchor to the base
of the inner C-pillar.
(11) Install and tighten the screw that secures the
lower seat belt anchor to the base of the inner C-pil-
lar. Tighten the screw to 40 N´m (29 ft. lbs.).(12) Reinstall the rear seat into the vehicle. (Refer
to 23 - BODY/SEATS/SEAT - REAR - INSTALLA-
TION).
REAR SEAT BELT BUCKLE
REMOVAL
REMOVAL - CENTER & LEFT OUTBOARD
WARNING: DURING AND FOLLOWING ANY SEAT
BELT OR CHILD RESTRAINT ANCHOR SERVICE,
CAREFULLY INSPECT ALL SEAT BELTS, BUCKLES,
MOUNTING HARDWARE, RETRACTORS, TETHER
STRAPS, AND ANCHORS FOR PROPER INSTALLA-
TION, OPERATION, OR DAMAGE. REPLACE ANY
BELT THAT IS CUT, FRAYED, OR TORN.
STRAIGHTEN ANY BELT THAT IS TWISTED.
TIGHTEN ANY LOOSE FASTENERS. REPLACE ANY
BELT THAT HAS A DAMAGED OR INOPERATIVE
BUCKLE OR RETRACTOR. REPLACE ANY BELT
THAT HAS A BENT OR DAMAGED LATCH PLATE
OR ANCHOR PLATE. REPLACE ANY CHILD
RESTRAINT ANCHOR OR THE UNIT TO WHICH THE
ANCHOR IS INTEGRAL THAT HAS BEEN BENT OR
DAMAGED. NEVER ATTEMPT TO REPAIR A SEAT
BELT OR CHILD RESTRAINT COMPONENT.
ALWAYS REPLACE DAMAGED OR FAULTY SEAT
BELT AND CHILD RESTRAINT COMPONENTS WITH
THE CORRECT, NEW AND UNUSED REPLACEMENT
PARTS LISTED IN THE DAIMLERCHRYSLER MOPAR
PARTS CATALOG.
(1) Lift up the rear seat cushion into its stowed
position against the rear seat back.
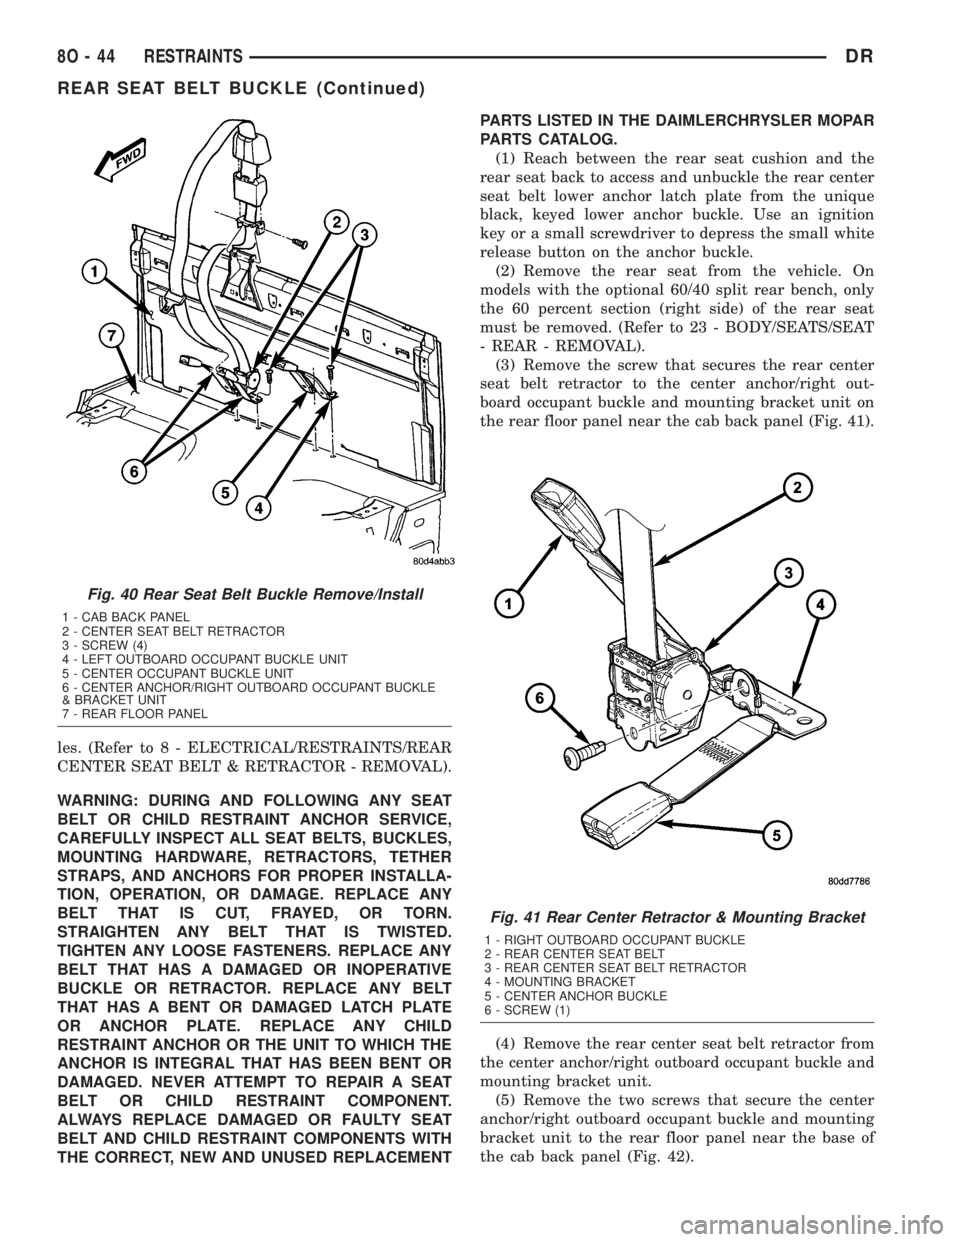
(2) Remove the screw that secures either the cen-
ter or the left outboard occupant buckle unit to the
rear floor panel near the base of the cab back panel
(Fig. 40). On models with the optional 60/40 split
rear bench, the screw that secures the buckle unit
also secures one of the rear seat mounting brackets
to the rear floor panel.
(3) Remove the center or the left outboard occu-
pant buckle unit from the rear floor panel or from
the rear seat mounting bracket.
REMOVAL - CENTER ANCHOR & RIGHT
OUTBOARD
The unique black, keyed center seat belt lower
anchor buckle and the right outboard occupant
buckle are serviced as a unit with their mounting
bracket. The rear center seat belt retractor is also
secured to the mounting bracket with these two
buckles, but can be removed from the mounting
bracket and is serviced separately from the two buck-
DRRESTRAINTS 8O - 43
REAR OUTBOARD SEAT BELT & RETRACTOR (Continued)
Page 645 of 2895
les. (Refer to 8 - ELECTRICAL/RESTRAINTS/REAR
CENTER SEAT BELT & RETRACTOR - REMOVAL).
WARNING: DURING AND FOLLOWING ANY SEAT
BELT OR CHILD RESTRAINT ANCHOR SERVICE,
CAREFULLY INSPECT ALL SEAT BELTS, BUCKLES,
MOUNTING HARDWARE, RETRACTORS, TETHER
STRAPS, AND ANCHORS FOR PROPER INSTALLA-
TION, OPERATION, OR DAMAGE. REPLACE ANY
BELT THAT IS CUT, FRAYED, OR TORN.
STRAIGHTEN ANY BELT THAT IS TWISTED.
TIGHTEN ANY LOOSE FASTENERS. REPLACE ANY
BELT THAT HAS A DAMAGED OR INOPERATIVE
BUCKLE OR RETRACTOR. REPLACE ANY BELT
THAT HAS A BENT OR DAMAGED LATCH PLATE
OR ANCHOR PLATE. REPLACE ANY CHILD
RESTRAINT ANCHOR OR THE UNIT TO WHICH THE
ANCHOR IS INTEGRAL THAT HAS BEEN BENT OR
DAMAGED. NEVER ATTEMPT TO REPAIR A SEAT
BELT OR CHILD RESTRAINT COMPONENT.
ALWAYS REPLACE DAMAGED OR FAULTY SEAT
BELT AND CHILD RESTRAINT COMPONENTS WITH
THE CORRECT, NEW AND UNUSED REPLACEMENTPARTS LISTED IN THE DAIMLERCHRYSLER MOPAR
PARTS CATALOG.
(1) Reach between the rear seat cushion and the
rear seat back to access and unbuckle the rear center
seat belt lower anchor latch plate from the unique
black, keyed lower anchor buckle. Use an ignition
key or a small screwdriver to depress the small white
release button on the anchor buckle.
(2) Remove the rear seat from the vehicle. On
models with the optional 60/40 split rear bench, only
the 60 percent section (right side) of the rear seat
must be removed. (Refer to 23 - BODY/SEATS/SEAT
- REAR - REMOVAL).
(3) Remove the screw that secures the rear center
seat belt retractor to the center anchor/right out-
board occupant buckle and mounting bracket unit on
the rear floor panel near the cab back panel (Fig. 41).
(4) Remove the rear center seat belt retractor from
the center anchor/right outboard occupant buckle and
mounting bracket unit.
(5) Remove the two screws that secure the center
anchor/right outboard occupant buckle and mounting
bracket unit to the rear floor panel near the base of
the cab back panel (Fig. 42).
Fig. 40 Rear Seat Belt Buckle Remove/Install
1 - CAB BACK PANEL
2 - CENTER SEAT BELT RETRACTOR
3 - SCREW (4)
4 - LEFT OUTBOARD OCCUPANT BUCKLE UNIT
5 - CENTER OCCUPANT BUCKLE UNIT
6 - CENTER ANCHOR/RIGHT OUTBOARD OCCUPANT BUCKLE
& BRACKET UNIT
7 - REAR FLOOR PANEL
Fig. 41 Rear Center Retractor & Mounting Bracket
1 - RIGHT OUTBOARD OCCUPANT BUCKLE
2 - REAR CENTER SEAT BELT
3 - REAR CENTER SEAT BELT RETRACTOR
4 - MOUNTING BRACKET
5 - CENTER ANCHOR BUCKLE
6 - SCREW (1)
8O - 44 RESTRAINTSDR
REAR SEAT BELT BUCKLE (Continued)
Page 647 of 2895
WARNING: DURING AND FOLLOWING ANY SEAT
BELT OR CHILD RESTRAINT ANCHOR SERVICE,
CAREFULLY INSPECT ALL SEAT BELTS, BUCKLES,
MOUNTING HARDWARE, RETRACTORS, TETHER
STRAPS, AND ANCHORS FOR PROPER INSTALLA-
TION, OPERATION, OR DAMAGE. REPLACE ANY
BELT THAT IS CUT, FRAYED, OR TORN.
STRAIGHTEN ANY BELT THAT IS TWISTED.
TIGHTEN ANY LOOSE FASTENERS. REPLACE ANY
BELT THAT HAS A DAMAGED OR INOPERATIVE
BUCKLE OR RETRACTOR. REPLACE ANY BELT
THAT HAS A BENT OR DAMAGED LATCH PLATE
OR ANCHOR PLATE. REPLACE ANY CHILD
RESTRAINT ANCHOR OR THE UNIT TO WHICH THE
ANCHOR IS INTEGRAL THAT HAS BEEN BENT OR
DAMAGED. NEVER ATTEMPT TO REPAIR A SEAT
BELT OR CHILD RESTRAINT COMPONENT.
ALWAYS REPLACE DAMAGED OR FAULTY SEAT
BELT AND CHILD RESTRAINT COMPONENTS WITH
THE CORRECT, NEW AND UNUSED REPLACEMENT
PARTS LISTED IN THE DAIMLERCHRYSLER MOPAR
PARTS CATALOG.
(1) Position the center anchor/right outboard occu-
pant buckle and mounting bracket unit onto the rear
floor panel near the base of the cab back panel (Fig.
42).
(2) Install and tighten the two screws that secure
the center anchor/right outboard occupant buckle and
mounting bracket unit to the rear floor panel.
Tighten the screws to 40 N´m (29 ft. lbs.).
(3) Position the rear center seat belt retractor onto
the center anchor/right outboard occupant buckle and
mounting bracket unit (Fig. 41).
(4)
Install and tighten the screw that secures the
rear center seat belt retractor to the center anchor/
right outboard occupant buckle and mounting bracket
unit. Tighten the screw to 40 N´m (29 ft. lbs.).
(5) Reinstall the rear seat into the vehicle. On
models with the optional 60/40 split rear bench, only
the 60 percent section (right side) of the rear seat
must be reinstalled. (Refer to 23 - BODY/SEATS/
SEAT - REAR - INSTALLATION).
(6) Reach between the rear seat cushion and the
rear seat back to access and buckle the rear center
seat belt lower anchor latch plate to the unique
black, keyed lower anchor buckle.
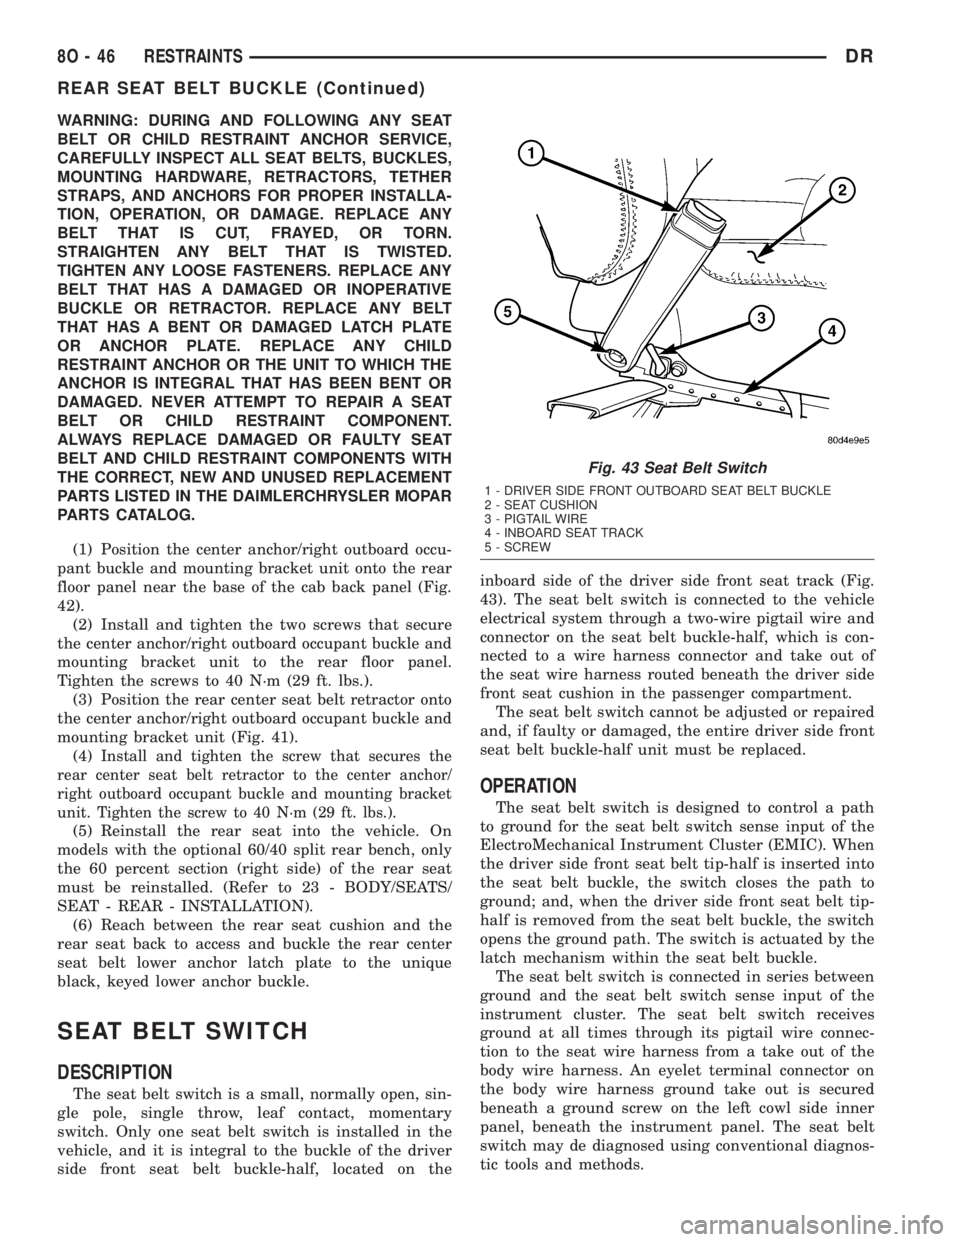
SEAT BELT SWITCH
DESCRIPTION
The seat belt switch is a small, normally open, sin-
gle pole, single throw, leaf contact, momentary
switch. Only one seat belt switch is installed in the
vehicle, and it is integral to the buckle of the driver
side front seat belt buckle-half, located on theinboard side of the driver side front seat track (Fig.
43). The seat belt switch is connected to the vehicle
electrical system through a two-wire pigtail wire and
connector on the seat belt buckle-half, which is con-
nected to a wire harness connector and take out of
the seat wire harness routed beneath the driver side
front seat cushion in the passenger compartment.
The seat belt switch cannot be adjusted or repaired
and, if faulty or damaged, the entire driver side front
seat belt buckle-half unit must be replaced.
OPERATION
The seat belt switch is designed to control a path
to ground for the seat belt switch sense input of the
ElectroMechanical Instrument Cluster (EMIC). When
the driver side front seat belt tip-half is inserted into
the seat belt buckle, the switch closes the path to
ground; and, when the driver side front seat belt tip-
half is removed from the seat belt buckle, the switch
opens the ground path. The switch is actuated by the
latch mechanism within the seat belt buckle.
The seat belt switch is connected in series between
ground and the seat belt switch sense input of the
instrument cluster. The seat belt switch receives
ground at all times through its pigtail wire connec-
tion to the seat wire harness from a take out of the
body wire harness. An eyelet terminal connector on
the body wire harness ground take out is secured
beneath a ground screw on the left cowl side inner
panel, beneath the instrument panel. The seat belt
switch may de diagnosed using conventional diagnos-
tic tools and methods.
Fig. 43 Seat Belt Switch
1 - DRIVER SIDE FRONT OUTBOARD SEAT BELT BUCKLE
2 - SEAT CUSHION
3 - PIGTAIL WIRE
4 - INBOARD SEAT TRACK
5 - SCREW
8O - 46 RESTRAINTSDR
REAR SEAT BELT BUCKLE (Continued)
Page 683 of 2895
CHECK VALVE
DESCRIPTION
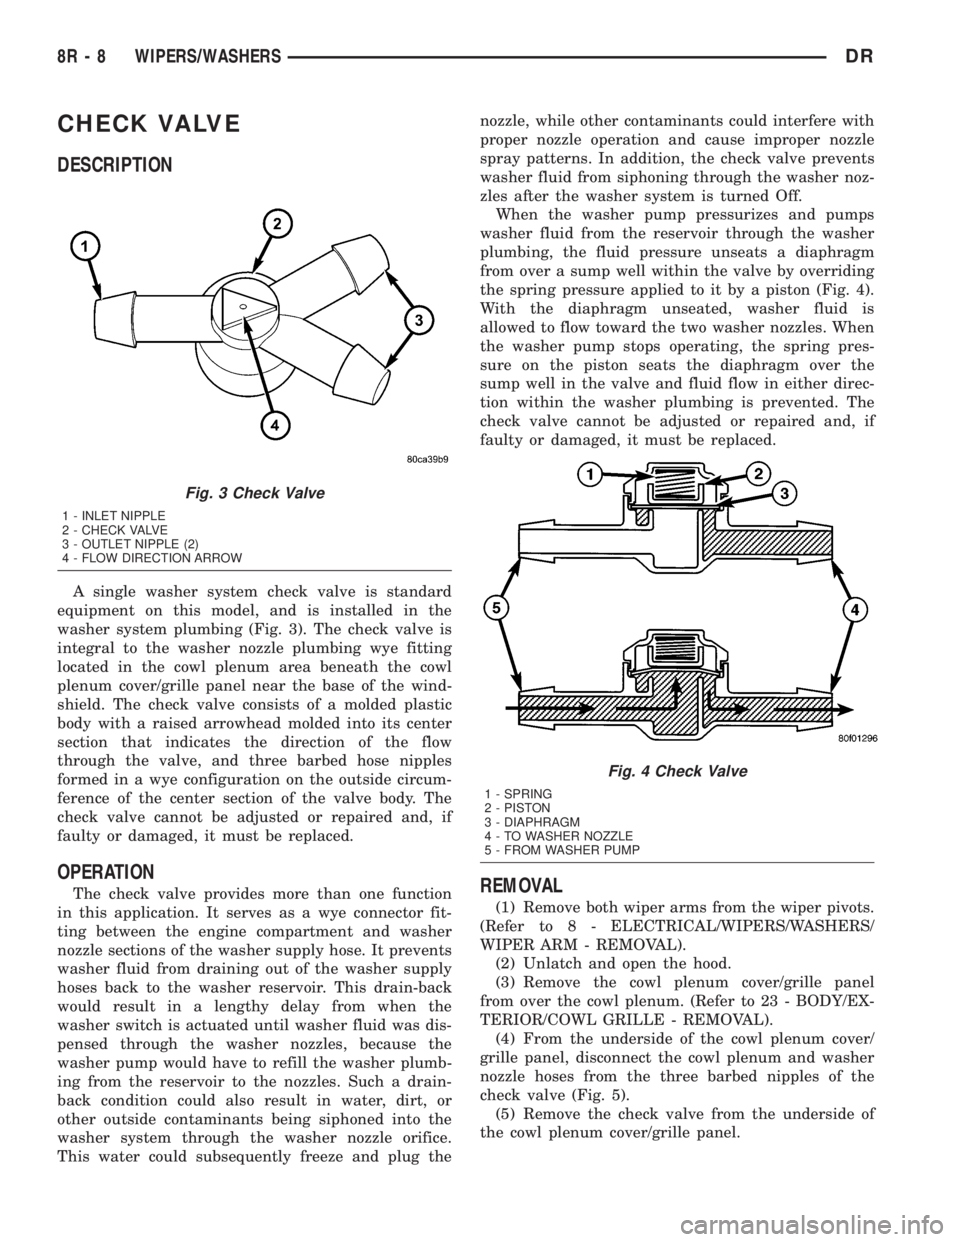
A single washer system check valve is standard
equipment on this model, and is installed in the
washer system plumbing (Fig. 3). The check valve is
integral to the washer nozzle plumbing wye fitting
located in the cowl plenum area beneath the cowl
plenum cover/grille panel near the base of the wind-
shield. The check valve consists of a molded plastic
body with a raised arrowhead molded into its center
section that indicates the direction of the flow
through the valve, and three barbed hose nipples
formed in a wye configuration on the outside circum-
ference of the center section of the valve body. The
check valve cannot be adjusted or repaired and, if
faulty or damaged, it must be replaced.
OPERATION
The check valve provides more than one function
in this application. It serves as a wye connector fit-
ting between the engine compartment and washer
nozzle sections of the washer supply hose. It prevents
washer fluid from draining out of the washer supply
hoses back to the washer reservoir. This drain-back
would result in a lengthy delay from when the
washer switch is actuated until washer fluid was dis-
pensed through the washer nozzles, because the
washer pump would have to refill the washer plumb-
ing from the reservoir to the nozzles. Such a drain-
back condition could also result in water, dirt, or
other outside contaminants being siphoned into the
washer system through the washer nozzle orifice.
This water could subsequently freeze and plug thenozzle, while other contaminants could interfere with
proper nozzle operation and cause improper nozzle
spray patterns. In addition, the check valve prevents
washer fluid from siphoning through the washer noz-
zles after the washer system is turned Off.
When the washer pump pressurizes and pumps
washer fluid from the reservoir through the washer
plumbing, the fluid pressure unseats a diaphragm
from over a sump well within the valve by overriding
the spring pressure applied to it by a piston (Fig. 4).
With the diaphragm unseated, washer fluid is
allowed to flow toward the two washer nozzles. When
the washer pump stops operating, the spring pres-
sure on the piston seats the diaphragm over the
sump well in the valve and fluid flow in either direc-
tion within the washer plumbing is prevented. The
check valve cannot be adjusted or repaired and, if
faulty or damaged, it must be replaced.REMOVAL
(1) Remove both wiper arms from the wiper pivots.
(Refer to 8 - ELECTRICAL/WIPERS/WASHERS/
WIPER ARM - REMOVAL).
(2) Unlatch and open the hood.
(3) Remove the cowl plenum cover/grille panel
from over the cowl plenum. (Refer to 23 - BODY/EX-
TERIOR/COWL GRILLE - REMOVAL).
(4) From the underside of the cowl plenum cover/
grille panel, disconnect the cowl plenum and washer
nozzle hoses from the three barbed nipples of the
check valve (Fig. 5).
(5) Remove the check valve from the underside of
the cowl plenum cover/grille panel.
Fig. 3 Check Valve
1 - INLET NIPPLE
2 - CHECK VALVE
3 - OUTLET NIPPLE (2)
4 - FLOW DIRECTION ARROW
Fig. 4 Check Valve
1 - SPRING
2 - PISTON
3 - DIAPHRAGM
4 - TO WASHER NOZZLE
5 - FROM WASHER PUMP
8R - 8 WIPERS/WASHERSDR
Page 702 of 2895
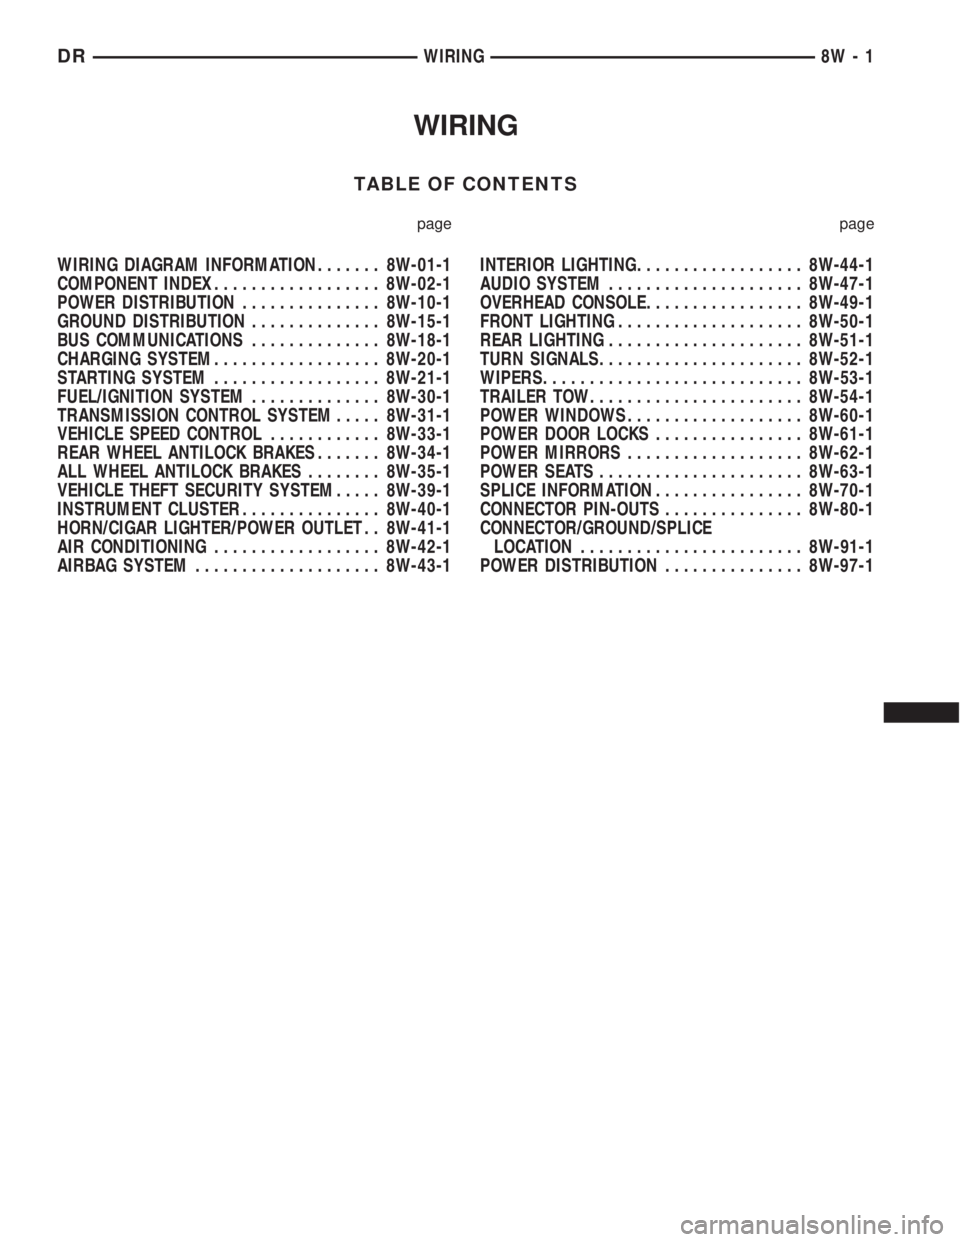
WIRING
TABLE OF CONTENTS
page page
WIRING DIAGRAM INFORMATION....... 8W-01-1
COMPONENT INDEX.................. 8W-02-1
POWER DISTRIBUTION............... 8W-10-1
GROUND DISTRIBUTION.............. 8W-15-1
BUS COMMUNICATIONS.............. 8W-18-1
CHARGING SYSTEM.................. 8W-20-1
STARTING SYSTEM.................. 8W-21-1
FUEL/IGNITION SYSTEM.............. 8W-30-1
TRANSMISSION CONTROL SYSTEM..... 8W-31-1
VEHICLE SPEED CONTROL............ 8W-33-1
REAR WHEEL ANTILOCK BRAKES....... 8W-34-1
ALL WHEEL ANTILOCK BRAKES........ 8W-35-1
VEHICLE THEFT SECURITY SYSTEM..... 8W-39-1
INSTRUMENT CLUSTER............... 8W-40-1
HORN/CIGAR LIGHTER/POWER OUTLET . . 8W-41-1
AIR CONDITIONING.................. 8W-42-1
AIRBAG SYSTEM.................... 8W-43-1INTERIOR LIGHTING.................. 8W-44-1
AUDIO SYSTEM..................... 8W-47-1
OVERHEAD CONSOLE................. 8W-49-1
FRONT LIGHTING.................... 8W-50-1
REAR LIGHTING..................... 8W-51-1
TURN SIGNALS...................... 8W-52-1
WIPERS............................ 8W-53-1
TRAILER TOW....................... 8W-54-1
POWER WINDOWS................... 8W-60-1
POWER DOOR LOCKS................ 8W-61-1
POWER MIRRORS................... 8W-62-1
POWER SEATS...................... 8W-63-1
SPLICE INFORMATION................ 8W-70-1
CONNECTOR PIN-OUTS............... 8W-80-1
CONNECTOR/GROUND/SPLICE
LOCATION........................ 8W-91-1
POWER DISTRIBUTION............... 8W-97-1 DRWIRING 8W - 1
Page 1050 of 2895
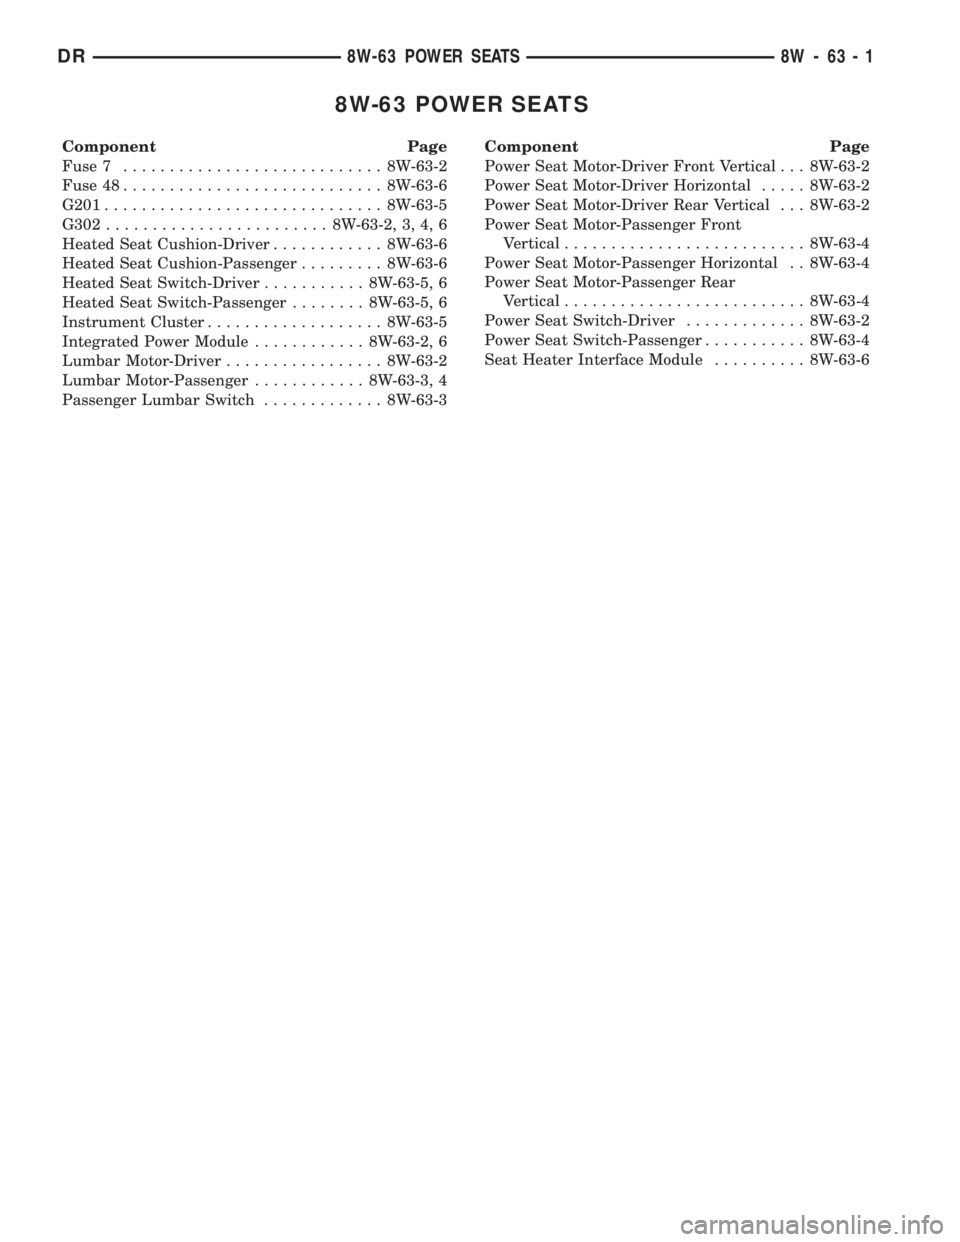
8W-63 POWER SEATS
Component Page
Fuse 7............................ 8W-63-2
Fuse 48............................ 8W-63-6
G201.............................. 8W-63-5
G302........................ 8W-63-2, 3, 4, 6
Heated Seat Cushion-Driver............ 8W-63-6
Heated Seat Cushion-Passenger......... 8W-63-6
Heated Seat Switch-Driver........... 8W-63-5, 6
Heated Seat Switch-Passenger........ 8W-63-5, 6
Instrument Cluster................... 8W-63-5
Integrated Power Module............ 8W-63-2, 6
Lumbar Motor-Driver................. 8W-63-2
Lumbar Motor-Passenger............ 8W-63-3, 4
Passenger Lumbar Switch............. 8W-63-3Component Page
Power Seat Motor-Driver Front Vertical . . . 8W-63-2
Power Seat Motor-Driver Horizontal..... 8W-63-2
Power Seat Motor-Driver Rear Vertical . . . 8W-63-2
Power Seat Motor-Passenger Front
Vertical.......................... 8W-63-4
Power Seat Motor-Passenger Horizontal . . 8W-63-4
Power Seat Motor-Passenger Rear
Vertical.......................... 8W-63-4
Power Seat Switch-Driver............. 8W-63-2
Power Seat Switch-Passenger........... 8W-63-4
Seat Heater Interface Module.......... 8W-63-6
DR8W-63 POWER SEATS 8W - 63 - 1
Page 1250 of 2895
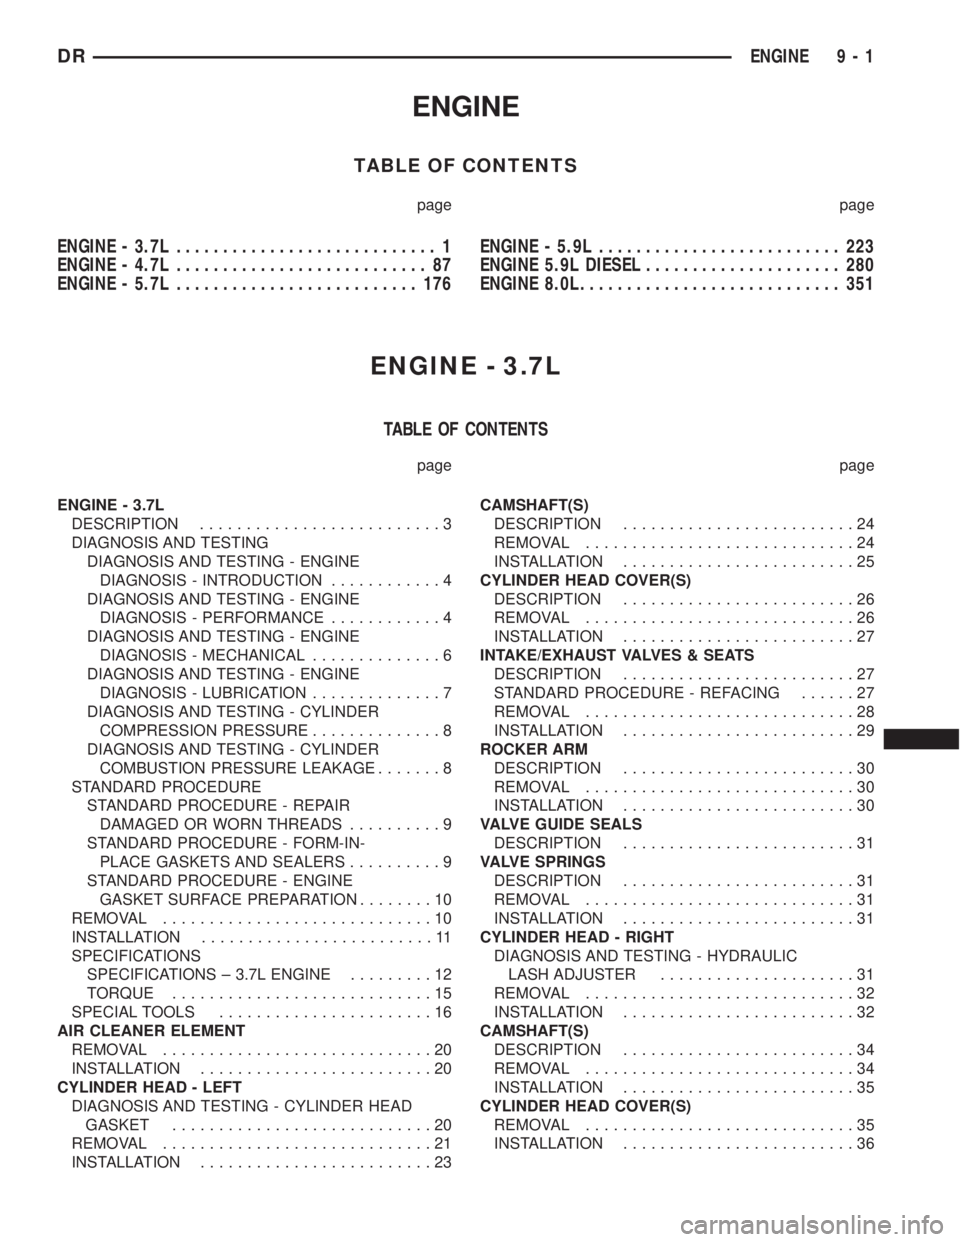
ENGINE
TABLE OF CONTENTS
page page
ENGINE - 3.7L............................ 1
ENGINE - 4.7L........................... 87
ENGINE - 5.7L.......................... 176ENGINE - 5.9L.......................... 223
ENGINE 5.9L DIESEL..................... 280
ENGINE 8.0L............................ 351
ENGINE - 3.7L
TABLE OF CONTENTS
page page
ENGINE - 3.7L
DESCRIPTION..........................3
DIAGNOSIS AND TESTING
DIAGNOSIS AND TESTING - ENGINE
DIAGNOSIS - INTRODUCTION............4
DIAGNOSIS AND TESTING - ENGINE
DIAGNOSIS - PERFORMANCE............4
DIAGNOSIS AND TESTING - ENGINE
DIAGNOSIS - MECHANICAL..............6
DIAGNOSIS AND TESTING - ENGINE
DIAGNOSIS - LUBRICATION..............7
DIAGNOSIS AND TESTING - CYLINDER
COMPRESSION PRESSURE..............8
DIAGNOSIS AND TESTING - CYLINDER
COMBUSTION PRESSURE LEAKAGE.......8
STANDARD PROCEDURE
STANDARD PROCEDURE - REPAIR
DAMAGED OR WORN THREADS..........9
STANDARD PROCEDURE - FORM-IN-
PLACE GASKETS AND SEALERS..........9
STANDARD PROCEDURE - ENGINE
GASKET SURFACE PREPARATION........10
REMOVAL.............................10
INSTALLATION.........................11
SPECIFICATIONS
SPECIFICATIONS ± 3.7L ENGINE.........12
TORQUE............................15
SPECIAL TOOLS.......................16
AIR CLEANER ELEMENT
REMOVAL.............................20
INSTALLATION.........................20
CYLINDER HEAD - LEFT
DIAGNOSIS AND TESTING - CYLINDER HEAD
GASKET............................20
REMOVAL.............................21
INSTALLATION.........................23CAMSHAFT(S)
DESCRIPTION.........................24
REMOVAL.............................24
INSTALLATION.........................25
CYLINDER HEAD COVER(S)
DESCRIPTION.........................26
REMOVAL.............................26
INSTALLATION.........................27
INTAKE/EXHAUST VALVES & SEATS
DESCRIPTION.........................27
STANDARD PROCEDURE - REFACING......27
REMOVAL.............................28
INSTALLATION.........................29
ROCKER ARM
DESCRIPTION.........................30
REMOVAL.............................30
INSTALLATION.........................30
VALVE GUIDE SEALS
DESCRIPTION.........................31
VALVE SPRINGS
DESCRIPTION.........................31
REMOVAL.............................31
INSTALLATION.........................31
CYLINDER HEAD - RIGHT
DIAGNOSIS AND TESTING - HYDRAULIC
LASH ADJUSTER.....................31
REMOVAL.............................32
INSTALLATION.........................32
CAMSHAFT(S)
DESCRIPTION.........................34
REMOVAL.............................34
INSTALLATION.........................35
CYLINDER HEAD COVER(S)
REMOVAL.............................35
INSTALLATION.........................36
DRENGINE 9 - 1
Page 1255 of 2895
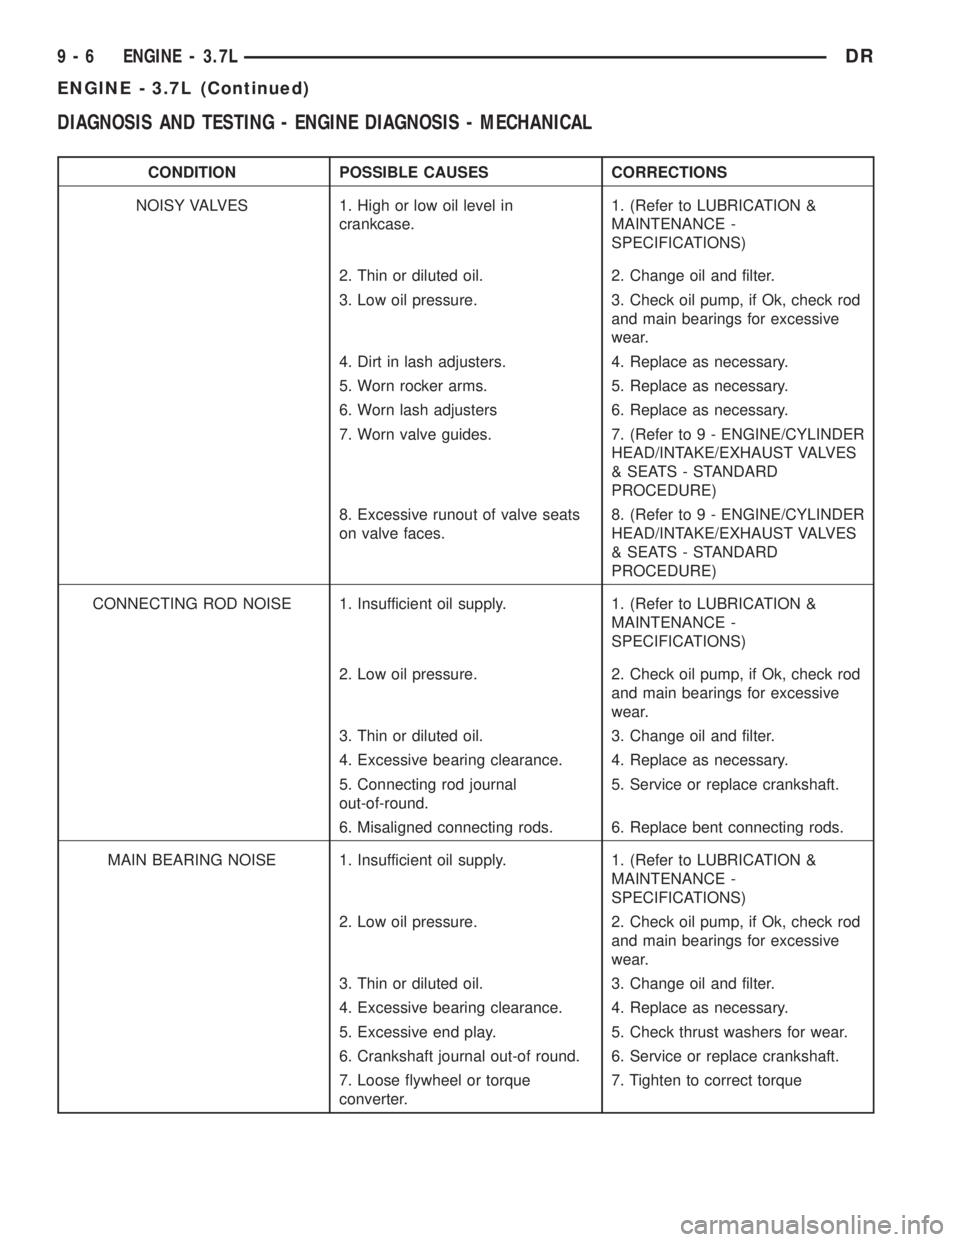
DIAGNOSIS AND TESTING - ENGINE DIAGNOSIS - MECHANICAL
CONDITION POSSIBLE CAUSES CORRECTIONS
NOISY VALVES 1. High or low oil level in
crankcase.1. (Refer to LUBRICATION &
MAINTENANCE -
SPECIFICATIONS)
2. Thin or diluted oil. 2. Change oil and filter.
3. Low oil pressure. 3. Check oil pump, if Ok, check rod
and main bearings for excessive
wear.
4. Dirt in lash adjusters. 4. Replace as necessary.
5. Worn rocker arms. 5. Replace as necessary.
6. Worn lash adjusters 6. Replace as necessary.
7. Worn valve guides. 7. (Refer to 9 - ENGINE/CYLINDER
HEAD/INTAKE/EXHAUST VALVES
& SEATS - STANDARD
PROCEDURE)
8. Excessive runout of valve seats
on valve faces.8. (Refer to 9 - ENGINE/CYLINDER
HEAD/INTAKE/EXHAUST VALVES
& SEATS - STANDARD
PROCEDURE)
CONNECTING ROD NOISE 1. Insufficient oil supply. 1. (Refer to LUBRICATION &
MAINTENANCE -
SPECIFICATIONS)
2. Low oil pressure. 2. Check oil pump, if Ok, check rod
and main bearings for excessive
wear.
3. Thin or diluted oil. 3. Change oil and filter.
4. Excessive bearing clearance. 4. Replace as necessary.
5. Connecting rod journal
out-of-round.5. Service or replace crankshaft.
6. Misaligned connecting rods. 6. Replace bent connecting rods.
MAIN BEARING NOISE 1. Insufficient oil supply. 1. (Refer to LUBRICATION &
MAINTENANCE -
SPECIFICATIONS)
2. Low oil pressure. 2. Check oil pump, if Ok, check rod
and main bearings for excessive
wear.
3. Thin or diluted oil. 3. Change oil and filter.
4. Excessive bearing clearance. 4. Replace as necessary.
5. Excessive end play. 5. Check thrust washers for wear.
6. Crankshaft journal out-of round. 6. Service or replace crankshaft.
7. Loose flywheel or torque
converter.7. Tighten to correct torque
9 - 6 ENGINE - 3.7LDR
ENGINE - 3.7L (Continued)