2003 DODGE RAM transmission
[x] Cancel search: transmissionPage 439 of 2895
SPECIFICATIONS - TORQUE - STARTING
SYSTEM
DESCRIPTION N´m Ft. Lbs. In. Lbs.
Battery Cable Eyelet Nut at
Solenoid (large nut - gas engines)25 19 221
Battery Cable Eyelet Nut at
Solenoid (large nut - diesel engine)14 - 120
Starter Solenoid Nut (small nut -
diesel engine)6-55
Starter Mounting Bolts - Gas
Engines68 50 -
Starter Mounting Nut - Gas Engines 68 50 -
Starter Mounting Bolts - Diesel 43 32 -
STARTER MOTOR
DIAGNOSIS AND TESTING - STARTER MOTOR
Correct starter motor operation can be confirmed
by performing the following free running bench test.
This test can only be performed with starter motor
removed from vehicle. Refer to Specifications for
starter motor specifications.
(1) Remove starter motor from vehicle. Refer to
Starter Motor Removal and Installation.
(2) Mount starter motor securely in a soft-jawed
bench vise. The vise jaws should be clamped on the
mounting flange of starter motor. Never clamp on
starter motor by field frame.
(3) Connect a suitable volt-ampere tester and a
12-volt battery to starter motor in series, and set
ammeter to 100 ampere scale. See instructions pro-
vided by manufacturer of volt-ampere tester being
used.
(4) Install jumper wire from solenoid terminal to
solenoid battery terminal. The starter motor should
operate. If starter motor fails to operate, replace
faulty starter motor assembly.
(5) Adjust carbon pile load of tester to obtain free
running test voltage. Refer to Specifications for
starter motor free running test voltage specifications.
(6) Note reading on ammeter and compare reading
to free running test maximum amperage draw. Refer
to Specifications for starter motor free running test
maximum amperage draw specifications.
(7) If ammeter reading exceeds maximum amper-
age draw specification, replace faulty starter motor
assembly.
STARTER SOLENOID
This test can only be performed with starter motor
removed from vehicle.(1) Remove starter motor from vehicle. Refer to
Starter Motor Removal and Installation.
(2) Disconnect wire from solenoid field coil termi-
nal.
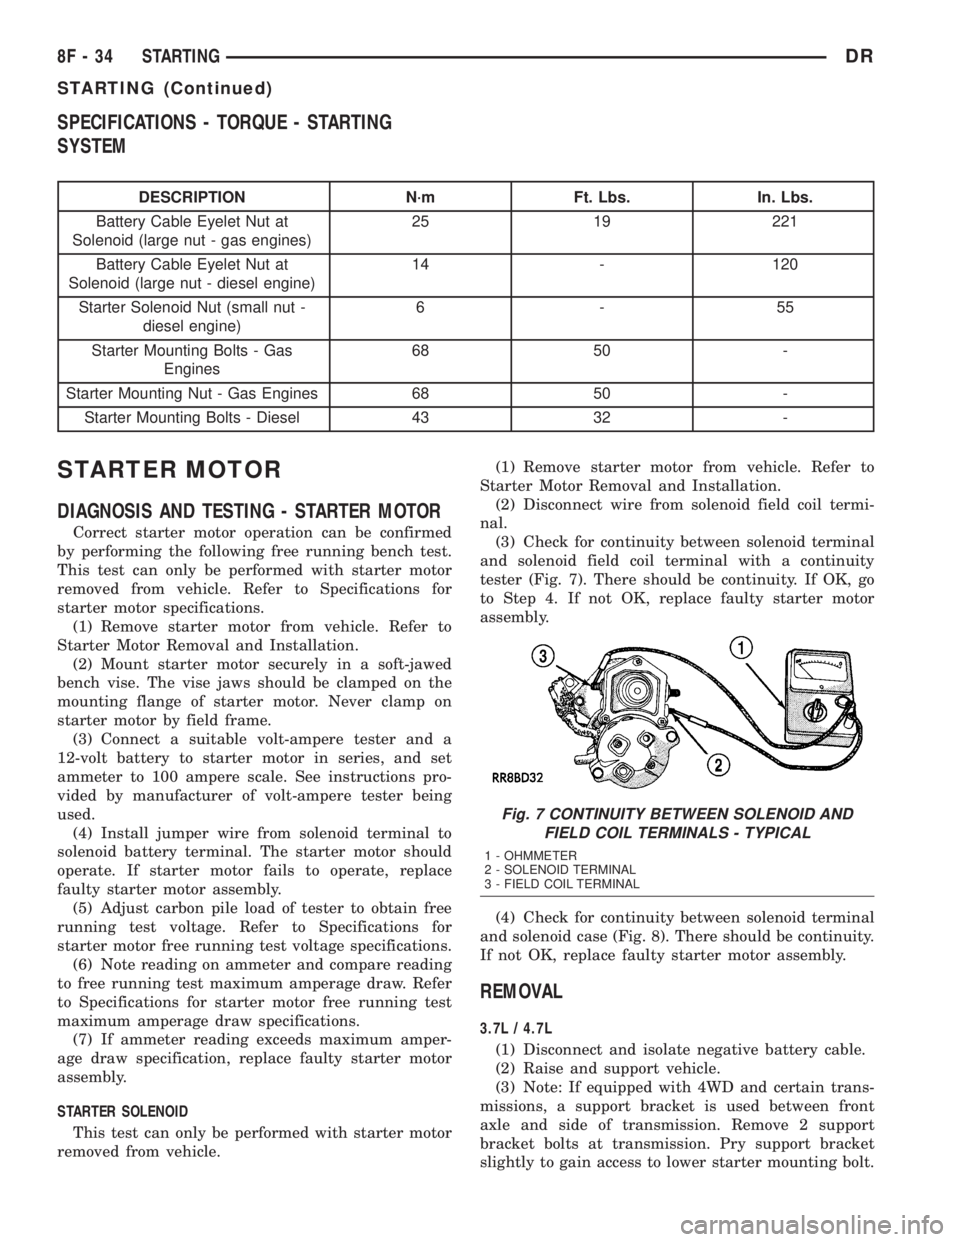
(3) Check for continuity between solenoid terminal
and solenoid field coil terminal with a continuity
tester (Fig. 7). There should be continuity. If OK, go
to Step 4. If not OK, replace faulty starter motor
assembly.
(4) Check for continuity between solenoid terminal
and solenoid case (Fig. 8). There should be continuity.
If not OK, replace faulty starter motor assembly.
REMOVAL
3.7L / 4.7L
(1) Disconnect and isolate negative battery cable.
(2) Raise and support vehicle.
(3) Note: If equipped with 4WD and certain trans-
missions, a support bracket is used between front
axle and side of transmission. Remove 2 support
bracket bolts at transmission. Pry support bracket
slightly to gain access to lower starter mounting bolt.
Fig. 7 CONTINUITY BETWEEN SOLENOID AND
FIELD COIL TERMINALS - TYPICAL
1 - OHMMETER
2 - SOLENOID TERMINAL
3 - FIELD COIL TERMINAL
8F - 34 STARTINGDR
STARTING (Continued)
Page 440 of 2895
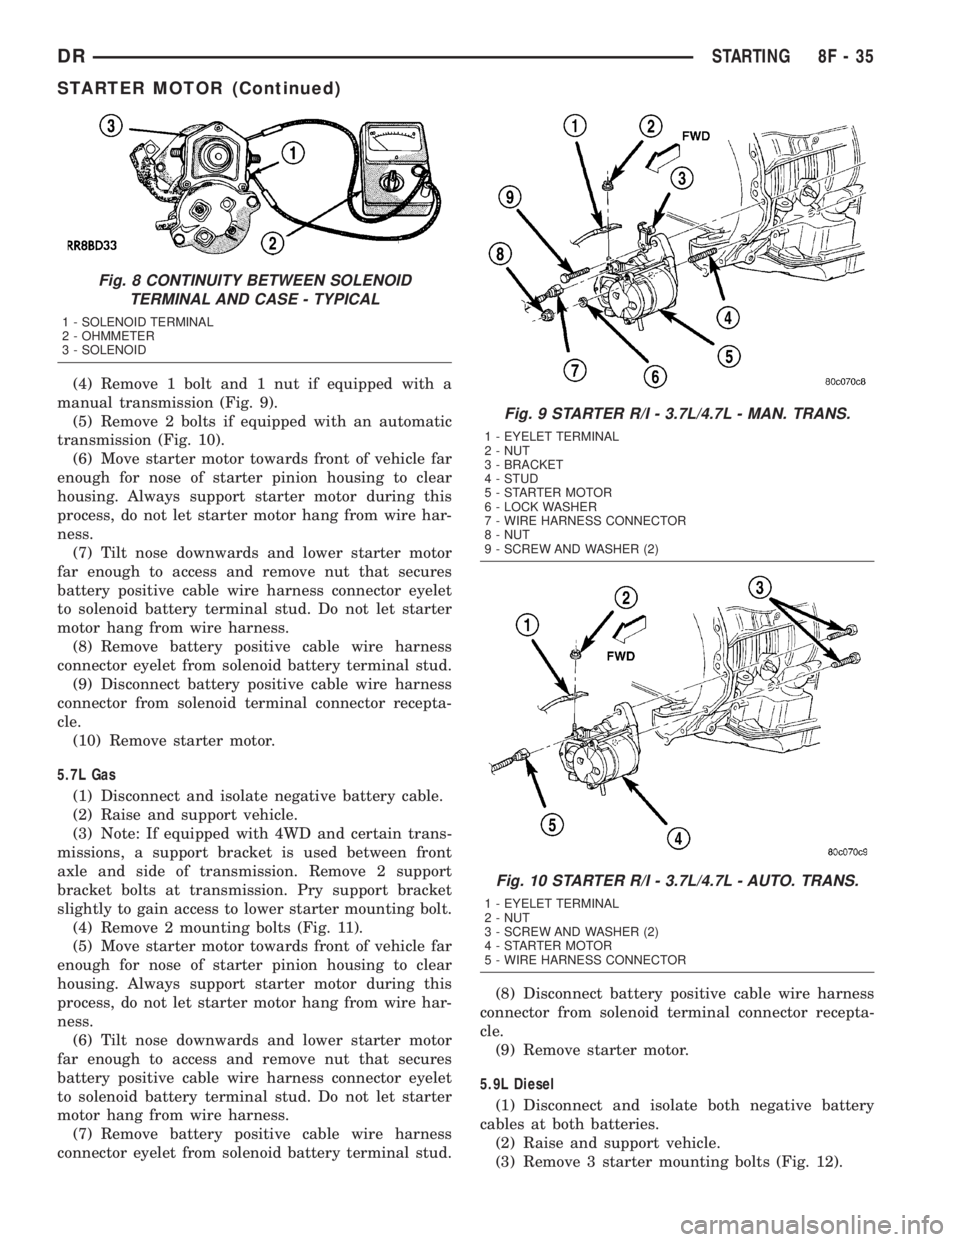
(4) Remove 1 bolt and 1 nut if equipped with a
manual transmission (Fig. 9).
(5) Remove 2 bolts if equipped with an automatic
transmission (Fig. 10).
(6) Move starter motor towards front of vehicle far
enough for nose of starter pinion housing to clear
housing. Always support starter motor during this
process, do not let starter motor hang from wire har-
ness.
(7) Tilt nose downwards and lower starter motor
far enough to access and remove nut that secures
battery positive cable wire harness connector eyelet
to solenoid battery terminal stud. Do not let starter
motor hang from wire harness.
(8) Remove battery positive cable wire harness
connector eyelet from solenoid battery terminal stud.
(9) Disconnect battery positive cable wire harness
connector from solenoid terminal connector recepta-
cle.
(10) Remove starter motor.
5.7L Gas
(1) Disconnect and isolate negative battery cable.
(2) Raise and support vehicle.
(3) Note: If equipped with 4WD and certain trans-
missions, a support bracket is used between front
axle and side of transmission. Remove 2 support
bracket bolts at transmission. Pry support bracket
slightly to gain access to lower starter mounting bolt.
(4) Remove 2 mounting bolts (Fig. 11).
(5) Move starter motor towards front of vehicle far
enough for nose of starter pinion housing to clear
housing. Always support starter motor during this
process, do not let starter motor hang from wire har-
ness.
(6) Tilt nose downwards and lower starter motor
far enough to access and remove nut that secures
battery positive cable wire harness connector eyelet
to solenoid battery terminal stud. Do not let starter
motor hang from wire harness.
(7) Remove battery positive cable wire harness
connector eyelet from solenoid battery terminal stud.(8) Disconnect battery positive cable wire harness
connector from solenoid terminal connector recepta-
cle.
(9) Remove starter motor.
5.9L Diesel
(1) Disconnect and isolate both negative battery
cables at both batteries.
(2) Raise and support vehicle.
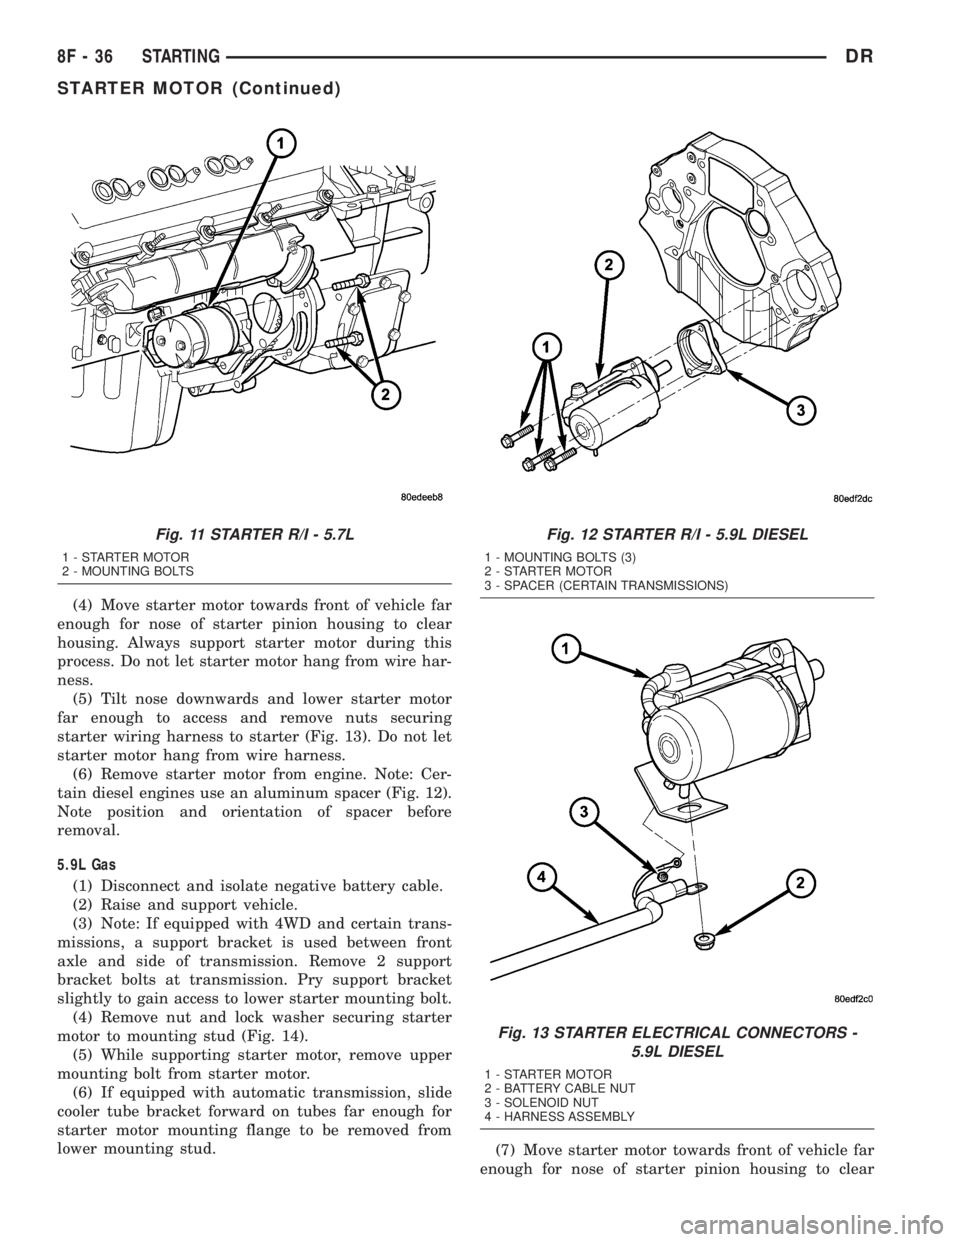
(3) Remove 3 starter mounting bolts (Fig. 12).
Fig. 8 CONTINUITY BETWEEN SOLENOID
TERMINAL AND CASE - TYPICAL
1 - SOLENOID TERMINAL
2 - OHMMETER
3 - SOLENOID
Fig. 9 STARTER R/I - 3.7L/4.7L - MAN. TRANS.
1 - EYELET TERMINAL
2 - NUT
3 - BRACKET
4 - STUD
5 - STARTER MOTOR
6 - LOCK WASHER
7 - WIRE HARNESS CONNECTOR
8 - NUT
9 - SCREW AND WASHER (2)
Fig. 10 STARTER R/I - 3.7L/4.7L - AUTO. TRANS.
1 - EYELET TERMINAL
2 - NUT
3 - SCREW AND WASHER (2)
4 - STARTER MOTOR
5 - WIRE HARNESS CONNECTOR
DRSTARTING 8F - 35
STARTER MOTOR (Continued)
Page 441 of 2895
(4) Move starter motor towards front of vehicle far
enough for nose of starter pinion housing to clear
housing. Always support starter motor during this
process. Do not let starter motor hang from wire har-
ness.
(5) Tilt nose downwards and lower starter motor
far enough to access and remove nuts securing
starter wiring harness to starter (Fig. 13). Do not let
starter motor hang from wire harness.
(6) Remove starter motor from engine. Note: Cer-
tain diesel engines use an aluminum spacer (Fig. 12).
Note position and orientation of spacer before
removal.
5.9L Gas
(1) Disconnect and isolate negative battery cable.
(2) Raise and support vehicle.
(3) Note: If equipped with 4WD and certain trans-
missions, a support bracket is used between front
axle and side of transmission. Remove 2 support
bracket bolts at transmission. Pry support bracket
slightly to gain access to lower starter mounting bolt.
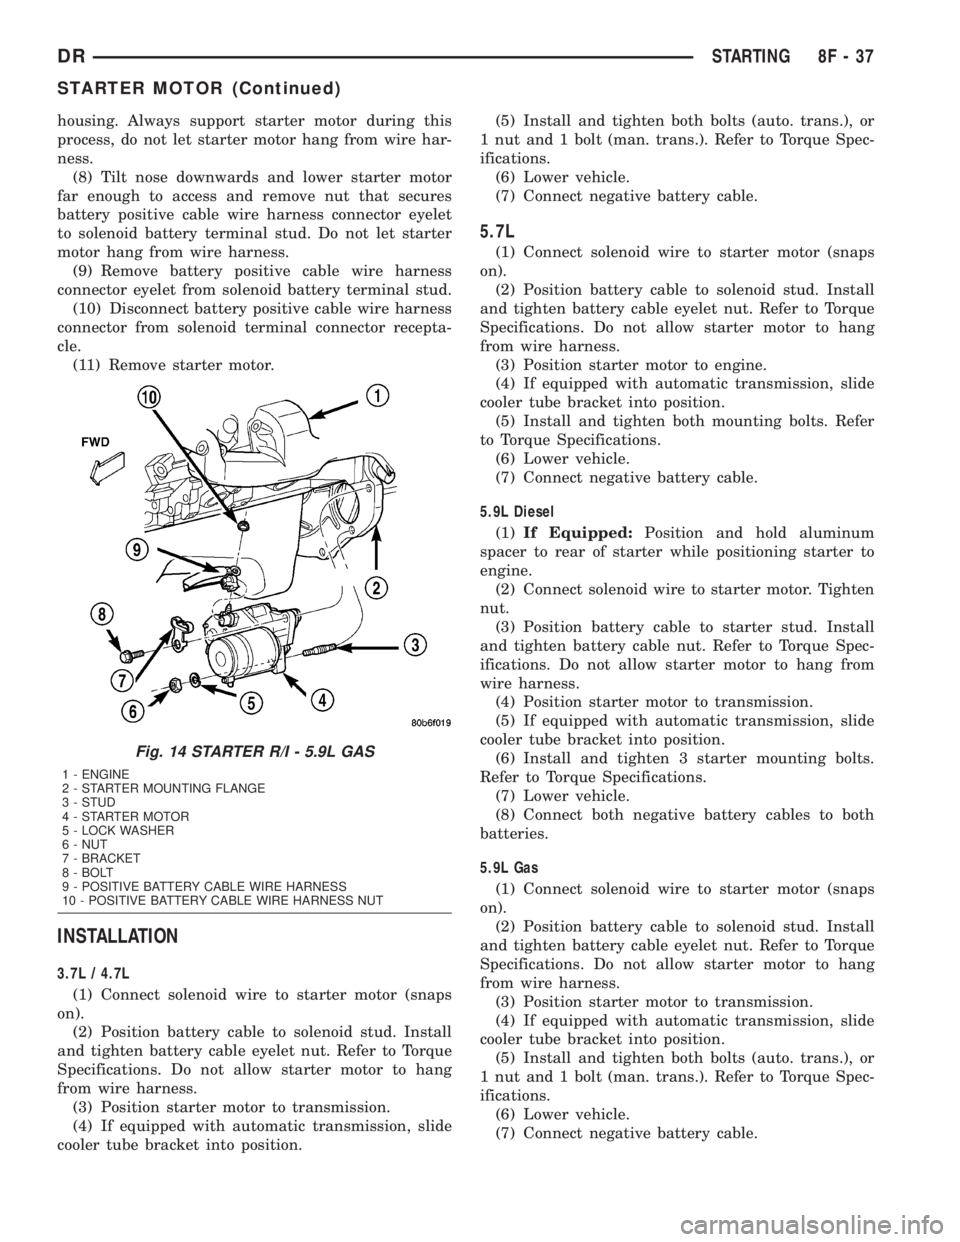
(4) Remove nut and lock washer securing starter
motor to mounting stud (Fig. 14).
(5) While supporting starter motor, remove upper
mounting bolt from starter motor.
(6) If equipped with automatic transmission, slide
cooler tube bracket forward on tubes far enough for
starter motor mounting flange to be removed from
lower mounting stud.
(7) Move starter motor towards front of vehicle far
enough for nose of starter pinion housing to clear
Fig. 11 STARTER R/I - 5.7L
1 - STARTER MOTOR
2 - MOUNTING BOLTS
Fig. 12 STARTER R/I - 5.9L DIESEL
1 - MOUNTING BOLTS (3)
2 - STARTER MOTOR
3 - SPACER (CERTAIN TRANSMISSIONS)
Fig. 13 STARTER ELECTRICAL CONNECTORS -
5.9L DIESEL
1 - STARTER MOTOR
2 - BATTERY CABLE NUT
3 - SOLENOID NUT
4 - HARNESS ASSEMBLY
8F - 36 STARTINGDR
STARTER MOTOR (Continued)
Page 442 of 2895
housing. Always support starter motor during this
process, do not let starter motor hang from wire har-
ness.
(8) Tilt nose downwards and lower starter motor
far enough to access and remove nut that secures
battery positive cable wire harness connector eyelet
to solenoid battery terminal stud. Do not let starter
motor hang from wire harness.
(9) Remove battery positive cable wire harness
connector eyelet from solenoid battery terminal stud.
(10) Disconnect battery positive cable wire harness
connector from solenoid terminal connector recepta-
cle.
(11) Remove starter motor.
INSTALLATION
3.7L / 4.7L
(1) Connect solenoid wire to starter motor (snaps
on).
(2) Position battery cable to solenoid stud. Install
and tighten battery cable eyelet nut. Refer to Torque
Specifications. Do not allow starter motor to hang
from wire harness.
(3) Position starter motor to transmission.
(4) If equipped with automatic transmission, slide
cooler tube bracket into position.(5) Install and tighten both bolts (auto. trans.), or
1 nut and 1 bolt (man. trans.). Refer to Torque Spec-
ifications.
(6) Lower vehicle.
(7) Connect negative battery cable.
5.7L
(1) Connect solenoid wire to starter motor (snaps
on).
(2) Position battery cable to solenoid stud. Install
and tighten battery cable eyelet nut. Refer to Torque
Specifications. Do not allow starter motor to hang
from wire harness.
(3) Position starter motor to engine.
(4) If equipped with automatic transmission, slide
cooler tube bracket into position.
(5) Install and tighten both mounting bolts. Refer
to Torque Specifications.
(6) Lower vehicle.
(7) Connect negative battery cable.
5.9L Diesel
(1)If Equipped:Position and hold aluminum
spacer to rear of starter while positioning starter to
engine.
(2) Connect solenoid wire to starter motor. Tighten
nut.
(3) Position battery cable to starter stud. Install
and tighten battery cable nut. Refer to Torque Spec-
ifications. Do not allow starter motor to hang from
wire harness.
(4) Position starter motor to transmission.
(5) If equipped with automatic transmission, slide
cooler tube bracket into position.
(6) Install and tighten 3 starter mounting bolts.
Refer to Torque Specifications.
(7) Lower vehicle.
(8) Connect both negative battery cables to both
batteries.
5.9L Gas
(1) Connect solenoid wire to starter motor (snaps
on).
(2) Position battery cable to solenoid stud. Install
and tighten battery cable eyelet nut. Refer to Torque
Specifications. Do not allow starter motor to hang
from wire harness.
(3) Position starter motor to transmission.
(4) If equipped with automatic transmission, slide
cooler tube bracket into position.
(5) Install and tighten both bolts (auto. trans.), or
1 nut and 1 bolt (man. trans.). Refer to Torque Spec-
ifications.
(6) Lower vehicle.
(7) Connect negative battery cable.
Fig. 14 STARTER R/I - 5.9L GAS
1 - ENGINE
2 - STARTER MOUNTING FLANGE
3 - STUD
4 - STARTER MOTOR
5 - LOCK WASHER
6 - NUT
7 - BRACKET
8 - BOLT
9 - POSITIVE BATTERY CABLE WIRE HARNESS
10 - POSITIVE BATTERY CABLE WIRE HARNESS NUT
DRSTARTING 8F - 37
STARTER MOTOR (Continued)
Page 443 of 2895
STARTER MOTOR RELAY
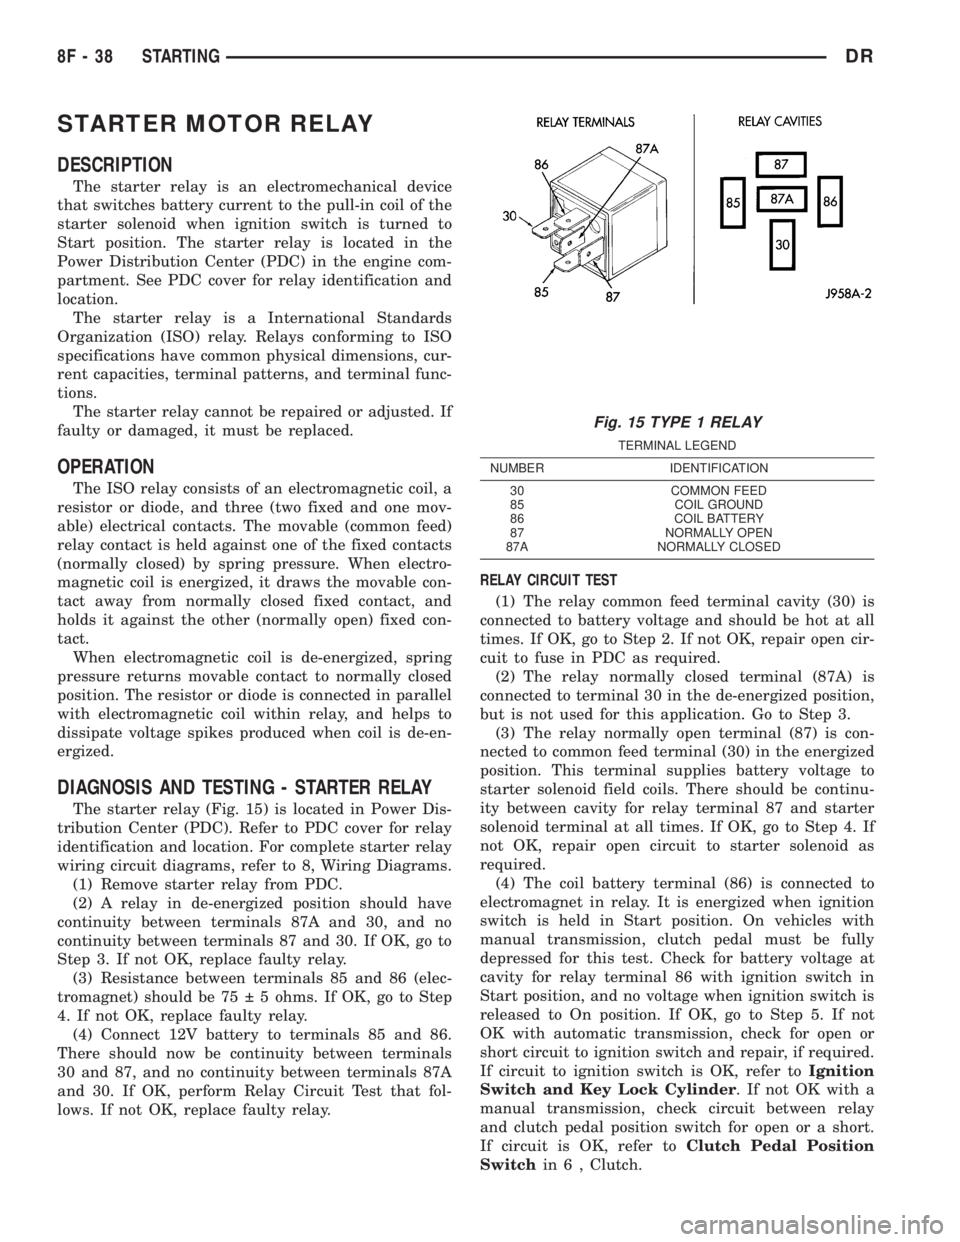
DESCRIPTION
The starter relay is an electromechanical device
that switches battery current to the pull-in coil of the
starter solenoid when ignition switch is turned to
Start position. The starter relay is located in the
Power Distribution Center (PDC) in the engine com-
partment. See PDC cover for relay identification and
location.
The starter relay is a International Standards
Organization (ISO) relay. Relays conforming to ISO
specifications have common physical dimensions, cur-
rent capacities, terminal patterns, and terminal func-
tions.
The starter relay cannot be repaired or adjusted. If
faulty or damaged, it must be replaced.
OPERATION
The ISO relay consists of an electromagnetic coil, a
resistor or diode, and three (two fixed and one mov-
able) electrical contacts. The movable (common feed)
relay contact is held against one of the fixed contacts
(normally closed) by spring pressure. When electro-
magnetic coil is energized, it draws the movable con-
tact away from normally closed fixed contact, and
holds it against the other (normally open) fixed con-
tact.
When electromagnetic coil is de-energized, spring
pressure returns movable contact to normally closed
position. The resistor or diode is connected in parallel
with electromagnetic coil within relay, and helps to
dissipate voltage spikes produced when coil is de-en-
ergized.
DIAGNOSIS AND TESTING - STARTER RELAY
The starter relay (Fig. 15) is located in Power Dis-
tribution Center (PDC). Refer to PDC cover for relay
identification and location. For complete starter relay
wiring circuit diagrams, refer to 8, Wiring Diagrams.
(1) Remove starter relay from PDC.
(2) A relay in de-energized position should have
continuity between terminals 87A and 30, and no
continuity between terminals 87 and 30. If OK, go to
Step 3. If not OK, replace faulty relay.
(3) Resistance between terminals 85 and 86 (elec-
tromagnet) should be 75 5 ohms. If OK, go to Step
4. If not OK, replace faulty relay.
(4) Connect 12V battery to terminals 85 and 86.
There should now be continuity between terminals
30 and 87, and no continuity between terminals 87A
and 30. If OK, perform Relay Circuit Test that fol-
lows. If not OK, replace faulty relay.RELAY CIRCUIT TEST
(1) The relay common feed terminal cavity (30) is
connected to battery voltage and should be hot at all
times. If OK, go to Step 2. If not OK, repair open cir-
cuit to fuse in PDC as required.
(2) The relay normally closed terminal (87A) is
connected to terminal 30 in the de-energized position,
but is not used for this application. Go to Step 3.
(3) The relay normally open terminal (87) is con-
nected to common feed terminal (30) in the energized
position. This terminal supplies battery voltage to
starter solenoid field coils. There should be continu-
ity between cavity for relay terminal 87 and starter
solenoid terminal at all times. If OK, go to Step 4. If
not OK, repair open circuit to starter solenoid as
required.
(4) The coil battery terminal (86) is connected to
electromagnet in relay. It is energized when ignition
switch is held in Start position. On vehicles with
manual transmission, clutch pedal must be fully
depressed for this test. Check for battery voltage at
cavity for relay terminal 86 with ignition switch in
Start position, and no voltage when ignition switch is
released to On position. If OK, go to Step 5. If not
OK with automatic transmission, check for open or
short circuit to ignition switch and repair, if required.
If circuit to ignition switch is OK, refer toIgnition
Switch and Key Lock Cylinder. If not OK with a
manual transmission, check circuit between relay
and clutch pedal position switch for open or a short.
If circuit is OK, refer toClutch Pedal Position
Switchin 6 , Clutch.
Fig. 15 TYPE 1 RELAY
TERMINAL LEGEND
NUMBER IDENTIFICATION
30 COMMON FEED
85 COIL GROUND
86 COIL BATTERY
87 NORMALLY OPEN
87A NORMALLY CLOSED
8F - 38 STARTINGDR
Page 444 of 2895
(5) The coil ground terminal (85) is connected to
the electromagnet in the relay. On vehicles with
manual transmission, it is grounded at all times. On
vehicles with automatic transmission, it is grounded
through park/neutral position switch only when gear-
shift selector lever is in Park or Neutral positions.
Check for continuity to ground at cavity for relay ter-
minal 85. If not OK with manual transmission,
repair circuit to ground as required. If not OK with
automatic transmission, check for pen or short circuit
to park/neutral position switch and repair, if
required. If circuit to park/neutral position switch is
OK, refer toPark/Neutral Position Switchin 21,
Transmission.
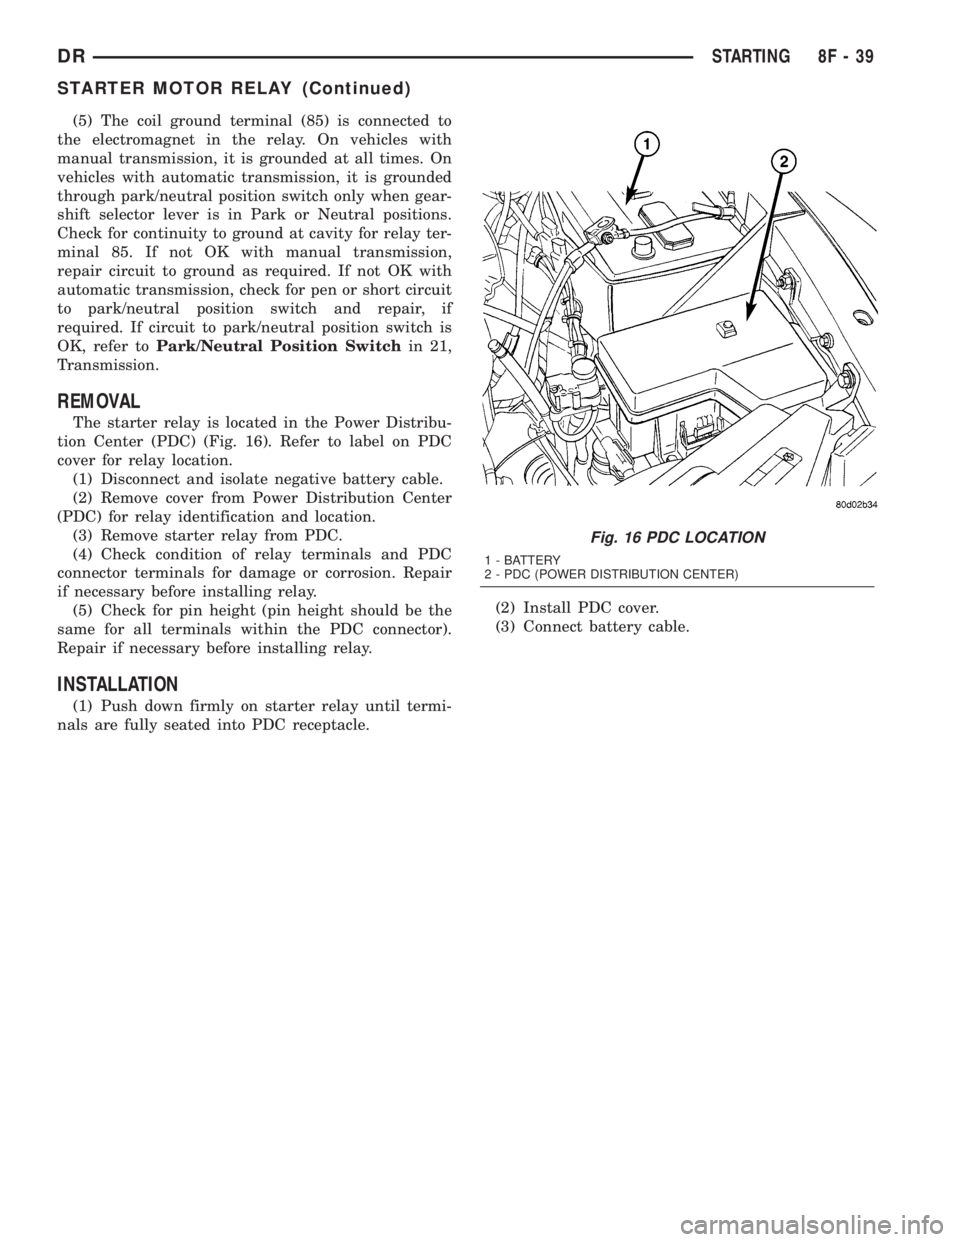
REMOVAL
The starter relay is located in the Power Distribu-
tion Center (PDC) (Fig. 16). Refer to label on PDC
cover for relay location.
(1) Disconnect and isolate negative battery cable.
(2) Remove cover from Power Distribution Center
(PDC) for relay identification and location.
(3) Remove starter relay from PDC.
(4) Check condition of relay terminals and PDC
connector terminals for damage or corrosion. Repair
if necessary before installing relay.
(5) Check for pin height (pin height should be the
same for all terminals within the PDC connector).
Repair if necessary before installing relay.
INSTALLATION
(1) Push down firmly on starter relay until termi-
nals are fully seated into PDC receptacle.(2) Install PDC cover.
(3) Connect battery cable.
Fig. 16 PDC LOCATION
1 - BATTERY
2 - PDC (POWER DISTRIBUTION CENTER)
DRSTARTING 8F - 39
STARTER MOTOR RELAY (Continued)
Page 479 of 2895

4.7L V-8
Battery voltage is supplied to the 8 individual igni-
tion coils from the ASD relay. The Powertrain Con-
trol Module (PCM) opens and closes each ignition coil
ground circuit at a determined time for ignition coil
operation.
Base ignition timing is not adjustable.By con-
trolling the coil ground circuit, the PCM is able to set
the base timing and adjust the ignition timing
advance. This is done to meet changing engine oper-
ating conditions.
The ignition coil is not oil filled. The windings are
embedded in an epoxy compound. This provides heat
and vibration resistance that allows the ignition coil
to be mounted on the engine.
Because of coil design, spark plug cables (second-
ary cables) are not used with the 4.7L V-8 engine.
5.7L V-8
The ignition system is controlled by the Powertrain
Control Module (PCM) on all engines.
A ªwasted sparkº system is used on the 5.7L
engine combining paired, or dual-firing coils, and 2
spark plugs per cylinder. The coils and spark plugs
are connected with paired, secondary high-voltage
cables.
Each cylinder is equipped with 1 dual-output coil.
Meaning one coil mounts directly over one of the
dual spark plugs for 1 high-voltage output. A second
high-voltage output is supplied directly from the
same coil (using a plug cable) to one of the dual
spark plugs on a corresponding (paired) cylinder on
the opposite cylinder bank.
Each coil fires 2 spark plugs simultaneously on
each of the cylinder banks (one cylinder on compres-
sion stroke and one cylinder on exhaust stroke).
EXAMPLE :When the #1 cylinder is on compression
stroke and ready for spark, the #1 coil will fire one of
the dual spark plugs on the #1 cylinder (directly
below the coil). The other dual spark plug on the #1
cylinder will be fired by the #6 coil. At the same
time, the #1 coil will fire a ªwasted sparkº to one of
the dual spark plugs at the #6 cylinder as coil #6 also
fires a ªwasted sparkº to one of the dual spark plugs
at the #6 cylinder.
The firing order is paired at cylinders 1/6, 2/3, 4/7,
5/8. Basic cylinder firing order is 1±8±4±3±6±5±7±2.
Battery voltage is supplied to all of the ignition
coils positive terminals from the ASD relay. If the
PCM does not see a signal from the crankshaft and
camshaft sensors (indicating the ignition key is ON
but the engine is not running), it will shut down the
ASD circuit.
Base ignition timing is not adjustable on the
5.7L V-8 engine.By controlling the coil ground cir-
cuits, the PCM is able to set the base timing andadjust the ignition timing advance. This is done to
meet changing engine operating conditions.
The PCM adjusts ignition timing based on inputs it
receives from:
²The engine coolant temperature sensor
²The crankshaft position sensor (engine speed)
²The camshaft position sensor (crankshaft posi-
tion)
²The manifold absolute pressure (MAP) sensor
²The throttle position sensor
²Transmission gear selection
5.9L V-8
A single ignition coil is used. The Powertrain Con-
trol Module (PCM) opens and closes the ignition coil
ground circuit for ignition coil operation.
Battery voltage is supplied to the ignition coil pos-
itive terminal from the ASD relay. If the PCM does
not see a signal from the crankshaft and camshaft
sensors (indicating the ignition key is ON but the
engine is not running), it will shut down the ASD cir-
cuit.
Base ignition timing is not adjustable on any
engine.By controlling the coil ground circuit, the
PCM is able to set the base timing and adjust the
ignition timing advance. This is done to meet chang-
ing engine operating conditions.
Conventional spark plug cables (secondary cables)
are used with the 5.9L V-8 engine.
8.0L V-10
When one of the 5 independent coils discharges, it
fires two paired cylinders at the same time (one cyl-
inder on compression stroke and the other cylinder
on exhaust stroke).
Coil firing is paired together on cylinders:
²Number 5 and 10
²Number 9 and 8
²Number 1 and 6
²Number 7 and 4
²Number 3 and 2
The ignition system is controlled by the Powertrain
Control Module (PCM) on all engines.
Battery voltage is supplied to all of the ignition
coils positive terminals from the ASD relay. If the
PCM does not see a signal from the crankshaft and
camshaft sensors (indicating the ignition key is ON
but the engine is not running), it will shut down the
ASD circuit.
Conventional spark plug cables (secondary cables)
are used with the 8.0L V-10 engine.
Base ignition timing is not adjustable on the
8.0L V-10 engine.By controlling the coil ground cir-
cuits, the PCM is able to set the base timing and
adjust the ignition timing advance. This is done to
meet changing engine operating conditions.
8I - 22 IGNITION CONTROLDR
IGNITION COIL (Continued)
Page 480 of 2895

The PCM adjusts ignition timing based on inputs it
receives from:
²The engine coolant temperature sensor
²The crankshaft position sensor (engine speed)
²The camshaft position sensor (crankshaft posi-
tion)
²The manifold absolute pressure (MAP) sensor
²The throttle position sensor
²Transmission gear selection
REMOVAL
3.7L V-6
An individual ignition coil is used for each spark
plug (Fig. 30). The coil fits into machined holes in the
cylinder head. A mounting stud/nut secures each coil
to the top of the intake manifold (Fig. 31). The bot-
tom of the coil is equipped with a rubber boot to seal
the spark plug to the coil. Inside each rubber boot is
a spring. The spring is used for a mechanical contact
between the coil and the top of the spark plug. These
rubber boots and springs are a permanent part of the
coil and are not serviced separately. An o-ring (Fig.
30) is used to seal the coil at the opening into the cyl-
inder head.
(1) Depending on which coil is being removed, the
throttle body air intake tube or intake box may need
to be removed to gain access to coil.
(2) Disconnect electrical connector from coil by
pushing downward on release lock on top of connec-
tor and pull connector from coil.
(3) Clean area at base of coil with compressed air
before removal.
(4) Remove coil mounting nut from mounting stud
(Fig. 31).
(5) Carefully pull up coil from cylinder head open-
ing with a slight twisting action.
(6) Remove coil from vehicle.
4.7L V-8
An individual ignition coil is used for each spark
plug (Fig. 30). The coil fits into machined holes in the
cylinder head. A mounting stud/nut secures each coil
to the top of the intake manifold (Fig. 32). The bot-
tom of the coil is equipped with a rubber boot to seal
the spark plug to the coil. Inside each rubber boot is
a spring. The spring is used for a mechanical contact
between the coil and the top of the spark plug. These
rubber boots and springs are a permanent part of the
coil and are not serviced separately. An o-ring (Fig.
30) is used to seal the coil at the opening into the cyl-
inder head.
(1) Depending on which coil is being removed, the
throttle body air intake tube or intake box may need
to be removed to gain access to coil.(2) Disconnect electrical connector (Fig. 32) from
coil by pushing downward on release lock on top of
connector and pull connector from coil.
(3) Clean area at base of coil with compressed air
before removal.
(4) Remove coil mounting nut from mounting stud
(Fig. 32).
(5) Carefully pull up coil from cylinder head open-
ing with a slight twisting action.
(6) Remove coil from vehicle.
5.7L V-8
Before removing or disconnecting any spark plug
cables, note their original position. Remove cables
one-at-a-time. To prevent ignition crossfire, spark
plug cablesMUSTbe placed in cable tray (routing
loom) into their original position.
An individual ignition coil (Fig. 33) is used at each
cylinder. The coil mounts to the top of the valve cover
with 2 bolts (Fig. 34). The bottom of the coil is
equipped with a rubber boot to seal the spark plug to
the coil. Inside each rubber boot is a spring. The
spring is used for a mechanical contact between the
coil and the top of the spark plug.
(1) Depending on which coil is being removed, the
throttle body air intake tube or intake box may need
to be removed to gain access to coil.
(2) Unlock electrical connector (Fig. 34) by moving
slide lock first. Press on release lock (Fig. 34) while
pulling electrical connector from coil.
(3) Disconnect secondary high-voltage cable from
coil with a twisting action.
(4) Clean area at base of coil with compressed air
before removal.
(5) Remove 2 mounting bolts (note that mounting
bolts are retained to coil).
(6) Carefully pull up coil from cylinder head open-
ing with a slight twisting action.
(7) Remove coil from vehicle.
(8) Before installing spark plug cables to either the
spark plugs or coils, or before installing a coil to a
spark plug, apply dielectric grease to inside of boots.
5.9L V-8
The coil is not oil filled. The coil windings are
embedded in an epoxy compound. This provides heat
and vibration resistance that allows the coil to be
mounted on the engine. If the coil is replaced, it must
be replaced with the same type.
5.9L V-8 LDC-Gas Engines: The coil is mounted to
a bracket that is bolted to the front of the right
engine cylinder head (Fig. 35). This bracket is
mounted on top of the automatic belt tensioner
bracket using common bolts.
DRIGNITION CONTROL 8I - 23
IGNITION COIL (Continued)