2003 BMW Z4 2.5I light
[x] Cancel search: lightPage 86 of 106
Replacement procedures
86 tion using the fog lamps, provided traffic
laws in your area do not prohibit this.
Because of the extremely high volt-
ages involved, any work on the xenon
lighting system, including bulb-changing,
should be carried out by technically quali-
fied personnel only. Otherwise, there is a
risk of fatal injury.<
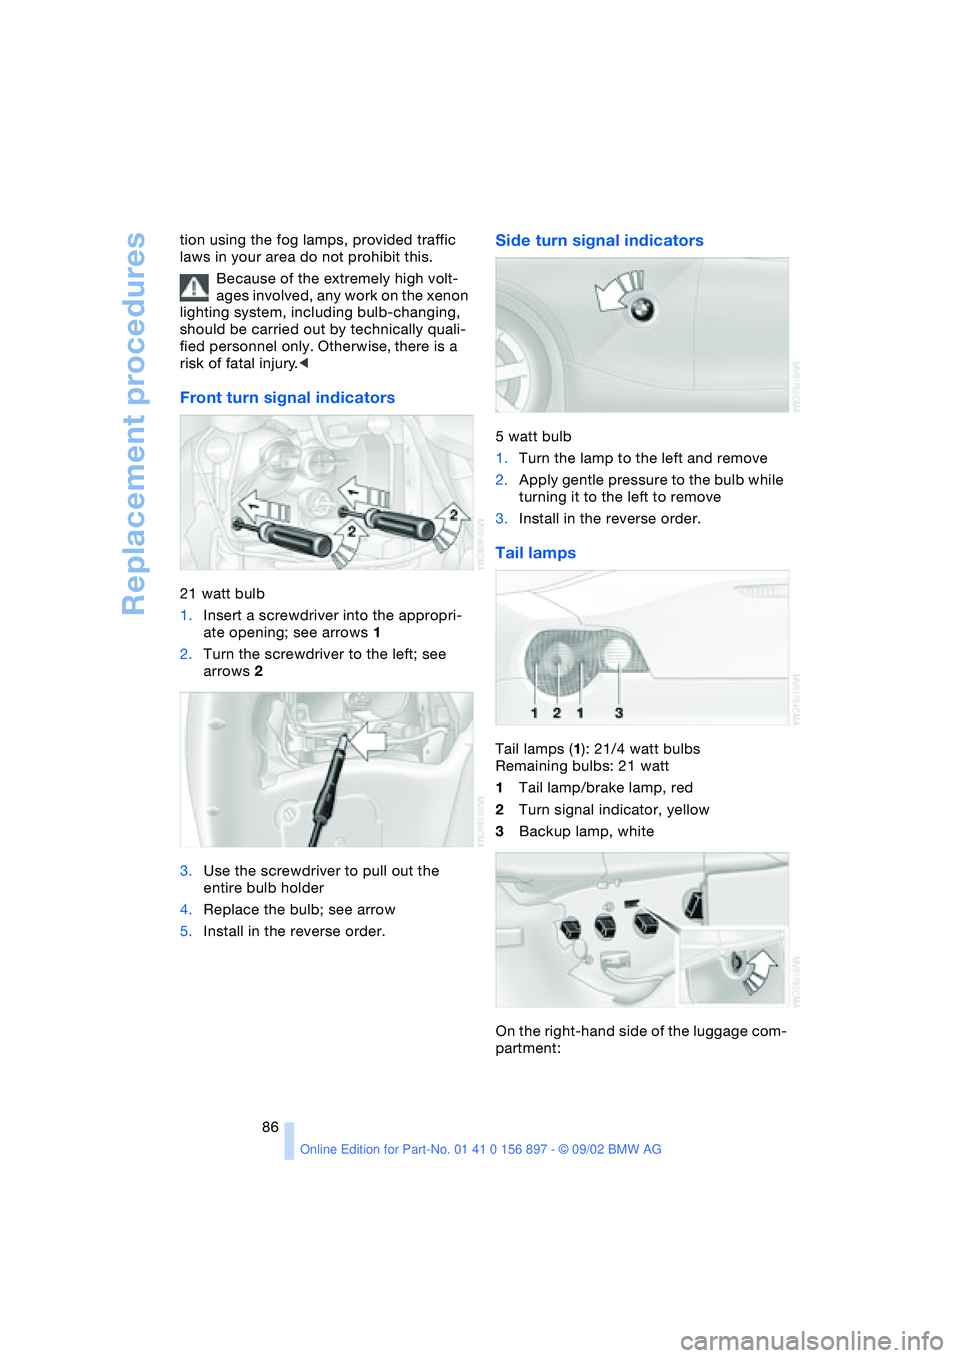
Front turn signal indicators
21 watt bulb
1.Insert a screwdriver into the appropri-
ate opening; see arrows 1
2.Turn the screwdriver to the left; see
arrows 2
3.Use the screwdriver to pull out the
entire bulb holder
4.Replace the bulb; see arrow
5.Install in the reverse order.
Side turn signal indicators
5 watt bulb
1.Turn the lamp to the left and remove
2.Apply gentle pressure to the bulb while
turning it to the left to remove
3.Install in the reverse order.
Tail lamps
Tail lamps (1): 21/4 watt bulbs
Remaining bulbs: 21 watt
1Tail lamp/brake lamp, red
2Turn signal indicator, yellow
3Backup lamp, white
On the right-hand side of the luggage com-
partment:
Page 87 of 106
At a glance
Controls
Driving tips
Mobility
Reference
87
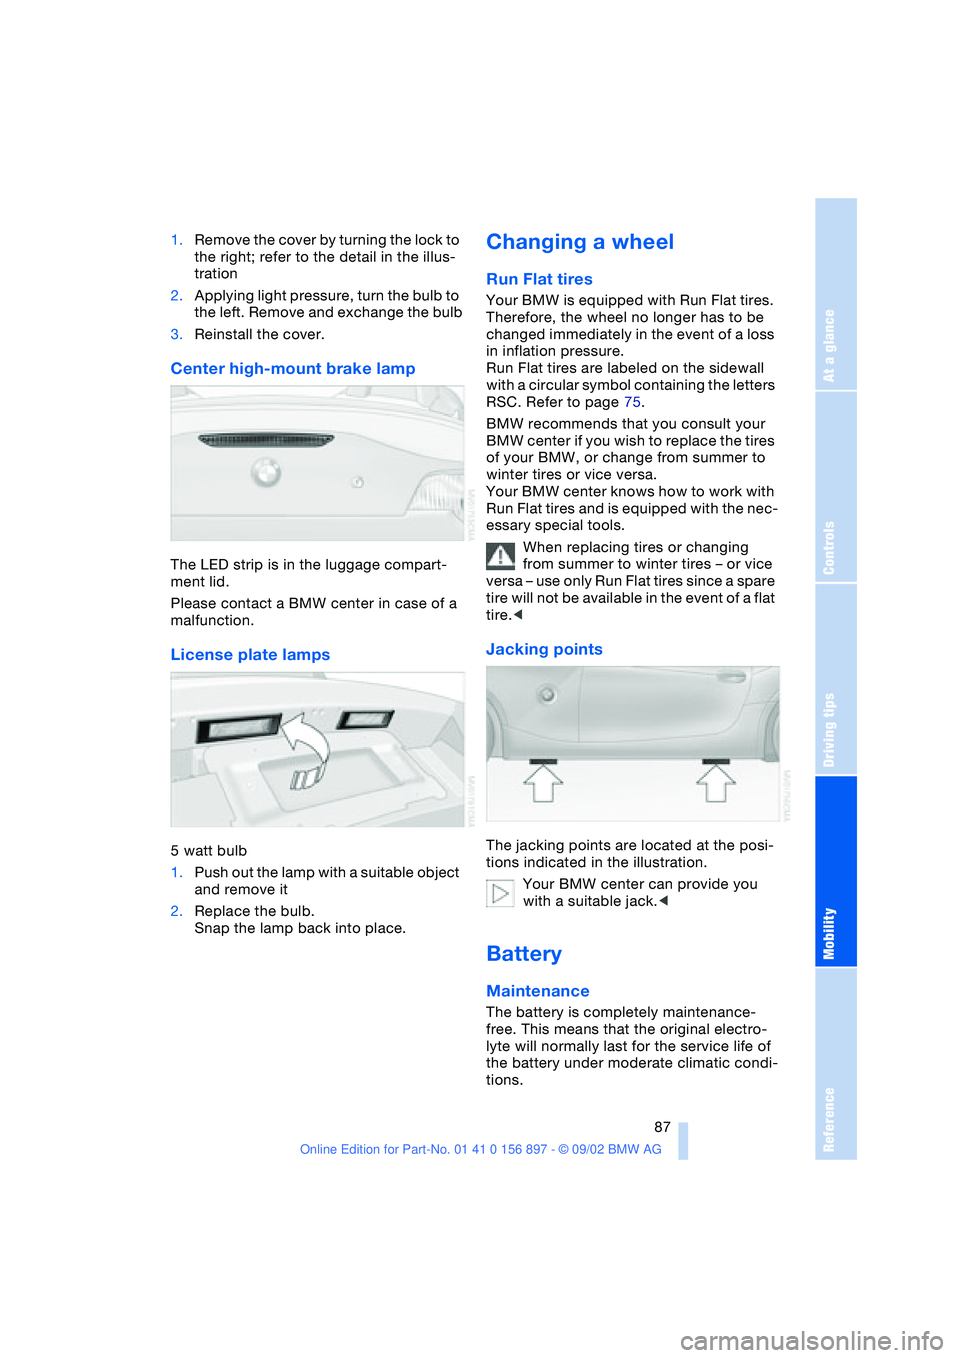
1.Remove the cover by turning the lock to
the right; refer to the detail in the illus-
tration
2.Applying light pressure, turn the bulb to
the left. Remove and exchange the bulb
3.Reinstall the cover.
Center high-mount brake lamp
The LED strip is in the luggage compart-
ment lid.
Please contact a BMW center in case of a
malfunction.
License plate lamps
5 watt bulb
1.Push out the lamp with a suitable object
and remove it
2.Replace the bulb.
Snap the lamp back into place.
Changing a wheel
Run Flat tires
Your BMW is equipped with Run Flat tires.
Therefore, the wheel no longer has to be
changed immediately in the event of a loss
in inflation pressure.
Run Flat tires are labeled on the sidewall
with a circular symbol containing the letters
RSC. Refer to page 75.
BMW recommends that you consult your
BMW center if you wish to replace the tires
of your BMW, or change from summer to
winter tires or vice versa.
Your BMW center knows how to work with
Run Flat tires and is equipped with the nec-
essary special tools.
When replacing tires or changing
from summer to winter tires – or vice
versa – use only Run Flat tires since a spare
tire will not be available in the event of a flat
tire.<
Jacking points
The jacking points are located at the posi-
tions indicated in the illustration.
Your BMW center can provide you
with a suitable jack.<
Battery
Maintenance
The battery is completely maintenance-
free. This means that the original electro-
lyte will normally last for the service life of
the battery under moderate climatic condi-
tions.
Page 88 of 106
Replacement procedures
88 Please consult your BMW center
whenever you have any questions
concerning the battery. Since the battery is
absolutely maintenance-free, the following
statements are for your information only.<
Do not disconnect the battery cables
when the engine is running. Discon-
necting the battery cables when the engine
is running will cause a voltage surge which
will damage the vehicle's onboard elec-
tronics.<
Indicator lamp
The indicator lamp for the battery
charge current lights up:
The battery is no longer being
charged. The alternator drive belt is defec-
tive or there is a malfunction in the charging
circuit of the alternator. Please contact the
nearest BMW center.
If the drive belt is defective, pull over
and switch off the engine immediately
to prevent overheating and serious engine
damage.
If the onboard supply voltage drops to a
very low level, increased steering effort
may also be necessary.<
Charging the battery
Charge the battery in the vehicle only when
the engine is not running. Use the terminals
provided in the engine compartment. For
information on connections, refer to Jump-
Starting on page 89.
Battery disposal
Return used batteries to a recycling
point or to your BMW center. Maintain
the battery in an upright position for trans-
port and storage. Secure the battery
against tilting when transporting.<
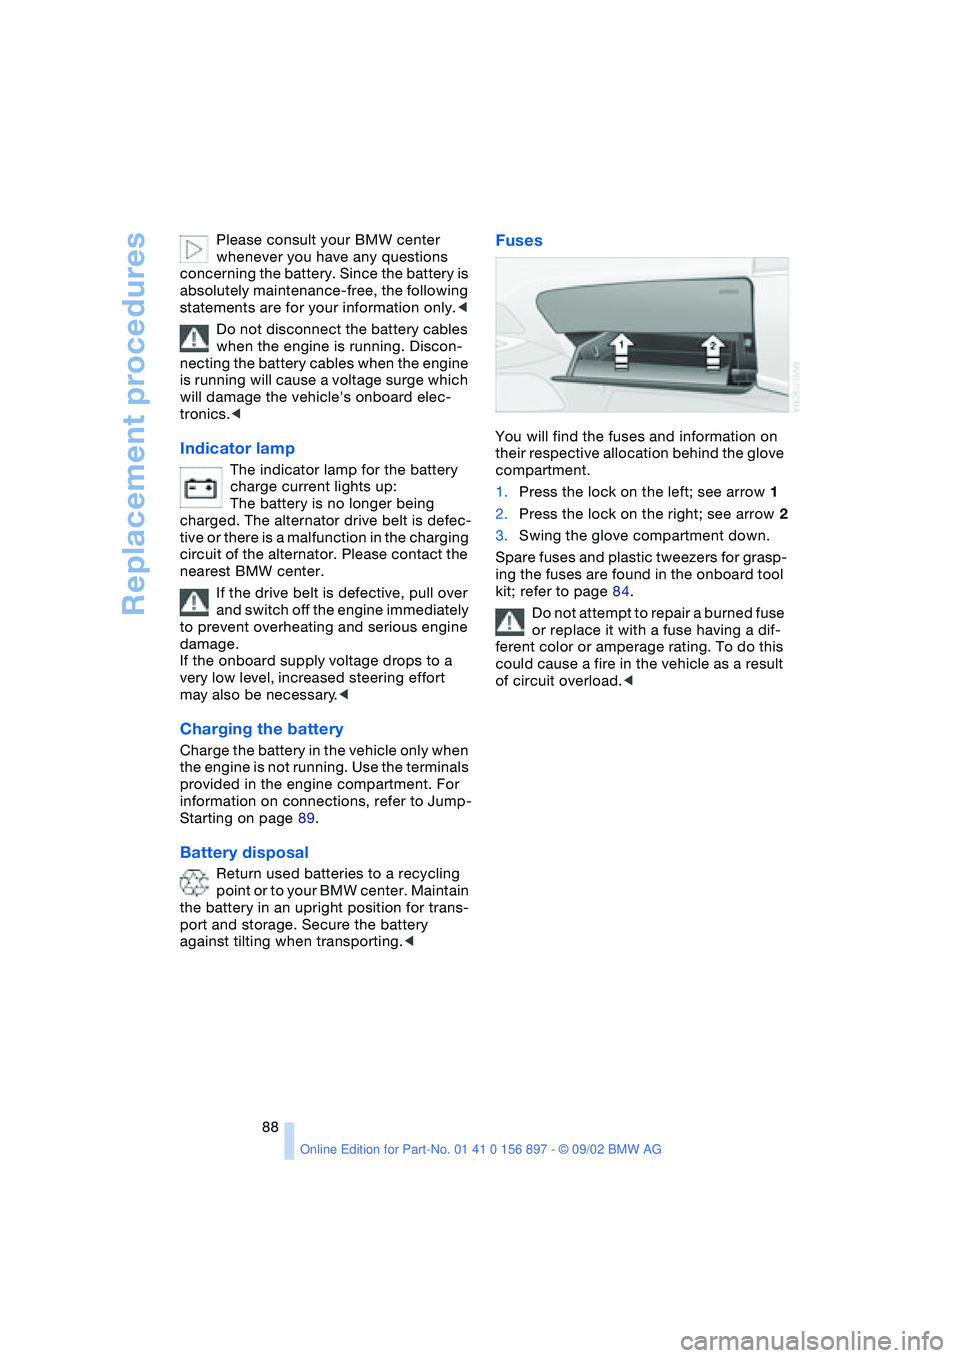
Fuses
You will find the fuses and information on
their respective allocation behind the glove
compartment.
1.Press the lock on the left; see arrow 1
2.Press the lock on the right; see arrow 2
3.Swing the glove compartment down.
Spare fuses and plastic tweezers for grasp-
ing the fuses are found in the onboard tool
kit; refer to page 84.
Do not attempt to repair a burned fuse
or replace it with a fuse having a dif-
ferent color or amperage rating. To do this
could cause a fire in the vehicle as a result
of circuit overload.<
Page 90 of 106
Giving and receiving assistance
90 4.Start the engine on the support vehicle
and allow it to run
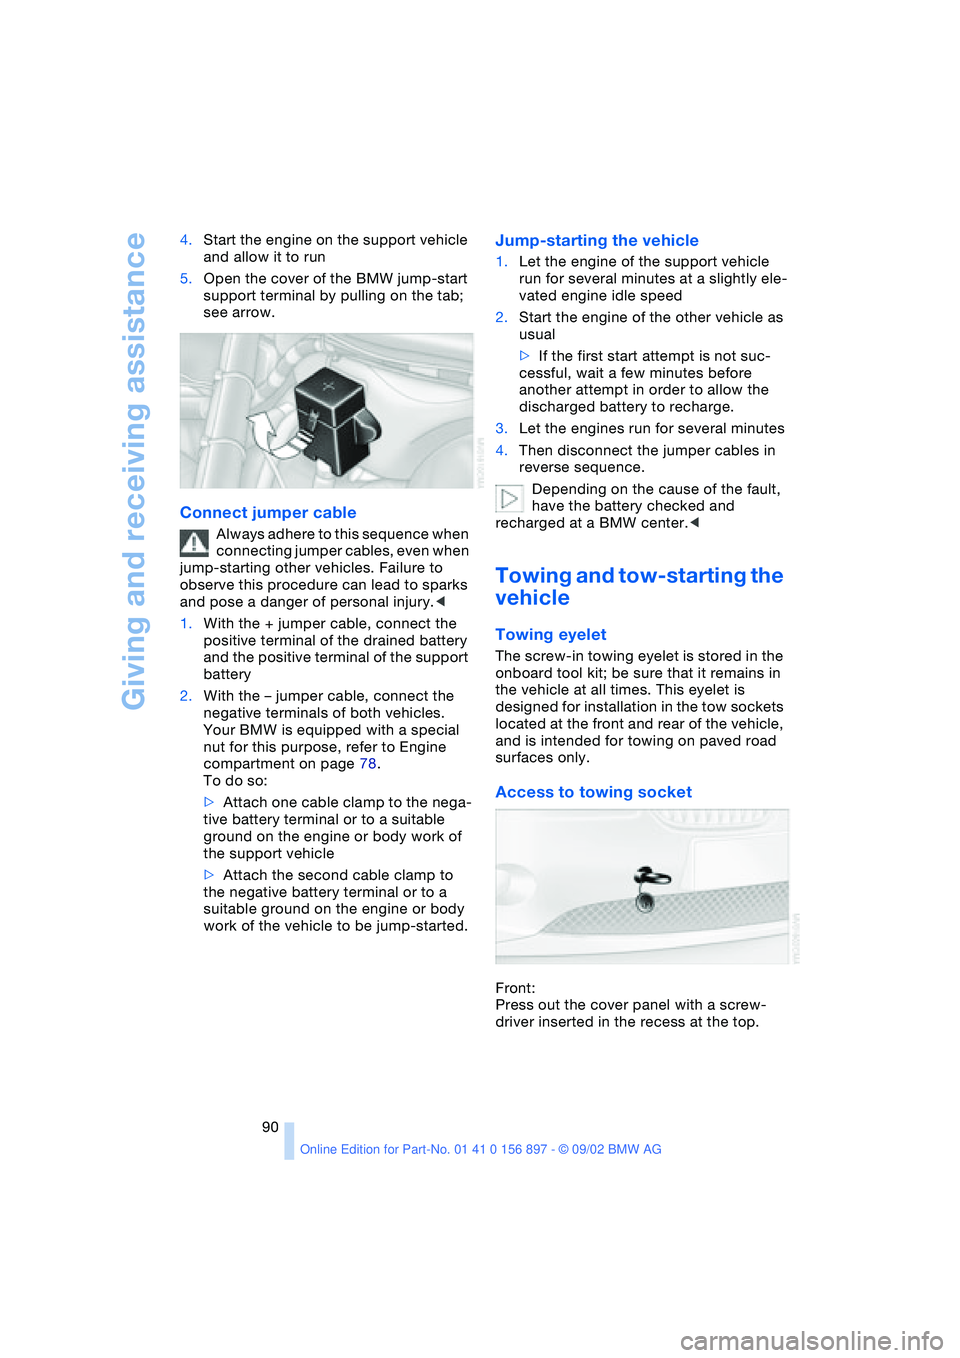
5.Open the cover of the BMW jump-start
support terminal by pulling on the tab;
see arrow.
Connect jumper cable
Always adhere to this sequence when
connecting jumper cables, even when
jump-starting other vehicles. Failure to
observe this procedure can lead to sparks
and pose a danger of personal injury.<
1.With the + jumper cable, connect the
positive terminal of the drained battery
and the positive terminal of the support
battery
2.With the – jumper cable, connect the
negative terminals of both vehicles.
Your BMW is equipped with a special
nut for this purpose, refer to Engine
compartment on page 78.
To do so:
>Attach one cable clamp to the nega-
tive battery terminal or to a suitable
ground on the engine or body work of
the support vehicle
>Attach the second cable clamp to
the negative battery terminal or to a
suitable ground on the engine or body
work of the vehicle to be jump-started.
Jump-starting the vehicle
1.Let the engine of the support vehicle
run for several minutes at a slightly ele-
vated engine idle speed
2.Start the engine of the other vehicle as
usual
>If the first start attempt is not suc-
cessful, wait a few minutes before
another attempt in order to allow the
discharged battery to recharge.
3.Let the engines run for several minutes
4.Then disconnect the jumper cables in
reverse sequence.
Depending on the cause of the fault,
have the battery checked and
recharged at a BMW center.<
Towing and tow-starting the
vehicle
Towing eyelet
The screw-in towing eyelet is stored in the
onboard tool kit; be sure that it remains in
the vehicle at all times. This eyelet is
designed for installation in the tow sockets
located at the front and rear of the vehicle,
and is intended for towing on paved road
surfaces only.
Access to towing socket
Front:
Press out the cover panel with a screw-
driver inserted in the recess at the top.
Page 98 of 106
Everything from A - Z
98 Brake system 65
– brake fluid level 81
– brake pads 66
– break-in procedures 64
– disc brakes 65
Brakes
– driving notes 65
Break-in procedures 64
– brake system 64
– clutch 64
– differential 64
– engine 64
– tires 64
Bulb
– defective 45
– replacement 84
C
California Proposition 65
warning 83
Can holder 61
Capacities 94, 96
– luggage
compartment 22, 94
Car battery 87
Car radio, refer to the
Owner's Manual for Radio
Car wash, refer to the Car-
ing for your vehicle bro-
chure
Cargo loading 66
Cassette player operation,
refer to the Owner's Man-
ual for Radio
Catalytic converter, refer to
High temperatures 65
CD player operation, refer
to the Owner's Manual for
Radio
Cellular phone
preparation 61
Cellular phone, refer to the
separate Owner's Manual
Center high-mount brake
lamp 87
Central locking system 18
– button 20
– interior 20
Charge indicator
lamp 14, 88Check gas cap 70
– indicator lamp 14
Child seat 34
Child-restraint mounting
system (LATCH) 36
Child-restraint systems 34
Cigarette lighter 61
Cleaning the headlamps 43
Cleaning the windshield 43
Clock
– 12/24-hour mode 49
– adjusting, refer also to the
radio or onboard com-
puter Owner's Manual
Clothes hooks 27
Cluster 13
Clutch
– break-in procedure 64
Cockpit 12
Code, refer to the Owner's
Manual for Radio
Combination switch, refer
to Turn signal indicators/
Headlamp flasher 42
Compartments 60
Compression ratio 94
Computer 49
– average fuel
consumption 50
– average speed 50
– clock, 12/24-hour
mode 49
– cruising range 50
– outside temperature 49
Condensation
– removing from
windows 56, 58
Configuring adjustments,
refer to Vehicle Memory,
Key Memory 37
Consumption 50
Convenience operation
– convertible top 20
– windows 20
Convertible top 23
– convenience operation 20
– electrical fault 25
– emergency operation 25
– malfunction 25
– manual operation 23
– mechanical 23Convertible top compart-
ment panel 22
Coolant 80, 96
– indicator lamp 14
Coolant thermometer 47
Cooling system 96
Cooling, maximum 58
Copyright 4, 6
Cruise control 44
Cruising range 50
Cup holder, refer to Bever-
age holder 61
Curb weight 94
Cylinders 94
D
Data 94
– engine 94
– filling capacities 96
– weights 94
Daytime driving lamps 45
DBC Dynamic Brake
Control 52
Defects 8
Deflector for wind 26
Defrost setting 56, 58
Defroster, rear window
– air conditioning 56
– automatic climate
control 59
Defrosting
– windows 56, 58
Differential
– break-in procedures 64
Digital clock
Dimensions 95
Dimming mirror 33
Dipstick, engine oil 79
Disc brakes 65
Displacement 94
Displays, refer to Instru-
ment cluster 13
Door lock 20
Door lock buttons 21
Doors
– emergency operation 20
– locking 19
– unlocking 19
DOT quality grades 73
Drivelogic 42
Page 100 of 106

Everything from A - Z
100 Indicator lamps
– airbag 33
– alarm system 27
– brake fluid 81
– engine temperature 47
– flat tire 75
– Flat Tire Monitor 53
– reserve tank 47
Inflation pressure 71
– monitor 53
INSPECTION 48
Instrument cluster 13
Instrument lighting 46
Instrument panel 12
Interior
– central locking system 20
Interior lamps 19, 46
– remote control 19
Interior mirror
– automatic dimming
feature 33
Interior motion sensor 19
– deactivating 28
Interior rearview mirror 32
Interlock 38
Intermittent operation,
windshield wipers 43
J
Jack 87
– jacking points 87
Jets, refer to
Ventilation 56, 59
Jump-starting 89
K
Key Memory 37
Keys 18
– spare 18
– with remote control 18
Knee airbags 33
L
Lamp
– passenger airbags 35
Lamp control 45
Lamp replacement 84Lamps
– backup lamp 86
– brake lamp 86
– bulb replacement 84
– center high-mount brake
lamp 87
– daytime driving lamps 45
– defective bulbs 45
– fog lamps 46
– headlamp flasher 46
– headlamps 84
– high beams 46, 85
– indicator lamp, defective
bulb 14
– instrument lighting 46
– interior lamps 46
– lamp replacement 84
– license plate lamps 87
– LIGHTS ON warning 45
– low beams 45, 85
– low beams, automatic 45
– parking lamps 45
– reading lamps 46
– rear lamp 86
– standing lamps 46
– turn signal indicators 86
– xenon lamps 85
LATCH child-restraint
mounting system 36
Length 95
License plate lamps
– bulb replacement 87
Light switch 45
Lighter 61
LIGHTS ON warning 45
Loads, securing 66
Lock
– door 20
Locking 19
Longlife oils 80
Low beams 45
– automatic 45
– bulb replacement 85
– indicator lamp, defective
bulb 14
Luggage
compartment 22, 94
– capacity 94
– enlarging 22
– remote control 19Luggage compartment
lid 21
– emergency release from
luggage compartment's
interior 22
– opening from the
inside 21
– opening from the
outside 21
– opening/closing 21
– remote control 19
M
M+S tires 76
Maintenance system 82
Malfunction
– door lock 20
– fuel filler door 70
– remote control 19
– storage compartment 60
Malfunction of electrical
accessory 88
Manual convertible top 23
Manual operation
– door lock 20
– electrical convertible
top 25
– fuel filler door 70
– storage compartment 60
Manual transmission 40
Master key 18
Maximum cooling 58
MC operation, refer to the
Owner's Manual for Radio
MD operation, refer to the
Owner's Manual for Radio
Mechanical convertible
top 23
Mechanical seat 29
Memory
– seats 30
Memory, refer to Key Mem-
ory, Vehicle Memory 37
Microfilter 59
Microphone, cellular
phone 61
Mirrors 32
– heating 32
Modifications,
technical 7
Page 101 of 106

At a glance
Controls
Driving tips
Mobility
Reference
101
N
Navigation system, refer to
the separate Owner's
Manual
Nets 60
O
OBD socket 83
Odometer 47
Oil 79
– additives 80
– capacity 96
– quality 80
Oil change interval, refer to
the Service and Warranty
Information Booklet for
US models/Warranty and
Service Guide Booklet for
Canadian models
Oil consumption 79
Oil dipstick 79
Oil filter change 96
Oil level 79
– checking 79
– indicator lamp 14
Oil pressure 79
– indicator lamp 14
Oil sensor 79
– indicator lamp 14
OIL SERVICE 48
Oil types 80
Onboard computer, refer to
Computer or to the sepa-
rate Owner's Manual for
Onboard Computer
Onboard tool kit 84
Operating elements 12
Outlets, refer to
Ventilation 56, 59
Output 94
Outside air mode
– air conditioning 56
Outside temperature
display 48
– changing units 49
– in computer 49
P
Paintwork, refer to the Car-
ing for your vehicle bro-
chure
Panel lighting 46
Panic mode 19
Parking brake 39
– indicator lamp 14
Parking lamps 45
Particle filter
– automatic climate
control 56
Passenger airbags
– activation/deactivation 34
Pollen, refer to
– Microfilter/activated-
charcoal filter 59
– Particle filter 56
Power seat 30
Power steering, electric 42
Power windows 22
Preparations for the cellular
phone 61
Pressure monitor, tires 53
Pressure, tires 71
R
Radiator 96
Radio, refer to the Owner's
Manual for Radio
Rain sensor 43
Reading lamps 46
Rear lamps 86
– bulb replacement 86
Rear window defroster
– air conditioning 56
– automatic climate
control 59
Rearview mirror 32
Recirculated air mode
– air conditioning 56
– automatic climate
control 58
Refueling 70
Remote control 18
– interior motion sensor 19
– luggage compartment
lid 19
– malfunction 19Remote control keys 18
Replacement key 18
Replacement of tires 73
Reserve tank indicator
lamp 47
Restraint systems 34
Reverse 40
Run Flat tires 73, 75, 87
– flat tire 75
S
Safety belts 31
Safety defects 8
Seat adjustment
– storing 30
Seat heating 31
Seat memory 30
Seats 29
– adjustment,
mechanical 29
– adjustment, power 30
Securing loads 66
Securing, locking the
vehicle 19
Selector lever
– automatic
transmission 40
– position, automatic
transmission 40
Service 48
Service and warranty 7
Service and Warranty Infor-
mation Booklet 82
Service Engine Soon 83
– indicator lamp 14
Service interval
display 48, 82
Shiftlock 40
Side airbags 33
Snow chains 76
Socket
– for Onboard
Diagnostics 83
– refer to Cigarette lighter
socket 61
Spare fuses 88
Spare key 18
Special oils 80
Speed control, refer to
Cruise control 44
Page 102 of 106

Everything from A - Z
102 Speedometer 13
Sport program
– automatic transmission
with Steptronic 41
– Drivelogic 42
Standing lamps, refer to
Parking lamps 45, 46
Starting problems 89
Starting the engine 38
Steering lock 38
Steering wheel
– adjusting 32
Steptronic 40
Storage compartments 60
– electrical fault 60
– opening manually 60
Storage nets 60
Storage, tires 76
Storing the vehicle, refer to
the Caring for your vehi-
cle brochure
Stroke 94
Switching gears, refer to
Automatic transmission
with Steptronic 40
Symbols 6
Synthetic oils 80
T
Tachometer 47
Tail lamps
– bulb replacement 86
– indicator lamp, defective
bulb 14
Tank capacity 96
Technical data 94
– engine 94
– weight 94
Technical
modifications 7
Telephone preparation 61
Telephone, refer to the
Owner's Manual for the
telephone
Temperature
– air conditioning 56
– automatic climate
control 58
– tires 74Temperature display
– engine coolant 47
– outside temperature 48
– outside temperature in
computer 49
Third brake lamp 87
Tilt alarm sensor 19, 28
– deactivating 28
– remote control 19
Tire change 87
Tire damage 73
Tire inflation pressure 71
– checking 71
Tire pressure monitor 53
Tires
– age 73
– approval 71
– break-in procedures 64
– condition 73
– damage 73
– DOT quality grades 73
– flat tire 75
– inflation pressure 71
– M+S tires 76
– replacement 73
– Run Flat tires 73, 75, 87
– temperature 74
– traction 74
– tread 73
– tread wear 73
– Uniform Tire Quality
Grading 74
– wheel-tire
combination 74
– winter tires 76
Tool kit, refer to Onboard
tool kit 84
Torque 94
Towing 90
Towing eyelet 90
Tow-starting 90
Track width 95
Traction 74
Transmission, refer to
Automatic transmission
with Steptronic 40
Transporting children
safely 34
Tread depth, tires 73
Tread wear 73
Tread wear indicator 73Trip odometer 47
Trunk lid, refer to Luggage
compartment lid 21, 22
Trunk, refer to Luggage
compartment 22
Turn signal indicators 42
– bulb replacement 86
– indicator lamps 14
Turning circle 95
U
Undercoating, refer to the
Caring for your vehicle
brochure
Uniform Tire Quality
Grading 74
Unintentional alarm 28
Unlocking the vehicle 19
Used batteries, refer to
Battery disposal 88
V
Vacuum cleaner, refer to
Cigarette lighter
socket 61
Vehicle
– battery 87
– break-in procedures 64
– data 94
Vehicle Memory 37
Vehicle storage, refer to the
Caring for your vehicle
brochure
Vehicle vacuum cleaner,
refer to Cigarette lighter
socket 61
Ventilation 56, 59
Vents, refer to
Ventilation 56, 59
W
Warning and indicator
lamps 14
Warning triangle 89
Warranty and service 7
Warranty and Service
Guide Booklet 82