Page 105 of 279
E - Security Systems
1-E-6
Boot (Trunk) Lock Control
To open the boot (trunk), press the right
key fob button. The key fob red lamp will
stay on so long as the right hand button is
pressed. The direction indicators will flash
once (in markets where visible alarm signals
are permitted), the siren will chirp once (in
markets where audible sirens are permitted
and programmed) and the boot will unlock.
It is not necessary to disarm the alarm in
order to use the boot unlock feature.
Caution: Always ensure that the boot (trunk) lid is securely closed after use. The boot
(trunk) interior lights will be on when the lid is left partially open and will cause the
vehicle battery to discharge.
Page 106 of 279

E - Security Systems
1-E-7
The Passive Anti-Theft System (PATs)
The PATs system is a fully automatic engine immobiliser. The system consists
of a transponder inside the head of each ignition key and, around the
ignition lock, a transceiver aerial which communicates signals to the PATs
electronic control unit. The PATs control unit communicates with the engine
management controller to immobilise the engine until a valid code signal is
received from the ignition key.
Two coded keys are provided with the vehicle. These
keys fit both the door locks, the boot lock and the ignition
lock.
In the event of loss of one of the keys, duplicate keys can
be created and programmed from the other key by your
Aston Martin dealer.
Starting the Engine
When the alarm system is disarmed and the vehicle key is turned in the
ignition lock, the PATs controller sends a signal to the ignition key. The
ignition key must respond with a valid code before engine start will be
enabled. If a valid code is received, the ignition system will operate
normally.
If the key code is not received, or is invalid, engine start remains disabled.
Caution: To ensure a trouble-free signal exchange between the key and the vehicle,
do not cover the key head with any metal object (e.g. another key).
ASTON MARTIN
Page 107 of 279

E - Security Systems
1-E-8
PATs Status
The PATs system state is shown by the red status
LED in the centre console.
The status LED will illuminate for three seconds
when the ignition is turned on and will extinguish
when a valid code is received from the ignition
key.
When the ignition is turned off, the status LED
will flash. This is the normal state when the
vehicle is parked with the ignition off and the
key removed.
If the status LED remains on when the ignition is switched on, the system is
in fail-safe mode. This means that the car will start, but PATs has a fault.
After one minute, the status lamp will flash a fault code. Your Aston Martin
Dealer can use this code to aid diagnosis of the PATs problem.
If the status LED continues flashing when the ignition is turned on, the
vehicle remains immobilised due to a fault in the system or an invalid key
code. Should this situation arise, try the spare key. If successful, source a
replacement for the faulty key. If problems persist with both keys, consult
your Aston Martin dealer.
During normal operation, the only indication that PATs is present is the PATS
status LED. The system is designed to be completely transparent to the
vehicle user.
Page 108 of 279
E - Security Systems
1-E-9
Alarm On
System Armed
Normal state - parked and locked
Alarm Off
System Disarmed
Normal state when driving
Press Left Button Once
Indicators flash
three times
(where permitted and
programmed).
Doors Unlock
Panic Alarm
Siren On for 30 secs
Indicators Flash
5 minutes
Panic Alarm
Siren On for 30 secs
Indicators Flash
5 minutes
Resets after
5 minutesPress Left Button
for 3 seconds
Press Right Button
1indicator flash
1 siren chirp
(where permitted
and programmed).
Boot unlocks
Press Right Button
1 indicator flash
1 siren chirp
(where permitted
and programmed).
Boot unlocks
Boot Open
Press Left Button Once
Indicators flash
once
(where permitted and
programmed).
Doors Lock
Resets after
5 minutes
Press Left Button
for 3 seconds
Alarm System - Operating Summary
Note: Siren and indicator lamp flashes are prohibited in some markets.
Page 109 of 279
E - Security Systems
1-E-10
Alarm Key Fob - Range and Battery Replacement
The normal range of the alarm key fob is approximately 10 metres (30 feet).
If you need to come closer to the car before the key fob signal is effective,
the key fob battery probably needs replacing.
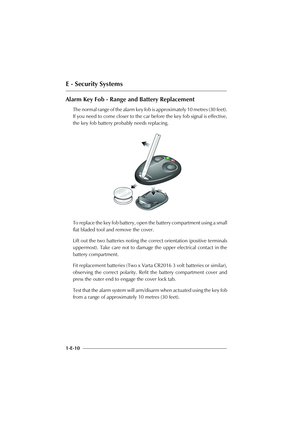
To replace the key fob battery, open the battery compartment using a small
flat bladed tool and remove the cover.
Lift out the two batteries noting the correct orientation (positive terminals
uppermost). Take care not to damage the upper electrical contact in the
battery compartment.
Fit replacement batteries (Two x Varta CR2016 3 volt batteries or similar),
observing the correct polarity. Refit the battery compartment cover and
press the outer end to engage the cover lock tab.
Test that the alarm system will arm/disarm when actuated using the key fob
from a range of approximately 10 metres (30 feet).
Page 110 of 279

F - Owner Maintenance
1-F-1
Contents
Introduction........................................................................................ 1-F-2
Servicing Precautions ...........................................................................1-F-4
Fluid Level Checks ............................................................................... 1-F-6
Wheels and Tyres.............................................................................. 1-F-13
The Vehicle Toolkit ............................................................................ 1-F-18
Jacking and Wheel Changing............................................................. 1-F-22
Vehicle Recovery............................................................................... 1-F-26
Electrics .............................................................................................1-F-30
Fuse Boxes........................................................................................ 1-F-38
Bulb and Fuse Replacement ...............................................................1-F-42
Bodywork and Fittings....................................................................... 1-F-54
Vehicle Cleaning................................................................................ 1-F-54
Storing the Car - Recommendations ...................................................1-F-58
Page 111 of 279

F - Owner Maintenance
1-F-2
Introduction
Owner Maintenance
Each item in the Service Schedules must be performed on time as failure to
do so may void the New Car Warranty or other warranties. It is the owner's
responsibility to see that the vehicle is maintained properly and in accordance
with the manufacturer's service schedules.
Due to the sophistication of the various systems and the specialised
equipment required to maintain the DB AR1, owner maintenance should
be restricted to the routine procedures given in this Owner's Guide. If you
think that the car is not functioning properly, please return it to an Aston
Martin Dealer to be checked professionally.
Electronic Fuel Injection
WARNING: Electronic Fuel Injection: If the fuel system is allowed to run dry
irreparable damage to the fuel pumps may occur.
The electronic fuel injection system requires special equipment and test
facilities to set up and maintain so that the car gives maximum performance
coupled with economy and reliability. You are, therefore, strongly advised
to entrust all service work to an Aston Martin dealer.
WARNING: Any modifications/additions to the fuel system not specifically
designed by Aston Martin are prohibited. If done, they may cause damage to the
fuel system which in some circumstances could result in fire. It is recommended
that all Service Field Actions are entrusted to an Aston Martin dealer.
Page 112 of 279

F - Owner Maintenance
1-F-3
Parts and Lubricants
When undertaking a warranty servicing task, only parts, materials,
lubricants etc. that are specifically recommended by Aston Martin
Lagonda Limited should be used. Failure to do so can result in
damage to the vehicle and invalidate the New Car Warranty or
other warranties. Recommended lubricants, capacities, etc. may be
found in the Specifications section of this Owner's Guide, and are
recommended for use at all routine services whether or not under
warranty.
Emissions Warranty
The emission control systems fitted to cars for certain markets are
covered by a separate emissions warranty. A statement of the provisions
is given in the Warranty section of this Owner's Guide. You are
advised to familiarise yourself with all warranty conditions prior to
taking delivery of your car.
Engine Compartment Covers
The primary fluid level checks and reservoirs within the engine
compartment are all immediately accessible. The less frequently
maintained items are located under the engine compartment side
covers. To remove the covers, use a coin or the tool kit screwdriver
to turn the cover fasteners a quarter turn anti-clockwise. The fasteners
will pop-up and the covers can then be lifted off, along with a
rubber protection strip.
When replacing the covers, fit them into place and secure by pushing
down on each fastener and turn it a quarter turn clockwise until it
locks, then insert the rubber protection strip.