Page 637 of 1690
B68229
w/ Headlamp Cleaner
Headlamp Washer
Actuator Sub±assy RH
Headlamp Washer
Actuator Sub±assy LH
Radiator Grille Lower
Front Bumper Cover Headlamp Washer
Nozzle Sub±assy LH Headlamp Washer
Nozzle Sub±assy RH
Front Spoiler
Cover LH Front Spoiler
Cover RH
76±2
± EXTERIOR/INTERIOR TRIMFRONT BUMPER
AVENSIS REPAIR MANUAL (RM1018E)
Page 638 of 1690

760WY±01
B67425
Claw
B67431
± EXTERIOR/INTERIOR TRIMFRONT BUMPER
76±3
AVENSIS REPAIR MANUAL (RM1018E)
REPLACEMENT
HINT:
The installation is in the reverse order of the removal. However, when there is a special point concerning
the installation, it is indicated.
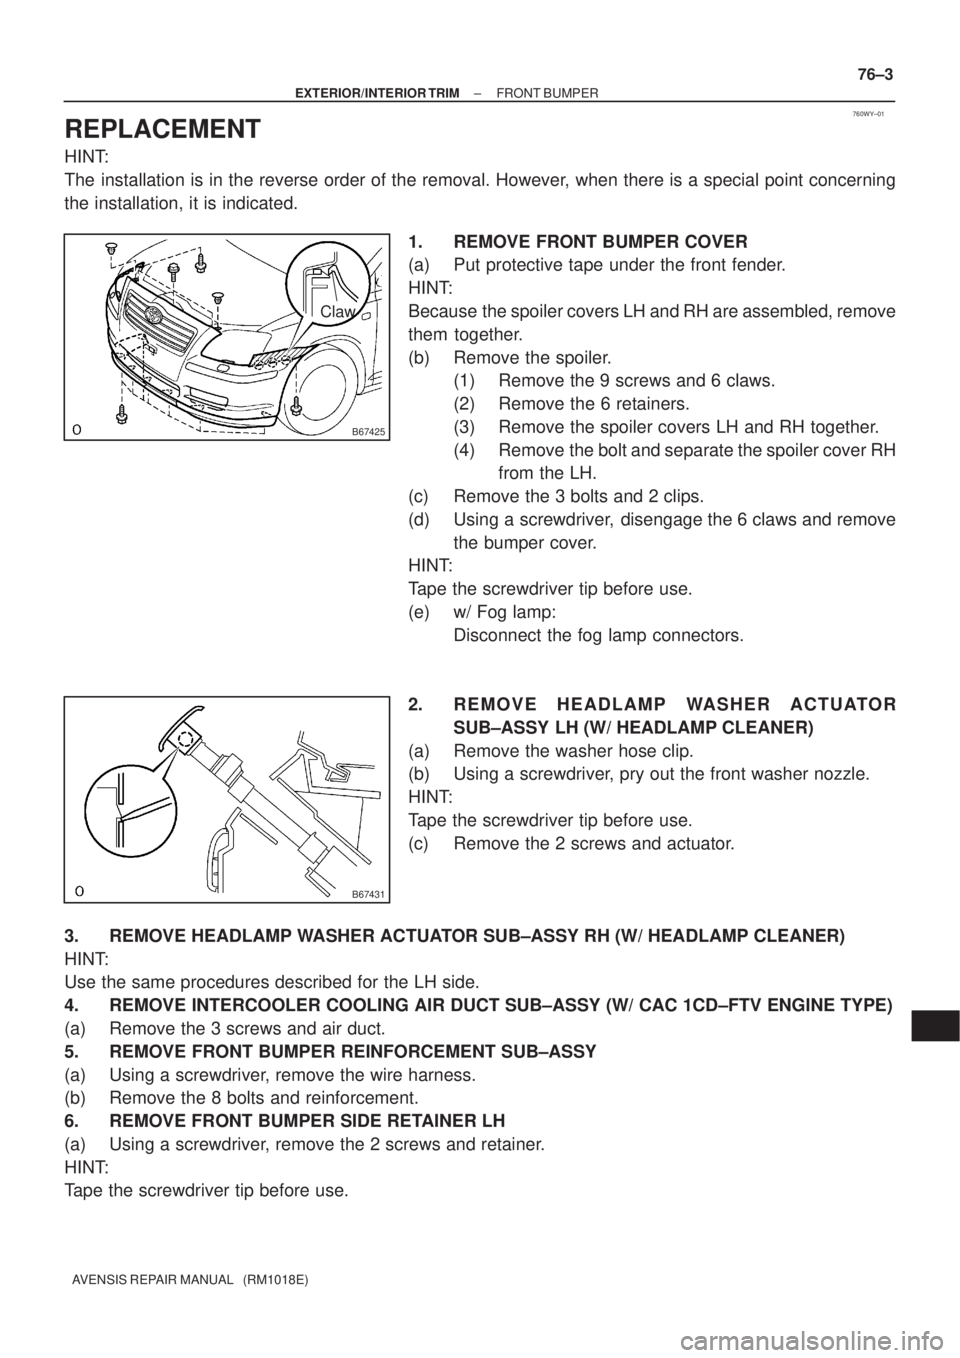
1. REMOVE FRONT BUMPER COVER
(a) Put protective tape under the front fender.
HINT:
Because the spoiler covers LH and RH are assembled, remove
them together.
(b) Remove the spoiler.
(1) Remove the 9 screws and 6 claws.
(2) Remove the 6 retainers.
(3) Remove the spoiler covers LH and RH together.
(4) Remove the bolt and separate the spoiler cover RH
from the LH.
(c) Remove the 3 bolts and 2 clips.
(d) Using a screwdriver, disengage the 6 claws and remove
the bumper cover.
HINT:
Tape the screwdriver tip before use.
(e) w/ Fog lamp:
Disconnect the fog lamp connectors.
2. R E M O V E H E A D L A M P WA S H E R A C T U ATO R
SUB±ASSY LH (W/ HEADLAMP CLEANER)
(a) Remove the washer hose clip.
(b) Using a screwdriver, pry out the front washer nozzle.
HINT:
Tape the screwdriver tip before use.
(c) Remove the 2 screws and actuator.
3. REMOVE HEADLAMP WASHER ACTUATOR SUB±ASSY RH (W/ HEADLAMP CLEANER)
HINT:
Use the same procedures described for the LH side.
4. REMOVE INTERCOOLER COOLING AIR DUCT SUB±ASSY (W/ CAC 1CD±FTV ENGINE TYPE)
(a) Remove the 3 screws and air duct.
5. REMOVE FRONT BUMPER REINFORCEMENT SUB±ASSY
(a) Using a screwdriver, remove the wire harness.
(b) Remove the 8 bolts and reinforcement.
6. REMOVE FRONT BUMPER SIDE RETAINER LH
(a) Using a screwdriver, remove the 2 screws and retainer.
HINT:
Tape the screwdriver tip before use.
Page 1024 of 1690
650T2±01
I35251
I35252Claw
± LIGHTINGHEADLAMP DIMMER SWITCH ASSY
65±27
AVENSIS REPAIR MANUAL (RM1018E)
HEADLAMP DIMMER SWITCH ASSY
REPLACEMENT
1. SEPARATE STEERING COLUMN COVER LWR
(a) Remove the 3 screws and steering column cover LWR.
2. REMOVE HEADLAMP DIMMER SWITCH ASSY
(a) Disconnect the connector.
(b) Release the claw and pull out the headlamp dimmer
switch assy.
Page 1025 of 1690
650T5±01
I35250
65±30
±
LIGHTING HEADLAMP LEVELING ECU ASSY
AVENSIS REPAIR MANUAL (RM1018E)
HEADLAMP LEVELING ECU ASSY
REPLACEMENT
1. REMOVE GLOVE COMPARTMENT DOOR ASSY (LHD STEERING POSITION TYPE) (See page 71±11)
2.REMOVE FUSE BOX OPENING COVER (RHD STEERING POSITION TYPE) (See page 71±11)
3. REMOVE LIGHT CONTROL ECU
(a) Disconnect the connector.
(b) Remove the bolt and headlamp leveling ECU assy.
4. INSTALL LIGHT CONTROL ECU
(a) Install the headlamp leveling ECU assy with the bolt.
(b) Connect the connector.
Page 1026 of 1690
650ST±01
I35226
Headlamp No.2 BulbBulb Socket
Socket Cover
Bulb Socket
Back Cover
Headlamp No.1 Bulb
Front Turn Signal Lamp Bulb Clearance Lamp Bulb Halogen Headlamp:
Discharge Headlamp:
Headlamp No.2 Bulb
Clearance Lamp Bulb
Bulb Socket
Back Cover
Front Turn Signal Lamp Bulb
Socket Cover
Discharge Headlamp Bulb
Headlamp Protector Retainer
± LIGHTINGHEADLAMP UNIT LH
65±15
AVENSIS REPAIR MANUAL (RM1018E)
HEADLAMP UNIT LH
COMPONENTS
Page 1027 of 1690
650SU±01
I35241
I35242
I35243
I35254
65±16
±
LIGHTING HEADLAMP UNIT LH
AVENSIS REPAIR MANUAL (RM1018E)
REPLACEMENT
1.REMOVE FRONT SPOILER COVER LH (See page 76±3)
2.REMOVE FRONT SPOILER COVER RH (See page 76±3)
3.REMOVE FRONT BUMPER COVER (See page 76±3) 4. REMOVE HEAD LIGHT ASSY
(a) Disconnect the connector.
(b) Remove the 2 screws.
(c) Remove the headlamp assy and disengage the claw asshown in the illustration.
5. REMOVE HEADLAMP, NO.1 BULB (HALOGEN HEAD LAMP)
(a) Release the lock of the set spring and remove the head- lamp bulb No.1.
6. REMOVE DISCHARGE HEADLAMP BULB (DISCHARGE HEAD LAMP)
(a) Rotate the bulb socket cover in the direction of the arrow
and pull it of backward of the vehicle.
Page 1028 of 1690

I35255
I35244
I35229
I35245
I36703
± LIGHTINGHEADLAMP UNIT LH
65±17
AVENSIS REPAIR MANUAL (RM1018E)
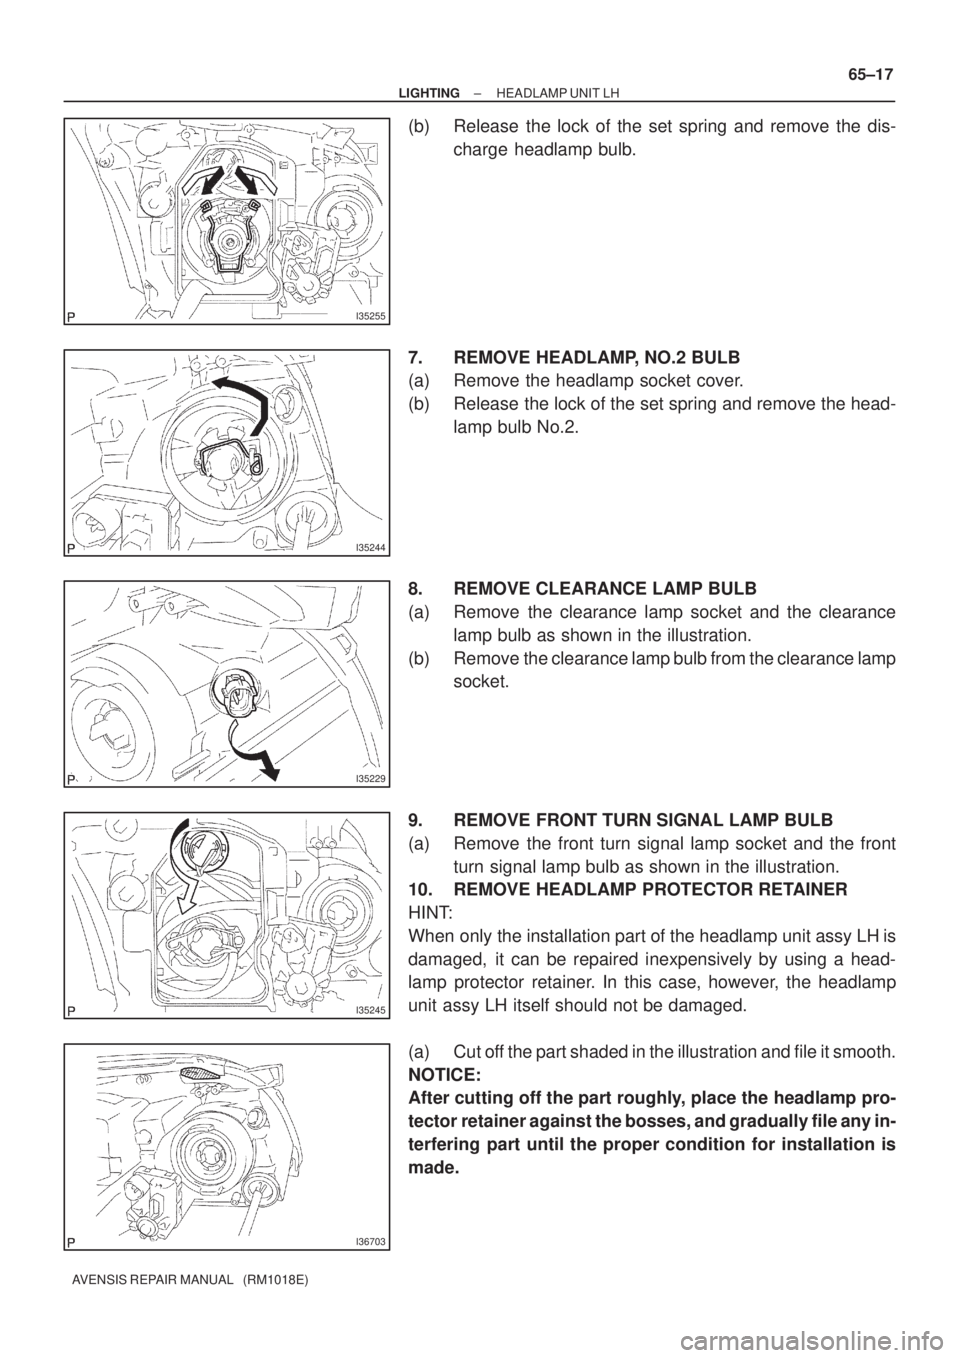
(b) Release the lock of the set spring and remove the dis-
charge headlamp bulb.
7. REMOVE HEADLAMP, NO.2 BULB
(a) Remove the headlamp socket cover.
(b) Release the lock of the set spring and remove the head-
lamp bulb No.2.
8. REMOVE CLEARANCE LAMP BULB
(a) Remove the clearance lamp socket and the clearance
lamp bulb as shown in the illustration.
(b) Remove the clearance lamp bulb from the clearance lamp
socket.
9. REMOVE FRONT TURN SIGNAL LAMP BULB
(a) Remove the front turn signal lamp socket and the front
turn signal lamp bulb as shown in the illustration.
10. REMOVE HEADLAMP PROTECTOR RETAINER
HINT:
When only the installation part of the headlamp unit assy LH is
damaged, it can be repaired inexpensively by using a head-
lamp protector retainer. In this case, however, the headlamp
unit assy LH itself should not be damaged.
(a) Cut off the part shaded in the illustration and file it smooth.
NOTICE:
After cutting off the part roughly, place the headlamp pro-
tector retainer against the bosses, and gradually file any in-
terfering part until the proper condition for installation is
made.
Page 1029 of 1690
I36704
65±18
±
LIGHTING HEADLAMP UNIT LH
AVENSIS REPAIR MANUAL (RM1018E)
(b)Install the headlamp protector retainer with the 2 screws.
11.HEADLIGHT AIM ONLY (See page 65±19)