Page 1592 of 1690
700T7±01
B67059
Back Door Side Garnish RH
Center Stop Lamp Assy
Back Door Trim Board
Back Door Side Garnish LH Back Door Trim
Panel Assy Upper
Wiper Arm Head Cap
Rear Wiper Arm Assy
Wiper Motor Assy� Back Door Glass
: Specified torque
N�m (kgf�cm, ft�lbf)
� Non±reusable part
5.5 (56, 49 in.�lbf)5.5 (56, 49 in.�lbf)
5.5 (56, 49 in.�lbf)
70±34
± WINDSHIELD/WINDOWGLASS/MIRRORBACK DOOR GLASS (LIFTBACK MODELS)
AVENSIS REPAIR MANUAL (RM1018E)
BACK DOOR GLASS (LIFTBACK MODELS)
COMPONENTS
Page 1593 of 1690

70±35
AVENSIS REPAIR MANUAL (RM1018E)
REPLACEMENT
HINT:
The installation i")
700T8±01
B68025
Piano Wire
Clip
B69235
Protective Tape
±
WINDSHIELD/WINDOWGLASS/MIRROR BACK DOOR GLASS (LIFTBACK MODELS)
70±35
AVENSIS REPAIR MANUAL (RM1018E)
REPLACEMENT
HINT:
The installation is in the reverse order of the removal. However, when there is a special point concerning
the installation, it is indicated.
1.REMOVE BACK DOOR TRIM BOARD ASSY (See page 75±40)
(a) Remove the back door trim panel assy upper.
(b) Remove the back door side garnish LH.
(c) Remove the back door side garnish RH.
(d) Remove the back door trim board.
2.REMOVE CENTER STOP LAMP ASSY (See page 65±26)
3.REMOVE REAR WIPER MOTOR ASSY (
See page 66±17)
(a) Remove the wiper arm head cap.
(b) Remove the rear wiper arm.
(c) Remove the wiper motor.
4. REMOVE BACK DOOR GLASS
(a) Pass a piano wire between the body and glass from theinterior.
(b) Tie both wire ends to wooden blocks or similar objects.
HINT:
Apply protective tape to the outer surface to prevent the surface
from being scratched.
NOTICE:
When separating the glass, take care not to damage the
paint and interior and exterior ornaments.
(c) Cut off the adhesive by pulling the piano wire around the glass.
(d) Using a suction rubber, remove the glass.
NOTICE:
Leave as much adhesive on the body as possible when re-
moving the glass.
Page 1598 of 1690
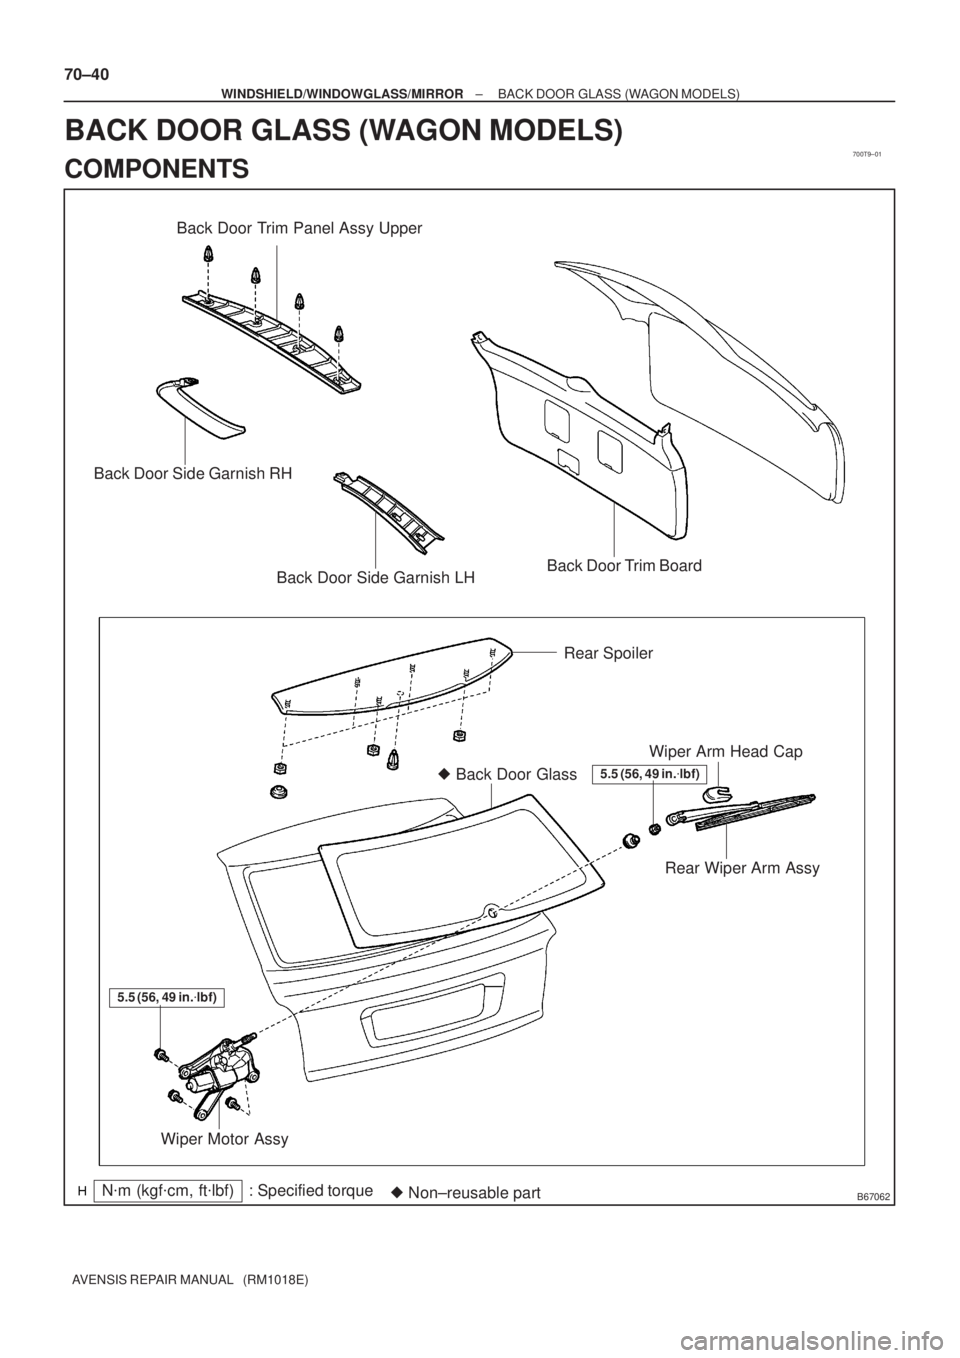
700T9±01
B67062
Back Door Trim Panel Assy Upper
Back Door Side Garnish RH
Back Door Side Garnish LHBack Door Trim Board
Rear Spoiler
� Back Door Glass
Wiper Motor AssyRear Wiper Arm Assy Wiper Arm Head Cap
: Specified torqueN�m (kgf�cm, ft�lbf)
� Non±reusable part
5.5 (56, 49 in.�lbf)
5.5 (56, 49 in.�lbf)
70±40
± WINDSHIELD/WINDOWGLASS/MIRRORBACK DOOR GLASS (WAGON MODELS)
AVENSIS REPAIR MANUAL (RM1018E)
BACK DOOR GLASS (WAGON MODELS)
COMPONENTS
Page 1599 of 1690

70±41
AVENSIS REPAIR MANUAL (RM1018E)
REPLACEMENT
HINT:
The installati")
700TA±01
B68025
Clip
Piano Wire
B69236
Protective Tape
BO4421
±
WINDSHIELD/WINDOWGLASS/MIRROR BACK DOOR GLASS (WAGON MODELS)
70±41
AVENSIS REPAIR MANUAL (RM1018E)
REPLACEMENT
HINT:
The installation is in the reverse order of the removal. However, when there is a special point concerning
the installation, it is indicated.
1.REMOVE BACK DOOR TRIM BOARD ASSY (See page 75±45)
(a) Remove the back door trim panel upper.
(b) Remove the back door side garnish LH.
(c) Remove the back door side garnish RH.
(d) Remove the back door trim board.
2.REMOVE REAR SPOILER (See page 76±30)
3.REMOVE REAR WIPER MOTOR ASSY (See page 66±17)
(a) Remove the wiper arm head cap.
(b) Remove the rear wiper arm.
(c) Remove the wiper motor.
4. REMOVE BACK DOOR GLASS
(a) Pass a piano wire between the body and glass from theinterior.
(b) Tie both wire ends to wooden blocks or similar objects.
HINT:
Apply protective tape to the outer surface to prevent the surface
from being scratched.
NOTICE:
When separating the glass, take care not to damage the
paint and interior and exterior ornaments.
(c) Cut off the adhesive by pulling the piano wire around it.
(d) Using a suction rubber, remove the glass.
NOTICE:
Leave as much adhesive on the body as possible when re-
moving the glass.
5. CLEAN BACK DOOR GLASS
(a) Clean the outer circumference of the glass with white gas- oline.
NOTICE:
�Do not touch the glass surface after cleaning it.
�Be careful not to damage the body.
Page 1649 of 1690
700T1±01
B67031
Assist Grip
RH Visor Assy
LH Visor Assy
Map Lamp AssyRoof Headlining
Rain Sensor
Cover
Rain Sensor Cover Front Pillar Garnish RH
Front Door
Weatherstrip
RHWindshield Moulding
Outer Upper Visor Holder
Visor Holder
Inner Rear View Mirror Assy
� Windshield Glass Stopper No. 1
Front Door Weatherstrip LHFront Pillar Garnish LH
Windshield Wiper Arm Cover
FR Wiper Arm LH
Cowl Top Ventilator
Louver RHWindshield Glass
FR Wiper Arm RH� Windshield Glass Stopper No. 2
Hood Cowl Top Seal
Cowl Top Ventilator Louver LHRain Sensor
w/ EC Mirror
Inner Rear Vice Mirror
Assy
: Specified torqueN�m (kgf�cm, ft�lbf)
� Non±reusable part
20 (204, 15)
20 (204, 15)
� Window Glass Adhesive Dam
Windshield Wiper
Arm Cover
70±14
± WINDSHIELD/WINDOWGLASS/MIRRORWINDSHIELD GLASS
AVENSIS REPAIR MANUAL (RM1018E)
WINDSHIELD GLASS
COMPONENTS
Page 1650 of 1690

REPLACEMENT
HINT:
The installation is in the reverse o")
700T2±01
B50448
CutCut
Moulding
WindshieldBody
B67281
±
WINDSHIELD/WINDOWGLASS/MIRROR WINDSHIELD GLASS
70±15
AVENSIS REPAIR MANUAL (RM1018E)
REPLACEMENT
HINT:
The installation is in the reverse order of the removal. However, when there is a special point concerning
the installation, it is indicated.
1. REMOVE ROOF HEADLINING ASSY ( See page 76±36 or 76±45 or 76±54 )
(a) Remove the front door weatherstrip LH.
(b) Remove the front door weatherstrip RH.
(c) Remove the front pillar garnish LH.
(d) Remove the front pillar garnish RH.
(e) Remove the LH visor.
(f) Remove the RH visor.
(g) Remove the assist grip.
(h) Remove the 2 visor holders.
(i) Remove the map lamp assy.
(j) Do not remove the roof headlining assy completely partially so that the \
windshield glass can be re- moved.
2 . REMOVE INNER REAR VIEW MIRROR ASSY ( See page 70±64)
3 . REMOVE RAIN SENSOR ( See page 66±26)
4 . REMOVE COWL T OP VENTIL ATOR LOUVER ( See page66±13 )
(a) Remove the 2 windshield wiper arm covers.
(b) Remove the FR wiper arm LH.
(c) Remove the FR wiper arm RH.
(d) Remove the hood to cowl top seal.
(e) Remove the cowl top ventilator louver LH.
(f) Remove the cowl top ventilator louver RH.
5. REMOVE WINDSHIELD MOULDING OUTER UPPER
(a) Using a knife, cut off the moulding, as shown in the il-lustration.
NOTICE:
Do not damage the body with the knife.
(b) Remove the remaining moulding.
HINT:
When removing, make a partial cut, then pull and remove it by
hand.
6. DISCONNECT CONNECTOR (W/ DEICER)
(a) Disconnect the deicer connector, as shown in the illustra- tion.
Page 1666 of 1690
660CN±01
I35256
I352578Clips
I35258
± WIPER & WASHERWINDSHIELD WIPER MOTOR ASSY
66±13
AVENSIS REPAIR MANUAL (RM1018E)
WINDSHIELD WIPER MOTOR ASSY
REPLACEMENT
1. REMOVE FRONT WIPER ARM HEAD CAP
(a) Using a small screwdriver, remove the 2 front wiper arm
head cap.
HINT:
Tape up the screwdriver tip before use.
2. REMOVE FR WIPER ARM RH
(a) Operate the wiper, and stop the windshield wiper motor assy to the automatic stop position.
(b) Remove the nut and the FR wiper arm RH.
3. REMOVE FR WIPER ARM LH
(a) Remove the nut and the FR wiper arm LH.
4. REMOVE COWL TOP VENTILATOR LOUVER
(a) Disengage the 8 clips, and remove the hood cowl top
seal.
(b) Remove the 2 clips, and the cowl top ventilator louver.
5. REMOVE WINDSHIELD WIPER MOTOR & LINK ASSY
(a) Disconnect the connector, and remove the 2 bolts.
(b) Slide the wiper link assy to vehicle's passengers side. Dis-
engage the meshing of the rubber pin, and remove the
wiper motor & link assy.
Page 1667 of 1690
E65848
E65849
E65850
E65850
66±14
± WIPER & WASHERWINDSHIELD WIPER MOTOR ASSY
AVENSIS REPAIR MANUAL (RM1018E)
6. REMOVE WINDSHIELD WIPER MOTOR ASSY
(a) Using a screwdriver, disengage the meshing of 2 rods at
the crank arm pivot of the windshield wiper motor assy.
(b) Remove the 2 torx bolts and the windshield wiper motor
assy.
7. INSTALL WINDSHIELD WIPER MOTOR ASSY
(a) Apply MP grease to the crank arm pivot of the windshield
wiper motor assy.
(b) Install the windshield wiper motor assy to the windshield
wiper link assy with the 2 torx bolts.
Torque: 7.5 N�m (76 kgf�cm, 66 in.�lbf)


WINDSHIELD WIPER MOTOR ASSY
REPLACEMENT
1. REMOVE FRONT WIPER ARM HEAD CAP
(a")

6. REMOVE WINDSHIELD WIPER MOTOR ASSY
(a) Using a screwdriver, disengage the meshing o")