2002 NISSAN ALTIMA brake
[x] Cancel search: brakePage 152 of 249
parking brake is weakened or whenever the
parking brake shoes and/or drums are re-
placed, in order to assure the best braking
performance.
This procedure is described in the Vehicle
service manual and can be performed by
your NISSAN dealer.
WARNING
c
While driving on a slippery surface,
be careful when braking, accelerating
or downshifting. Abrupt braking or
accelerating could cause the wheels
to skid and result in an accident.
cIf the engine is not running or is
turned off while driving, the power
assist for the brakes will not work.
Braking will be harder.
Wet brakes
When the vehicle is washed or driven
through water, the brakes may get wet. As a
result, your braking distance will be longer
and the vehicle may pull to one side during
braking.
To dry brakes, drive the vehicle at a safe
speed while lightly pressing the brake pedalto heat-up the brakes. Do this until the
brakes return to normal. Avoid driving the
vehicle at high speeds until the brakes
function correctly.
ANTI-LOCK BRAKE SYSTEM
(ABS) (if so equipped)
The anti-lock brake system installed in
some models controls the brakes at each
wheel so the wheels do not lock when
braking abruptly or when braking on slip-
pery surfaces. The system detects the rota-
tion speed at each wheel and varies the
brake fluid pressure to prevent each wheel
from locking and sliding. By preventing
wheel lockup, the system helps the driver
maintain steering control and helps to mini-
mize swerving and spinning on slippery
surfaces.
Using the system
Depress the brake pedal and hold it down.
WARNING
Do not pump the brake pedal. Doing so
may result in increased stopping dis-
tances.
Normal operation
The anti-lock brake system does not oper-
ate at speeds below 3 to 6 MPH (5 to 10
km/h). The speeds vary according to road
conditions. When the anti-lock system
senses that one or more wheels are close to
locking up, the actuator (under the hood)
rapidly applies and releases hydraulic pres-
sure (like pumping the brakes very quickly).
While the actuator is working, you may feel
a pulsation in the brake pedal and hear a
noise or vibration from the actuator under
the hood. This is normal and indicates that
the anti-lock system is working properly.
However, the pulsation may indicate that
road conditions are hazardous and extra
care is required while driving.
Self-test feature
The anti-lock brake system is sophisticated,
with electronic sensors, electric pumps, and
hydraulic solenoids controlled by a com-
puter. The computer has a built-in diagnos-
tic feature that tests the system each time
you start the engine and move the vehicle at
a low speed in forward or reverse. When the
self-test occurs, you may hear a ``clunk''
noise and/or feel a pulsation in the brake
pedal. This is normal and is not an indica-
Starting and driving
5-19
ZX
Page 153 of 249
tion of any malfunction. If the computer
senses any malfunction, it switches the anti-
lock brake system OFF and turns on the
ABS brake warning light in the dashboard.
The brake system then operates normally,
but without anti-lock assistance.
If the light comes on during the self-test or
while driving, take the vehicle to an autho-
rized NISSAN dealer for repair.
WARNING
The anti-lock brake system is a sophis-
ticated device, but it cannot prevent
accidents resulting from careless or
dangerous driving techniques. It can
help maintain vehicle control during
braking on slippery surfaces, but re-
member that the stopping distance on
slippery surfaces will be longer than on
normal surfaces, even with the anti-
lock brake system. Stopping distances
may also be longer on rough, gravel or
snow covered roads, or if you are using
tire chains. Always maintain a safe dis-
tance from the vehicle in front of you.
Ultimately, the responsibility for safety
of self and others rests in the hands of
the driver.cTire type and condition of tires may
also affect braking effectiveness.
When replacing tires, install the
specified size of tire on all four
wheels.
cWhen installing a spare tire, make
sure it is the proper size and type as
specified on the tire placard. For tire
placard location information, refer to
ªTire placardº in the ``Technical and
consumer information'' section of
this manual.
Refer to ``Wheels and tires'' in the
``Maintenance and do-it-yourself'' sec-
tion of this manual.When driving on slippery surfaces or sud-
denly avoiding obstacles on roads, the ve-
hicle might swerve or slip. With the vehicle
traction control system, sensors detect
these movements and control the braking
and engine output to help improve vehicle
stability while driving.
cWhen the traction control system is op-
erating, the slip indicator in the instru-
ment panel blinks.
cIf the slip indicator blinks, the vehicle is
under slippery conditions. Be sure to
drive carefully. See ªSlip indicator lightº,
and ªtraction control off indicator lightº in
the ªInstruments and controlsº section.
cIf a malfunction occurs in the system,
the
andindicator lights come
on in the meter panel.
As long as these warning lights are on,
the traction control function is canceled.
The vehicle will behave like a vehicle
without the system.
TRACTION CONTROL
SYSTEM (TCS)
5-20Starting and driving
ZX
Page 156 of 249
cAllow more stopping distance under
these conditions. Braking should be
started sooner than on dry pavement.
cAllow greater following distances on
slippery roads.
cWatch for slippery spots (glare ice).
These may appear on an otherwise
clear road in shaded areas. If a patch
of ice is seen ahead, brake before
reaching it. Try not to brake while on
the ice, and avoid any sudden steer-
ing maneuvers.
cDo not use the cruise control on
slippery roads.
cSnow can trap dangerous exhaust
gases under your vehicle. Keep
snow clear of the exhaust pipe and
from around your vehicle.
ENGINE BLOCK HEATER (if so
equipped)
An engine block heater to assist extreme
cold temperature starting is available
through an authorized NISSAN dealer.
WARNING
Do not use your heater with an un-
grounded electrical system or two-
pronged (cheater) adapters. You can be
injured by an electrical shock if you use
an ungrounded connection.
Starting and driving
5-23
ZX
Page 159 of 249
CHANGING A FLAT TIRE
If you have a flat tire, follow the instructions
below:
Stopping the vehicle
1. Safely move the vehicle off of the road
and away from traffic.
2. Turn on the hazard warning flashers.
3. Park on a level surface and apply the
parking brake. Shift the manual transmis-
sion into R (Reverse), or the automatic
transmission into P (Park).
4. Turn off the engine.
5. Raise the hood to warn other traffic, and
to signal professional road assistance
personnel that you need assistance.
6. Have all passengers get out of the ve-
hicle and stand in a safe place, away
from traffic and clear of the vehicle.
WARNING
cMake sure the parking brake is se-
curely applied and the manual trans-
mission is shifted into R (Reverse),
or the automatic transmission into P
(Park).
cNever change tires when the vehicle
is on a slope, ice or slippery areas.
This is hazardous.
cNever change tires if oncoming traf-
fic is close to your vehicle. Wait for
professional road assistance.
Blocking wheels
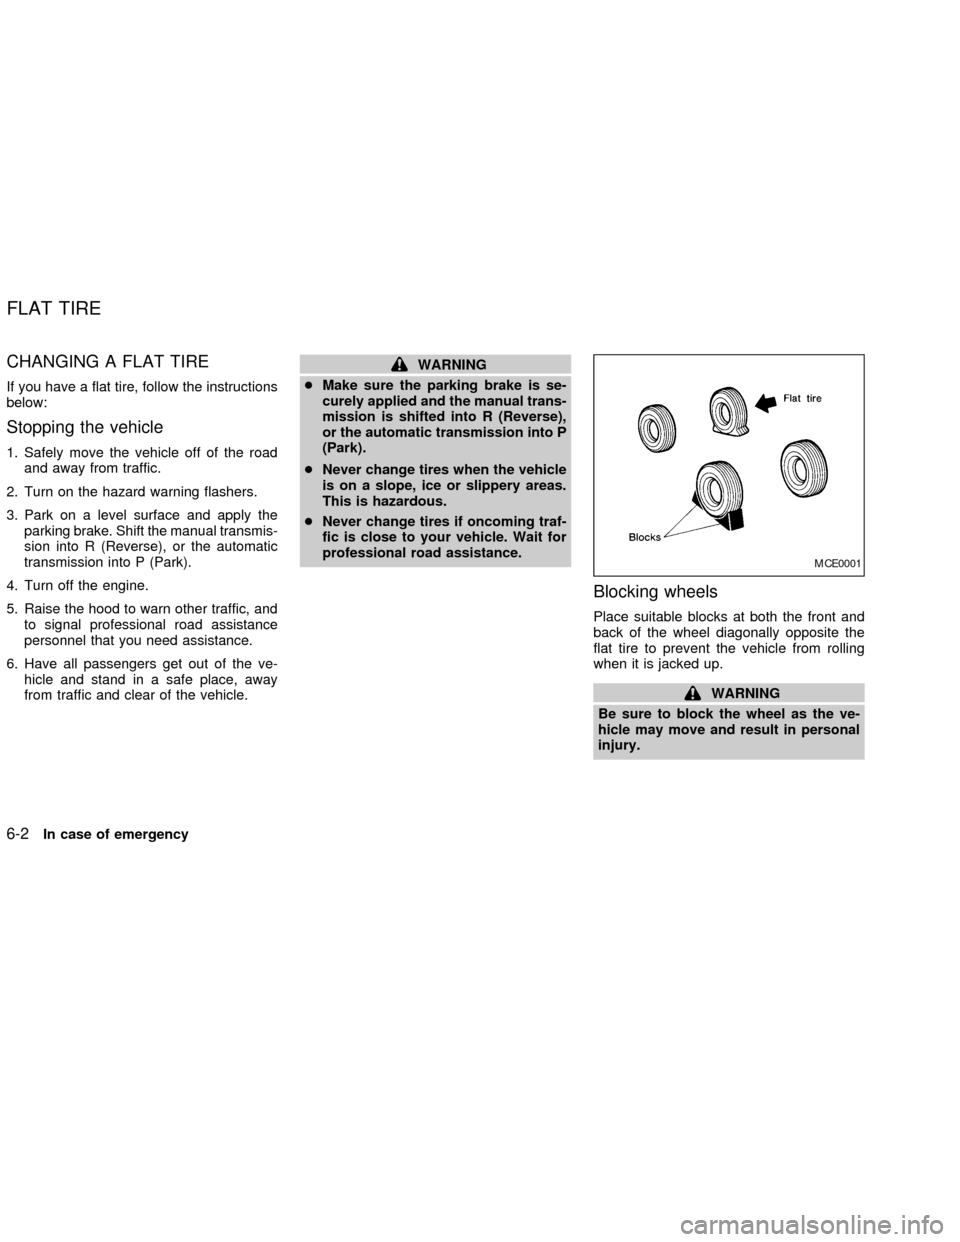
Place suitable blocks at both the front and
back of the wheel diagonally opposite the
flat tire to prevent the vehicle from rolling
when it is jacked up.
WARNING
Be sure to block the wheel as the ve-
hicle may move and result in personal
injury.
MCE0001
FLAT TIRE
6-2In case of emergency
ZX
Page 164 of 249
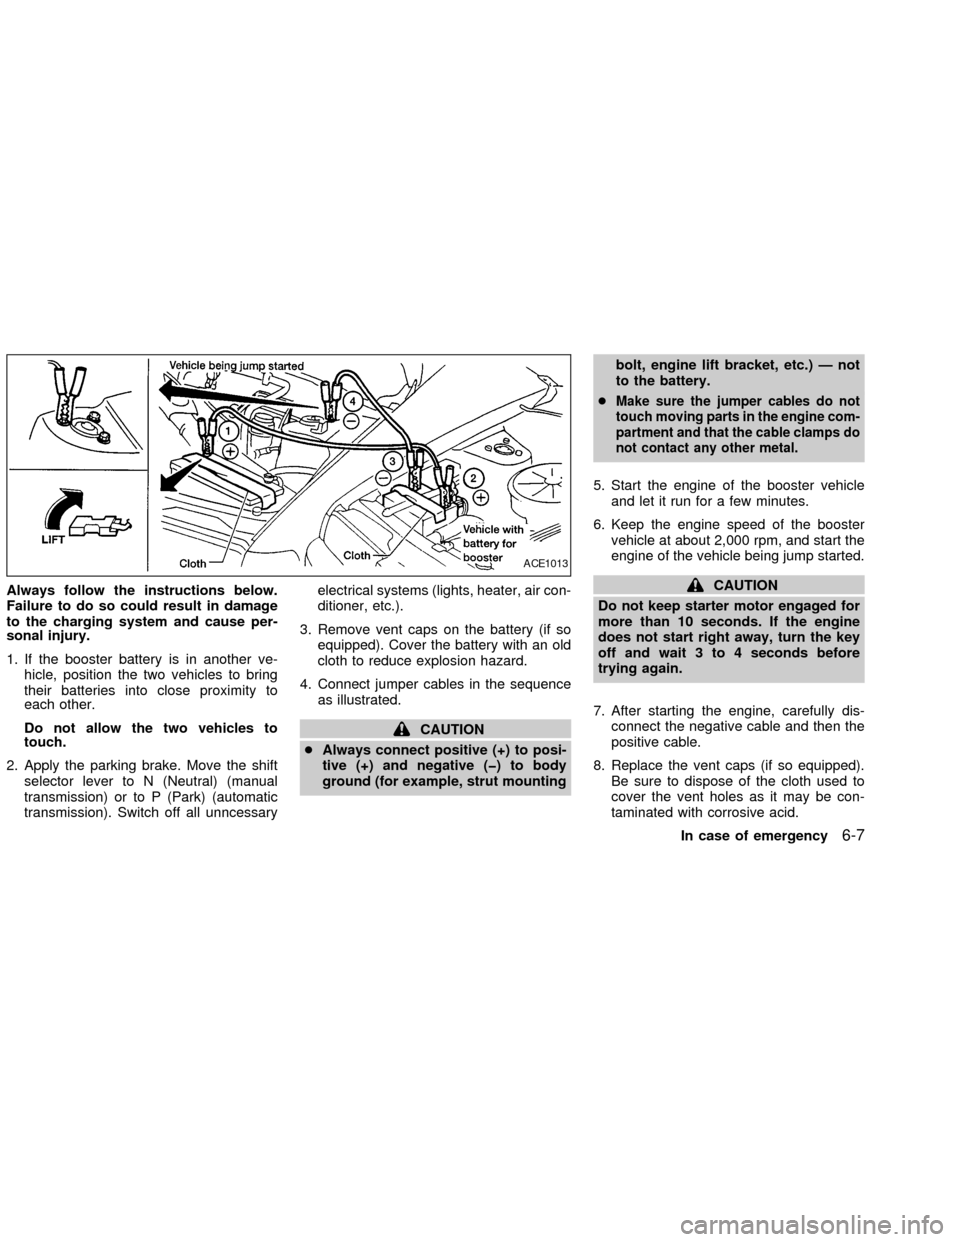
Always follow the instructions below.
Failure to do so could result in damage
to the charging system and cause per-
sonal injury.
1. If the booster battery is in another ve-
hicle, position the two vehicles to bring
their batteries into close proximity to
each other.
Do not allow the two vehicles to
touch.
2. Apply the parking brake. Move the shift
selector lever to N (Neutral) (manual
transmission) or to P (Park) (automatic
transmission). Switch off all unncessaryelectrical systems (lights, heater, air con-
ditioner, etc.).
3. Remove vent caps on the battery (if so
equipped). Cover the battery with an old
cloth to reduce explosion hazard.
4. Connect jumper cables in the sequence
as illustrated.
CAUTION
cAlways connect positive (+) to posi-
tive (+) and negative (þ) to body
ground (for example, strut mountingbolt, engine lift bracket, etc.) Ð not
to the battery.
c
Make sure the jumper cables do not
touch moving parts in the engine com-
partment and that the cable clamps do
not contact any other metal.
5. Start the engine of the booster vehicle
and let it run for a few minutes.
6. Keep the engine speed of the booster
vehicle at about 2,000 rpm, and start the
engine of the vehicle being jump started.
CAUTION
Do not keep starter motor engaged for
more than 10 seconds. If the engine
does not start right away, turn the key
off and wait 3 to 4 seconds before
trying again.
7. After starting the engine, carefully dis-
connect the negative cable and then the
positive cable.
8. Replace the vent caps (if so equipped).
Be sure to dispose of the cloth used to
cover the vent holes as it may be con-
taminated with corrosive acid.
ACE1013
In case of emergency6-7
ZX
Page 165 of 249
CAUTION
cAutomatic transmission models can-
not be push started. This may cause
transmission damage.
cThree way catalyst equipped models
should not be started by pushing.
The three way catalyst may be dam-
aged.
cNever try to start the vehicle by tow-
ing it. When the engine starts, the
forward surge could cause the ve-
hicle to collide with the tow vehicle.If your vehicle is overheating (indicated by an
extremely high temperature gauge reading),
or if you feel a lack of engine power, detect
abnormal noise, etc., take the following steps:
WARNING
cDo not continue to drive if your ve-
hicle overheats. Doing so could
cause a vehicle fire.
cTo avoid the danger of being
scalded, never remove the radiator
cap while the engine is still hot.
When the radiator cap is removed,
pressurized hot water will spurt out,
possibly causing serious injury.
cDo not open the hood if steam is
coming out.
1. Move the vehicle safely off the road,
apply the parking brake and move the
shift lever to N (Neutral) (manual trans-
mission) or to P (Park) (automatic trans-
mission).
Do not stop the engine.
2. Turn off the air conditioner. Open all the
windows, move the heater or air condi-
tioner temperature control to maximum
hot and fan control to high speed.3. Get out of the vehicle. Look and listen for
steam or coolant escaping from the ra-
diator before opening the hood. Wait until
no steam or coolant can be seen before
proceeding.
4. Open the engine hood.
WARNING
If steam or water is coming from the
engine, stand clear to prevent getting
burned.
5. Visually check drive belts for damage or
looseness. Also check if the cooling fan
is running. The radiator hoses and radia-
tor should not leak water. If coolant is
leaking, the water pump belt is missing or
loose, or the cooling fan does not run,
stop the engine.
PUSH STARTING IF YOUR VEHICLE
OVERHEATS
6-8In case of emergency
ZX
Page 167 of 249
TOWING RECOMMENDED BY
NISSAN
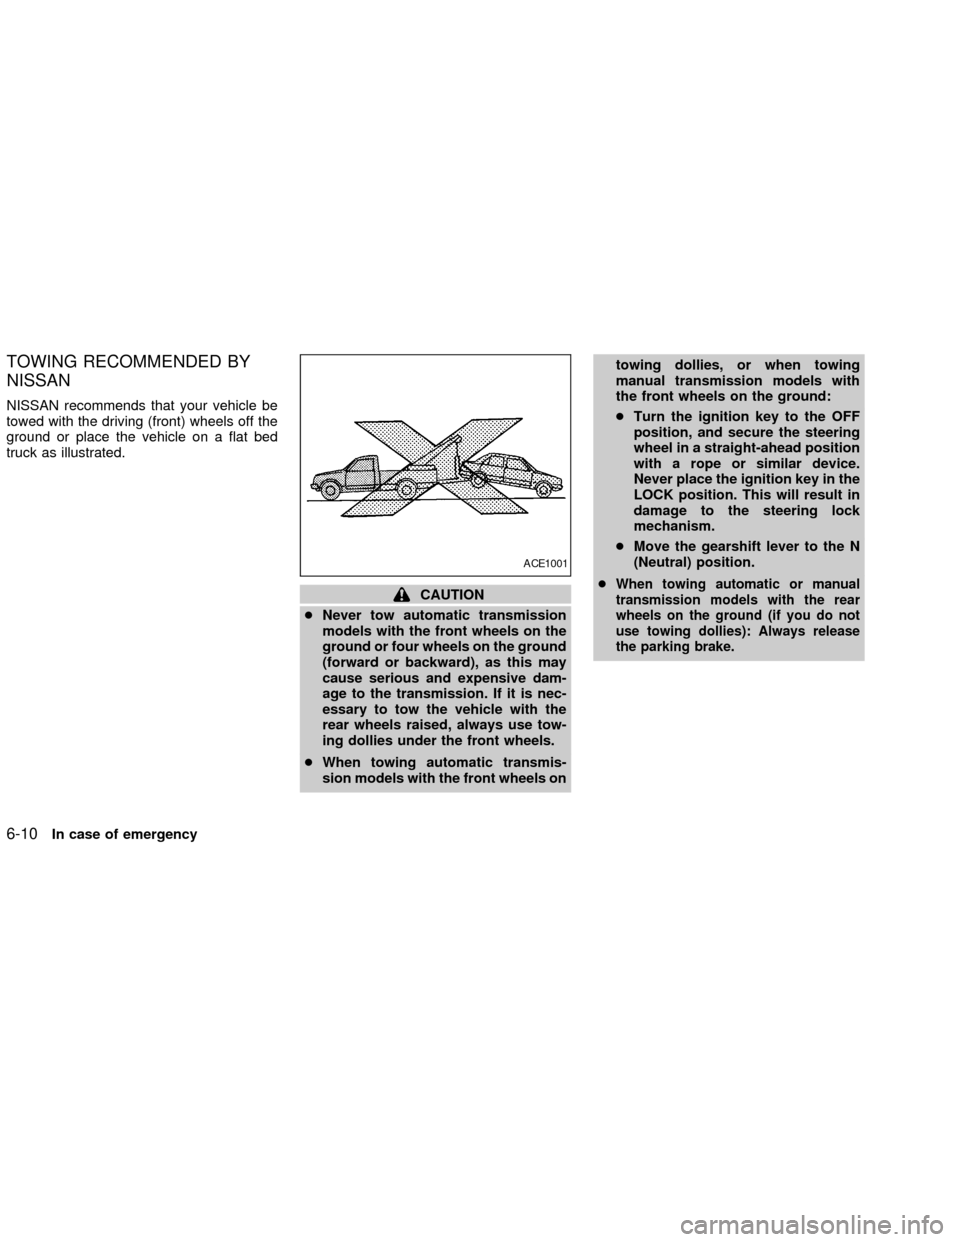
NISSAN recommends that your vehicle be
towed with the driving (front) wheels off the
ground or place the vehicle on a flat bed
truck as illustrated.
CAUTION
cNever tow automatic transmission
models with the front wheels on the
ground or four wheels on the ground
(forward or backward), as this may
cause serious and expensive dam-
age to the transmission. If it is nec-
essary to tow the vehicle with the
rear wheels raised, always use tow-
ing dollies under the front wheels.
cWhen towing automatic transmis-
sion models with the front wheels ontowing dollies, or when towing
manual transmission models with
the front wheels on the ground:
cTurn the ignition key to the OFF
position, and secure the steering
wheel in a straight-ahead position
with a rope or similar device.
Never place the ignition key in the
LOCK position. This will result in
damage to the steering lock
mechanism.
cMove the gearshift lever to the N
(Neutral) position.
cWhen towing automatic or manual
transmission models with the rear
wheels on the ground (if you do not
use towing dollies): Always release
the parking brake.
ACE1001
6-10In case of emergency
ZX
Page 168 of 249
VEHICLE RECOVERY (Freeing a
stuck vehicle)
Front
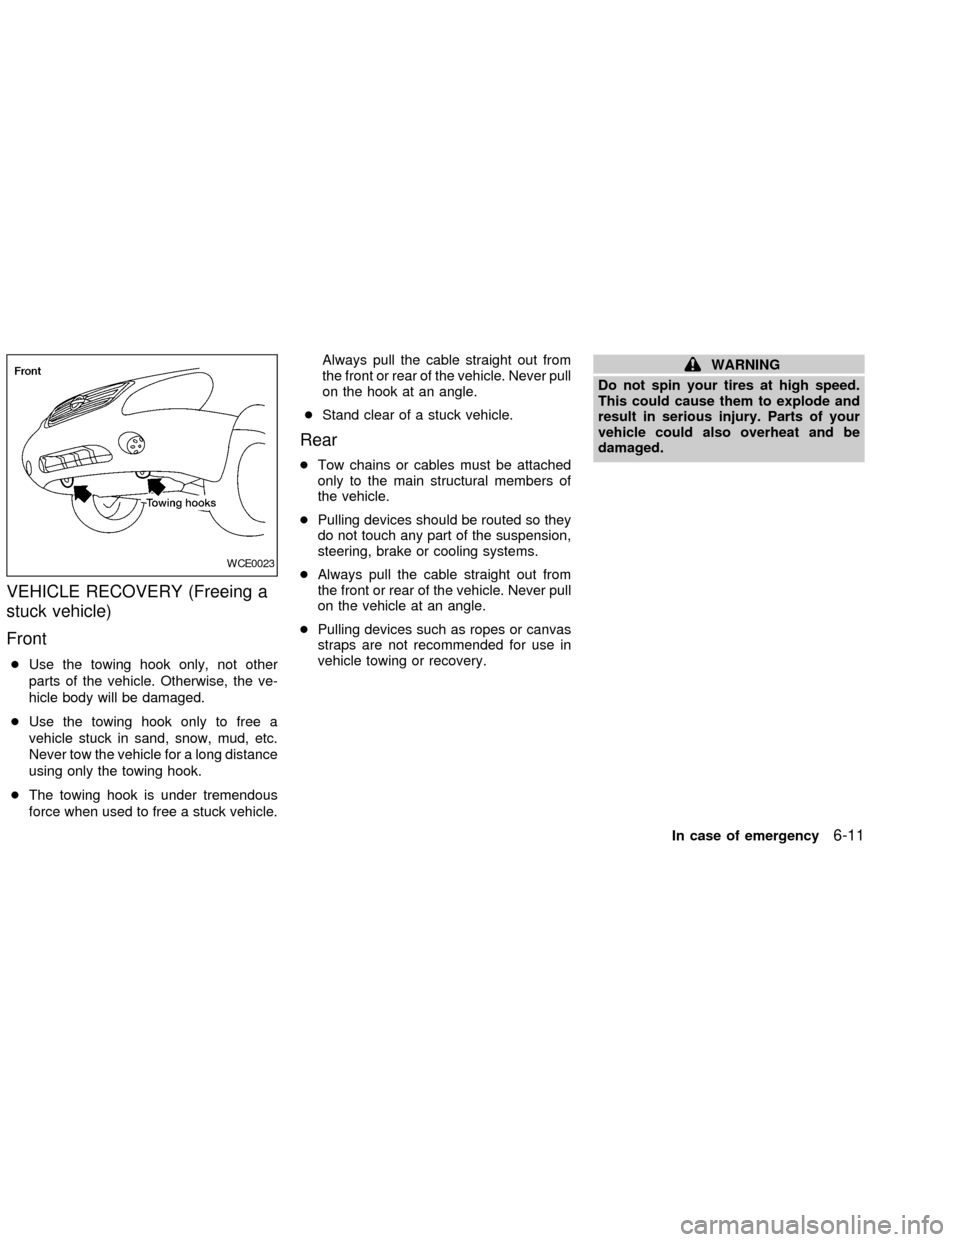
cUse the towing hook only, not other
parts of the vehicle. Otherwise, the ve-
hicle body will be damaged.
cUse the towing hook only to free a
vehicle stuck in sand, snow, mud, etc.
Never tow the vehicle for a long distance
using only the towing hook.
cThe towing hook is under tremendous
force when used to free a stuck vehicle.Always pull the cable straight out from
the front or rear of the vehicle. Never pull
on the hook at an angle.
cStand clear of a stuck vehicle.
Rear
cTow chains or cables must be attached
only to the main structural members of
the vehicle.
cPulling devices should be routed so they
do not touch any part of the suspension,
steering, brake or cooling systems.
cAlways pull the cable straight out from
the front or rear of the vehicle. Never pull
on the vehicle at an angle.
cPulling devices such as ropes or canvas
straps are not recommended for use in
vehicle towing or recovery.
WARNING
Do not spin your tires at high speed.
This could cause them to explode and
result in serious injury. Parts of your
vehicle could also overheat and be
damaged.
WCE0023
In case of emergency6-11
ZX