2002 NISSAN ALTIMA sensor
[x] Cancel search: sensorPage 21 of 249

Supplemental front air bag system
The driver supplemental air bag is located in
the center of the steering wheel; the front
passenger supplemental air bag is mounted in
the dashboard above the glove box. Thesesystems are designed to meet optional certi-
fication requirements under U.S. regulations.
They are also permitted in Canada. The op-
tional certification allows front air bags to be
designed to inflate somewhat less forcefully
than previously.However, all of the informa-tion, cautions and warnings in this manual
still apply and must be followed.The front
air bags are designed to inflate in higher
severity frontal collisions, although they may
inflate if the forces in another type of collision
are similar to those of a higher severity frontal
impact. They may not inflate in certain frontal
collisions. Vehicle damage (or lack of it) is not
always an indication of proper supplemental
air bag operation.
The supplemental air bag system has dual
stage inflators for both the driver and pas-
senger air bags. The system monitors infor-
mation from the crash zone sensor, the
diagnosis sensor unit and seat belt buckle
sensors that detect if the seat belts are
fastened. Inflator operation is based on the
severity of a collision and whether the seat
belts are being used.
When the supplemental front air bag in-
flates, a fairly loud noise may be heard,
followed by release of smoke. This smoke is
not harmful and does not indicate a fire.
Care should be taken not to inhale it, as it
may cause irritation and choking. Those
with a history of a breathing condition
should get fresh air promptly.
Supplemental front air bags, along with the
LRS0104
1-14Seats, restraints and supplemental air bag systems
ZX
Page 26 of 249

SUPPLEMENTAL AIR BAG
WARNING LABELS
Warning labels about the supplemental
front air bag, supplemental side air bag and
curtain air bag systems are placed in the
vehicle as shown in the illustration.
SUPPLEMENTAL AIR BAG
WARNING LIGHT
The supplemental air bag warning light, dis-
playing
in the instrument panel, moni-
tors the circuits of the supplemental front air
bag, supplemental side air bag and curtain
air bag (if so equipped) and pre-tensioner
seat belt systems. The circuits monitored by
the supplemental air bag warning light are
the diagnosis sensor unit, satellite sensors,
front air bag modules, side air bag modules,
curtain air bag modules, pre-tensioner seat
belts and all related wiring.
WRS0124LRS0100
Seats, restraints and supplemental air bag systems1-19
ZX
Page 53 of 249

in the speedometer display. When the igni-
tion is turned to ON, the display scrolls all
the modes of the trip computer and then
shows the mode chosen before the ignition
switch is turned OFF.
If the battery terminal is disconnected,
push the trip computer mode switch
more than 1 second to activate the com-
puter.
When the ignition switch is turned to ON,
modes of the trip computer can be selected
by pushing the trip mode switch on the
steering wheel switch for audio controls or
by the trip computer change button. The
following modes can be selected:
Outside air temperature (ICY±ÉF or
ÉC)
The outside air temperature is displayed in
ÉF or ÉC.
The outside air temperature mode includes
a low temperature warning feature: below
37ÉF (3ÉC), the outside air temperaturemode is automatically selected and ICY will
illuminate in order to draw the driver's atten-
tion. Press the mode switch if you wish to
return to the mode that was selected before
the warning occurred. The ICY indicator will
continue blinking as long as the tempera-
ture remains below 39ÉF (4ÉC).
The ambient temperature sensor is located
in front of the radiator. The sensor may be
affected by road or engine heat, wind direc-
tions and other driving conditions. The dis-
play may differ from the actual ambient
temperature or the temperature displayed
on various signs or billboards.
Distance to empty (dte±mile or km)
The distance to empty (dte) mode provides
you with an estimation of the distance that
can be driven before refueling. The dte is
constantly being calculated, based on the
amount of fuel in the fuel tank and the actual
fuel consumption.
The display is updated every 30 seconds.
The dte mode inlcudes a low range warning
feature: when the fuel level is low, the dte
mode is automatically selected and the dig-
its blink in order to draw the driver's atten-
tion. Press the mode switch if you wish to
WIC0159
2-4Instruments and controls
ZX
Page 70 of 249

To set the autolamp system:
1. Make sure the headlight switch is in the
AUTO position.
2. Turn the ignition key to ON.
3. The autolamp system automatically turns
the headlights on and off.
To turn the autolamp system off, turn the
switch to the OFF,
,orposition.
Be sure you do not put anything on top
of the autolamp sensor located in the top
driver side of the instrument panel. The
autolamp sensor controls the autolamp;
if it is covered, the autolamp sensor
reacts as if it is dark out and the head-
lights will illuminate. If this occurs while
parked with the engine off and the key in
the ON position, your vehicle's battery
could become discharged.
TURN SIGNAL SWITCH
Turn signal
Move the lever up or down to signal the
turning direction. When the turn is com-
pleted, the turn signals cancel automati-
cally.
Lane change signal
To signal a lane change, move the lever up
or down to the point where the indicator light
begins to flash, but the lever does not latch.
Normal operation of the fog lights in the
ON
position:
Headlight switch in the AUTO position;
daytime operation
cFog lights, marker and taillights come
ON.
cHeadlights do not come ON.
cDash readouts dim unless the dimmer
switch is on full bright.
cIf the ignition switch is in the OFF position
with the fog lights turned ON, a warning
chime will sound indicating the fog lights
LIC0173
FOG LIGHT SWITCH (if so
equipped)
Instruments and controls2-21
ZX
Page 71 of 249

were left ON. The fog lights will be turned
OFF by the Battery Saver function ap-
proximately 5 minutes after the last door
is closed.
cIf the ignition switch is turned to the ON
position after the fog lights were turned
OFF by the Battery Saver function, the
fog lights will immediately come back
ON.
Headlight switch in the AUTO position;
nighttime operation
cFog lights, marker and taillights come
ON.
cHeadlights come ON.
cDash readouts dim unless the dimmer
switch is on full bright.
cIf the ignition switch is in the OFF position
with the fog lights turned ON, the fog
lights will be turned OFF by the Twilight
Sentinel function approximately 45 sec-
onds after the last door is closed. When
any door is opened when the ignition
switch is in the OFF position, the Twilight
Sentinel function operates for approxi-
mately 5 minutes. After approximately 5minutes, the lights will turn OFF due to
the Battery Saver function.
cIf the ignition switch is turned to the ON
position after the fog lights were turned
OFF by the Twilight Sentinel function, the
fog lights and the headlights will come
ON together when the Auto Light Sensor
determines it is dark enough. The fog
lights will now operate independently of
the headlights only if the headlight switch
is turned OFF.
cWhen the high-beams are turned ON, the
fog lights will turn OFF. The fog lights will
come back ON when the high-beams are
turned OFF.
Headlights turned ON and OFF by the
driver (no AUTO headlight function); day
or nighttime operation
cSame operation as ``Headlight switch in
the AUTO position; daytime operation''
described above.
Some of the Battery Saver and Twilight
Sentinel functions can be turned ON
and OFF or adjusted. Please see your
NISSAN dealer if you have any ques-
tions.To turn the fog lights OFF, turn the switch to
the OFF position.
The fog lights automatically turn off when-
ever the high-beam headlight function is
selected.
2-22Instruments and controls
ZX
Page 102 of 249

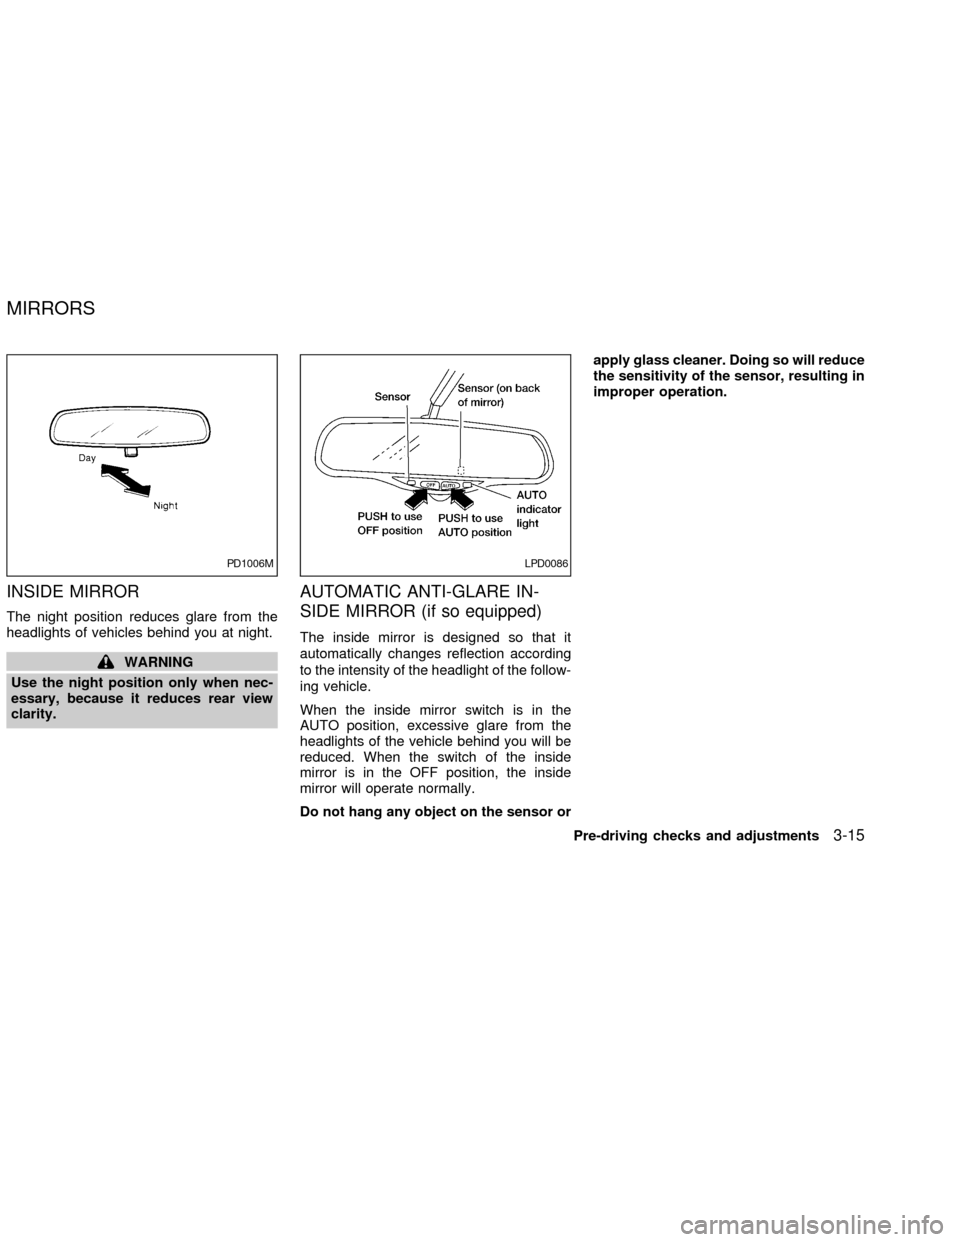
INSIDE MIRROR
The night position reduces glare from the
headlights of vehicles behind you at night.
WARNING
Use the night position only when nec-
essary, because it reduces rear view
clarity.
AUTOMATIC ANTI-GLARE IN-
SIDE MIRROR (if so equipped)
The inside mirror is designed so that it
automatically changes reflection according
to the intensity of the headlight of the follow-
ing vehicle.
When the inside mirror switch is in the
AUTO position, excessive glare from the
headlights of the vehicle behind you will be
reduced. When the switch of the inside
mirror is in the OFF position, the inside
mirror will operate normally.
Do not hang any object on the sensor orapply glass cleaner. Doing so will reduce
the sensitivity of the sensor, resulting in
improper operation.
PD1006MLPD0086
MIRRORS
Pre-driving checks and adjustments3-15
ZX
Page 114 of 249

OPERATING TIPS
cWhen the engine coolant temperature
and outside air temperature are low, the
air flow from the foot outlets may not
operate for a maximum of 150 seconds.
However, this is not a malfunction. After
the coolant temperature warms up, air
flow from the foot outlets will operate
normally.
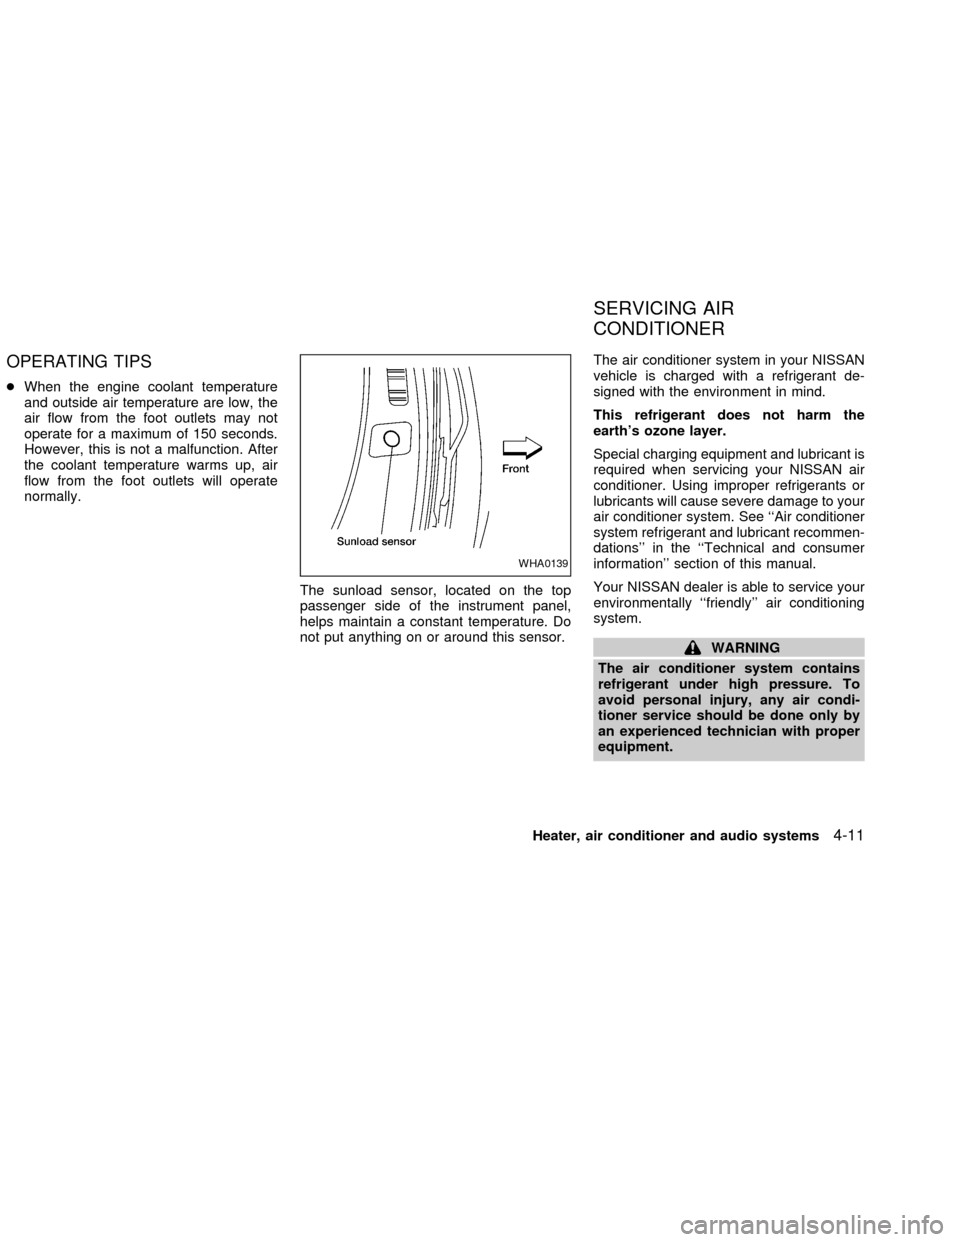
The sunload sensor, located on the top
passenger side of the instrument panel,
helps maintain a constant temperature. Do
not put anything on or around this sensor.The air conditioner system in your NISSAN
vehicle is charged with a refrigerant de-
signed with the environment in mind.
This refrigerant does not harm the
earth's ozone layer.
Special charging equipment and lubricant is
required when servicing your NISSAN air
conditioner. Using improper refrigerants or
lubricants will cause severe damage to your
air conditioner system. See ``Air conditioner
system refrigerant and lubricant recommen-
dations'' in the ``Technical and consumer
information'' section of this manual.
Your NISSAN dealer is able to service your
environmentally ``friendly'' air conditioning
system.
WARNING
The air conditioner system contains
refrigerant under high pressure. To
avoid personal injury, any air condi-
tioner service should be done only by
an experienced technician with proper
equipment.
WHA0139
SERVICING AIR
CONDITIONER
Heater, air conditioner and audio systems4-11
ZX
Page 152 of 249

parking brake is weakened or whenever the
parking brake shoes and/or drums are re-
placed, in order to assure the best braking
performance.
This procedure is described in the Vehicle
service manual and can be performed by
your NISSAN dealer.
WARNING
c
While driving on a slippery surface,
be careful when braking, accelerating
or downshifting. Abrupt braking or
accelerating could cause the wheels
to skid and result in an accident.
cIf the engine is not running or is
turned off while driving, the power
assist for the brakes will not work.
Braking will be harder.
Wet brakes
When the vehicle is washed or driven
through water, the brakes may get wet. As a
result, your braking distance will be longer
and the vehicle may pull to one side during
braking.
To dry brakes, drive the vehicle at a safe
speed while lightly pressing the brake pedalto heat-up the brakes. Do this until the
brakes return to normal. Avoid driving the
vehicle at high speeds until the brakes
function correctly.
ANTI-LOCK BRAKE SYSTEM
(ABS) (if so equipped)
The anti-lock brake system installed in
some models controls the brakes at each
wheel so the wheels do not lock when
braking abruptly or when braking on slip-
pery surfaces. The system detects the rota-
tion speed at each wheel and varies the
brake fluid pressure to prevent each wheel
from locking and sliding. By preventing
wheel lockup, the system helps the driver
maintain steering control and helps to mini-
mize swerving and spinning on slippery
surfaces.
Using the system
Depress the brake pedal and hold it down.
WARNING
Do not pump the brake pedal. Doing so
may result in increased stopping dis-
tances.
Normal operation
The anti-lock brake system does not oper-
ate at speeds below 3 to 6 MPH (5 to 10
km/h). The speeds vary according to road
conditions. When the anti-lock system
senses that one or more wheels are close to
locking up, the actuator (under the hood)
rapidly applies and releases hydraulic pres-
sure (like pumping the brakes very quickly).
While the actuator is working, you may feel
a pulsation in the brake pedal and hear a
noise or vibration from the actuator under
the hood. This is normal and indicates that
the anti-lock system is working properly.
However, the pulsation may indicate that
road conditions are hazardous and extra
care is required while driving.
Self-test feature
The anti-lock brake system is sophisticated,
with electronic sensors, electric pumps, and
hydraulic solenoids controlled by a com-
puter. The computer has a built-in diagnos-
tic feature that tests the system each time
you start the engine and move the vehicle at
a low speed in forward or reverse. When the
self-test occurs, you may hear a ``clunk''
noise and/or feel a pulsation in the brake
pedal. This is normal and is not an indica-
Starting and driving
5-19
ZX