2002 NISSAN ALTIMA fuse
[x] Cancel search: fusePage 75 of 249
cUse this power outlet with the engine
running. (If the engine is stopped,
this could result in a discharged bat-
tery.)
cAvoid using when the air conditioner,
headlights or rear window defogger is
on.
cBefore inserting or disconnecting a
plug, be sure the electrical accessory
being used is turned off.
cPush the plug in as far as it will go. If
good contact is not made, the plug
may overheat or the internal tempera-
ture fuse may blow.
cWhen not in use, be sure to close the
cap. Do not allow water to contact the
socket.
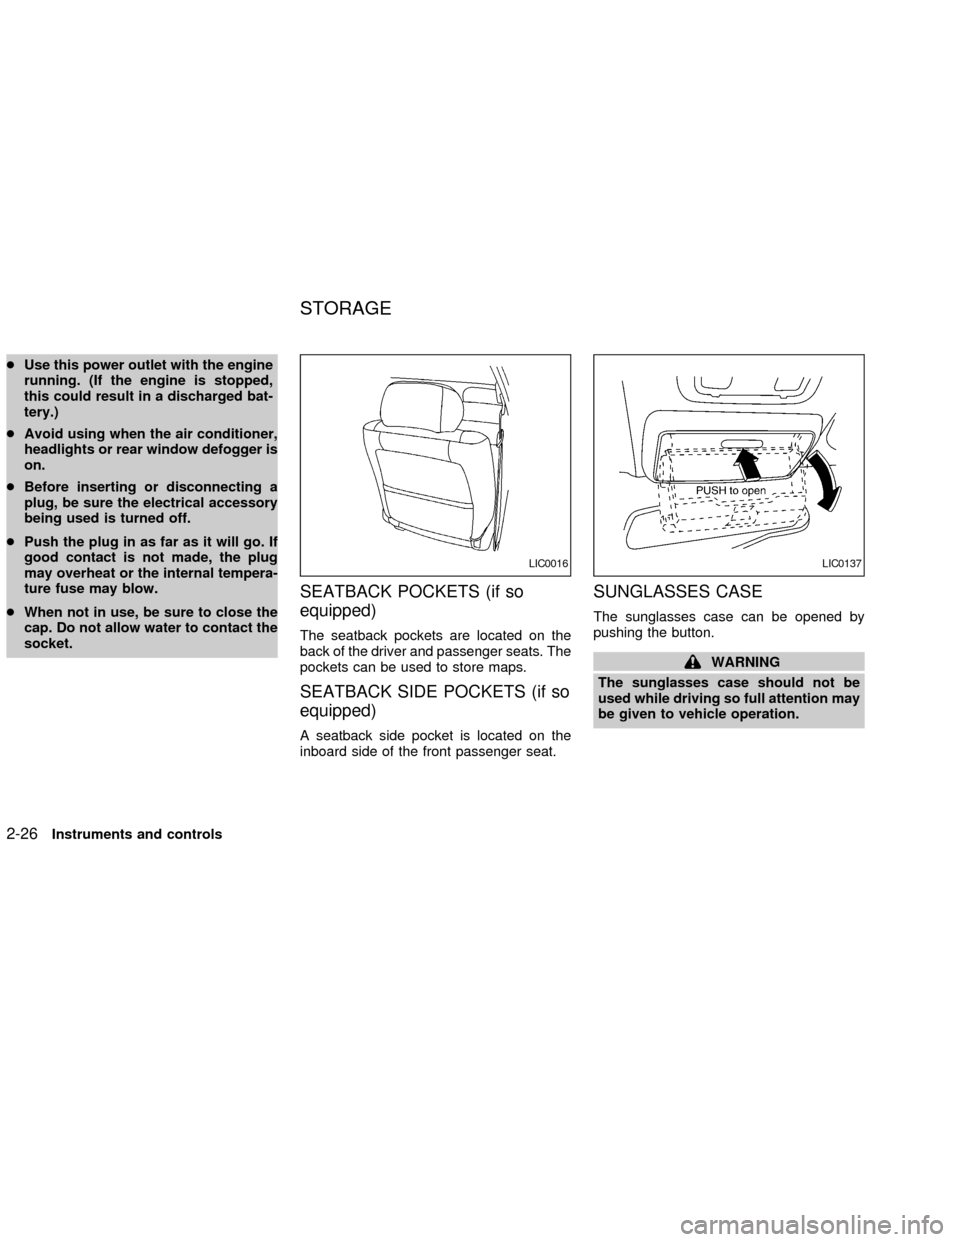
SEATBACK POCKETS (if so
equipped)
The seatback pockets are located on the
back of the driver and passenger seats. The
pockets can be used to store maps.
SEATBACK SIDE POCKETS (if so
equipped)
A seatback side pocket is located on the
inboard side of the front passenger seat.
SUNGLASSES CASE
The sunglasses case can be opened by
pushing the button.
WARNING
The sunglasses case should not be
used while driving so full attention may
be given to vehicle operation.
LIC0016LIC0137
STORAGE
2-26Instruments and controls
ZX
Page 120 of 249
TUNE/FF-REV
WARNING
The radio should not be tuned while
driving so full attention may be given to
vehicle operation.
Use the
orbuttons for manual tun-
ing. To move quickly through the channels,
hold the tuning buttons down.
SEEK tuning
Push SEEK/TRACK (or). SEEK
tuning begins from low to high frequencies or
high to low frequencies, depending on which
button is pressed, and stops at the next
broadcasting station. If using the up button,
once the highest broadcasting station is
reached, the radio continues in the SEEK
mode at the lowest broadcasting station. If
using the down button, once the lowest
broadcasting station is reached, the radio
continues in the SEEK mode at the highest
broadcasting station.
SCAN tuning
Push the SCAN button. SCAN illuminates in
the display window. Scan tuning begins
from low to high frequencies or from high to
low frequencies. Scan tuning stops at each
broadcasting station that has sufficient sig-
nal strength for 5 seconds. When scanning,
SCAN blinks in the display. Pushing the
SCAN button again during this 5 second
period stops Scan tuning and the radio
remains tuned to that station.
Station memory operation þ Travel Pre-
set is OFF
Each preset mode (A, B or C) has 6 presets,
capable of storing any combination of AM,
FM and FM RDS stations.
Press the PRESET ABC button to change
between the presets:
A!B!C
The radio displays icon A, B or C to indicate
which set of presets is active.
To store a radio station in a preset:
1. Select the desired preset by pressing
PRESET ABC.
2. Tune to the desired station.3. Press the desired station select button
(>2 seconds.)
4. A beep will sound indicating memoriza-
tion is complete.
5. Other station select buttons can be set in
the same manner.
If the battery cable is disconnected, or if the
radio fuse opens, the radio memory is can-
celled. In that case, reset the desired sta-
tions.
Turning ON Travel Preset
1. Press the TRAVEL preset button (<1.5
seconds). The TRAVEL icon shows in
the display.
2. The radio selects the strongest stations
in the area and stores them in Travel
Presets A, B and C. 12 FM stations and
6 AM stations are the default settings. To
change the default settings, see ªEditing
Travel Presetº later in this section.
3. When finished storing radio stations, the
radio tunes to the first stored preset of
Travel Preset A.
4. If the radio cannot find any stations, the
Heater, air conditioner and audio systems
4-17
ZX
Page 125 of 249
TUNE/FF-REV
WARNING
The radio should not be tuned while
driving so full attention may be given to
vehicle operation.
Use the
orbuttons for manual tun-
ing. To move quickly through the channels,
hold the tuning buttons down.
SEEK tuning
Push SEEK/TRACK (or). SEEK
tuning begins from low to high frequencies or
high to low frequencies, depending on which
button is pressed, and stops at the next
broadcasting station. If using the up button,
once the highest broadcasting station is
reached, the radio continues in the SEEK
mode at the lowest broadcasting station. If
using the down button, once the lowest
broadcasting station is reached, the radio
continues in the SEEK mode at the highest
broadcasting station.
SCAN tuning
Push the SCAN button. SCAN illuminates in
the display window. Scan tuning begins
from low to high frequencies or from high to
low frequencies. Scan tuning stops at each
broadcasting station that has sufficient sig-
nal strength for 5 seconds. When scanning,
SCAN blinks in the display. Pushing the
SCAN button again during this 5 second
period stops Scan tuning and the radio
remains tuned to that station.
Station memory operation þ Travel Pre-
set is OFF
Each preset mode (A, B or C) has 6 presets,
capable of storing any combination of AM,
FM and FM RDS stations.
Press the PRESET ABC button to change
between the presets:
A!B!C
The radio displays icon A, B or C to indicate
which set of presets is active.
To store a radio station in a preset:
1. Select the desired preset by pressing
PRESET ABC.
2. Tune to the desired station.3. Press the desired station select button
(>2 seconds.)
4. When the indicator illuminates in the
station selection button, a beep will
sound indicating memorization is com-
plete. For FM stations, the indicator will
turn green. For AM stations, the indicator
will turn amber.
5. Other station select buttons can be set in
the same manner.
If the battery cable is disconnected, or if the
radio fuse opens, the radio memory is can-
celled. In that case, reset the desired sta-
tions.
Turning ON Travel Preset
1. Press the TRAVEL preset button (<1.5
seconds). The TRAVEL icon shows in
the display.
2. The radio selects the strongest stations
in the area and stores them in Travel
Presets A, B and C. 12 FM stations and
6 AM stations are the default settings. To
change the default settings, see ªEditing
Travel Presetº later in this section.
3. When finished storing radio stations, the
4-22Heater, air conditioner and audio systems
ZX
Page 177 of 249

8 Maintenance and do-it-yourself
Maintenance requirements .....................................8-2
General maintenance .............................................8-3
Explanation of general maintenance
items ..................................................................8-3
Maintenance precautions .......................................8-5
Engine compartment check locations QR
engine .....................................................................8-7
Engine compartment check locations VQ
engine .....................................................................8-8
Engine cooling system ...........................................8-9
Checking engine coolant level ..........................8-9
Changing engine coolant ................................8-10
Engine oil .............................................................8-10
Checking engine oil level ................................8-10
Changing engine oil ........................................8-11
Changing engine oil filter.................................8-13
Automatic transmission fluid ................................8-14
Temperature conditions for checking ..............8-14
Power steering fluid..............................................8-15
Brake and clutch fluid...........................................8-16
Brake fluid........................................................8-16
Clutch fluid .......................................................8-16Window washer fluid ............................................8-17
Battery ..................................................................8-17
Jump starting ...................................................8-18
Drive belts ............................................................8-19
Spark plugs ..........................................................8-20
Replacing spark plugs (QR25DE) ...................8-20
Replacing spark plugs (VQ35DE) ...................8-20
Air cleaner ............................................................8-21
Cabin air filter (if so equipped) ........................8-21
Windshield wiper blades ......................................8-24
Cleaning ..........................................................8-24
Replacing .........................................................8-24
Parking brake and brake pedal ............................8-25
Checking parking brake...................................8-25
Checking brake pedal .....................................8-25
Brake booster ..................................................8-26
Clutch pedal .........................................................8-26
Checking clutch pedal .....................................8-26
Fuses ....................................................................8-27
Engine compartment .......................................8-27
Passenger compartment .................................8-28
Keyfob battery replacement .................................8-29
ZX
Page 184 of 249

1. Power steering fluid reservoir
2. Spark plug caps
3. Brake fluid reservoir
4. Clutch fluid reservoir (M/T models)
5. Air cleaner
6. Battery
7. Fuse/fusible link box
8. Transmission dipstick (A/T models)
9. Engine oil dipstick
10. Radiator cap
11. Fuse block
12. Windshield washer fluid reservoir
13. Coolant reservoir
14. Engine oil filler cap
NOTE: Engine cover removed for clarity
LDI0073
ENGINE COMPARTMENT
CHECK LOCATIONS QR
ENGINE
Maintenance and do-it-yourself8-7
ZX
Page 185 of 249

1. Power steering fluid reservoir
2. Engine oil filler cap
3. Brake fluid reservoir
4. Clutch fluid reservoir (M/T models)
5. Air cleaner
6. Battery
7. Fuse/fusible link box
8. Transmission dipstick (A/T models)
9. Engine oil dipstick
10. Radiator cap
11. Fuse block
12. Windshield washer fluid reservoir
13. Coolant reservoir
NOTE: Engine cover removed for clarity
LDI0074
ENGINE COMPARTMENT
CHECK LOCATIONS VQ
ENGINE
8-8Maintenance and do-it-yourself
ZX
Page 204 of 249
ENGINE COMPARTMENT
CAUTION
Never use a fuse of a higher amperage
rating than specified on the fuse box
cover. This could damage the electrical
system or cause a fire.
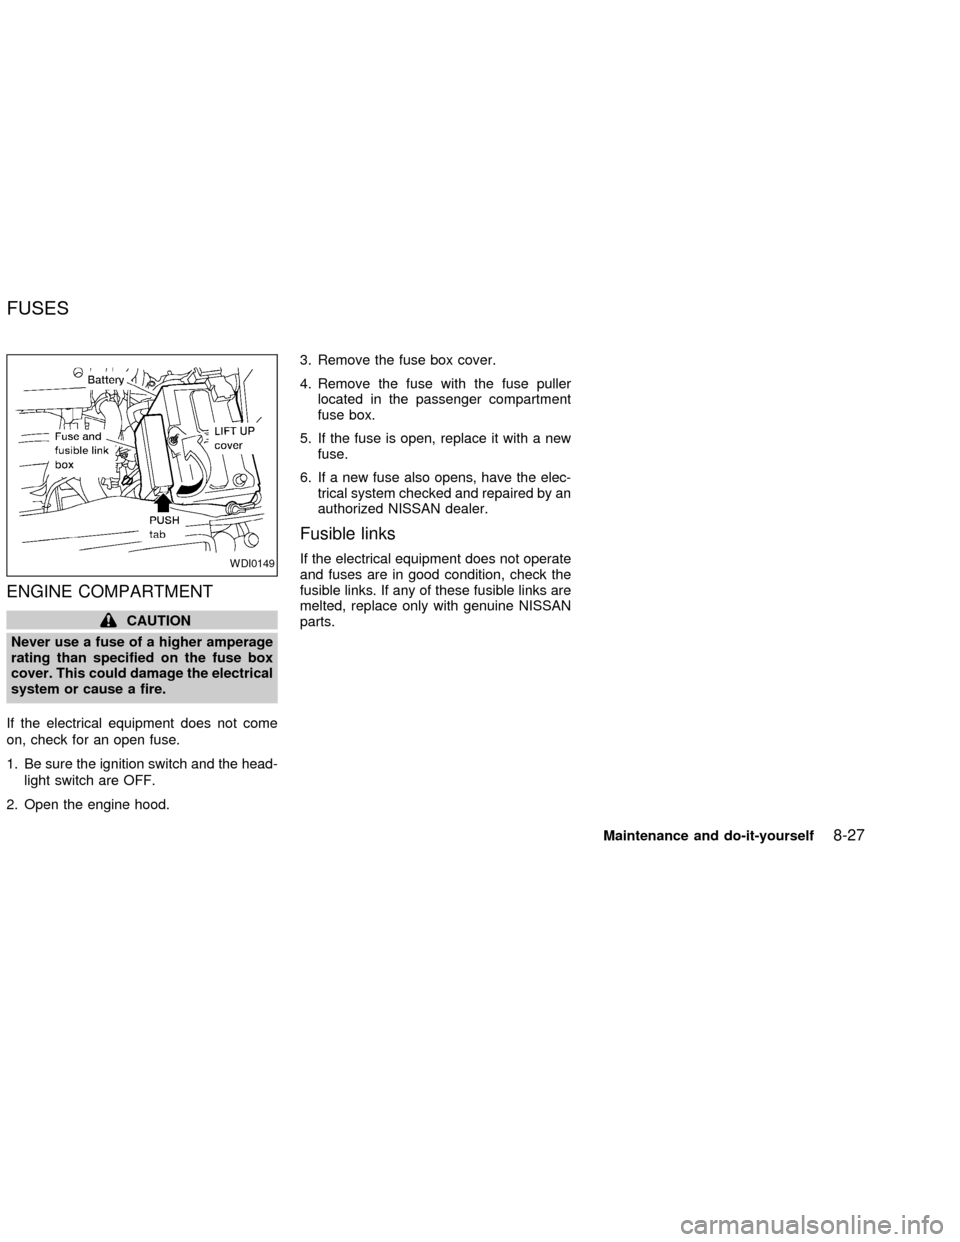
If the electrical equipment does not come
on, check for an open fuse.
1. Be sure the ignition switch and the head-
light switch are OFF.
2. Open the engine hood.3. Remove the fuse box cover.
4. Remove the fuse with the fuse puller
located in the passenger compartment
fuse box.
5. If the fuse is open, replace it with a new
fuse.
6. If a new fuse also opens, have the elec-
trical system checked and repaired by an
authorized NISSAN dealer.
Fusible links
If the electrical equipment does not operate
and fuses are in good condition, check the
fusible links. If any of these fusible links are
melted, replace only with genuine NISSAN
parts.WDI0149
FUSES
Maintenance and do-it-yourself8-27
ZX
Page 205 of 249
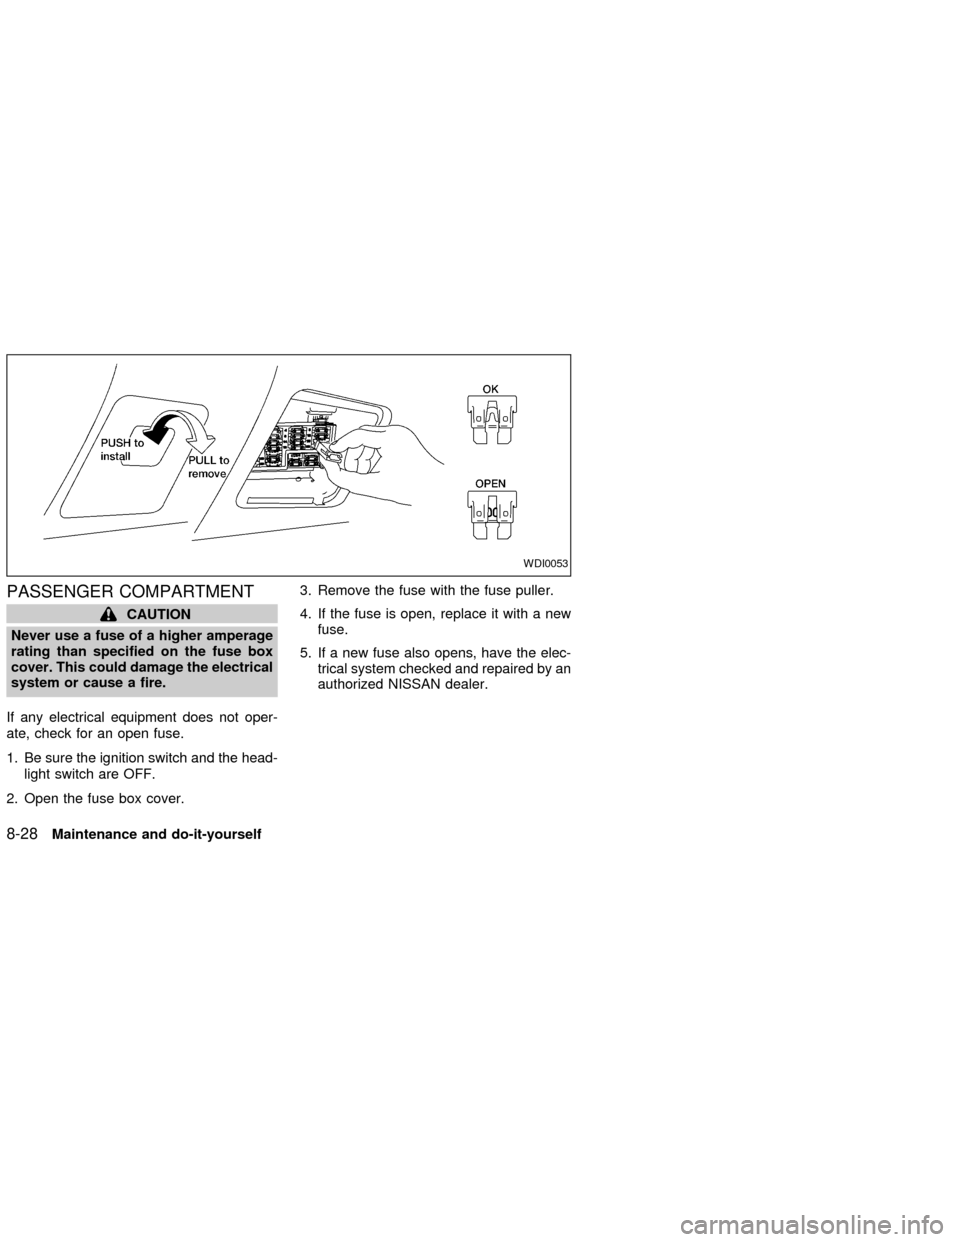
PASSENGER COMPARTMENT
CAUTION
Never use a fuse of a higher amperage
rating than specified on the fuse box
cover. This could damage the electrical
system or cause a fire.
If any electrical equipment does not oper-
ate, check for an open fuse.
1. Be sure the ignition switch and the head-
light switch are OFF.
2. Open the fuse box cover.3. Remove the fuse with the fuse puller.
4. If the fuse is open, replace it with a new
fuse.
5. If a new fuse also opens, have the elec-
trical system checked and repaired by an
authorized NISSAN dealer.
WDI0053
8-28Maintenance and do-it-yourself
ZX