Page 85 of 246

CONNECT Nav
84
“SELECT”
When choosing and confirming “SE-
LECT” by rotating and pressing the
knob 22-fig. 1the display shows the
message list fig. 91. There are four dif-
ferent message types:
1message stored but not sent;
2message stored and sent;
3message received but not read;
4message received and read.When the user selects a message of
type 1or 2from the above list, screen
displayed is that shown in fig. 92with
the following options:
– “VIEW MESSAGE”
– “DELETE”
– “SEND”.
Selecting and confirming “VIEW MES-
SAGE” rotating and pressing the knob
22-fig. 1will display the selected mes-
sage. Selecting and confirming “DELETE”
rotating and pressing the knob 22-fig. 1
activates selected message deletion. A
confirmation dialog is shown for user
confirmation; pressing the knob 22-
fig. 1starts message deletion from SIM
card.
Selecting and confirming “SEND” ro-
tating and pressing the knob 22-fig. 1
(active only if phone number is pre-
sent) starts message sending to the se-
lected number.
Press “ESC” 23-fig. 1to go back to
previous menu without sending the
message.
fig. 91
F0D2157g
fig. 92
F0D2158g
Page 86 of 246

When selecting types 3or 4from the
above list, the display will show the
screen in fig. 93, with the following
options:
– “VIEW MESSAGE”
– “DELETE”
– “CALL”
– “ANSWER”
Selecting and confirming “VIEW MES-
SAGE” rotating and pressing the knob
22-fig. 1will display the selected mes-
sage. Selecting and confirming “DELETE”
rotating and pressing the knob 22-
fig. 1activates selected message dele-
tion. A confirmation dialog is shown
for user confirmation; pressing the
knob 22-fig. 1starts message deletion
from SIM card.
Selecting and confirming “CALL” ro-
tating and pressing the knob 22-fig. 1
starts a call to the sender of the mes-
sage; the display shows “CALL IN
PROGRESS”.
Selecting and confirming “ANSWER”
rotating and pressing the knob 22-fig. 1
lets the user reply to the received mes-
sage with a new SMS.
Press “ESC” 23-fig. 1to quit and go
back to fig. 92screen.“CENTER NUMBER”
Selecting “CENTER NUMBER”
(provider phone number) using the
keypad (keys 0-9, +, *, #) rotating the
knob 22-fig. 1and pressing it to con-
firm, the user can set the service
Provider phone number.
CONNECT Nav
85fig. 93
F0D2074g
Page 87 of 246

CONNECT Nav
86
“PHONE OPTION”
FUNCTION
Selecting and confirming “PHONE
OPTION” rotating and pressing the
knob 22-fig. 1the display shows
fig. 94screen with the following op-
tions:
– “NETWORK OPERATOR”: to se-
lect provider;
– “PIN”: PIN editing and setting;
– “INFORMATION”: shows infor-
mation related to the GSM module
(Provider name, IMEI code, etc…).
– “ANONYMOUS”: enables or dis-
ables forwarding of caller telephone
number to the called party.Network operator
“NETWORK OPERATOR”, select-
ed and confirmed rotating and press-
ing the knob 22-fig. 1allows manage-
ment of network Providers; the display
shows the following options fig. 95:
– “SELECT”: to display operator se-
lection modes;
– “OPERATOR”: for manual opera-
tor choice (if enabled);
– “OK”: to accept and store settings.“SELECT” – “OPERATOR”: With
these options the user has three pos-
sible ways to choose the network op-
erator:
•“AUTOMATIC”: the system
chooses automatically the network
operator. If it is no longer able to pro-
vide an adequate GSM field, another
operator is sought. In this case “OP-
ERATOR” is disabled.
•“MANUAL” fig. 96: operator is
chosen manually. In this case “OPER-
ATOR” is enabled. If chosen operator
is no longer able to provide an ade-
quate GSM field, telephone functions
will not be available.
fig. 94
F0D2075g
fig. 95
F0D2076g
fig. 96
F0D2077g
Page 89 of 246
CONNECT Nav
88
“RECALL LAST PIN”: stores the first
PIN entered, sending it automatically
to the SIM card when required. This
setting is saved in system settings,
when inserting the SIM card the dis-
play will not show “PIN REQUEST”.
“OK”: to accept and store settings.Information
“INFORMATION” shows informa-
tion related to the GSM service
provider fig. 99. Press ”ESC” 23-
fig. 1to quit.“PHONE SETTINGS”
FUNCTION
Selecting and confirming “PHONE
SETTINGS” rotating and pressing the
knob 22-fig. 1, will display the screen
in fig. 100, with the following options:
– “RINGER VOLUME”: sets the vol-
ume level of the telephone ringer;
fig. 99
F0D2080g
fig. 100
F0D2081g
Page 90 of 246

CONNECT Nav
89
– “REDIAL”: in case of busy line, re-
dials automatically the called number
(for a preset number of times); to stop
redialling press key 2-fig. 1at length.
– “CALL FORWARDING”: enables
or disables call divert;
– “CALL FORWARDING NO.”: al-
lows input of the phone number to
which call is diverted.
– “ENABLE CALL WAITING”: en-
ables or disables incoming call an-
nouncement;A beep will be heard to indicate an
incoming call during an active phone
conversation. To accept the incoming
call press the knob 22-fig. 1; the first
call will wait until the second conver-
sation is ended or until the first caller
hangs up the phone.
To refuse the incoming call press
“ESC” 23-fig. 1; no interference with
the active call will be generated.
– “OK”: to accept and store settings.When the user modifies the call for-
warding settings, the display shows
“WARNING! OPERATION IN
PROGRESS: PLEASE WAIT …”.
When this operation is ended, the dis-
play shows “CALL FORWARDING -
OPERATION CONCLUDED”.
Should it be impossible to modify set-
tings, the display shows “CALL FOR-
WARDING” – “OPERATION NOT
PERFORMED”.
Page 98 of 246

97
CONNECT Nav
DESTINATION
Select and confirm “DESTINA-
TION” rotating and pressing the knob
22-fig. 1to start route calculation.
If route guidance is active yet, select-
ing “DESTINATION” AGAIN, THE
DISPLAY SHOWS THE FOLLOW-
ING MESSAGE: “CALCULATE
ROUTE TO NEW DESTINATION.
PRESS ENTER TO CONFIRM ESC
TO CANCEL”. Pressing “ESC” 23-fig. 1will maintain
the current route thus refusing new
route calculation that will be inserted
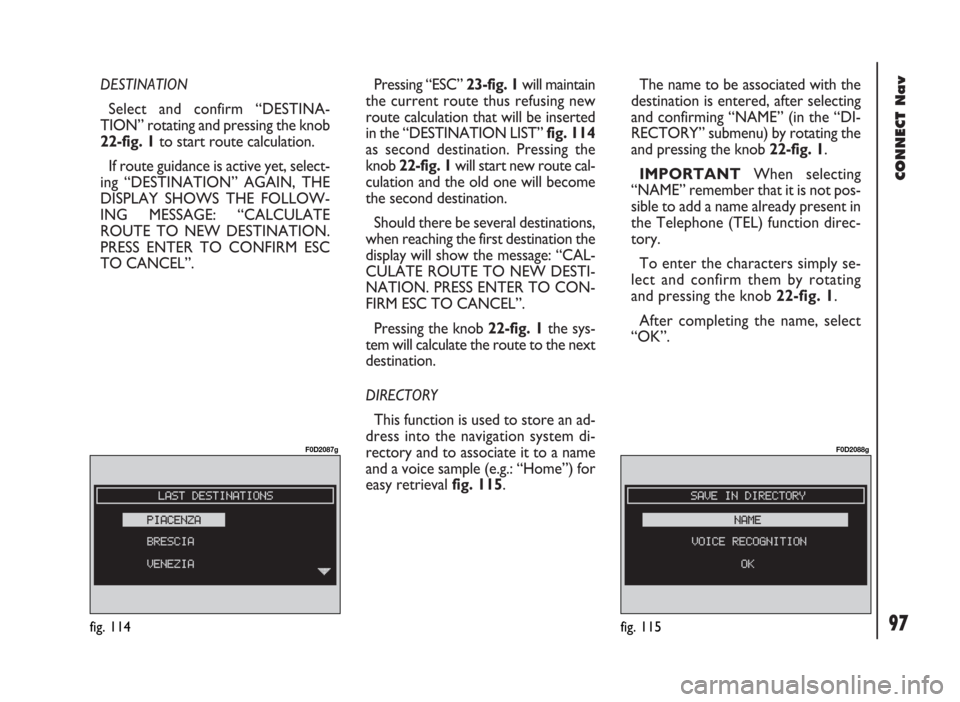
in the “DESTINATION LIST” fig. 114
as second destination. Pressing the
knob 22-fig. 1will start new route cal-
culation and the old one will become
the second destination.
Should there be several destinations,
when reaching the first destination the
display will show the message: “CAL-
CULATE ROUTE TO NEW DESTI-
NATION. PRESS ENTER TO CON-
FIRM ESC TO CANCEL”.
Pressing the knob 22-fig. 1the sys-
tem will calculate the route to the next
destination.
DIRECTORY
This function is used to store an ad-
dress into the navigation system di-
rectory and to associate it to a name
and a voice sample (e.g.: “Home”) for
easy retrieval fig. 115.The name to be associated with the
destination is entered, after selecting
and confirming “NAME” (in the “DI-
RECTORY” submenu) by rotating the
and pressing the knob 22-fig. 1.
IMPORTANT When selecting
“NAME” remember that it is not pos-
sible to add a name already present in
the Telephone (TEL) function direc-
tory.
To enter the characters simply se-
lect and confirm them by rotating
and pressing the knob 22-fig. 1.
After completing the name, select
“OK”.
fig. 114
F0D2087g
fig. 115
F0D2088g
Page 116 of 246

CONNECT Nav
115
GENERAL
INFORMATION
With the “Voice recognition” func-
tion the user can control the CON-
NECT system by voice. By means of
the voice recognition, the user can
send commands to the system
through a microphone: short push on
ô14-fig. 1set on front panel or on
ô3-fig. 2set on the steering wheel
enables voice command interpreta-
tion; the system will then provide
voice help to guide the user get the
required function.
Press again
ô14-fig. 1or ô3-fig. 2
to stop procedure.Voice recognition is performed two
ways:
– voice recognition without
voice identification;
– voice recognition with voice
identification.
Commands without voice identi-
ficationactivate the main system
functions (TEL, RADIO, CD etc.).
Commands with voice identifica-
tionmakes it possible to enter / recall
names in the phone directory and/or
navigation addresses.
In the first case (voice recognition
without voice identification), the sys-
tem is able to receive the voice com-
mands regardless of the user’s sex and
voice tone and inflexion.No preliminary training phase is re-
quired, just follow the instructions giv-
en by the system each time.
In the second case (voice recognition
with voice identification), the system
is able to recognise the required com-
mand comparing the voice command
pronounced to the corresponding
voice sample previously stored by the
user.
IMPORTANTThe voice recogni-
tion and message store operations are
immediately interrupted in the event
of incoming calls; in this case, at the
end of the call, the whole operation
must be repeated. Conversely, in-
coming SMS text messages do not in-
terrupt the operations.
V V
O O
I I
C C
E E
R R
E E
C C
O O
G G
N N
I I
T T
I I
O O
N N
( (
w w
h h
e e
r r
e e
p p
r r
o o
v v
i i
d d
e e
d d
) )
Page 117 of 246

CONNECT Nav
116
VOICE COMMANDS
Voice commands, identified as “key-
words”, that the system is able to rec-
ognize are organized according to four
increasing levels: 1
stlevel, 2ndlevel, 3rd
level, 4thlevel. 1stlevel keywords acti-
vate the following main system func-
tions: Memo; Radio; CD player; CD
Changer; Navigator, Telephone.
When a 1
stlevel keyword is pro-
nounced, the system will activate 2nd
level keywords; when a 2ndlevel key-
word is pronounced, the system will
activate 3
rd level keywords; when a 3rd
level keyword is pronounced, the sys-
tem will activate 4thlevel keywords.
If the user pronounces a 1st level
keyword, then the submenu relevant
to that command will remain active
until another 1st level keyword is giv-
en; the same rule applies for the oth-
er lower levels (2, 3 and 4).
If too much time passes between a
command and another of lower level
the system will invite the user to con-
tinue by voice message “Can I help
you?”.1st level keywords are the following:
– Memo
– Radio
– CD player
– Navigator
– Call
– Dial
– Redial
– PIN code
– Directory
– Abort.
KEYWORDS - Summary
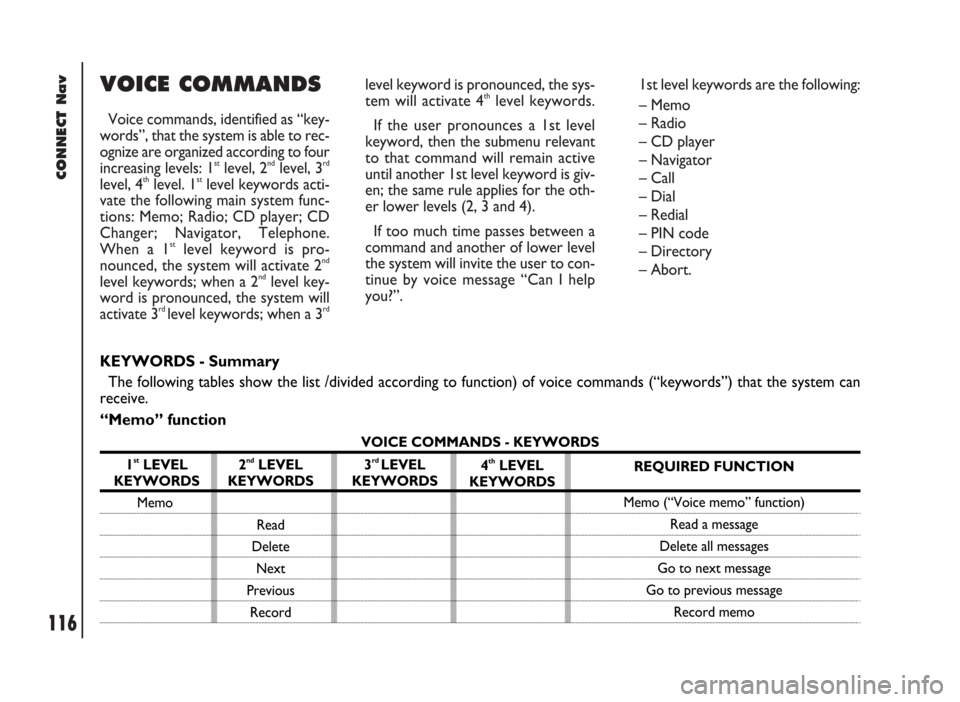
The following tables show the list /divided according to function) of voice commands (“keywords”) that the system can
receive.
“Memo” function
VOICE COMMANDS - KEYWORDS
1
stLEVEL
KEYWORDS
Memo
2ndLEVEL
KEYWORDS
Read
Delete
Next
Previous
Record3rd LEVEL
KEYWORDS4thLEVEL
KEYWORDSREQUIRED FUNCTION
Memo (“Voice memo” function)
Read a message
Delete all messages
Go to next message
Go to previous message
Record memo