2002 FIAT DUCATO 244 stop start
[x] Cancel search: stop startPage 18 of 246
CONNECT Nav
17
With ignition key at MAR, if au-
thentication fails, system starts work-
ing as usual, but the user is asked to
enter the 4-digit “Master Code” to al-
low access to the standard functions.
Master code is unique for each sys-
tem, and is stored in its memory and
can not be reset.
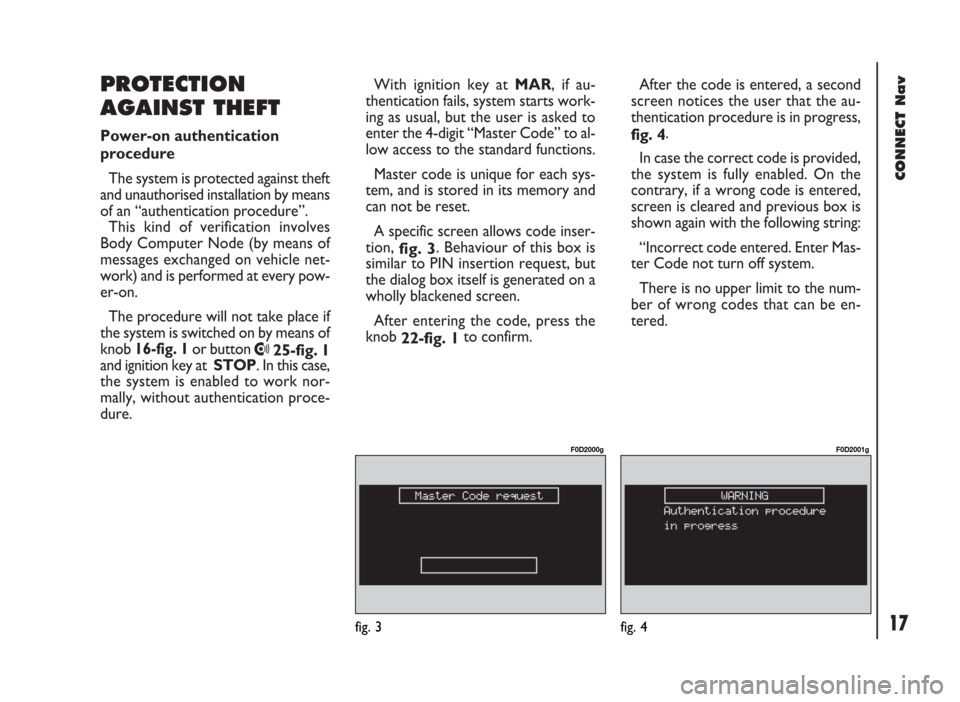
A specific screen allows code inser-
tion,
fig. 3. Behaviour of this box is
similar to PIN insertion request, but
the dialog box itself is generated on a
wholly blackened screen.
After entering the code, press the
knob
22-fig. 1to confirm.
PROTECTION
AGAINST THEFT
Power-on authentication
procedure
The system is protected against theft
and unauthorised installation by means
of an “authentication procedure”.
This kind of verification involves
Body Computer Node (by means of
messages exchanged on vehicle net-
work) and is performed at every pow-
er-on.
The procedure will not take place if
the system is switched on by means of
knob 16-fig. 1or button
•25-fig. 1
and ignition key at STOP. In this case,
the system is enabled to work nor-
mally, without authentication proce-
dure.After the code is entered, a second
screen notices the user that the au-
thentication procedure is in progress,
fig. 4.
In case the correct code is provided,
the system is fully enabled. On the
contrary, if a wrong code is entered,
screen is cleared and previous box is
shown again with the following string:
“Incorrect code entered. Enter Mas-
ter Code not turn off system.
There is no upper limit to the num-
ber of wrong codes that can be en-
tered.
fig. 3
F0D2000g
fig. 4
F0D2001g
Page 24 of 246
CONNECT Nav
23
IMPORTANTStarting the engine
when the modem function is on, will
cause the connection drop with data
loss as a consequence. Stooping the
engine has no effect on data transmis-
sion since the CONNECT Nav will
stay on for other 20 minutes. If a GSM
communication is in progress the sys-
tem will automatically activate a new
window for other 20 minutes. Long
GSM communications (with data
transmission) can run down the vehi-
cle battery.
Operation requirements
The modem function is operational
if the following conditions are present:
– CONNECT Nav system on;
– SIM card inserted;
– sufficient credit;
– GSM coverage.Portable computer setting
SERIAL PORT SETTING
The computer serial port shall be set
for 9600bps data transmission speed.
For “Windows 95” proceed as fol-
lows:
– open “computer resources”
– open “control panel”
– open “system”
– open “peripheral control”
– select “com and LPT ports”
– select “COM1 port”
– select “port setting”
– check: bit per second = 9600
data bit = 8
parity = no parity
stop bit = 1
flow control = Xon/Xoff
MODEM SETTING
The portable computer shall have the
modem. For “Windows 95” proceed
as follows:
– open “computer resources”
– open “control panel”
– open “modem”:
select add
select “modem types” = other
select “next” and follow the dis-
played instructions.
Page 35 of 246

CONNECT Nav
34
The operations to be carried out for
each of the above described conditions
are listed below.
1) To receive stations enabled to
broadcast traffic information:
– choose band FM1, FM2 or FM3;
– turn on the TA function so that the
display shows “TA”;
– start seeking the frequencies.
2) If you wish to receive traffic infor-
mation while listening to a CD, before
inserting the CD, tune to a station en-
abled to broadcast traffic information
(TP) and turn the TA function on. If,
while playing the CD, this station
broadcasts traffic information, CD
playing will be temporarily stopped and
resumed automatically at the end of
the message.
If the CD player is already working
and at the same time you wish to re-
ceive traffic information, turning on theTA function, the radio tunes to the last
station heard in the FM band and the
traffic announcements are transmitted.
If the station selected does not broad-
cast traffic information, an enabled sta-
tion is sought automatically.
To stop traffic announcement, turn
off the TA function while receiving traf-
fic messages.
If the tuned station belongs to the
EON (ENHANCED OTHER NET-
WORK) circuit, the display will show
“EON”
A telephone call has higher priority
than traffic message.
IMPORTANT In certain countries,
radio stations exist which though the
TP function is active (the display shows
“TP”), do not broadcast traffic infor-
mation.If the radio is working in the AM
band, choosing the FM band tunes to
the last station heard. If the chosen
station does not broadcast traffic in-
formation (“TP” not shown on the dis-
play), an automatic search is started
for an enabled station.
If the volume is changed during a traf-
fic bulletin the value is not shown on
the display and the new value is kept
only for the bulletin in progress.
IMPORTANTIf the TA function is
on and the station tuned is not enabled
to provide traffic information or is no
longer able to broadcast this informa-
tion (the display does not show “TP”),
after about 1 minute in which the ra-
dio is in these conditions:
– if a CD is being played another sta-
tion enabled to broadcast traffic in-
formation is sought automatically.
Page 44 of 246
43
CONNECT Nav
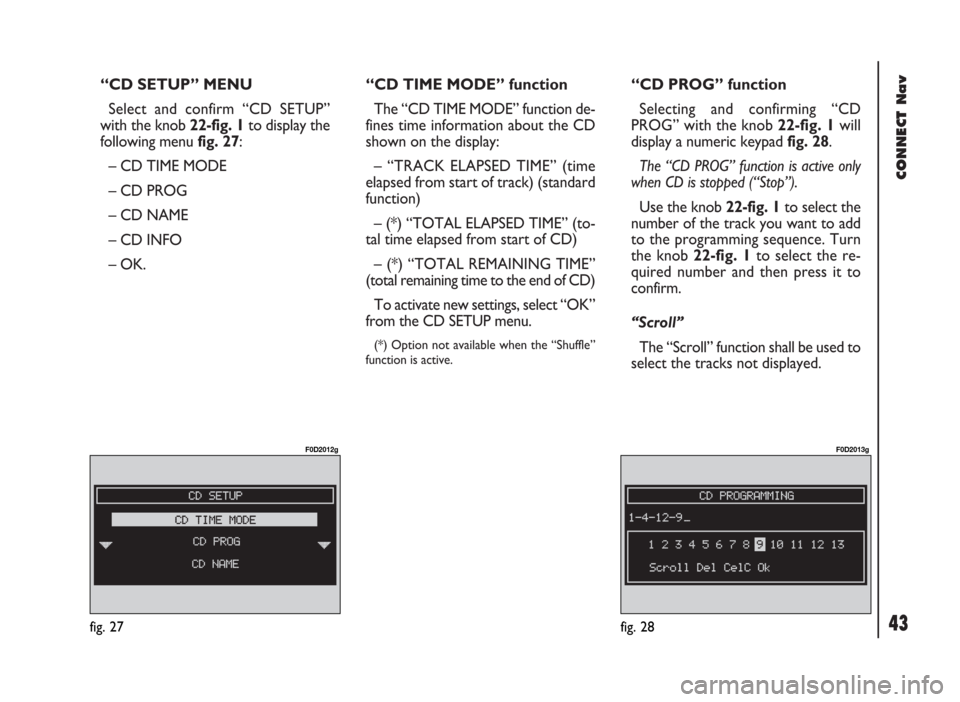
“CD SETUP” MENU
Select and confirm “CD SETUP”
with the knob 22-fig. 1to display the
following menu fig. 27:
– CD TIME MODE
– CD PROG
– CD NAME
– CD INFO
– OK.“CD TIME MODE” function
The “CD TIME MODE” function de-
fines time information about the CD
shown on the display:
– “TRACK ELAPSED TIME” (time
elapsed from start of track) (standard
function)
– (*) “TOTAL ELAPSED TIME” (to-
tal time elapsed from start of CD)
– (*) “TOTAL REMAINING TIME”
(total remaining time to the end of CD)
To activate new settings, select “OK”
from the CD SETUP menu.
(*) Option not available when the “Shuffle”
function is active.
“CD PROG” function
Selecting and confirming “CD
PROG” with the knob 22-fig. 1will
display a numeric keypad fig. 28.
The “CD PROG” function is active only
when CD is stopped (“Stop”).
Use the knob 22-fig. 1to select the
number of the track you want to add
to the programming sequence. Turn
the knob 22-fig. 1to select the re-
quired number and then press it to
confirm.
“Scroll”
The “Scroll” function shall be used to
select the tracks not displayed.
fig. 27
F0D2012g
fig. 28
F0D2013g
Page 55 of 246
CONNECT Nav
54
Pressing the knob 22-fig. 1will dis-
play the following options fig. 39 -
fig. 40:
– AUDIO SETUP
– DEFINE PLAYLIST
– PLAYLIST
– VIEW PLAYLIST
– COMPRESSION
– TA
– SCAN
– SHUFFLE
– REPEATTo stop the MP3 CD, press briefly II˙
10-fig. 1. To restart playing, press briefly
again II˙10-fig. 1. To pause the MP3
CD, press continuously II˙10-fig. 1.
“Stop” and “Pause” cause the stop of
track playing, maintaining in the main
screen information about the last played
song.
To eject MP3 CD 28-fig. 1press ˚
26-fig. 1.
“AUDIO SETUP” FUNCTION
(AUDIO ADJUSTMENTS)
To access the audio setup menu
while listening to a MP3 CD, select and
confirm “AUDIO SETUP” rotating and
pressing the knob 22-fig. 1.
For the description of the different
functions available in the menu, see the
corresponding paragraph in chapter
“AUDIO SETTINGS”.“DEFINE PLAYLIST”
FUNCTION
“DEFINE PLAYLIST” function allows
the management of max. 100 music
pieces among those included in the
MP3 CD, to be played in a specified se-
quence. Dedicated windows allow the
tracks choice, addition or cancellation.
It is possible to add a single track or
an entire directory. This function is de-
scribed in detail in a specific paragraph
below.
“DEFINE PLAYLIST” is disabled when
a MP3 CD is playing, you must stop CD
playing to enable it.
“PLAYLIST” FUNCTION
This function enables or disables
playback of the user track list previ-
ously programmed through the “DE-
FINE PLAYLIST” function. To turn this
function on/off, select and confirm
“PLAYLIST” rotating and pressing the
knob 22-fig. 1.
Page 57 of 246

CONNECT Nav
56
“REPEAT” FUNCTION
To turn this function on/off, select
and confirm “REPEAT” rotating and
pressing the knob 22-fig. 1. The dis-
play shows the following icon keys:
“NO REPEAT”, “REPEAT ONE” and
“REPEAT ALL”, fig. 41.
- “NO REPEAT”: repeat function off;
- “REPEAT ONE”: repeat one MP3
CD or playlist track;
- “REPEAT ALL”: repeat all MP3 CD
or playlist tracks.
When this function is on, the display
shows “RPT”.
Select and confirm the required item
by turning and pressing the knob 22-
fig. 1.PLAYING THE PLAYLIST
Inserting a MP3 CD with associated
playlist starts sequence playing auto-
matically.
“DEFINE PLAYLIST”, “PLAYLIST” and
”VIEW PLAYLIST” functions are active on-
ly when MP3 CD is stopped (“Stop”).
At “Stop” (stop playing by pressing
“II
˙” 10-fig. 1, the user can modify
the playlist through the “DEFINE
PLAYLIST” function or can set a
playlist. Press “II
˙” 10-fig. 1(“Play”)
to restart MP3 CD playback.PLAYING MP3 CD
Inserting a MP3 CD when no playlist
is found, the CONNECT system dis-
plays for 5 seconds the name of the
first “not empty” folder. Playing starts
automatically from the first track of
the first folder of the MP3 CD, going
on in sequence. When actual folder
tracks are all played, the sequence
continues with the next MP3 CD fold-
er tracks. Before starting to play the
first track of the new folder, the dis-
play shows for five seconds the new
folder name.
The main screen shows the follow-
ing information fig. 39:
– audio source (MP3);
– when available, author and song
name, or file name;
– current track number;
fig. 41
F0D2025g
Page 65 of 246
CONNECT Nav
64
To accept the call, proceed as
follows:
– short push on button ò13-fig. 1;
dialog box disappears and ring stops,
the display shows the string “call in
progress”.
To close the conversation,
proceed as follows:
– press button ò13-fig. 1; the sys-
tem returns automatically to the pre-
vious mode and the display shows the
relevant status.
To refuse the call, proceed as
follows:
– long push on button ò13-fig. 1;
dialog box disappears and ring stops.
In this case the screen will remain the
one shown before the incoming call.
IMPORTANT: dialog box disap-
pears and ring stops also if the line is
unwillingly lost.OUTGOING CALLS
To start a call, proceed as
follows:
– enter the telephone mode as pre-
viously described;
– dial the required number using the
multifunction keys 1 ÷ 12-fig. 1;
– to enter the international prefix
(“+” char), push button “*/+” at
length;
dialled number is shown in the input
box on the display; max. 20 digits can
be input and in case there is no enough
space to keep the whole string, the in-
terface will provide a left string scroll;
– to start a call, press button ò13-
fig. 1; active screen becomes the one
shown in fig. 47.
To enter a phone number, follow
these instructions:
Press briefly one of the multifunction
keys 1 ÷ 12-fig. 1to enter the cor-
responding digit or character;More particularly keys “*” and “#”
can be used.
Press continuously button “+” to en-
ter the international prefix (“+” char);
Press continuously keys 1 ÷ 9-fig. 1
to select the corresponding frequent
number set (see paragraph “Frequent
Numbers”);
Short push on “ESC” 23-fig. 1clears
the last input digit;
Long push on “ESC” 23-fig. 1clears
all entered digits;
DIALLING A SERVICE
NUMBER
Following the instructions given in
the previous paragraph, the user can
dial service numbers (e.g.: ←#
xxxxx←) according to ETSI Standard
GSM 02.30.
Page 82 of 246

A further push on ô14-fig. 1stops
sampling. Next sampling will be
queued after the previous one. After
3 minutes recording operation is
stopped and the display shows the
screen in fig. 82. Selecting and confirming “VOICE
MEMO” with the knob22-fig. 1, dis-
plays the screen in fig. 83, where per-
centage of memory occupied/available
and active message number (com-
pared with total memorized messages
number) are shown.
Press the knob 22-fig. 1again to dis-
play the specific voice memo menu. To
select the required option, rotate and
press the knob 22-fig. 1. Options are
the following fig. 84:PLAY˙plays active message;
STOP■stops message playback
or recording;
SKIP˜skips to next message;
SKIP÷skips to previous mes-
sage;
RECORDçstarts recording;
DELETEdeletes all recorded mes-
sages.
CONNECT Nav
81fig. 82
F0D2063g
fig. 83
F0D2064g
fig. 84
F0D2065g