Page 10 of 246
CONNECT Nav
9
New discs may be rough around the
edges. When using these discs the
player might not work or the sound
might skip. To remove roughness
from the edge of a disc use a ball-point
pen, etc.
No
Ball-point pen
Roughness
Do not use solvents such as stain re-
movers, antistatic sprays or thinners
in commerce for cleaning Compact
Discs.IMPORTANT Do not use the pro-
tective sheets for CDs in commerce
or discs with stabilisers, etc. as they
might get stuck in the internal mech-
anism and damage the disc.
Notes about Compact Discs
Do not stick labels on the surfaces of
a Compact Disc or write on the sur-
face with pens or pencils.
No
No
Do not expose Compact Discs to di-
rect sunlight or any other source of
heat. Do not use highly scratched, cracked
or distorted Compact Discs. This
could damage the player or prevent
it from working properly.
No
No
To remove fingerprints and dust, use
a soft cloth starting from the centre of
the Compact Disc towards the cir-
cumference.
Page 19 of 246
CONNECT Nav
18
MAIN MODE
The MAIN mode is activated by
pushing the “MAIN” button 17-fig. 1
on the front panel.
It is possible to access the Set-up
menu from the MAIN mode.
To access the Set-up menu, display
the page MAIN then push on knob 22-
fig.1. Set-up functions will be ac-
cessed (refer to the SET-UP chapter).
Depress several times “ESC” 23-
fig.1 for returning to the display of
MAIN.STANDARD INFORMATION
The display shows information rele-
vant to the main system modules:
– AUDIO
– TELEPHONE
– NAVIGATOR
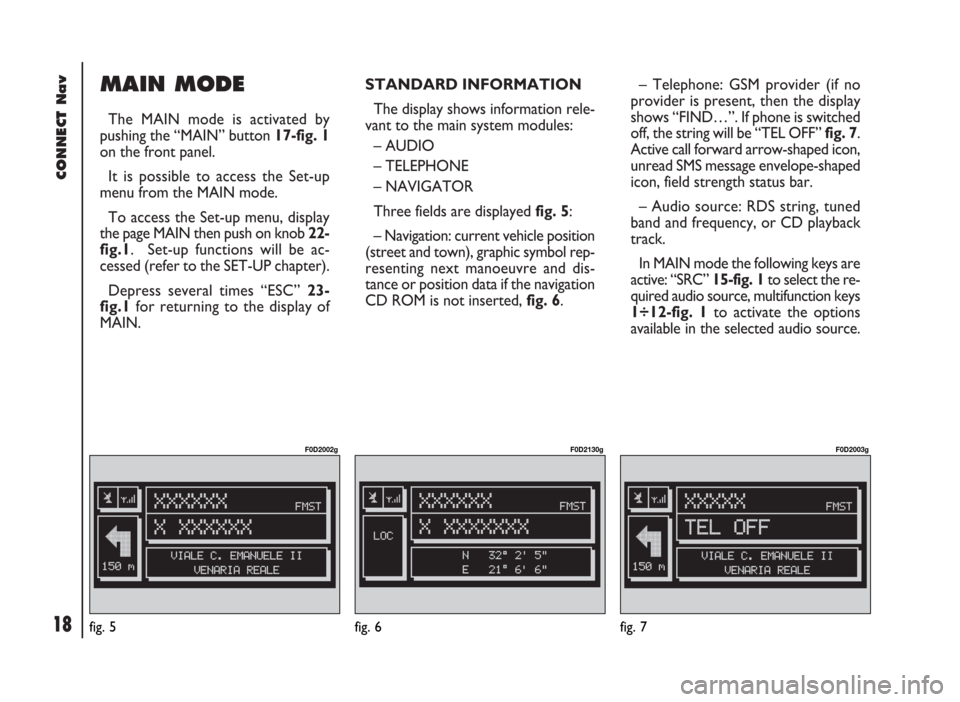
Three fields are displayed fig. 5:
– Navigation: current vehicle position
(street and town), graphic symbol rep-
resenting next manoeuvre and dis-
tance or position data if the navigation
CD ROM is not inserted, fig. 6.– Telephone: GSM provider (if no
provider is present, then the display
shows “FIND…”. If phone is switched
off, the string will be “TEL OFF” fig. 7.
Active call forward arrow-shaped icon,
unread SMS message envelope-shaped
icon, field strength status bar.
– Audio source: RDS string, tuned
band and frequency, or CD playback
track.
In MAIN mode the following keys are
active: “SRC” 15-fig. 1to select the re-
quired audio source, multifunction keys
1÷12-fig. 1to activate the options
available in the selected audio source.
fig. 5
F0D2002g
fig. 6
F0D2130g
fig. 7
F0D2003g
Page 94 of 246
93
CONNECT Nav
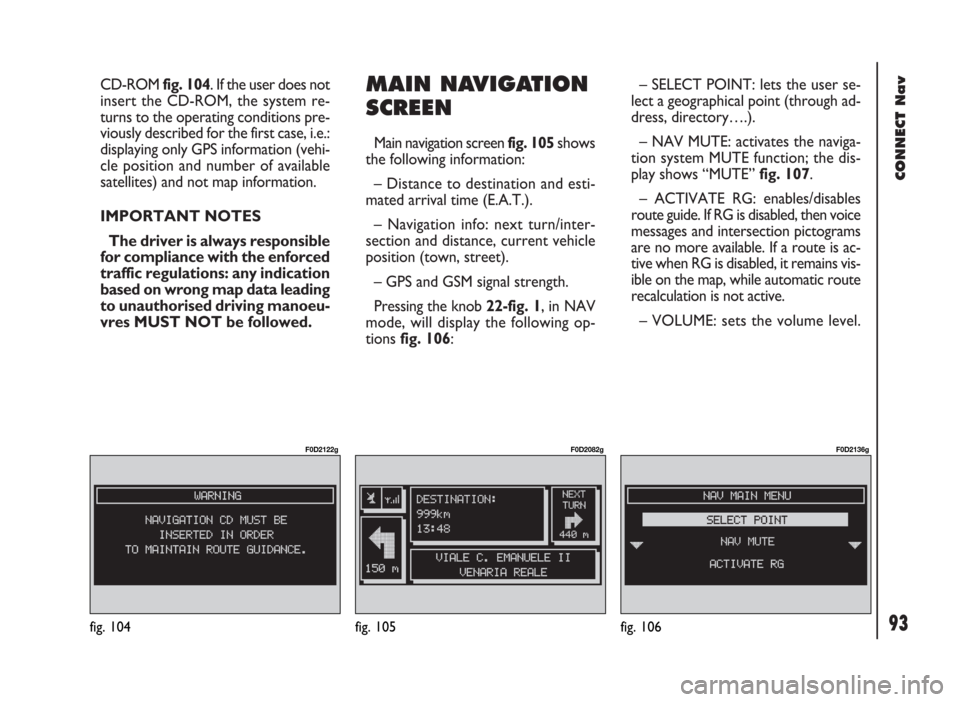
CD-ROM fig. 104. If the user does not
insert the CD-ROM, the system re-
turns to the operating conditions pre-
viously described for the first case, i.e.:
displaying only GPS information (vehi-
cle position and number of available
satellites) and not map information.
IMPORTANT NOTES
The driver is always responsible
for compliance with the enforced
traffic regulations: any indication
based on wrong map data leading
to unauthorised driving manoeu-
vres MUST NOT be followed.MAIN NAVIGATION
SCREEN
Main navigation screen fig. 105 shows
the following information:
– Distance to destination and esti-
mated arrival time (E.A.T.).
– Navigation info: next turn/inter-
section and distance, current vehicle
position (town, street).
– GPS and GSM signal strength.
Pressing the knob 22-fig. 1, in NAV
mode, will display the following op-
tions fig. 106:– SELECT POINT: lets the user se-
lect a geographical point (through ad-
dress, directory….).
– NAV MUTE: activates the naviga-
tion system MUTE function; the dis-
play shows “MUTE” fig. 107.
– ACTIVATE RG: enables/disables
route guide. If RG is disabled, then voice
messages and intersection pictograms
are no more available. If a route is ac-
tive when RG is disabled, it remains vis-
ible on the map, while automatic route
recalculation is not active.
– VOLUME: sets the volume level.
fig. 104
F0D2122g
fig. 105
F0D2082g
fig. 106
F0D2136g
Page 95 of 246
94
CONNECT Nav
– HOME1/HOME2: start route cal-
culation towards one of the two pre-
defined or frequently used destina-
tions.
– INFO: displays info on vehicle po-
sition and destination.
– DETOUR: allows the user to
choose an alternative route.
– SET ROUTE: defines route calcu-
lation parameters and activates the
zoom intersection function fig. 108.
– DESTINATION AND ROUTE:
controls destination and activate route
calculation.
– VOICE DIRECTORY (where pro-
vided): controls navigator voice direc-
tory.SELECT POINT
Choosign and confirming “SELECT
POINT” rotating and pressing the
knob 22-fig. 1, will activate this func-
tion that enables to specify a geo-
graphical point or a service and to get
the required information fig. 109.The available functions are:
– ADDRESS
– POINTS OF INTEREST
– LAST DESTINATIONS
– DIRECTORY
– RDS-TMC
– HOME 1
– HOME 2.
fig. 107
F0D2137g
fig. 108
F0D2138g
fig. 109
F0D2083g
Page 96 of 246
95
CONNECT Nav
ADDRESS
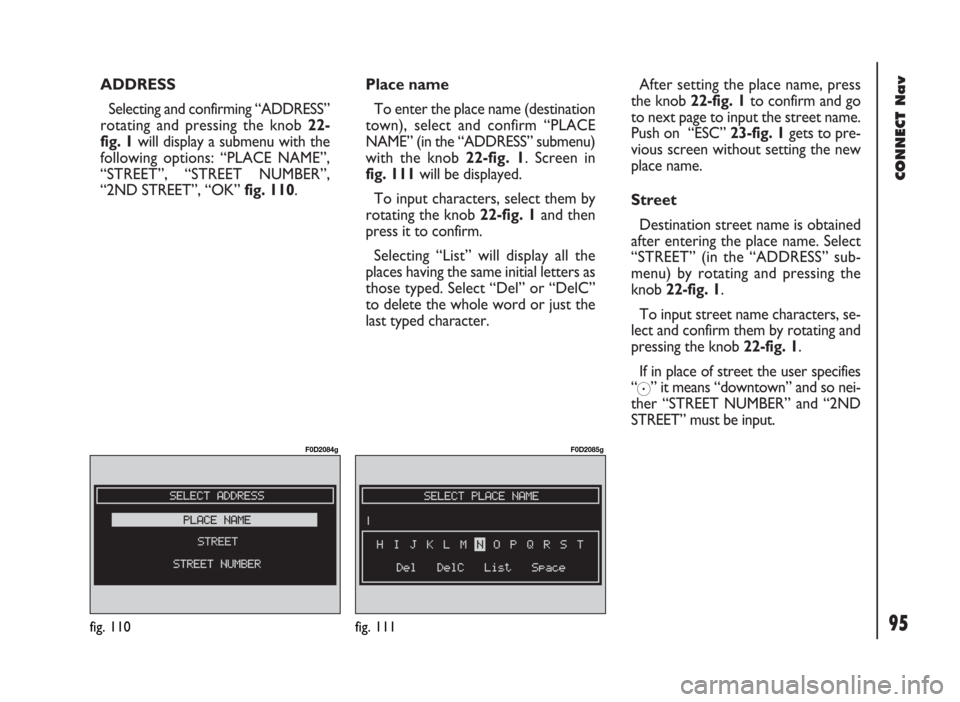
Selecting and confirming “ADDRESS”
rotating and pressing the knob 22-
fig. 1will display a submenu with the
following options: “PLACE NAME”,
“STREET”, “STREET NUMBER”,
“2ND STREET”, “OK” fig. 110.Place name
To enter the place name (destination
town), select and confirm “PLACE
NAME” (in the “ADDRESS” submenu)
with the knob 22-fig. 1. Screen in
fig. 111will be displayed.
To input characters, select them by
rotating the knob 22-fig. 1and then
press it to confirm.
Selecting “List” will display all the
places having the same initial letters as
those typed. Select “Del” or “DelC”
to delete the whole word or just the
last typed character.After setting the place name, press
the knob 22-fig. 1to confirm and go
to next page to input the street name.
Push on “ESC” 23-fig. 1gets to pre-
vious screen without setting the new
place name.
Street
Destination street name is obtained
after entering the place name. Select
“STREET” (in the “ADDRESS” sub-
menu) by rotating and pressing the
knob 22-fig. 1.
To input street name characters, se-
lect and confirm them by rotating and
pressing the knob 22-fig. 1.
If in place of street the user specifies
“
C” it means “downtown” and so nei-
ther “STREET NUMBER” and “2ND
STREET” must be input.
fig. 110
F0D2084g
fig. 111
F0D2085g
Page 97 of 246
96
CONNECT Nav
The navigation system always guide
you downtown in case of small towns.
After setting the street name, press
the knob 22-fig. 1to confirm and go
to next screen to input the street num-
ber. Push on “ESC” 23-fig. 1gets to
previous screen without setting the
street name.
Street number
Destination street number is ob-
tained after entering the street name.
Select “STREET NUMBER” (in the
“Address” submenu) by rotating and
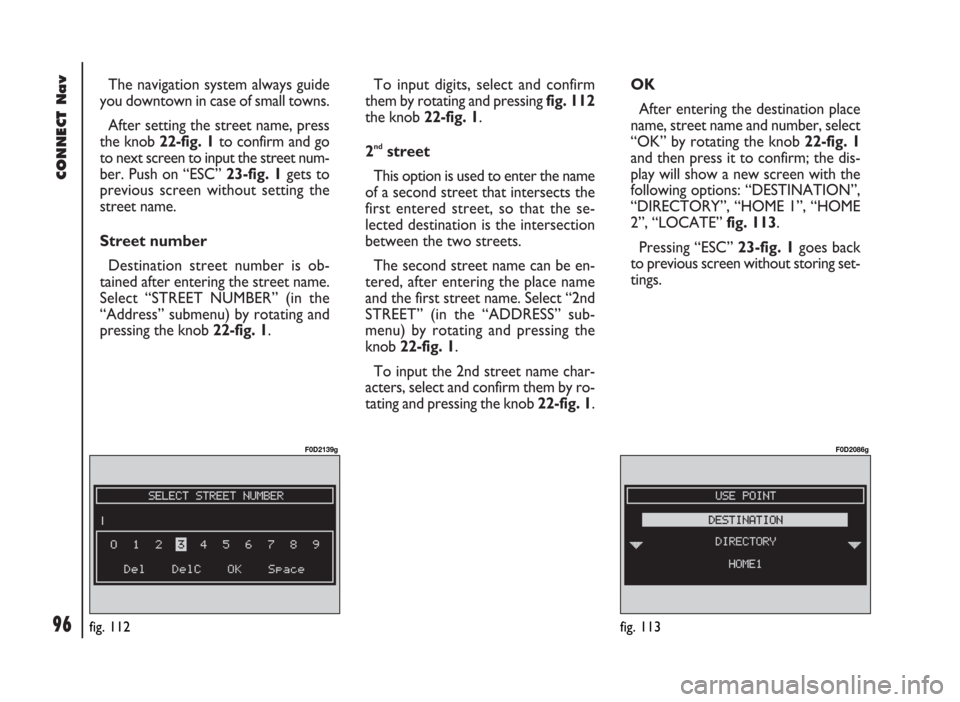
pressing the knob 22-fig. 1.To input digits, select and confirm
them by rotating and pressing fig. 112
the knob 22-fig. 1.
2
ndstreet
This option is used to enter the name
of a second street that intersects the
first entered street, so that the se-
lected destination is the intersection
between the two streets.
The second street name can be en-
tered, after entering the place name
and the first street name. Select “2nd
STREET” (in the “ADDRESS” sub-
menu) by rotating and pressing the
knob 22-fig. 1.
To input the 2nd street name char-
acters, select and confirm them by ro-
tating and pressing the knob 22-fig. 1. OK
After entering the destination place
name, street name and number, select
“OK” by rotating the knob 22-fig. 1
and then press it to confirm; the dis-
play will show a new screen with the
following options: “DESTINATION”,
“DIRECTORY”, “HOME 1”, “HOME
2”, “LOCATE” fig. 113.
Pressing “ESC” 23-fig. 1goes back
to previous screen without storing set-
tings.
fig. 113
F0D2086g
fig. 112
F0D2139g
Page 106 of 246
105
CONNECT Nav
GPS INFO
Selecting “INFO GPS” rotating the
knob 22-fig. 1and pressing it to con-
firm will display GPS information (lati-
tude, longitude and altitude) and the
number of available satellites fig. 134 -
135.
fig. 135
F0D2108g
fig. 137
F0D2110g
ROUTEINFO
Selecting “ROUTE INFO” rotating the
knob 22-fig. 1and pressing it to con-
firm will display the destination
(street/town), the estimated time of ar-
rival and the distance to destination
fig. 136 - 137.
fig. 136
F0D2109g
Obviously, this function will be avail-
able only if there is a calculated route.
fig. 134
F0D2107g
Page 148 of 246
CONNECT Nav+
147
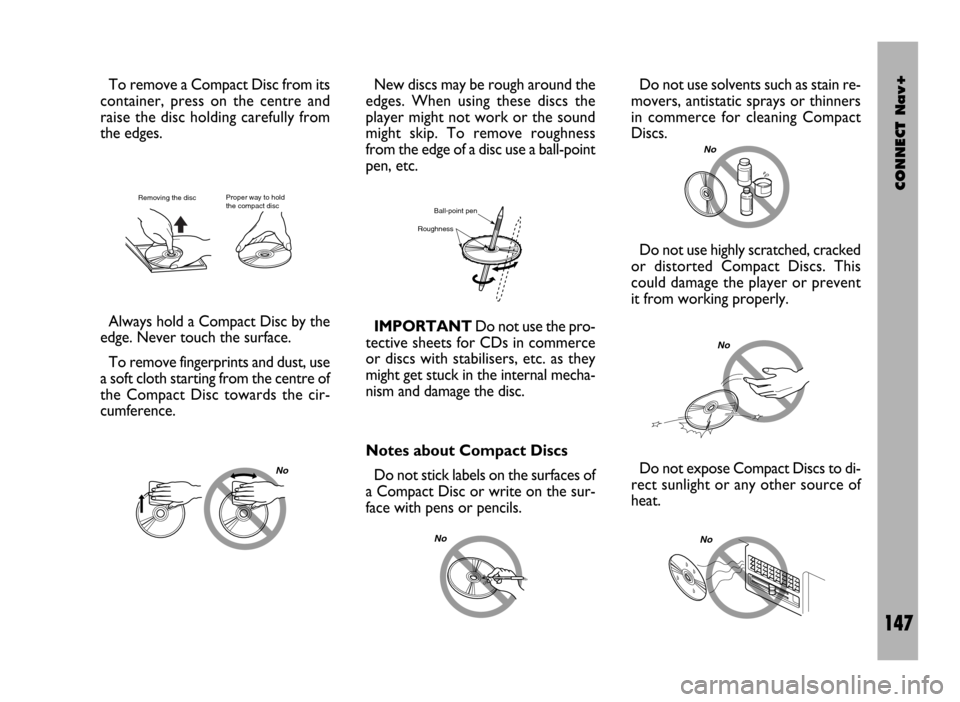
To remove a Compact Disc from its
container, press on the centre and
raise the disc holding carefully from
the edges.
Always hold a Compact Disc by the
edge. Never touch the surface.
To remove fingerprints and dust, use
a soft cloth starting from the centre of
the Compact Disc towards the cir-
cumference.New discs may be rough around the
edges. When using these discs the
player might not work or the sound
might skip. To remove roughness
from the edge of a disc use a ball-point
pen, etc.
IMPORTANTDo not use the pro-
tective sheets for CDs in commerce
or discs with stabilisers, etc. as they
might get stuck in the internal mecha-
nism and damage the disc.
Proper way to hold
the compact discRemoving the disc
No
Ball-point pen
Roughness
Do not use solvents such as stain re-
movers, antistatic sprays or thinners
in commerce for cleaning Compact
Discs.
Notes about Compact Discs
Do not stick labels on the surfaces of
a Compact Disc or write on the sur-
face with pens or pencils.
No
No
Do not use highly scratched, cracked
or distorted Compact Discs. This
could damage the player or prevent
it from working properly.
No
Do not expose Compact Discs to di-
rect sunlight or any other source of
heat.
No