Page 123 of 2255
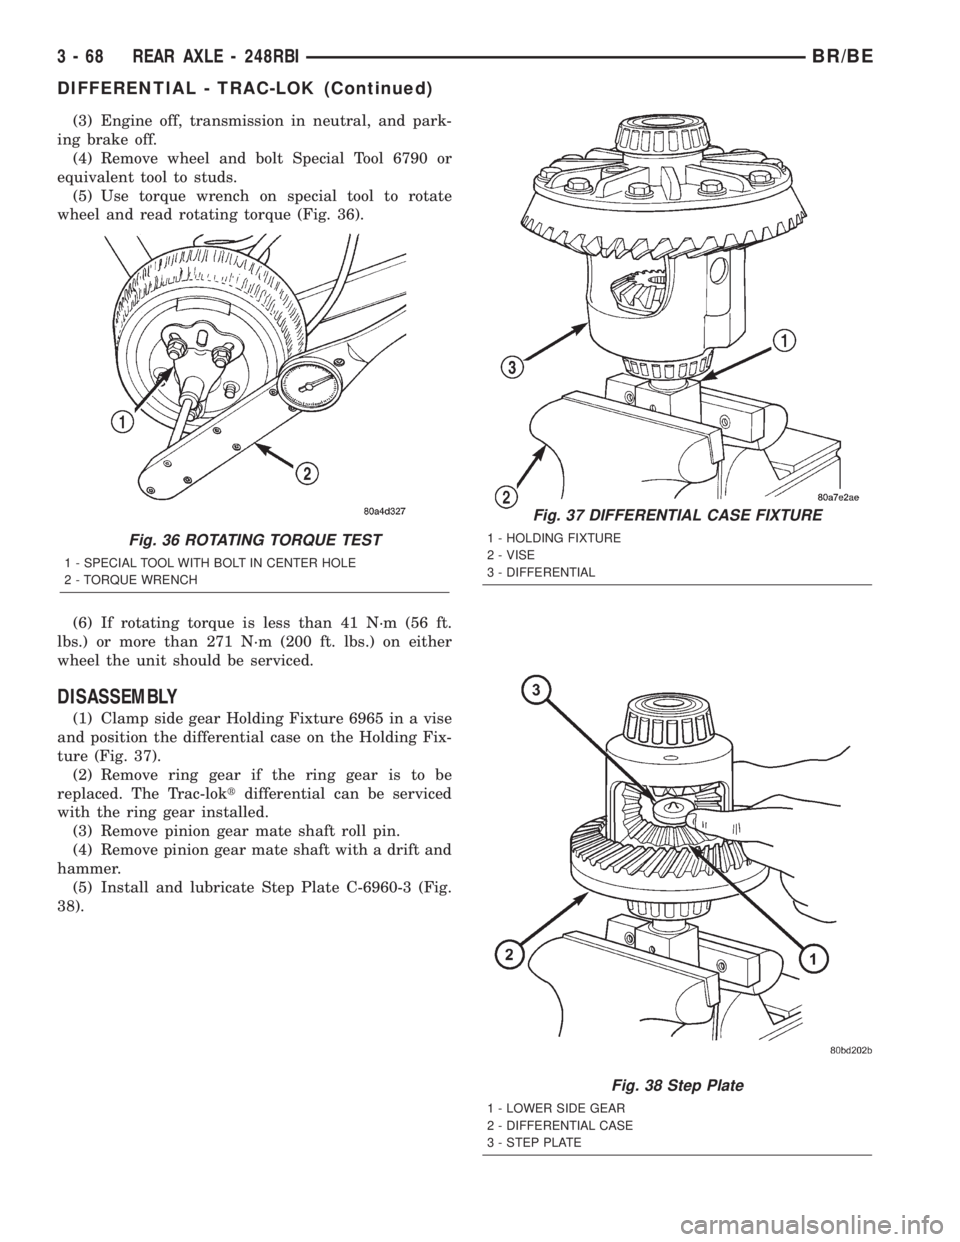
(3) Engine off, transmission in neutral, and park-
ing brake off.
(4) Remove wheel and bolt Special Tool 6790 or
equivalent tool to studs.
(5) Use torque wrench on special tool to rotate
wheel and read rotating torque (Fig. 36).
(6) If rotating torque is less than 41 N´m (56 ft.
lbs.) or more than 271 N´m (200 ft. lbs.) on either
wheel the unit should be serviced.
DISASSEMBLY
(1) Clamp side gear Holding Fixture 6965 in a vise
and position the differential case on the Holding Fix-
ture (Fig. 37).
(2) Remove ring gear if the ring gear is to be
replaced. The Trac-loktdifferential can be serviced
with the ring gear installed.
(3) Remove pinion gear mate shaft roll pin.
(4) Remove pinion gear mate shaft with a drift and
hammer.
(5) Install and lubricate Step Plate C-6960-3 (Fig.
38).
Fig. 36 ROTATING TORQUE TEST
1 - SPECIAL TOOL WITH BOLT IN CENTER HOLE
2 - TORQUE WRENCH
Fig. 37 DIFFERENTIAL CASE FIXTURE
1 - HOLDING FIXTURE
2 - VISE
3 - DIFFERENTIAL
Fig. 38 Step Plate
1 - LOWER SIDE GEAR
2 - DIFFERENTIAL CASE
3 - STEP PLATE
3 - 68 REAR AXLE - 248RBIBR/BE
DIFFERENTIAL - TRAC-LOK (Continued)
Page 124 of 2255
(6) Assemble Threaded Adapter C-6960-1 into top
side gear. Thread Forcing Screw C-6960-4 into
adapter until it becomes centered in adapter plate.
(7) Position a small screw driver in slot of
Threaded Adapter Disc C-6960-3 (Fig. 39) to prevent
adapter from turning.(8) Install Forcing Screw C-6960-4 and tighten
screw to 122 N´m (90 ft. lbs.) maximum to compress
Belleville springs in clutch packs (Fig. 40).
(9) With a feeler gauge remove thrust washers
from behind the pinion gears (Fig. 41).
Fig. 39 Threaded Adapter Disc
1 - SOCKET
2 - SLOT IN ADAPTER
3 - SCREWDRIVER
4 - DISC
5 - FORCING SCREW
6 - THREADED ADAPTER DISC
Fig. 40 COMPRESS BELLEVILLE SPRING
1 - TORQUE WRENCH
2 - TOOL ASSEMBLED
3 - DIFFERENTIAL CASE
Fig. 41 PINION GEAR THRUST WASHER
1 - THRUST WASHER
2 - FEELER GAUGE
BR/BEREAR AXLE - 248RBI 3 - 69
DIFFERENTIAL - TRAC-LOK (Continued)
Page 125 of 2255
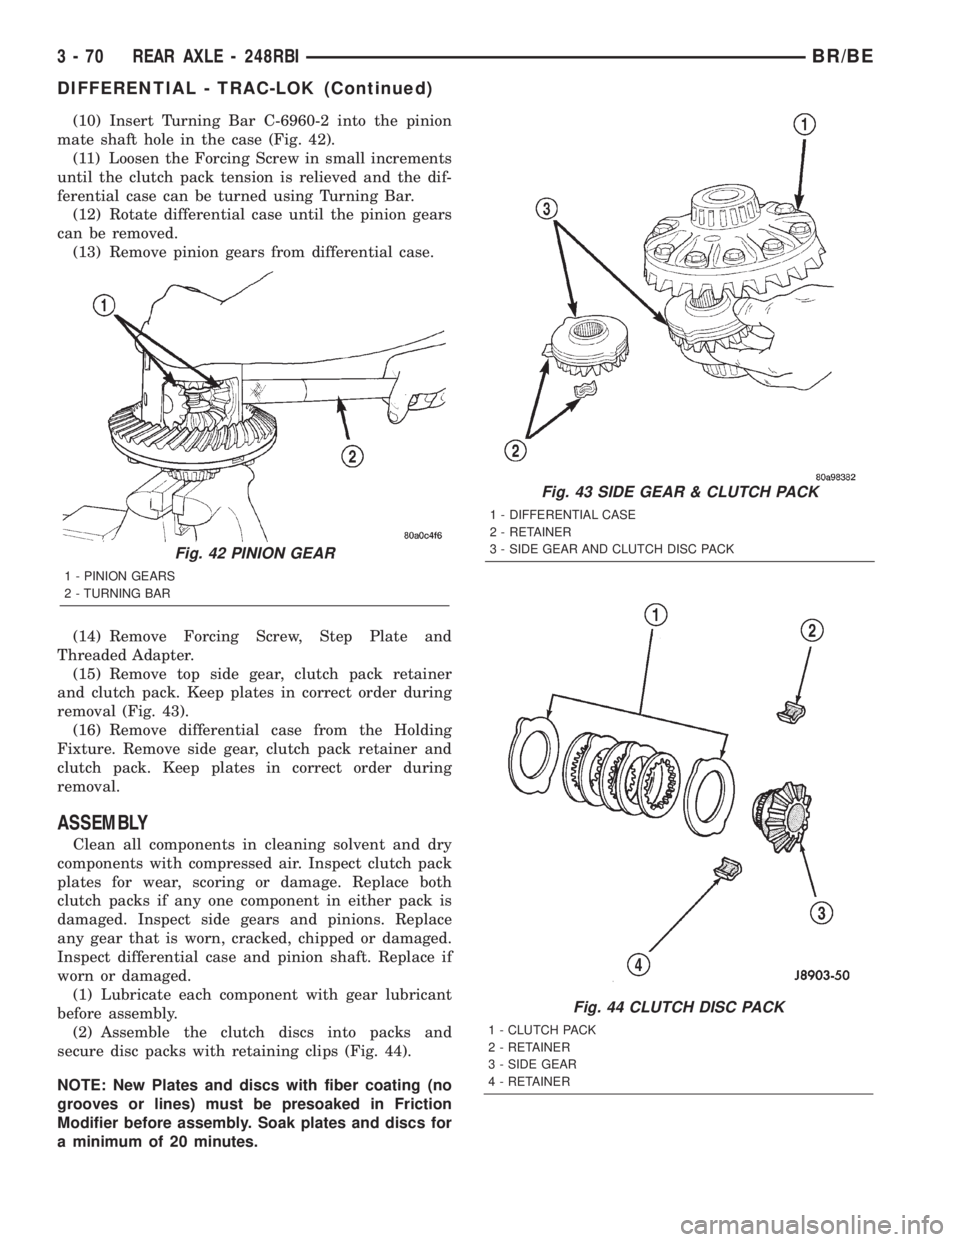
(10) Insert Turning Bar C-6960-2 into the pinion
mate shaft hole in the case (Fig. 42).
(11) Loosen the Forcing Screw in small increments
until the clutch pack tension is relieved and the dif-
ferential case can be turned using Turning Bar.
(12) Rotate differential case until the pinion gears
can be removed.
(13) Remove pinion gears from differential case.
(14) Remove Forcing Screw, Step Plate and
Threaded Adapter.
(15) Remove top side gear, clutch pack retainer
and clutch pack. Keep plates in correct order during
removal (Fig. 43).
(16) Remove differential case from the Holding
Fixture. Remove side gear, clutch pack retainer and
clutch pack. Keep plates in correct order during
removal.
ASSEMBLY
Clean all components in cleaning solvent and dry
components with compressed air. Inspect clutch pack
plates for wear, scoring or damage. Replace both
clutch packs if any one component in either pack is
damaged. Inspect side gears and pinions. Replace
any gear that is worn, cracked, chipped or damaged.
Inspect differential case and pinion shaft. Replace if
worn or damaged.
(1) Lubricate each component with gear lubricant
before assembly.
(2) Assemble the clutch discs into packs and
secure disc packs with retaining clips (Fig. 44).
NOTE: New Plates and discs with fiber coating (no
grooves or lines) must be presoaked in Friction
Modifier before assembly. Soak plates and discs for
a minimum of 20 minutes.
Fig. 43 SIDE GEAR & CLUTCH PACK
1 - DIFFERENTIAL CASE
2 - RETAINER
3 - SIDE GEAR AND CLUTCH DISC PACK
Fig. 44 CLUTCH DISC PACK
1 - CLUTCH PACK
2 - RETAINER
3 - SIDE GEAR
4 - RETAINER
Fig. 42 PINION GEAR
1 - PINION GEARS
2 - TURNING BAR
3 - 70 REAR AXLE - 248RBIBR/BE
DIFFERENTIAL - TRAC-LOK (Continued)
Page 126 of 2255
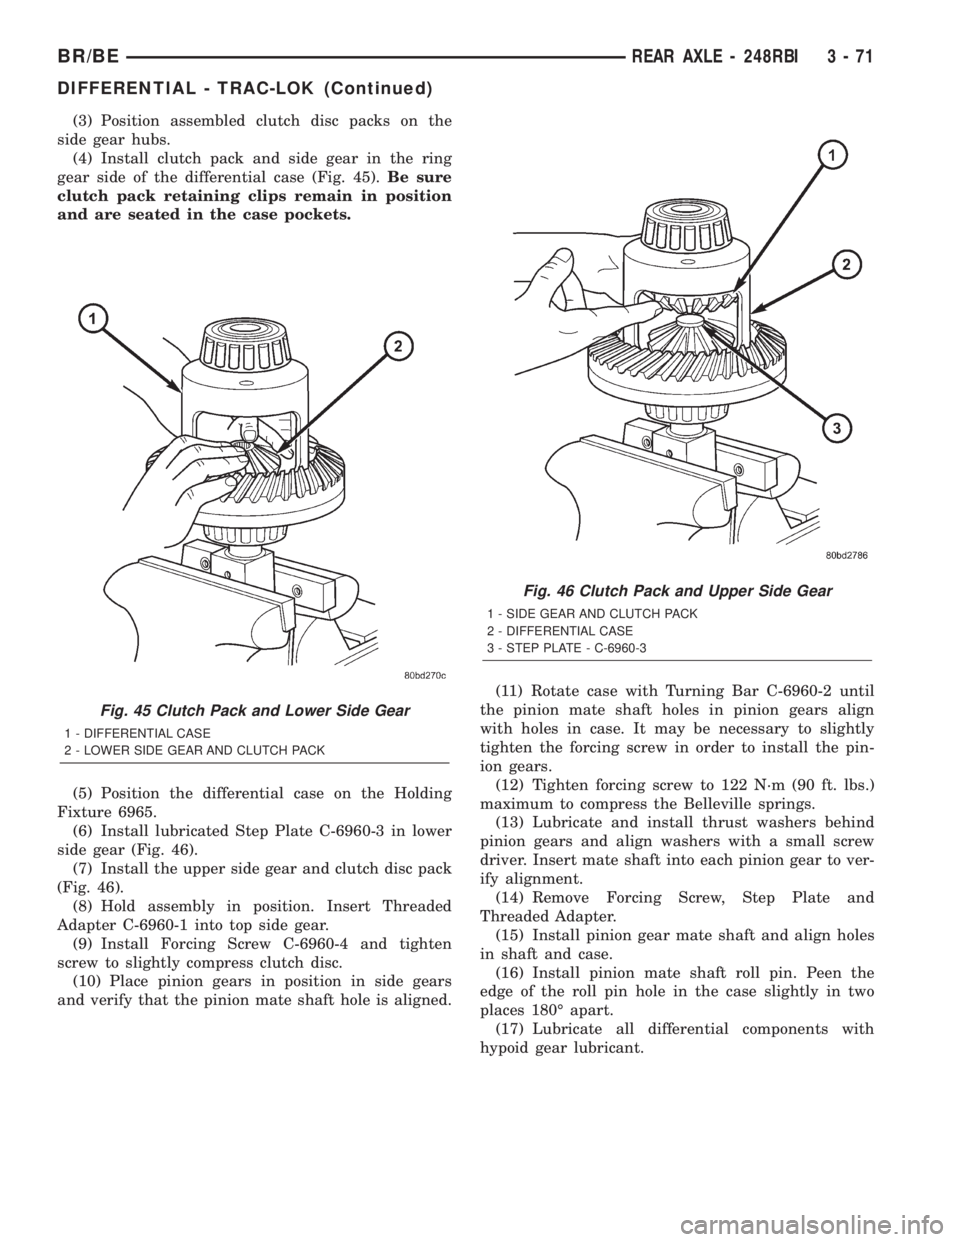
(3) Position assembled clutch disc packs on the
side gear hubs.
(4) Install clutch pack and side gear in the ring
gear side of the differential case (Fig. 45).Be sure
clutch pack retaining clips remain in position
and are seated in the case pockets.
(5) Position the differential case on the Holding
Fixture 6965.
(6) Install lubricated Step Plate C-6960-3 in lower
side gear (Fig. 46).
(7) Install the upper side gear and clutch disc pack
(Fig. 46).
(8) Hold assembly in position. Insert Threaded
Adapter C-6960-1 into top side gear.
(9) Install Forcing Screw C-6960-4 and tighten
screw to slightly compress clutch disc.
(10) Place pinion gears in position in side gears
and verify that the pinion mate shaft hole is aligned.(11) Rotate case with Turning Bar C-6960-2 until
the pinion mate shaft holes in pinion gears align
with holes in case. It may be necessary to slightly
tighten the forcing screw in order to install the pin-
ion gears.
(12) Tighten forcing screw to 122 N´m (90 ft. lbs.)
maximum to compress the Belleville springs.
(13) Lubricate and install thrust washers behind
pinion gears and align washers with a small screw
driver. Insert mate shaft into each pinion gear to ver-
ify alignment.
(14) Remove Forcing Screw, Step Plate and
Threaded Adapter.
(15) Install pinion gear mate shaft and align holes
in shaft and case.
(16) Install pinion mate shaft roll pin. Peen the
edge of the roll pin hole in the case slightly in two
places 180É apart.
(17) Lubricate all differential components with
hypoid gear lubricant.
Fig. 45 Clutch Pack and Lower Side Gear
1 - DIFFERENTIAL CASE
2 - LOWER SIDE GEAR AND CLUTCH PACK
Fig. 46 Clutch Pack and Upper Side Gear
1 - SIDE GEAR AND CLUTCH PACK
2 - DIFFERENTIAL CASE
3 - STEP PLATE - C-6960-3
BR/BEREAR AXLE - 248RBI 3 - 71
DIFFERENTIAL - TRAC-LOK (Continued)
Page 127 of 2255
DIFFERENTIAL CASE
BEARINGS
REMOVAL
(1) Remove differential case from the housing.
(2) Remove bearings from the differential case
with Puller/Press C-293-PA, Adapters C-293-62 and
Step Plate 8139-2 (Fig. 47).
INSTALLATION
(1) Install differential side bearings with installer
C-4190 and Handle C-4171 (Fig. 48).
(2) Install differential case into the housing.
Fig. 47 DIFFERENTIAL CASE BEARING
1 - PULLER
2 - ADAPTERS
3 - STEP PLATE
4 - BEARING
5 - DIFFERENTIAL CASE
Fig. 48 CASE BEARING INSTALLER
1 - HANDLE
2 - DIFFERENTIAL CASE
3 - BEARING
4 - INSTALLER
3 - 72 REAR AXLE - 248RBIBR/BE
Page 128 of 2255
PINION GEAR/RING GEAR/
TONE RING
REMOVAL
NOTE: The ring and pinion gears are service as a
matched set. Never replace ring gear without
replacing the matched pinion gear.
(1) Remove differential from housing.
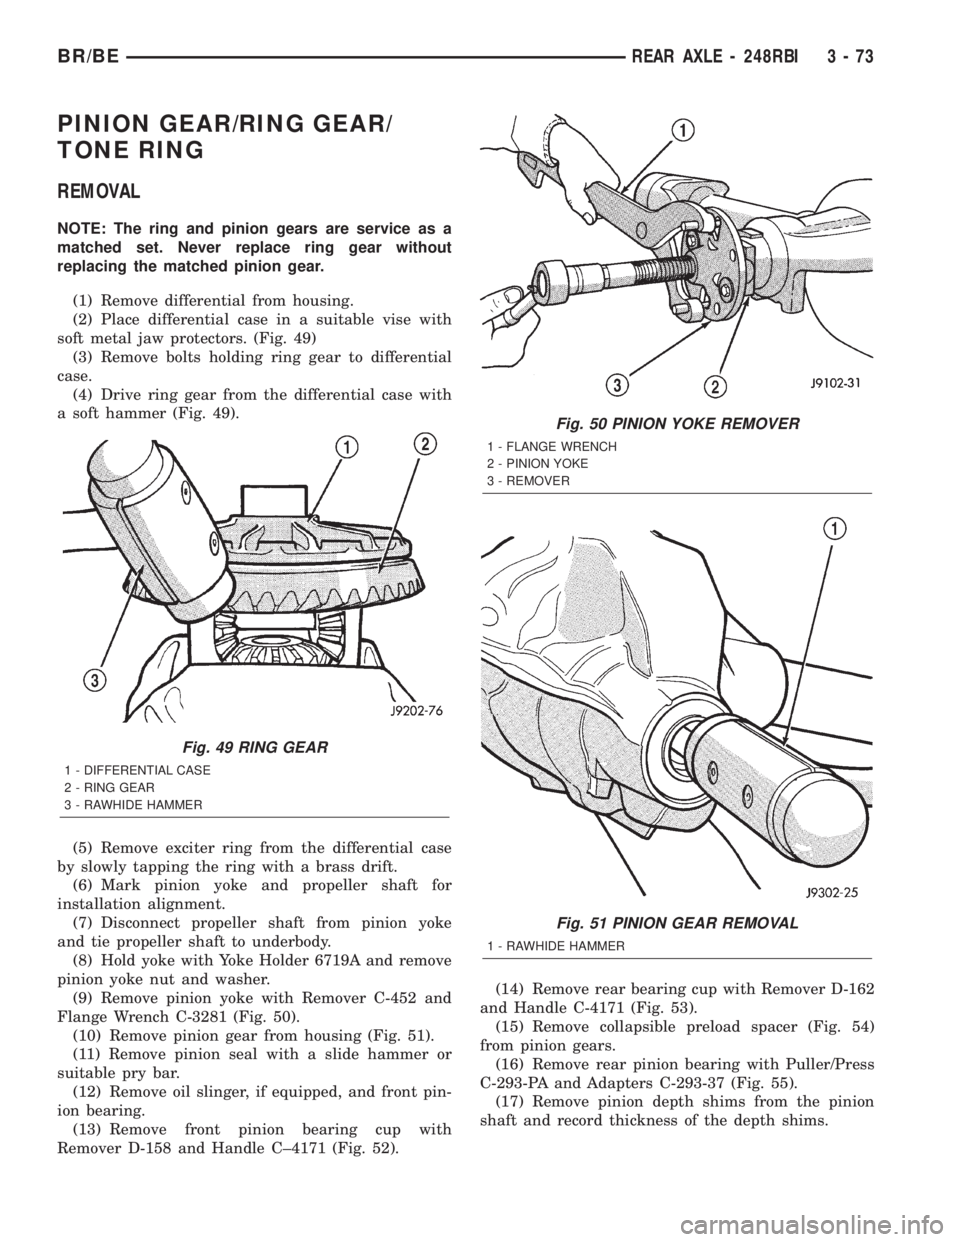
(2) Place differential case in a suitable vise with
soft metal jaw protectors. (Fig. 49)
(3) Remove bolts holding ring gear to differential
case.
(4) Drive ring gear from the differential case with
a soft hammer (Fig. 49).
(5) Remove exciter ring from the differential case
by slowly tapping the ring with a brass drift.
(6) Mark pinion yoke and propeller shaft for
installation alignment.
(7) Disconnect propeller shaft from pinion yoke
and tie propeller shaft to underbody.
(8) Hold yoke with Yoke Holder 6719A and remove
pinion yoke nut and washer.
(9) Remove pinion yoke with Remover C-452 and
Flange Wrench C-3281 (Fig. 50).
(10) Remove pinion gear from housing (Fig. 51).
(11) Remove pinion seal with a slide hammer or
suitable pry bar.
(12) Remove oil slinger, if equipped, and front pin-
ion bearing.
(13) Remove front pinion bearing cup with
Remover D-158 and Handle C±4171 (Fig. 52).(14) Remove rear bearing cup with Remover D-162
and Handle C-4171 (Fig. 53).
(15) Remove collapsible preload spacer (Fig. 54)
from pinion gears.
(16) Remove rear pinion bearing with Puller/Press
C-293-PA and Adapters C-293-37 (Fig. 55).
(17) Remove pinion depth shims from the pinion
shaft and record thickness of the depth shims.
Fig. 49 RING GEAR
1 - DIFFERENTIAL CASE
2 - RING GEAR
3 - RAWHIDE HAMMER
Fig. 50 PINION YOKE REMOVER
1 - FLANGE WRENCH
2 - PINION YOKE
3 - REMOVER
Fig. 51 PINION GEAR REMOVAL
1 - RAWHIDE HAMMER
BR/BEREAR AXLE - 248RBI 3 - 73
Page 131 of 2255
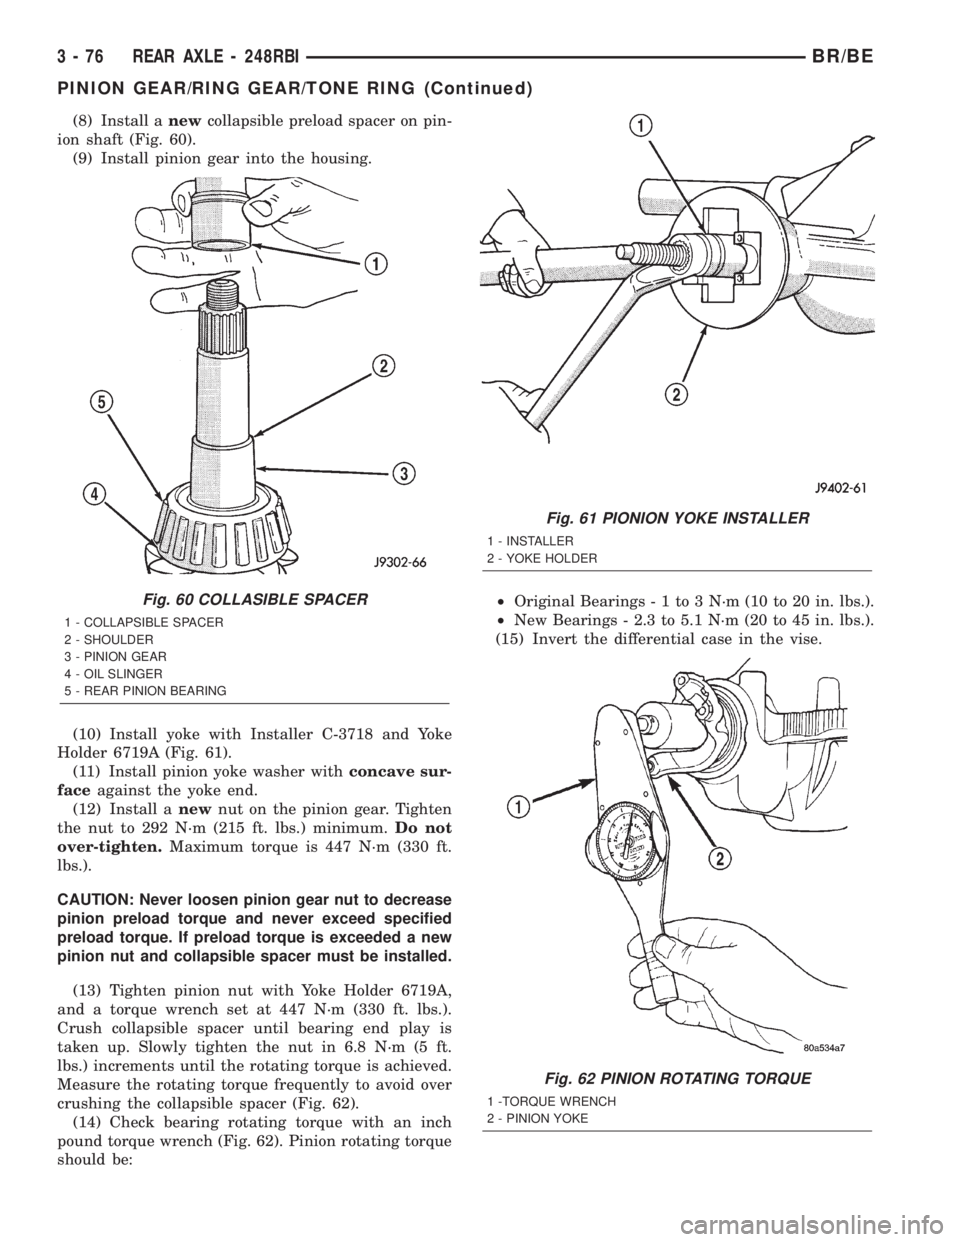
(8) Install anewcollapsible preload spacer on pin-
ion shaft (Fig. 60).
(9) Install pinion gear into the housing.
(10) Install yoke with Installer C-3718 and Yoke
Holder 6719A (Fig. 61).
(11) Install pinion yoke washer withconcave sur-
faceagainst the yoke end.
(12) Install anewnut on the pinion gear. Tighten
the nut to 292 N´m (215 ft. lbs.) minimum.Do not
over-tighten.Maximum torque is 447 N´m (330 ft.
lbs.).
CAUTION: Never loosen pinion gear nut to decrease
pinion preload torque and never exceed specified
preload torque. If preload torque is exceeded a new
pinion nut and collapsible spacer must be installed.
(13) Tighten pinion nut with Yoke Holder 6719A,
and a torque wrench set at 447 N´m (330 ft. lbs.).
Crush collapsible spacer until bearing end play is
taken up. Slowly tighten the nut in 6.8 N´m (5 ft.
lbs.) increments until the rotating torque is achieved.
Measure the rotating torque frequently to avoid over
crushing the collapsible spacer (Fig. 62).
(14) Check bearing rotating torque with an inch
pound torque wrench (Fig. 62). Pinion rotating torque
should be:²Original Bearings-1to3N´m(10to20in.lbs.).
²New Bearings - 2.3 to 5.1 N´m (20 to 45 in. lbs.).
(15) Invert the differential case in the vise.
Fig. 60 COLLASIBLE SPACER
1 - COLLAPSIBLE SPACER
2 - SHOULDER
3 - PINION GEAR
4 - OIL SLINGER
5 - REAR PINION BEARING
Fig. 61 PIONION YOKE INSTALLER
1 - INSTALLER
2 - YOKE HOLDER
Fig. 62 PINION ROTATING TORQUE
1 -TORQUE WRENCH
2 - PINION YOKE
3 - 76 REAR AXLE - 248RBIBR/BE
PINION GEAR/RING GEAR/TONE RING (Continued)
Page 132 of 2255
(16) Position exciter ring on differential case
slowly and evenly tap the exciter ring into position
with a brass drift.
(17) Istall ring gear and start two ring gear bolts
to provide case-to-ring gear bolt hole alignment.
(18) Invert differential case in the vise.
(19) Installnewring gear bolts and alternately
tighten to 176 N´m (130 ft. lbs.) (Fig. 63).
CAUTION: Never reuse ring gear bolts, the bolts
can fracture causing extensive damage.
(20) Install differential into the housing and verify
gear mesh and contact pattern.
(21) Install axle shafts.
(22) Install differential cover and fill differential
with gear lubricant.
Fig. 63 RING GEAR BOLT
1 - TORQUE WRENCH
2 - RING GEAR BOLT
3 - RING GEAR
4 - CASE
BR/BEREAR AXLE - 248RBI 3 - 77
PINION GEAR/RING GEAR/TONE RING (Continued)