Page 3622 of 4323

BO4HJ±01
H16717
Clip
H167342 Clips
H167354 Clips
H18891
± BODYWINDSHIELD
BO±61
3614 Author�: Date�:
2005 SEQUOIA (RM1146U)
REMOVAL
1. REMOVE FRONT DOOR OPENING TRIM WEATH-
ERSTRIPS
2. REMOVE FRONT PILLAR GARNISH
(a) Remove the assist grip.
(1) Using a screwdriver, remove the 2 assist grip plugs.
HINT:
Tape the screwdriver tip before use.
(2) Remove the 2 screws and assist grip.
(b) Remove the front pillar garnish.
(c) Use the same manner described above to the other side.
3. REMOVE SUN VISORS AND HOLDERS
4. w/ Sliding roof:
REMOVE ROOF CONSOLE BOX
(a) Remove the 2 screws.
(b) Using a screwdriver, remove the roof console box.
HINT:
Tape the screwdriver tip before use.
(c) Disconnect the connectors.
5. w/o Sliding roof:
REMOVE ROOF CONSOLE BOX
(a) Remove the 4 screws.
(b) Using a screwdriver, remove the roof console box.
HINT:
Tape the screwdriver tip before use.
(c) Disconnect the connectors.
6. w/o Electro chromic inner rear view mirror:
REMOVE INNER REAR VIEW MIRROR
Remove the torx screw and inner rear view mirror as shown in
the illustration.
Page 3623 of 4323

H18892
H16708
H05613
BO5232
H05619
BO±62
± BODYWINDSHIELD
3615 Author�: Date�:
2005 SEQUOIA (RM1146U)
7. w/ Electro chromic inner rear view mirror:
REMOVE INNER REAR VIEW MIRROR
(a) Remove the mirror cover.
(b) Disconnect the connector.
(c) Remove the torx screw and inner rear view mirror.
8. REMOVE WIPER ARMS
(a) Using a screwdriver, remove the 2 caps.
HINT:
Tape the screwdriver tip before use.
(b) Remove the 2 nuts and wiper arms.
9. REMOVE COWL TOP VENTILATOR LOUVER
(a) Remove the hood to cowl top seal.
(b) Using a clip remover, remove the 6 clips.
(c) Remove the 8 screws and cowl top ventilator louver.
10. REMOVE ROOF SIDE RAIL WEATHERSTRIP
Using SST, pull off the roof side rail weatherstrip from front end.
SST 09806±30010
11. REMOVE WINDSHIELD OUTSIDE MOULDINGS
Remove the 8 screws and windshield outside mouldings.
12. REMOVE WINDSHIELD OUTSIDE UPPER MOULDING
Using a knife, cut off the moulding as shown in the illustration.
NOTICE:
Do not damage the body with the knife.
13. REMOVE WINDSHIELD GLASS
(a) Push piano wire through between the body and glass
from the interior.
(b) Tie both wire ends to wooden blocks or similar objects.
HINT:
Apply protective tape to the outer surface to keep the surface
from being scratched.
NOTICE:
When separating the glass, be careful not to damage the
paint and exterior ornaments. To prevent scratching the
safety pad when removing the windshield, place a plastic
sheet between the piano wire and the safety pad.
(c) Cut the adhesive by pulling the piano wire around it.
(d) Remove the glass.
NOTICE:
Leave as much of the adhesive on the body as possible
when cutting off the glass.
Page 3628 of 4323
H18893
H18894
± BODYWINDSHIELD
BO±67
3620 Author�: Date�:
2005 SEQUOIA (RM1146U)
(d) Torque the 2 nuts.
Torque: 20 N´m (204 kgf´cm, 15 ft´lbf)
(e) Install the 2 cap.
17. w/ Electro chromic inner rear view mirror:
INSTALL INNER REAR VIEW MIRROR
(a) Install the inner rear view mirror and torx screw.
Torque: 2.5 N´m (25 kgf´cm, 22 in.´lbf)
(b) Connect the connector.
(c) Install the mirror cover.
18. w/o Electro chromic inner rear view mirror:
INSTALL INNER REAR VIEW MIRROR
Instll the inner rear view mirror and torx screw.
Torque: 2.5 N´m (25 kgf´cm, 22 in.´lbf)
19. INSTALL ROOF CONSOLE BOX
20. INSTALL SUN VISORS AND HOLDERS
21. INSTALL FRONT PILLAR GARNISHES
22. INSTALL FRONT DOOR OPENING TRIM WEATH-
ERSTRIPS
Page 3652 of 4323

H16202
H11371
H24860
4 Clips
H16748
6 Clips
± BODYINSTRUMENT PANEL
BO±91
3644 Author�: Date�:
2005 SEQUOIA (RM1146U)
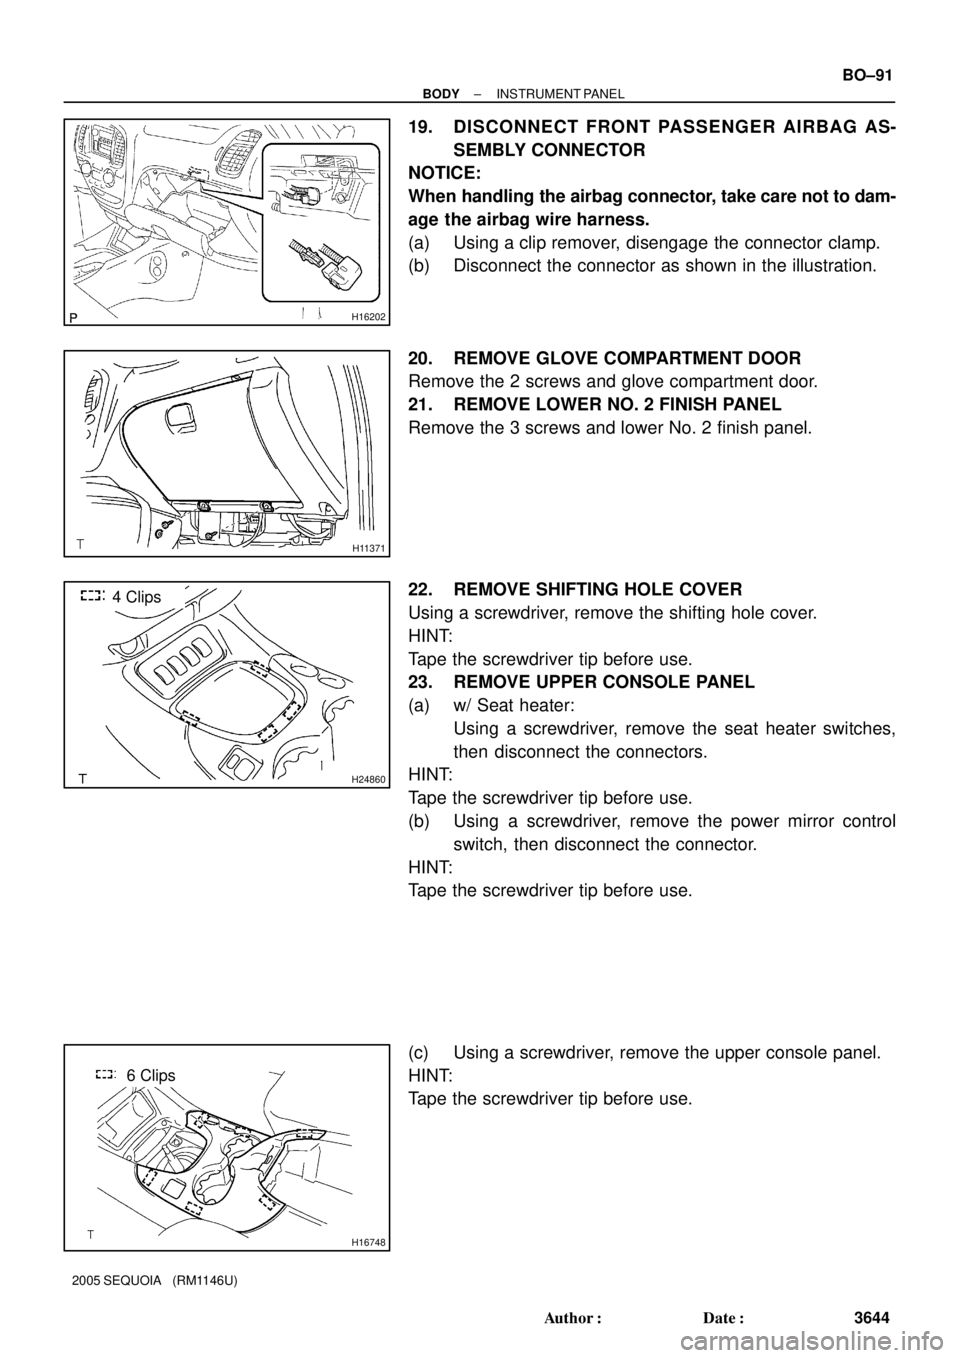
19. DISCONNECT FRONT PASSENGER AIRBAG AS-
SEMBLY CONNECTOR
NOTICE:
When handling the airbag connector, take care not to dam-
age the airbag wire harness.
(a) Using a clip remover, disengage the connector clamp.
(b) Disconnect the connector as shown in the illustration.
20. REMOVE GLOVE COMPARTMENT DOOR
Remove the 2 screws and glove compartment door.
21. REMOVE LOWER NO. 2 FINISH PANEL
Remove the 3 screws and lower No. 2 finish panel.
22. REMOVE SHIFTING HOLE COVER
Using a screwdriver, remove the shifting hole cover.
HINT:
Tape the screwdriver tip before use.
23. REMOVE UPPER CONSOLE PANEL
(a) w/ Seat heater:
Using a screwdriver, remove the seat heater switches,
then disconnect the connectors.
HINT:
Tape the screwdriver tip before use.
(b) Using a screwdriver, remove the power mirror control
switch, then disconnect the connector.
HINT:
Tape the screwdriver tip before use.
(c) Using a screwdriver, remove the upper console panel.
HINT:
Tape the screwdriver tip before use.
Page 3659 of 4323
BO4HM±01
H18897
Assist Gripw/ Rear A/C:
Rear No. 6 Air Duct
Roof Console BoxLens Map Lightw/ Rear No. 2 seat:
Assist Grip
Dome Light
LensRear Trim Roof Headlining
w/ Rear No. 2 seat:
Rear Trim Cover w/ Double Sun Visor:
Roof Headlining Roof Console Box
w/o Rear No. 2 seat:
Service Hole Cover
w/ Rear No. 2 seat:
Assist Grip
w/o Rear No. 2 seat:
Service Hole Cover
Sun VisorRoof Headlining
w/ Electro chrmic
inner rear view mirror:
Mirror Coverw/ Sliding roof:
Sun Visor
Sun Visor
Holder Holder
Assist Grip
Map Light
Lens
Sliding Roof Opening Trim
w/ Rear A/C:
Rear No.5 Air Duct
BO±98
± BODYROOF HEADLINING
3651 Author�: Date�:
2005 SEQUOIA (RM1146U)
ROOF HEADLINING
COMPONENTS
Page 3667 of 4323

H16732
7 Clips
2 Clips
H16733
H188952 Clips
H167342 Clips
H167354 Clips BO±106
± BODYROOF HEADLINING
3659 Author�: Date�:
2005 SEQUOIA (RM1146U)
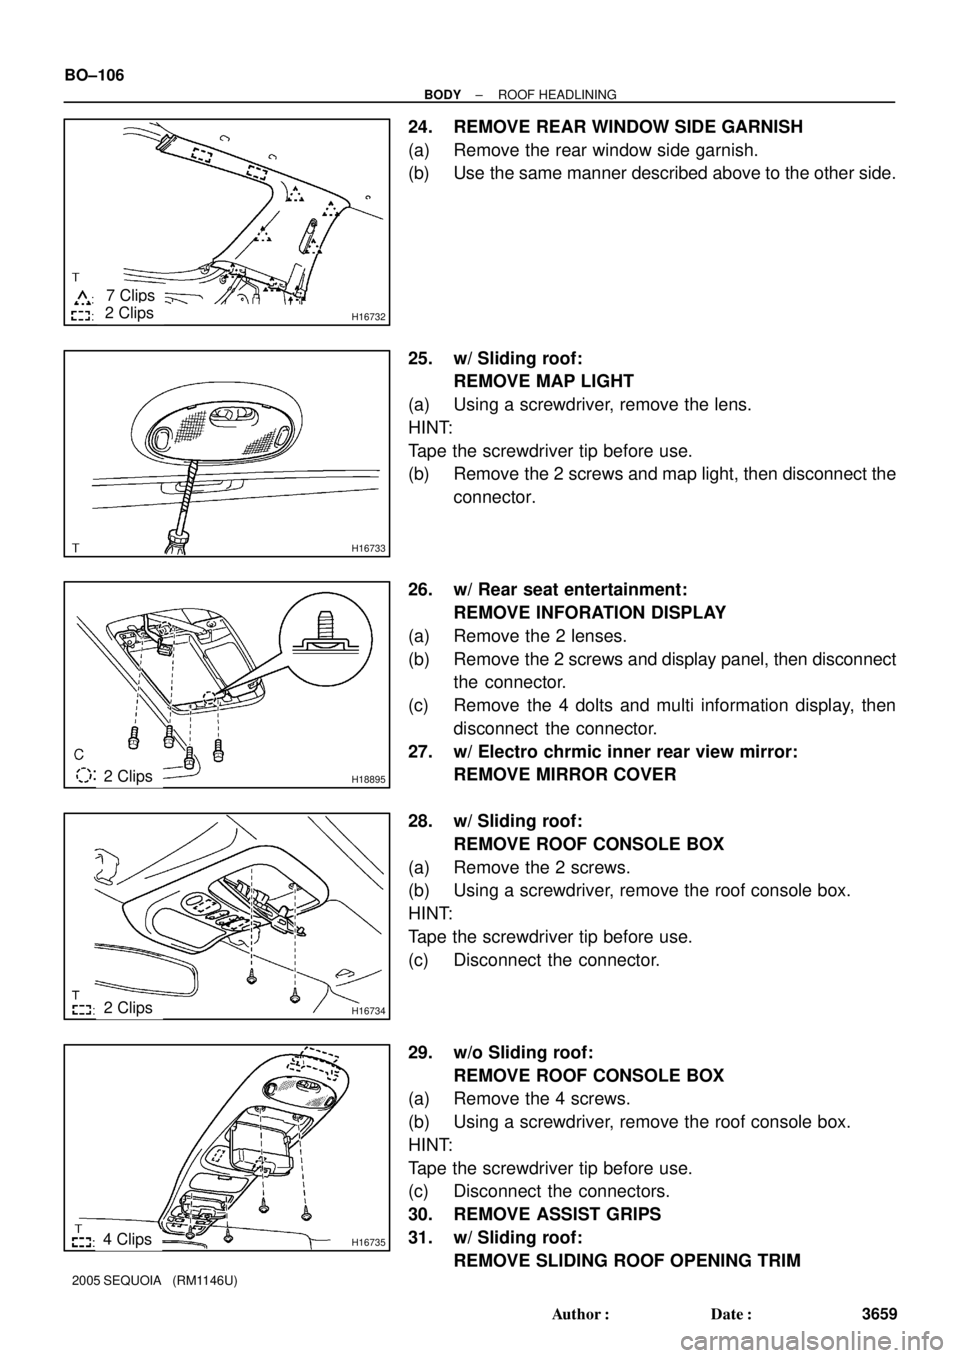
24. REMOVE REAR WINDOW SIDE GARNISH
(a) Remove the rear window side garnish.
(b) Use the same manner described above to the other side.
25. w/ Sliding roof:
REMOVE MAP LIGHT
(a) Using a screwdriver, remove the lens.
HINT:
Tape the screwdriver tip before use.
(b) Remove the 2 screws and map light, then disconnect the
connector.
26. w/ Rear seat entertainment:
REMOVE INFORATION DISPLAY
(a) Remove the 2 lenses.
(b) Remove the 2 screws and display panel, then disconnect
the connector.
(c) Remove the 4 dolts and multi information display, then
disconnect the connector.
27. w/ Electro chrmic inner rear view mirror:
REMOVE MIRROR COVER
28. w/ Sliding roof:
REMOVE ROOF CONSOLE BOX
(a) Remove the 2 screws.
(b) Using a screwdriver, remove the roof console box.
HINT:
Tape the screwdriver tip before use.
(c) Disconnect the connector.
29. w/o Sliding roof:
REMOVE ROOF CONSOLE BOX
(a) Remove the 4 screws.
(b) Using a screwdriver, remove the roof console box.
HINT:
Tape the screwdriver tip before use.
(c) Disconnect the connectors.
30. REMOVE ASSIST GRIPS
31. w/ Sliding roof:
REMOVE SLIDING ROOF OPENING TRIM
Page 3861 of 4323
05_SEQUOIA_U (L/O 0408)
2
2005 SEQUOIA from Aug. '04 Prod. (OM34424U)
1. Side vents
2. Instrument cluster
3. Center vents
4. Multi±information display
5. Personal lights
6. Garage door opener box or auxiliary
box
7. Electric moon roof switches
8. Side defroster outlet
9. Glove box
10. Power door lock switches
11. Power window switches
12. Power outlets
13. Seat heater switches
14. Rear console box
15. Rear air conditioning controls
16. Headphone input jacks and headphone
volume control dials
17. Input terminal adapter
18. Cup holders
19. Power rear view mirror control switches
20. Lower vent
Instrument panel overview
�View A
Page 3863 of 4323
05_SEQUOIA_U (L/O 0408)
4
2005 SEQUOIA from Aug. '04 Prod. (OM34424U)
1. Power back window switch
2. Driving position memory switches
3. Headlight, turn signal and front fog
light switches
4. Ignition switch
5. Wiper and washer switches
6. Automatic transmission selector lever
7. Emergency flasher switch
8. Automatic transmission shift position
ªLº switch (ªSHIFT Lº switch)
9. Audio system or navigation system
including audio system (For the
navigation system, see the separate
ªNavigation System Owner 's Manualº.)
10. Air conditioning controls
11. Front passenger occupant classification
indicator light/front passenger 's seat
belt reminder light
12. Back window and outside rear view
mirror defogger switch
13. Clock
14. Cup holder
15. Glass breakage sensor
16. Power outlet main switch
17. Rear height control air suspension
switches �View B (two±wheel drive models)